Chapter 6: Getting Social with Your Tablet
You can use the People app to store contact information, connect to social networks, and keep track of friends. You can use the Calendar app to schedule meetings, appointments, and other events.
View Your Contacts’ Activities
View Your Social Networking Activity
Post a Link to a Social Network
Send or Respond to an Event Invitation
Create a Contact
You can easily store information about your friends, family, and colleagues, as well as send messages to them, by using the People app to create a contact for each person. Each contact can store a wide variety of information, such as a person’s first and last names, company name, e-mail address, phone number, and street address.
If you already have contacts on a social network such as Facebook or LinkedIn, you do not need to enter those contacts by hand. Instead, you can connect your social network account to your Microsoft account, as described in the next few sections.
Create a Contact

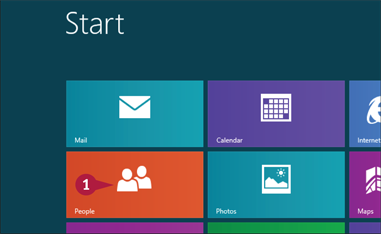
 On the Start screen, tap People.
The People app loads.

 Swipe up from the bottom edge of the screen.
 Tap New.
The New Contact screen appears.
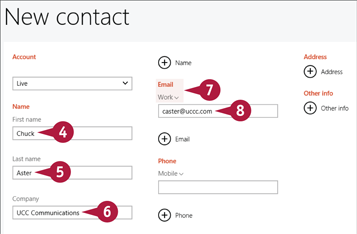
 Type the contact’s first name.
 Type the contact’s last name.
 Type the contact’s company name.
 Tap the Email label and then tap the type of e-mail address that you want to enter.
 Type the contact’s e-mail address.

 Tap the Phone label and then tap the type of phone number that you want to enter.
 Type the contact’s phone number.
 To add an address for the contact, tap the Address
  .
.
A To add another field for the contact, tap , tap a label, and then type the data in the field that appears.
 Tap Save.
The People app creates the new contact.
TIPS
Is there an easy way to send an e-mail to a contact?
Yes. Normally, you would open the Mail app, begin a new message as described in Chapter 5, “Sending E-mail and Messages,” and then tap the To button to open the People app and choose a recipient. If you are already working in the People app, however, it is easier and faster to tap the person’s tile to open the contact and then tap Send email.
Are there other types of information that I can record for a contact?
Yes, you can also add notes about the contact, the contact’s job title, the contact’s website address, and the name of the contact’s significant other. To add one of these categories, tap the Other info , tap the category you want to add, and then type the information in the new field that appears.
Connect to Facebook
If you are using a Microsoft account with Windows 8, you can connect your Facebook account to your Microsoft account and see your Facebook friends in the People app. To do so, you must tell Facebook that you give permission to connect your Microsoft and Facebook accounts.
After you have connected your accounts, you can use the People app to view your friends’ Facebook profiles, see the latest status updates and photos from your Facebook friends, and send messages to online Facebook friends.
Connect to Facebook
On the Start screen, tap People.
The People app loads.
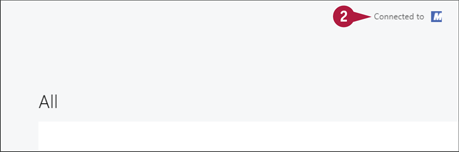
Tap Connected to.
The Accounts pane appears.

Tap Add an account.
Tap Facebook.
The People app displays a description of the Facebook connection.

Tap Connect.
Facebook prompts you to log in to your account.

Type your Facebook e-mail address.
Type your Facebook password.
Select the Keep me logged in check box ( changes to
  ).
).
Tap Log In.
Windows 8 connects your Facebook account to your Microsoft account.

Tap Done.
Connect to Twitter
If you are using a Microsoft account with Windows 8, you can connect your Twitter account to your Microsoft account and see the people that you follow in the People app. To do so, you must tell Twitter that you give permission to connect your Microsoft and Twitter accounts.
After you have connected your accounts, you can use the People app to view the Twitter profiles of the people you follow, see their latest tweets, retweet posts, and send replies.
Connect to Twitter
On the Start screen, tap People.
The People app loads.

Tap Connected to.
The Accounts pane appears.

Tap Add an account.
Tap Twitter.
The People app displays a description of the Twitter connection.

Tap Connect.
Twitter prompts you to authorize the connection.
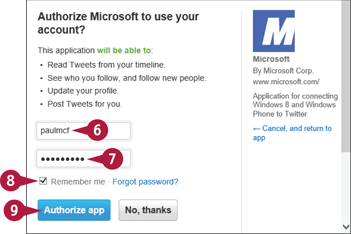
Type your Twitter username.
Type your Twitter password.
Select the Remember me check box ( changes to ).
Tap Authorize app.
Windows 8 connects your Twitter account to your Microsoft account.

Tap Done.
Connect to LinkedIn
If you are using a Microsoft account with Windows 8, you can connect your LinkedIn account to your Microsoft account and see your LinkedIn connections in the People app. To do so, you must tell LinkedIn that you give permission to connect your Microsoft and LinkedIn accounts.
After you have connected your accounts, you can use the People app to view the LinkedIn profiles of the people to whom you are connected. You can also send an e-mail message to a connection and map a connection’s address.
Connect to LinkedIn
On the Start screen, tap People.
The People app loads.
Tap Connected to.

The Accounts pane appears.

Tap Add an account.
Tap LinkedIn.
The People app displays a description of the LinkedIn connection.

Tap Connect.
LinkedIn prompts you to authorize the connection.

Type your LinkedIn e-mail address.
Type your LinkedIn password.
Tap Ok, I’ll Allow It.
Windows 8 connects your LinkedIn account to your Microsoft account.

Tap Done.
TIPS
Can I adjust the permissions set up between my Microsoft account and a social networking account?
Yes, each social network offers several different types of permission, and Windows 8 sets up default permissions at first. To change the default permissions, tap Connect to, tap the account that you want to adjust, and then tap Manage this account online. Use the check boxes to turn permissions on () and off () and then tap Save.
How do I disconnect a social network?
If you no longer use a social network in the People app, you should disconnect the network to reduce clutter in the app. Tap Connect to, tap the account that you want to adjust, tap Remove this connection completely, and then tap Remove.
Add Your Google Account
You can add your Google account to Windows 8 to access your Google contacts, e-mail, and calendar from your Windows 8 tablet. To do so, you must provide Windows 8 with your Google account login data.
After you have added your Google account, you can use the People app to view your Google contacts. You can use the Calendar app to view your Google events and appointments, and you can use the Mail app to view your Gmail messages.
Add Your Google Account
On the Start screen, tap People.
The People app loads.

Tap Connected to.
The Accounts pane appears.

Tap Add an account.
Tap Google.
The People app prompts you for your Google login data.
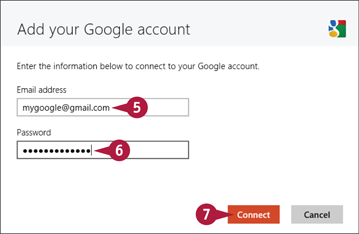
Type your Google e-mail address.
Type your Google password.
Tap Connect.
Windows 8 connects your Google account to your Microsoft account.
TIP
Can I control what type of Google content appears in Windows 8?
Yes, you can configure the type of content to sync between Google and Windows 8 and how much of that content to sync:
In the People app, tap Connected to.
Tap Google.
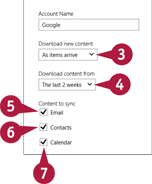
Tap the Download new content  and set when Google items are synced.
Tap the Download content from and set how much content is synced.
Tap Email ( changes to ) if you do not want to sync Gmail messages.
Tap Contacts ( changes to ) if you do not want to sync Google contacts.
Tap Calendar ( changes to ) if you do not want to sync Google events.
View a Contact
After you have added contacts and connected your other accounts to Windows 8, you can use the People app to view your contacts. The information that you see when you view a contact depends on how the contact was added to Windows 8. If you added the contact yourself, you see the information that you entered. If the contact was added by connecting another account to Windows 8, you see the data provided by that account.
After you have a contact displayed, you can edit the contact’s data to update existing information or add new information.
View a Contact
View a Contact

On the Start screen, tap People.
The People app loads.
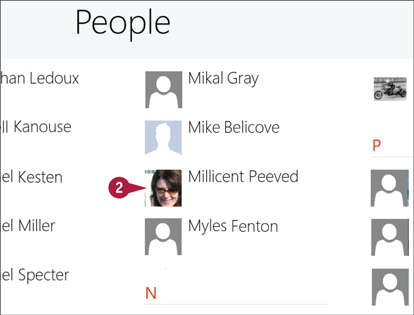
Locate and then tap the contact.
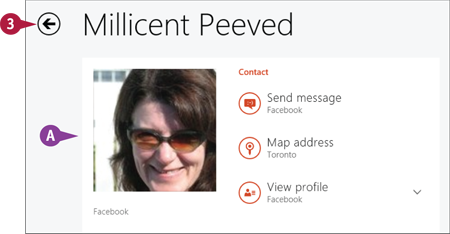
A The People app displays the contact’s data.
When you are done with the contact, tap  to return to the People tab.
Edit a Contact

Swipe up from the bottom edge of the screen.
Tap Edit.
Make your changes to the contact’s data.
Tap Save.
The People app saves the updated data.
View Your Contacts’ Activities
After you have connected your Microsoft account to one or more social network accounts, you can use the People app to view contact activities such as Facebook posts and photos and Twitter updates.
One of Microsoft’s goals when designing the Windows 8 Start screen was to give you a single place that shows you what is happening in your life. The People app can show you the latest messages from your social networks. You can view messages for all contacts or just a single contact.
View Your Contacts’ Activities
View All Contacts’ Activities
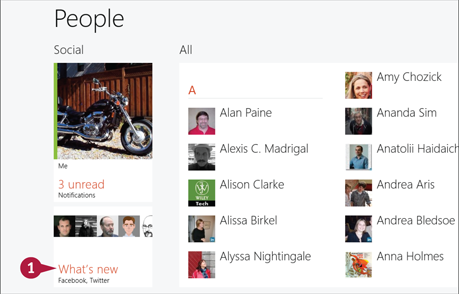
Tap What’s new.
Note: If you do not see the What's New section, swipe up from the bottom of the screen and tap Home.

A Your latest messages appear.
View One Contact’s Activities
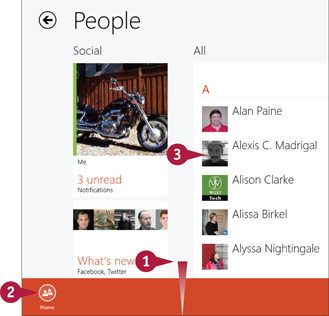
Swipe up from the bottom of the screen.
Tap Home.
Tap the contact.

Swipe left to the What’s new section.
B The contact’s latest activity appears here.
C Tap View all to see more activities.
View Your Social Networking Activity
After you have connected your Microsoft account to one or more social network accounts, you can use the People app to view your recent social networking activity.
Your social networking activity includes your Facebook status updates, posts, and photos, as well as your Twitter updates and retweets. Your activity also includes any notifications that a social networking service sends you. These notifications include comments on your Facebook posts, Twitter mentions, and service messages.
View Your Social Networking Activity

Tap the People tile.
The People app appears.

A This number tells you how many of your recent social network notifications you have yet to view.
Tap Me.

B Your latest social network post appears here.
C Tap View all to see all your recent posts.
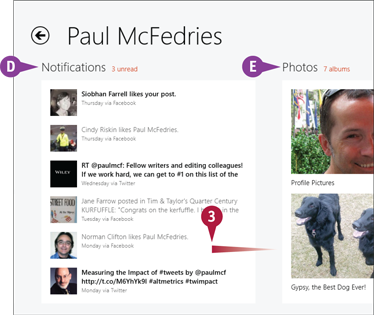
Swipe left.
D The Notifications section shows the recent notifications sent by your social networks.
E The Photos section shows your social network photo albums.
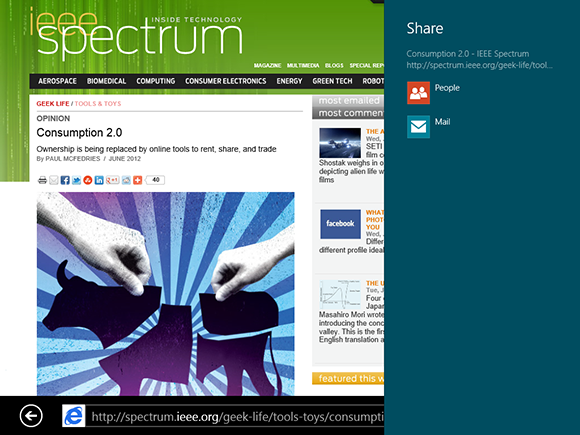
Post a Link to a Social Network
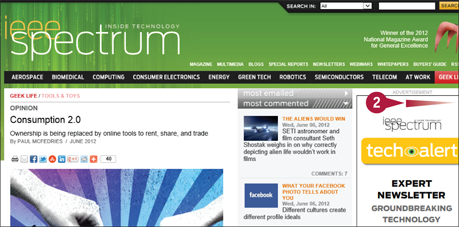
If you come across an interesting, useful, or entertaining web page, you can share that page by posting the link to a social network.
Windows 8 does not offer any way to post a text-only Facebook status update or tweet. However, you can use the Share feature to post links to interesting web pages. You can post a link and a short message describing the web page to your Facebook feed or to your Twitter followers.
Post a Link to a Social Network
Use Internet Explorer to open the web page that you want to share.
Swipe left from the right edge of the screen.
The Charms menu appears.
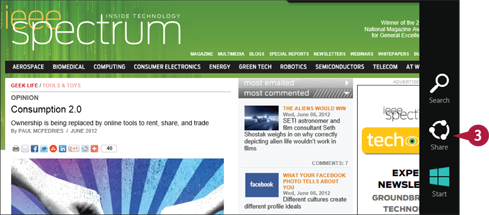
Tap Share.
The Share pane appears.
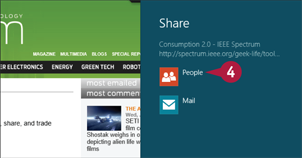
Tap People.
Windows 8 displays a new social network message.
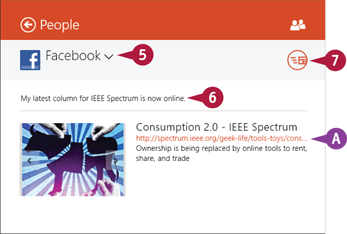
A A link to the web page appears here.
Tap and select Facebook or Twitter.
Type a message introducing or describing the link.
Tap the Send button ( ).
).
Windows 8 posts the link to the social network.
View Your Calendar
Windows 8 comes with a Calendar app to enable you to manage your schedule. To create an event such as an appointment, meeting, or an all-day event such as a conference or trip, you first select the date when the event occurs.
You can change the calendar view. For example, you can show just a single day’s worth of events if you want to concentrate on that day’s activities. Similarly, you can view a week’s or a month’s worth of events if you want to get a larger sense of what your overall schedule looks like.
View Your Calendar
View Events by Month
On the Start screen, tap the Calendar tile.
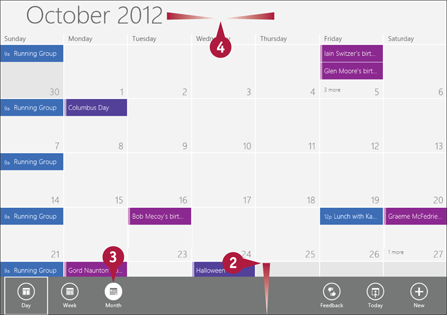
Swipe up from the bottom of the screen.
Tap Month.
Your calendar for the month appears.
Slide left and right to navigate the months.
View Events by Week

Swipe up from the bottom of the screen.
Tap Week.
Your events for the week appear.
Slide left and right to navigate the weeks.
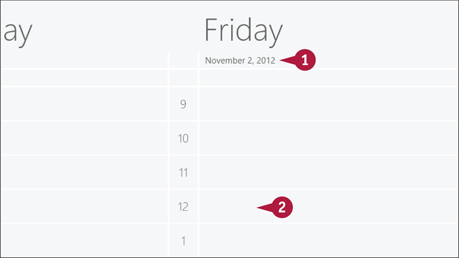
View Events by Day

Swipe up from the bottom of the screen.
Tap Day.
The events for two days appear.
Slide left and right to navigate the days.
View Today’s Events

Swipe up from the bottom of the screen.
Tap Today.
Calendar navigates the current view to include today’s date.
TIP
Are there any shortcuts that I can use to navigate the calendar?
Yes, if you are using a tablet PC with a keyboard, the Calendar app offers several keyboard shortcuts that you can use to change the view:

Add an Event to Your Calendar
You can help organize your life by using the Calendar app to record your upcoming events — such as appointments, meetings, phone calls, and dates — on the date and time that they are scheduled to occur.
If the event has a set time and duration — for example, a meeting or a lunch date — you add the event directly to the calendar as a regular appointment. If the event has no set time — for example, a birthday, anniversary, or multiple-day event such as a sales meeting or vacation — you can create an all-day event.
Add an Event to Your Calendar
In the Calendar app, navigate to the date when the event occurs.
Tap the time when the event starts.
Note: If you are currently in Month view, tap the day the event occurs.
Note: You can also start a new event by swiping up from the bottom edge of the screen and then tapping New.
Calendar displays the New Event screen.

Type a name for the event.
Type the event location.
If the start time is incorrect, use the Start controls to select the correct time.
Tap the How long  .
.
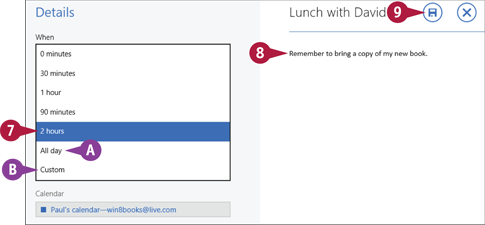
Tap the duration of the event.
A If the event is an anniversary or other event that lasts all day, tap All day.
B To choose a specific end time, tap Custom (see the Tip below).
Use the large text area to type notes related to the event.
Tap the Save This Event button ( ).
).

C Calendar adds the event to your schedule.
D To make changes to the event, tap it.
TIP
How do I create a custom event duration?
With a custom event duration, you specify not only the date and time the event starts, but also the date and time the event ends. Here are the steps to follow:
Follow steps 1 to 5 to set up a new event or tap an existing event.
Tap the How long .
Tap Custom.
Calendar adds controls for the end of the event.

Use these controls to set the end date.
Use these controls to set the end time.
Create a Recurring Event
If you have an activity or event that recurs at a regular interval, you can create an event and configure it to automatically repeat in the Calendar app. This saves you from having to repeatedly add the future events yourself because Calendar adds them for you automatically.
You can repeat an event daily, weekly, monthly, or yearly. If your activity recurs every day only during the work week, such as a staff meeting, you can also set up the event to repeat every weekday.
Create a Recurring Event

Follow the steps in the preceding section, “Add an Event to Your Calendar,” to create an event.
Tap Show more.
Tap the How often .
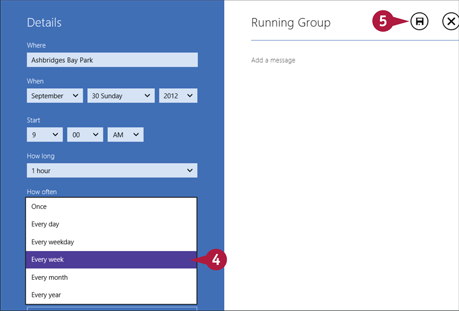
Tap the repeat interval that you want to use.
Tap .
Calendar adds the future events using the interval that you specified.
Note: To edit a recurring event, tap it and then tap either Change one to edit just that occurrence or Change all to edit every occurrence.
Add an Event Reminder
We are all living hectic, busy lives, and with our schedules more crammed than ever, it is easy to forget about an upcoming appointment or anniversary. You can help make sure that you never miss a meeting, appointment, or other event by setting up the Calendar app to remind you before the event occurs. A reminder is a notification message that Windows 8 displays at a specified time before the event occurs.
Add an Event Reminder

Follow the steps in the section “Add an Event to Your Calendar,” earlier in this chapter, to create an event.
Tap Show more.
Tap the Reminder .

Tap the length of time before the event that you want the reminder to appear.
Tap .
Calendar saves the event and later reminds you of it beforehand, according to the time that you selected.
Send or Respond to an Event Invitation
The Calendar app has a feature that enables you to include people from your Contacts list in your event by sending them invitations to attend. If you receive an event invitation yourself, you can respond to it to let the person organizing the event know whether you will be attending.
The advantage of this approach is that when other people respond to the invitation, Calendar automatically updates the event. When you receive an event invitation, the e-mail message contains buttons that enable you to respond quickly.
Send or Respond to an Event Invitation
Send an Event Invitation
Follow the steps in the section “Add an Event to Your Calendar,” earlier in this chapter, to create an event.
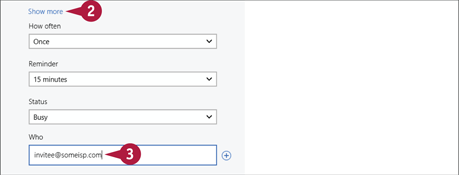
Tap Show more.
In the Who list, type the e-mail addresses of the people that you want to invite.
Note: To invite multiple people, separate the e-mail addresses with commas.
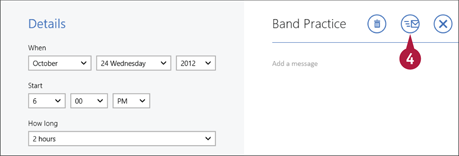
Tap .
The invitation is sent.
Handle an Event Invitation
On the Start screen, tap Internet Explorer.
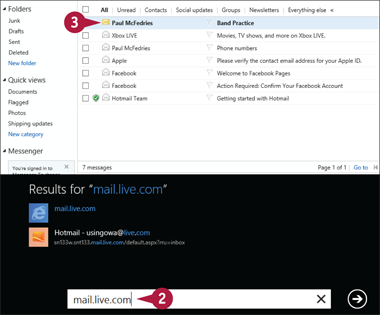
Type mail.live.com and tap  .
.
Your Inbox appears.
Tap the invitation message.
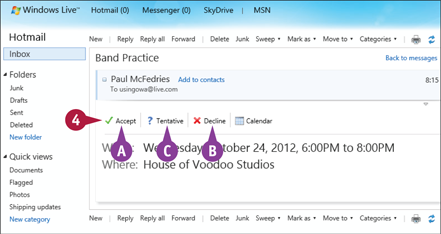
Tap the button that represents your reply to the invitation:
A Tap Accept if you can attend the event.
B Tap Decline if you cannot attend the event.
C Tap Tentative if you are currently not sure whether you can attend.