Chapter 12: Sharing Your Tablet with Others
If you share your tablet with others, this chapter shows you how to create separate user accounts so that each person works only with his own documents, programs, and settings.
Change Your User Account Picture
Display User Accounts
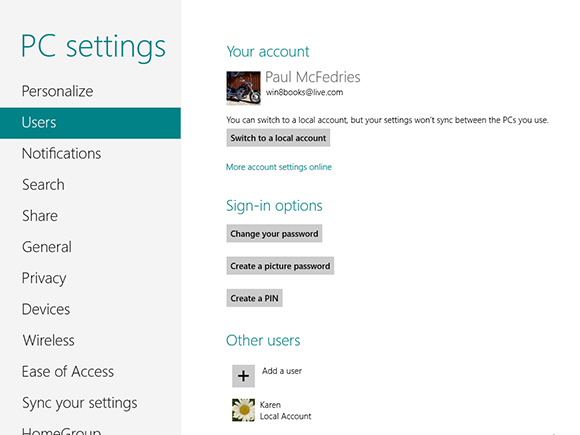
To work with user accounts, you need to display Windows 8’s Users settings.
A user account is a collection of Windows 8 folders and settings associated with one person. In this chapter, you learn how to create new user accounts, change a user account’s picture, change a user account’s password, and delete a user account. To perform any of these tasks, you must first display the Users tab of the PC Settings app.
Display User Accounts
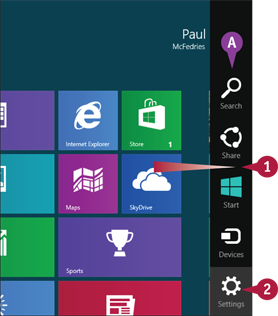
 Swipe left from the right edge of the screen.
A The Charms menu appears.
 Tap Settings.
The Start settings pane appears.
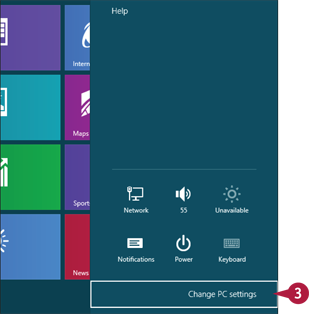
 Tap Change PC settings.
The PC Settings app appears.
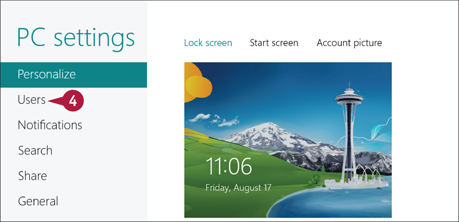
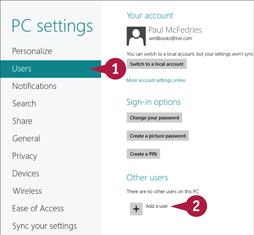
 Tap Users.
The Users tab appears.
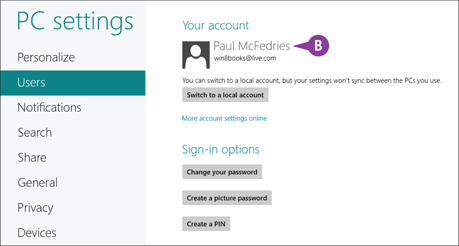
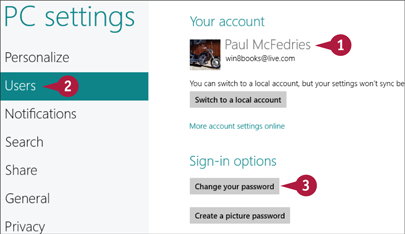
B Information about your account appears here. Later, after you have switched to another account, information for that account appears in this spot.
Create a User Account
If you want to share your tablet with another person, you need to create a user account for that individual. This enables the person to log on to Windows 8 and use the system.
The new user account is completely separate from your own account. This means that the other person can change settings, create documents, and perform other Windows tasks without interfering with your own settings or data. You can create a local user account or a Microsoft account. For maximum privacy, you should safeguard each account with a password.
Create a User Account
Display the Users tab of the PC Settings app.
Note: See the preceding section, “Display User Accounts,” to learn how to display the Users tab.
Tap Add a user.
The Add a User screen appears.
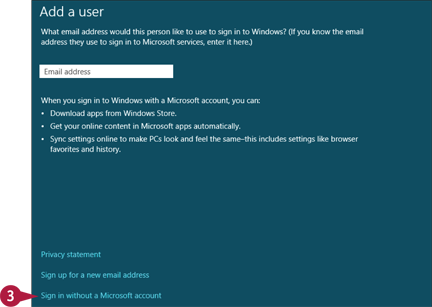
For a local account, tap Sign in without a Microsoft account.
Note: If you want to create a Microsoft account instead, follow the steps in the section “Create a Microsoft Account” in Chapter 1.
The account options page appears.

Tap Local account.
The local account version of the password page appears.
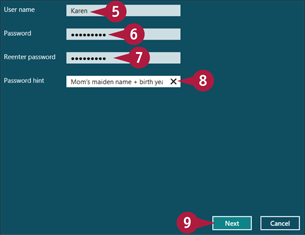
 Type the name that you want to use for the new account.
 Type the password.
Note: The password characters appear as dots for security reasons.
 Type the password again.
 Type a hint that will help you or the user remember the password.
 Tap Next.
The summary page appears.
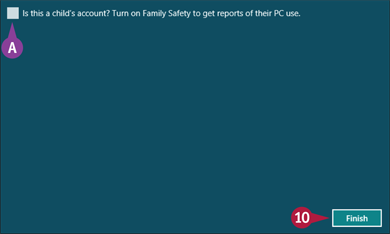
A If you are setting up an account for a child, you can tap this check box ( changes to
  ) to track and control the child’s PC usage. See Chapter 13 for details.
 Tap Finish.
Windows 8 creates the account.
Switch between Accounts
After you have created more than one account on your tablet, you can switch between accounts. This is useful when one person is already working in Windows 8 and another person needs to use the tablet.
When you switch to a second account, Windows 8 leaves the original user’s programs and windows running. This means that after the second person is finished, the original user can sign on again and continue working as before.
Switch between Accounts
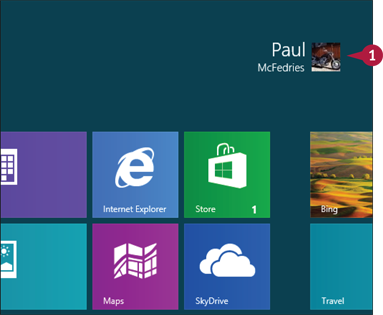
On the Start screen, tap your user account tile.
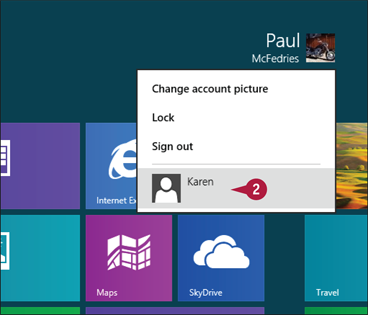
Tap the user account to which you want to switch.
Windows 8 prompts you for the user account password.
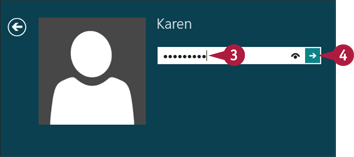
Type the password.
Tap  .
.
A The user’s name and picture now appear on the Start screen.
TIP
What happens if I forget my password?
When you set up your password as described in the preceding section, “Create a User Account,” Windows 8 asks you to supply a hint to help you remember the password. If you cannot remember your password, follow these steps:
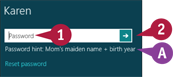
On the sign-on screen, leave the password text box blank.
Tap .
Windows 8 tells you that the password is incorrect.
Tap OK to return to the sign-on screen.
A Windows 8 displays the password hint.
Change Your User Account Picture
You can add visual interest to your user account as well as make it a bit easier to tell one user account from another by adding a picture to the account.
When you create a user account, Windows 8 assigns it a default picture, and this picture appears on the user’s Start screen tile, the Users tab of the PC Settings app, and the sign-on screen. Unfortunately, this default picture is a generic silhouette of a person’s head and upper torso, so it is not very interesting or useful. If you have a more suitable picture, you can change to that instead.
Change Your User Account Picture
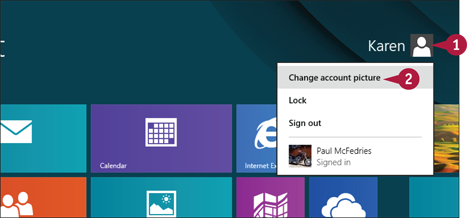
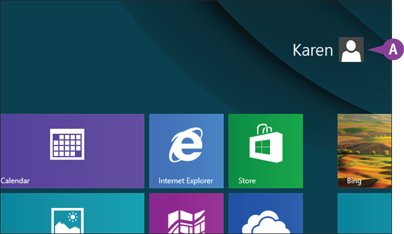
On the Start screen, tap your user account tile.
Tap Change account picture.
The PC Settings app appears with the Personalize tab displayed.
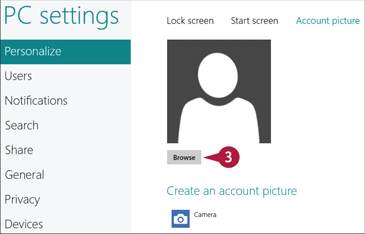
Tap Browse.
Windows 8 prompts you to choose an account picture.
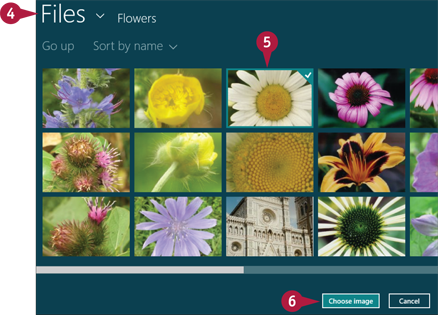
Tap Files and then tap the folder that contains the picture that you want to use.
Tap the picture that you want to use.
Tap Choose image.
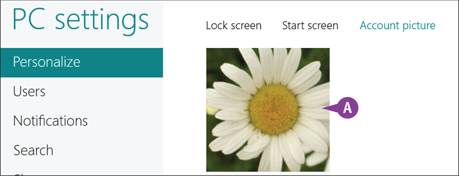
A You are returned to the Personalize tab, which displays the new picture.
TIP
How do I use a webcam photo as my user account picture?
Follow these steps:
Follow steps 1 and 2 in this section.
Tap Camera.
The Camera app appears.
Position yourself within the screen.
Tap the screen to take the picture.
The Camera app displays the photo and adds a rectangle that defines the area of the photo that it will use for your account picture.
Tap and drag the rectangle to the position that you want.
Tap and drag the rectangle corners to set the size and shape of the rectangle.
Tap OK.
You are returned to the Personalize tab, which displays the new picture.
Change a User’s Password
If you set up a user account with no password or if you find it difficult to remember your existing password, you can change it.
Assigning a password to each user account is a good practice because, otherwise, someone who picks up the tablet can sign in using an unprotected account. It is also a good practice to assign a strong password to each account so that a malicious user cannot guess it and gain access to the system. You can use Windows 8 to assign a password or create a password that is stronger or easier to remember.
Change a User’s Password
Sign in to the user account whose password you want to change.
Display the Users tab of the PC Settings app.
Note: See the section “Display User Accounts,” earlier in this chapter, for details.
Tap Change your password.
Note: If the account has no password, tap Create a password instead.
The Change Your Password screen appears.
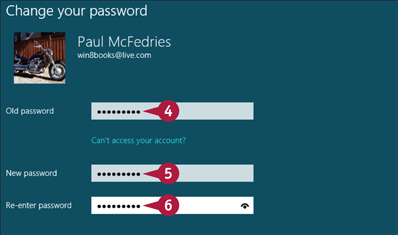
Type your old password.
Note: If the account has no password, you can skip step 4.
Type the new password.
Type the new password again.
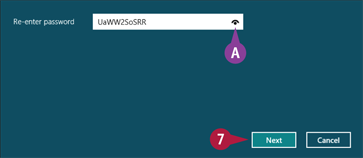
A If you are not sure that you typed the password correctly, tap and hold  to temporarily display the password.
Tap Next.
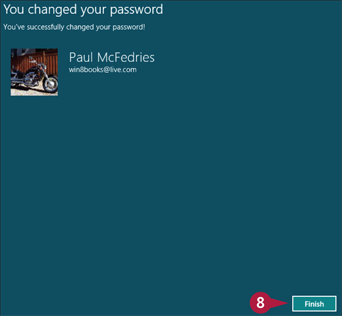
Tap Finish.
Windows 8 updates the user account password.
Delete an Account
If you created a user account temporarily or if you have a user account that is no longer needed or no longer used, you can delete that account.
This reduces the number of users that appear on the Users tab of the PC Settings app, as well as on the Windows 8 sign-on screen, which can make these screens a bit easier to navigate. Deleting a user account also means that Windows 8 reclaims the disk space that the account uses, which gives you more room to store files in your other accounts.
Delete an Account
Sign out of the user account that you want to delete.
Note: To sign out of an account, tap the user account tile on the Start screen and then tap Sign out.
Swipe left from the right edge of the screen and then tap Search.
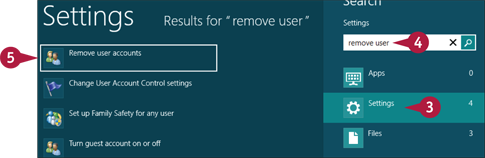
Tap Settings.
The Settings search pane appears.
Type remove user.
Tap Remove user accounts.
The Manage Accounts window appears.
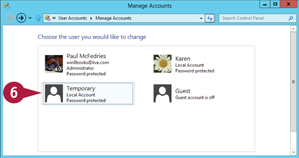
Tap the user account that you want to delete.
The Change an Account window appears.
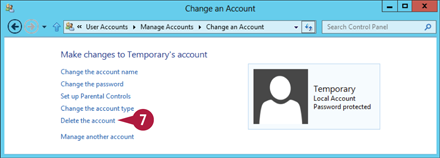
Tap Delete the account.
The Delete Account window appears.
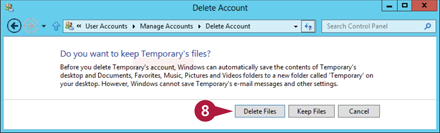
Tap to specify whether you want to keep or delete the user’s personal files.
Note: See the second Tip for information about these two options.
The Confirm Deletion window appears.
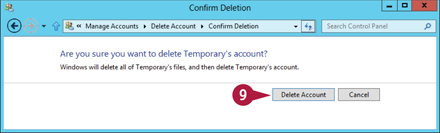
Tap Delete Account.
Windows 8 deletes the account.
Create a Homegroup
You can share documents and media easily with other Windows 8 tablets by creating a homegroup on your network. A homegroup is a collection of computers that share resources based on a single password. These resources include some or all of the user libraries on each computer and the media devices — such as printers — connected to each computer.
You use one Windows 8 tablet to create the homegroup, and then you use the homegroup password to join your other Windows 8 tablets. See the following section, “Join a Homegroup,” for more information.
Create a Homegroup
Swipe left from the right edge of the screen and then tap Settings.
The Settings pane appears.
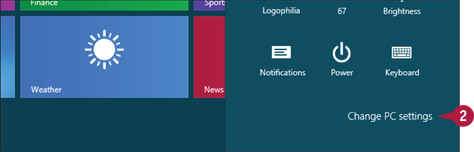
Tap Change PC settings.
The PC Settings app appears.
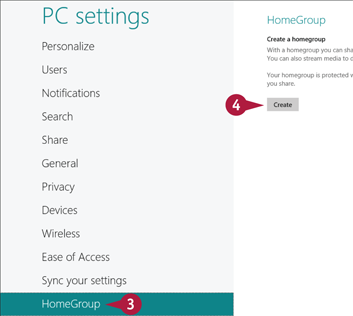
Tap HomeGroup.
Tap Create.
Windows 8 creates the homegroup and displays the Libraries and Devices screen.
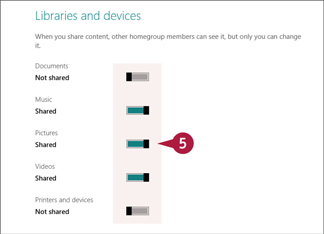
For each type of file that you want to share with the homegroup, tap the switch to Shared.
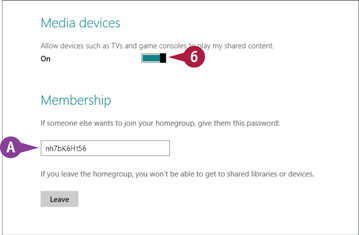
If you want devices on your network to be able to play your shared data, tap this switch to On.
A Windows 8 displays the homegroup password.
You can now join your other Windows 8 or Windows 7 tablets and computers to the homegroup, as described in the next section.
Join a Homegroup
If your network has a homegroup, you can join your Windows 8 tablet to that homegroup. This enables you to access shared resources on other homegroup tablets and to share your own resources with the homegroup.
This section assumes that you or someone else on your home network has already set up a homegroup as described in the preceding section, “Create a Homegroup,” and that you have the homegroup password.
Join a Homegroup
Swipe left from the right edge of the screen and then tap Settings.
The Settings pane appears.

Tap Change PC settings.
The PC Settings app appears.
Tap Homegroup.
Windows 8 prompts you for the homegroup password.
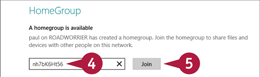
Type the homegroup password.
Tap Join.
Windows 8 joins the homegroup and displays the Libraries and Devices screen.
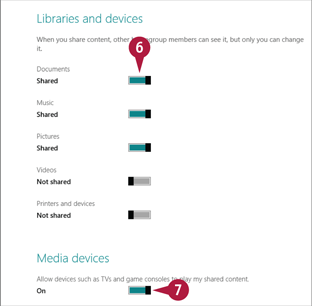
Tap the switch to Shared for each type of file that you want to share with the homegroup.
If you want devices on your network to be able to play your shared data, tap this switch to On.
You can now access other homegroup tablets and share your files with the homegroup.
TIPS
When I try to join a homegroup, Windows 8 tells me my password is not correct. What am I doing wrong?
First, double-check that you have been given the correct homegroup password and that you are typing that password correctly. Second, understand that homegroup passwords are case-sensitive, so you must enter the uppercase and lowercase letters exactly as they appear in the original homegroup settings. Make sure that your touch keyboard does not have Caps Lock turned on.
Can I leave a homegroup if I no longer need it?
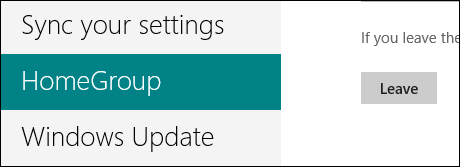
Yes. On the Start screen, tap  +
+ to open the Settings pane and then tap Change PC settings. Tap Homegroup and then tap Leave. Windows 8 removes your tablet from the homegroup.
Share a Document or Folder
You can share documents and folders with your homegroup, if your network has one. You can also share a document or folder with other users set up on your tablet.
Sharing a document or folder enables you to work on a file with other people without having to send them a copy of the file. You can set up each document or folder with View or View and Edit permissions. View permission means that users cannot make changes to the document or folder; View and Edit permission means that users can make changes.
Share a Document or Folder
Share with the Homegroup
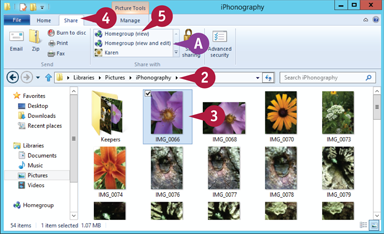
On the Start screen, tap Desktop and then tap  .
.
File Explorer opens.
Open the folder containing the document or subfolder that you want to share.
Tap the document or subfolder.
Note: If you want to share more than one item, select all the items.
Tap Share.
Tap Homegroup (view).
A If you want users to make changes to the item, tap Homegroup (view and edit) instead.
Share with a Specific User
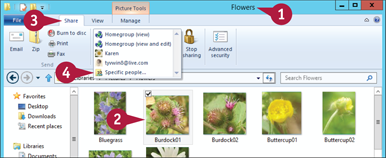
Open the folder containing the document or subfolder that you want to share.
Tap the document or subfolder.
Tap Share.
Tap Specific people.
The File Sharing dialog box appears.
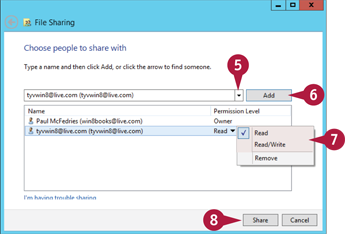
Tap  and then tap the name of the user.
Tap Add.
Tap and then tap the permission level.
Note: Read permission is the same as View, and Read/Write is the same as View and Edit.
Tap Share.
Windows 8 shares the document or folder.
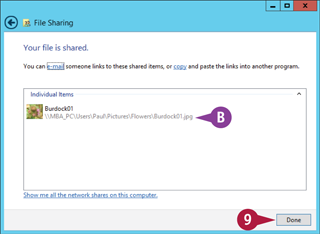
B Be sure to give the user the address that appears here.
Tap Done.