Principles of Winter Gardening
Climate
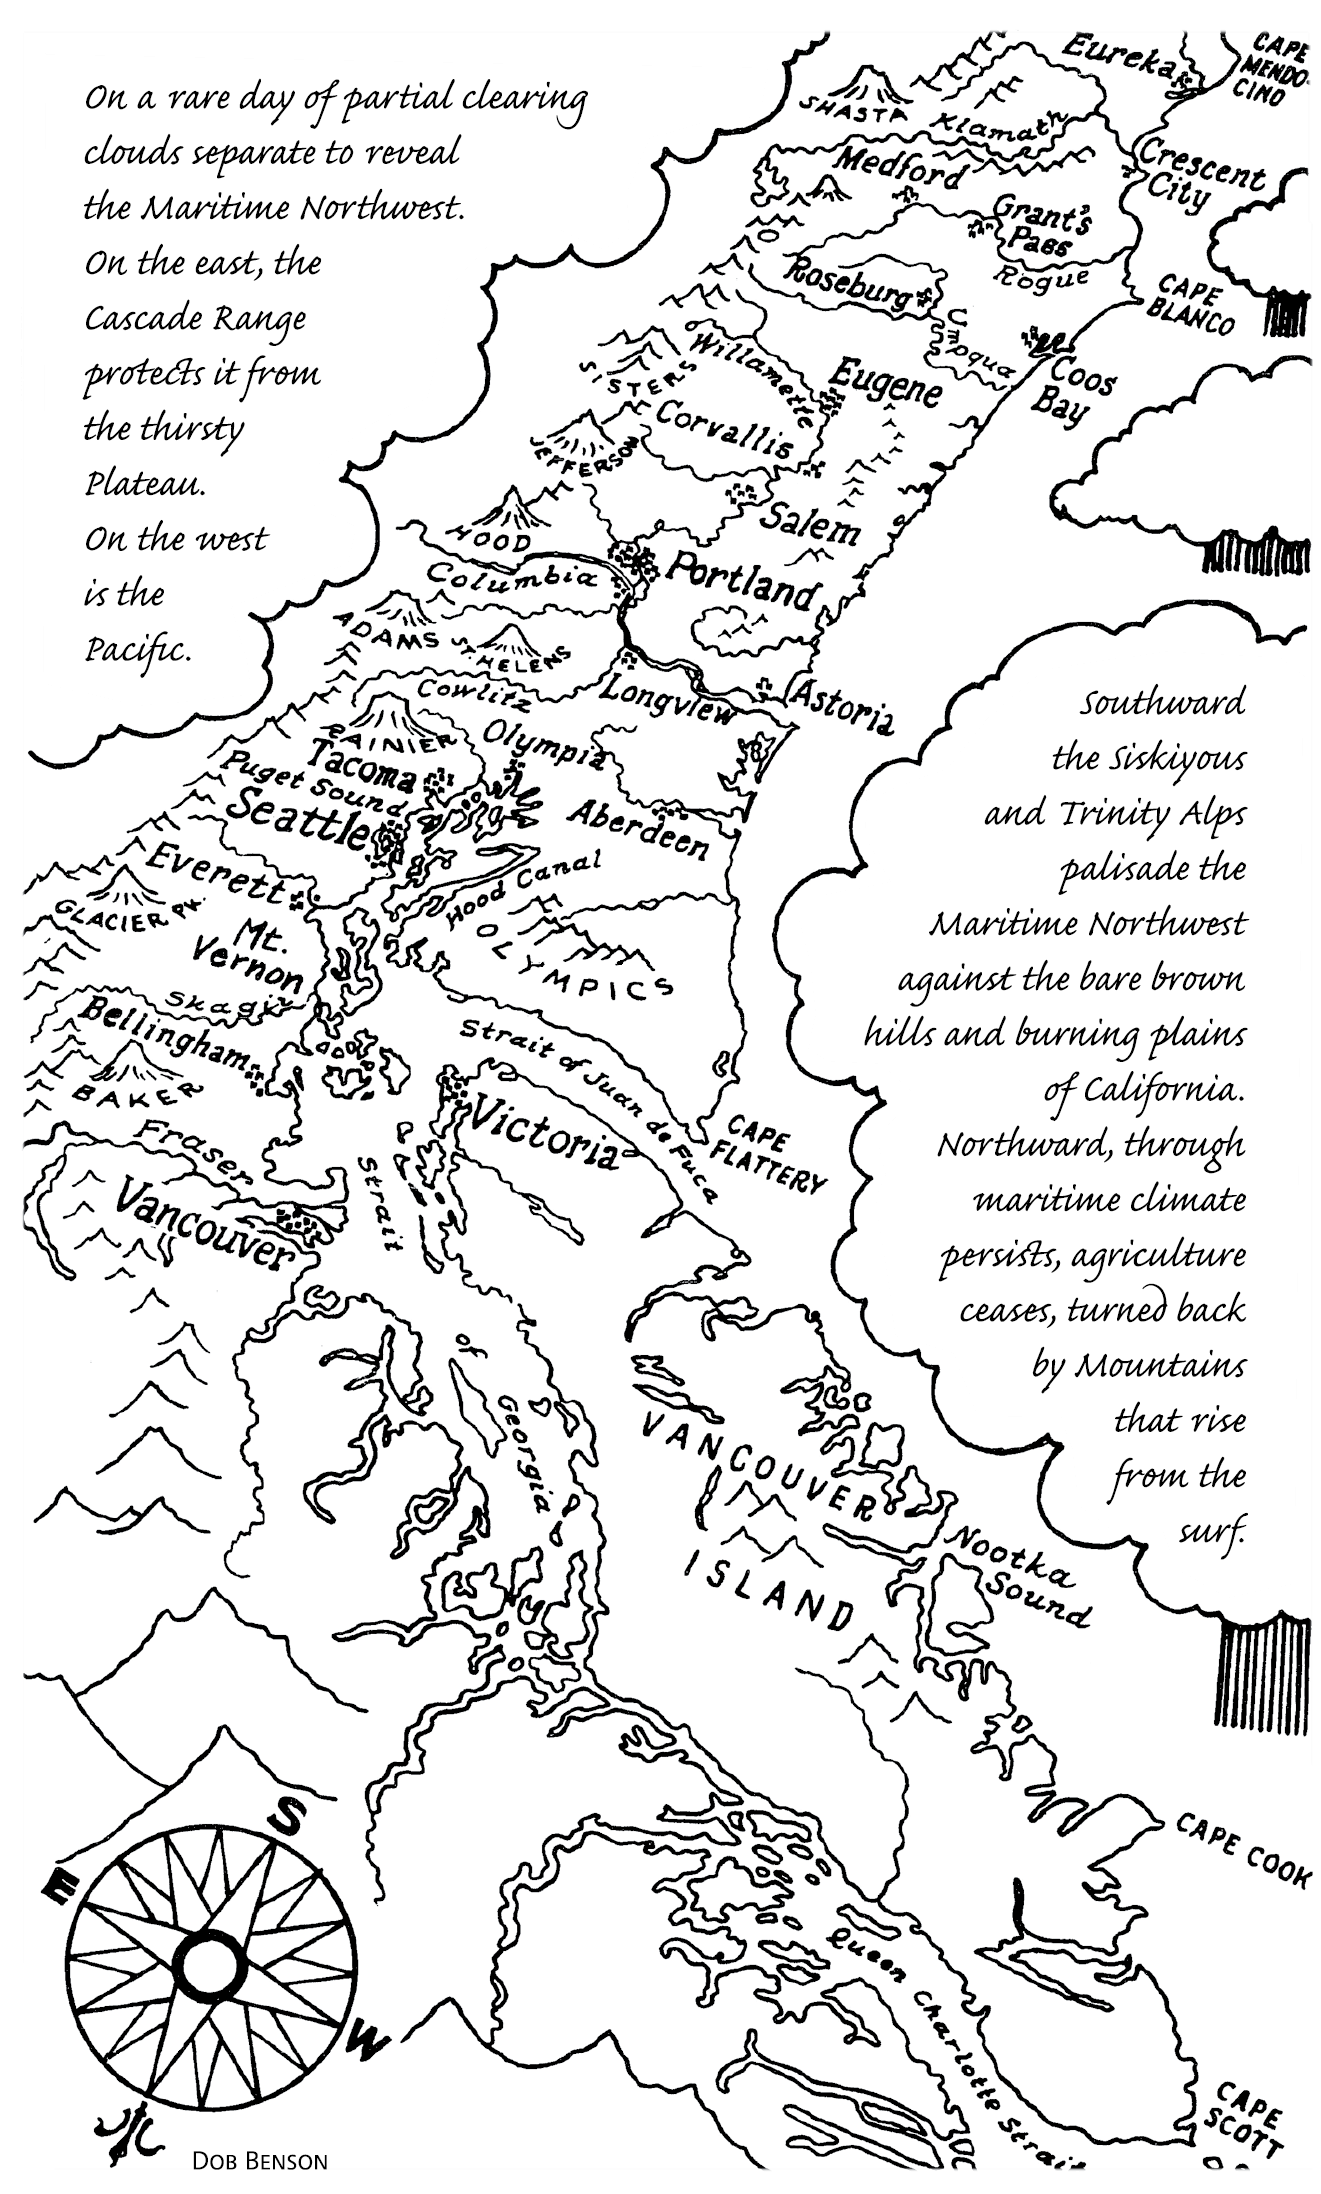
The earth turns eastward round her poles. And in our latitudes, our main wind comes to us from the west across hours of ocean, damp and restless. That mass of ocean air gives us our maritime climate, from the coast to the Cascade Mountains. This climate is just what is needed for us to grow winter crops in the higher latitudes. It exists along west coasts, peninsulas, inland seas and islands from about 37 to 59 degrees latitude, give or take a bit, due to ocean currents, mountains and other factors.
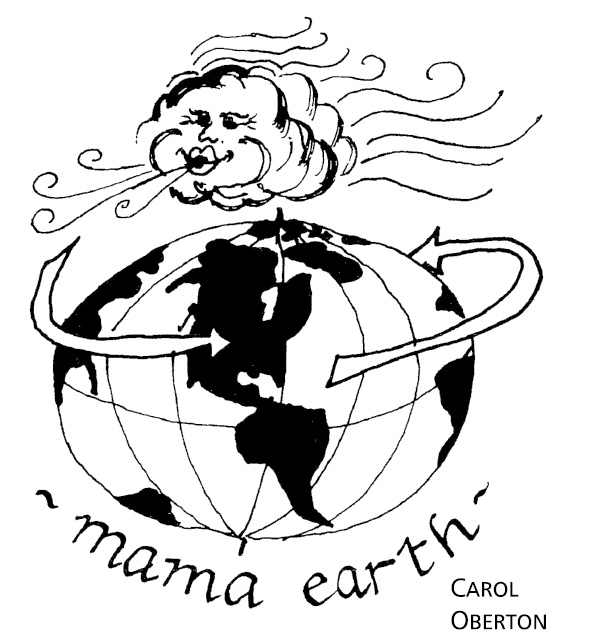
If you look at a world map, you will see that parts of Europe, Japan, Tasmania, the south island of New Zealand and Chile are all within this range. In North America the area from northern California to northern Vancouver Island in British Columbia and parts of the Alexander Archipelago in southeastern Alaska have potentially suitable climates. Farther north, although the climate is mild enough, there is little arable land, and high precipitation and lack of winter sunlight prevent most winter crop production.
A maritime climate is distinguished by its cool, even, humid nature, both summer and winter. Here on the west coast of North America, temperatures hover around 45°F (4°C) in the winter, with occasional changes in either direction. Spring and fall are long, slow affairs — misty, cloudy and rainy — trying to the patience of the human inhabitants.
For vegetables, however, this winter weather is easier to deal with than the deep dry cold of a continental climate. In fact, many of our vegetables are well-adapted to it. The long falls that gradually turn colder give vegetables ample time to prepare for winter and harden up. When the first frosts come, they are usually accompanied by high soil moisture and high air humidity. The latent heat in this water vapor is returned to the air as the water condenses in the form of frost, preventing most sudden drops in temperature. Misty mornings are another plus, as they give frozen plants plenty of time to thaw out gradually before they are touched by the sun. (Later, in the long, cool springs, plants such as spinach and leeks can produce lots of growth before bolting in warm weather and longer days.)
Winter does come, though. Around the time of the winter solstice, the dry, cold air masses east of the sheltering mountains tend to flow over and bring us a week or two of continental-type weather. Snow, though hard on traffic, is a blessing to the garden as it protects the soil and plants from freezing, insulating them in a snug white blanket. It is when cold comes without precipitation that the soil freezes deeply for long periods of time, the dry winds blow, and you can expect to lose many of your winter vegetables.
The winters of 1978–79, and 1990–91 were like that in Washington (with lots of snow, however), with frigid weather from Thanksgiving until February. But still, in my garden in Whatcom County near the Canadian border, leeks, kale, parsnips and mulched carrots supplied winter food. And in March the unprotected spinach and corn salad, along with the lettuces under the cold frames, all revived, grew and produced an abundance of salads. Sometimes these cold years run in bunches, as they did in the 1950s. It’s hard to tell when they will come, but you can count on at least one year in five not being very good for winter crops. Every 25 years or so, the maritime Northwest gets a really rough winter like 1978–79. But even these aren’t as bad as an average continental winter. Lately, due to La Niña, we have had some deep frosts in October and November before the vegetables have hardened up, but still, our crops have mostly produced.
Different parts of the Northwest have variations on the general maritime theme. The whole coastal strip is milder and very rainy and windy. All the foothills are colder in winter, with shorter and often cooler growing seasons. The inland valleys of southern Washington and the Willamette Valley in Oregon have slightly warmer summers and colder winters, while the Puget Sound region is generally mild. The San Juan Islands in the Olympic Mountain rain shadow experience less rain but more wind and cooler summers.
One thing to note, however, is that our summers are dry, so that although those on the edge of the Sound and Straits (Vancouver, Seattle, Portland, etc.) may get about the same amount of rain as Chicago or Boston (35 to 45 inches), it mostly comes in the winter. This mild winter and summer drought pattern (sometimes referred to as “modified Mediterranean”) should be taken into account when you are planting, sowing and transplanting your winter crops. If you pay for your water, you can run up quite a bill keeping summer and winter transplants alive and growing well during the dry summer stretches. So get a rain barrel. Or get two, or get one for every downspout. Instructions and kits abound for converting food-grade plastic barrels (often available free) to rain collectors. For a more upscale and larger volume solution, Cypress Designs in Bellingham, Washington, makes a molded plastic version that fits against the side of your house and holds up to 95 gallons.
Wherever you live, in order to be successful with vegetable crops you must pay attention to your local climate. By experimenting you can discover which winter varieties are suited to your garden and the proper time to sow and transplant them.
I think that the root of the Wind is Water
It would not sound so deep
Were it a firmamental product,
Airs no Oceans keep —
Mediterranean intonations,
To a Currents ear
There is a maritime conviction
In the atmosphere
— Emily Dickinson, 1830–1886
Site
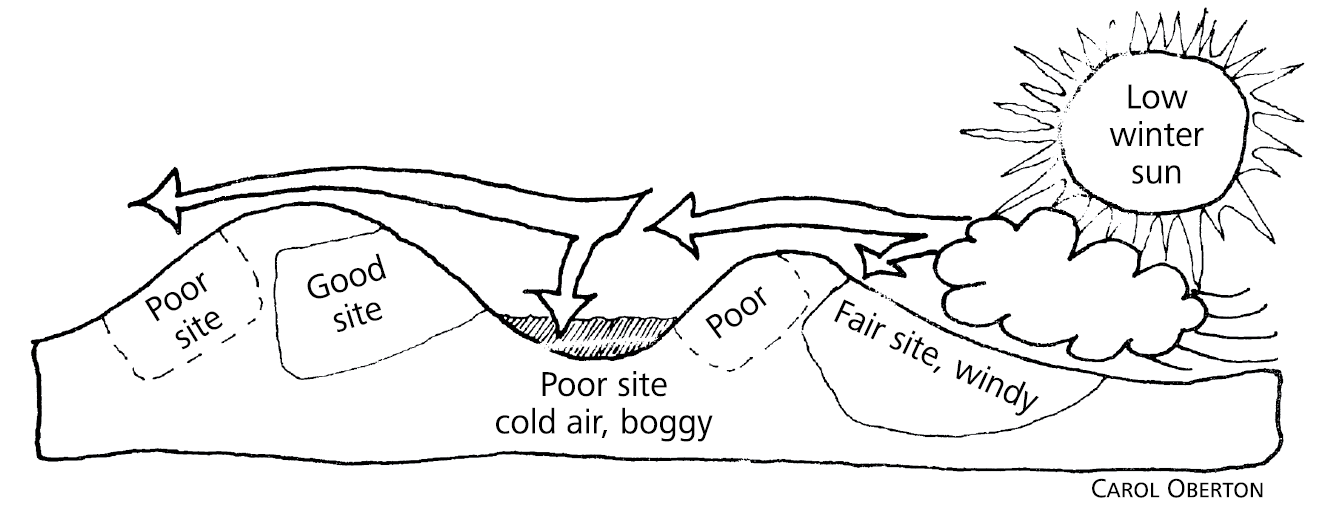
The best site for fall and winter crops is a gentle slope on the south side of a hill or a building. It might be a site you could terrace, with wind protection close enough to make a difference but not so close it blocks the sun. A building reflects and holds heat; the slope aids in drainage; terraces make a warm microclimate; and wind protection allows that pocket of warm air to stay where it has developed.
Light and Warmth
Usually the best place for winter crops is also a good sunbathing spot, so let that be your guide. When the sun comes out for a week during one of those January-February high-pressure systems, if you live out of the range of the severe winds from the northeast, which mostly come down the Fraser and Columbia Rivers, in the perfect site you should be able to work comfortably in your shirtsleeves. (I did in my Seattle garden, even though just around the north corner of the garage it was still winter.) Except during the darkest months of December and January, that extra warmth means extra growth on your lettuce, corn salad, Brussels sprouts, etc., and therefore healthier plants and more food. It also means slightly warmer temperatures in the soil and at night, which can make the difference between losing your plants to freezes or not.
Many a less-than-ideal spot, however, has produced an abundance of winter vegetables. Summer sun is as important as winter, as so many of the winter crops have to put on most of their growth then. If your choices for a garden don’t include a particularly sunny spot (8 to 10 hours of sun in the summer, 5-plus in the winter), then you may have to limit the kinds of vegetables you will grow. Better to have lots of spinach, leeks, kale and corn salad than Brussels sprouts and cabbages that won’t make it (especially if you are more likely to eat the former raw and hence maximize your nutrition).
Don’t underestimate the effects of shade and soil type on the timing and size of plants. For two years I gardened in two different sites at the same time. One was on a northeast-facing slope with a light silt soil, and it didn’t get sun until around ten in the morning. The other, two miles away, was down on river-bottom land and received a full day of sun. I took starts from the same plug flat and planted some out at each site on the same day. Two weeks later, I could see the difference: by the end of the month, the lowland plants were twice the size of the hillside ones. Hyper-fertilization and row covers will somewhat make up for this lack of sun.
If your only sunny spot faces onto a street, beware: traffic exhaust will be coating your plants, soil and, what’s worse, your lungs with lead, asbestos and other nasties. Be sure to wash your food well and avoid the garden during rush hour.
The warmest spot in fall and winter is usually the south side of a house, a traditional site of the perennial flower beds. If you like flowers, that’s a hard thing to give up. Consider interplanting with some of the more striking winter vegetables. Kales are both beautiful and delicious, and lettuce or onion greens can be tucked in among the asters. Be careful, though: many garden flowers and bulbs are poisonous, and you wouldn’t want to eat a daffodil bulb thinking it was an onion. If you want inspiration you would do well to refer to Rosalind Creasy’s edible landscaping books, especially the latest. (See Appendix B.)
Keep in mind that soil near house walls often contains chips and flakes of paint. If you live in an older house, chances are that the paints used were lead-based. Some municipalities will test for lead, and kits can be bought at hardware stores or home centers. If you’re unsure, the safest thing to do is to remove the suspect soil and replace it. This website gives information about testing for lead paint in your soil: epa.gov/lead/pubs/leadtest.pdf.
Drainage
Drainage of both water and air is another very important aspect of a site. Low spots are poor choices for winter gardens because they collect cold air as well as water. Wet soil will be too cold for good growth and it will suffocate your plants, which need air around their roots. Too much moisture can also increase problems with rot. If there are water drainage problems in the middle of an otherwise desirable spot, it is worth the trouble to install tile, dig a diverting ditch and/or make raised beds.
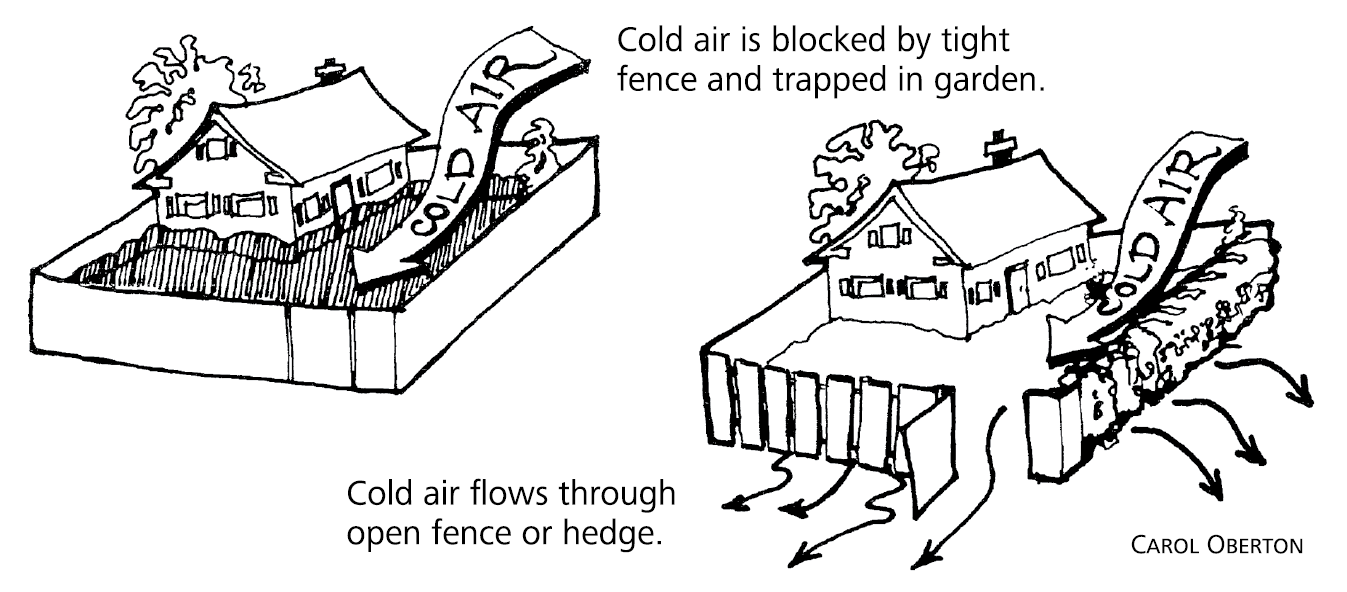
You can also have air drainage problems in the middle of a slope if you have barriers to the free flow of air. A tight fence downhill of your garden will catch the freezing air instead of letting it pass on by. Use an open fence or hedge instead. However, a solid barrier uphill is all to the good, as it deflects cold air and drying winds from the garden.
Shelter
No matter how good your site is in other respects, if the wind can blow away the warm air that has been built up, it won’t do the plants much good. Plants are quite vulnerable to wind damage in the winter. For one thing, they become brittle and desiccated in freezing weather; for another, if the ground is soft from lots of rain, their roots can easily be dislodged.
There are two distances at which windbreaks are useful: relatively long distances of 50 feet or more (provided by tall structures such as houses, barns or trees) and distances less than 40 feet (provided by garden fences, hedges and shingles or cloches). Unless you’re using transparent cloches, you should make sure that your wind protection doesn’t block the low winter sun.
Given enough space, I think it’s worthwhile to make a walled garden out of whatever material you can round up. If you can control the design of your house and outbuildings, take a tip from the layout of European and New England farms, which are often built in a complex that leaves sheltered spaces. In the New England countryside thehouses and barns used to be connected, but that is a fire hazard and probably should be avoided. Hedges or fences connecting buildings would serve just as well. In the city or suburbs this protection occurs automatically from the small size of lots and the proximity of buildings.
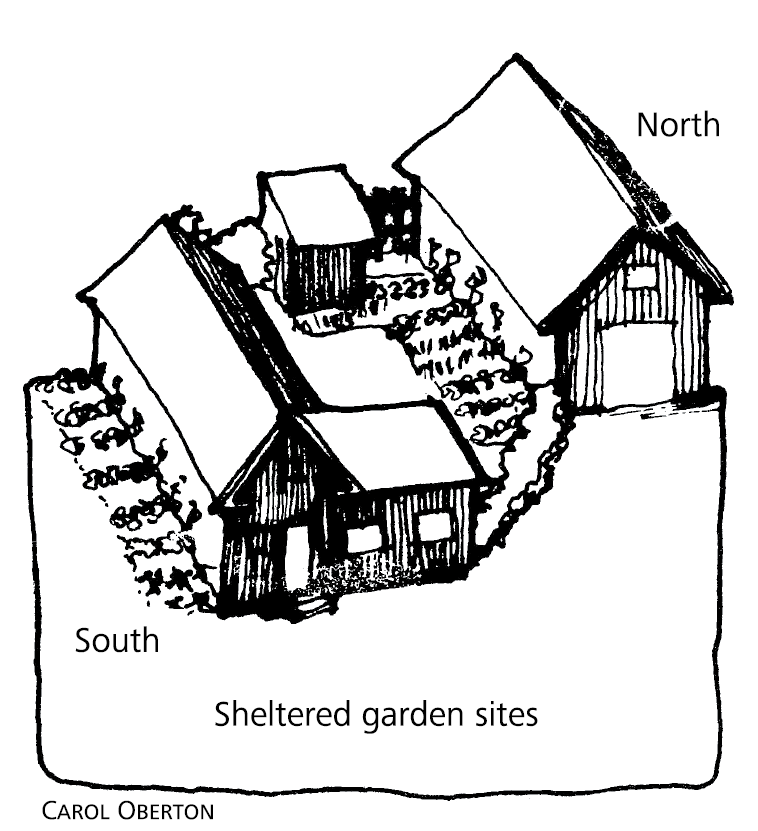
If you want to make a windbreak for your garden or grounds you have to decide what form to use. Although fences are expensive, they are quick to build and are good if you have limited space. A hedge may take five years to reach a useful size, and you have to keep it well pruned at first to encourage density. It also occupies a lot of space, and the roots will reach out well beyond the drip line and take up water and nutrients you want for crops.
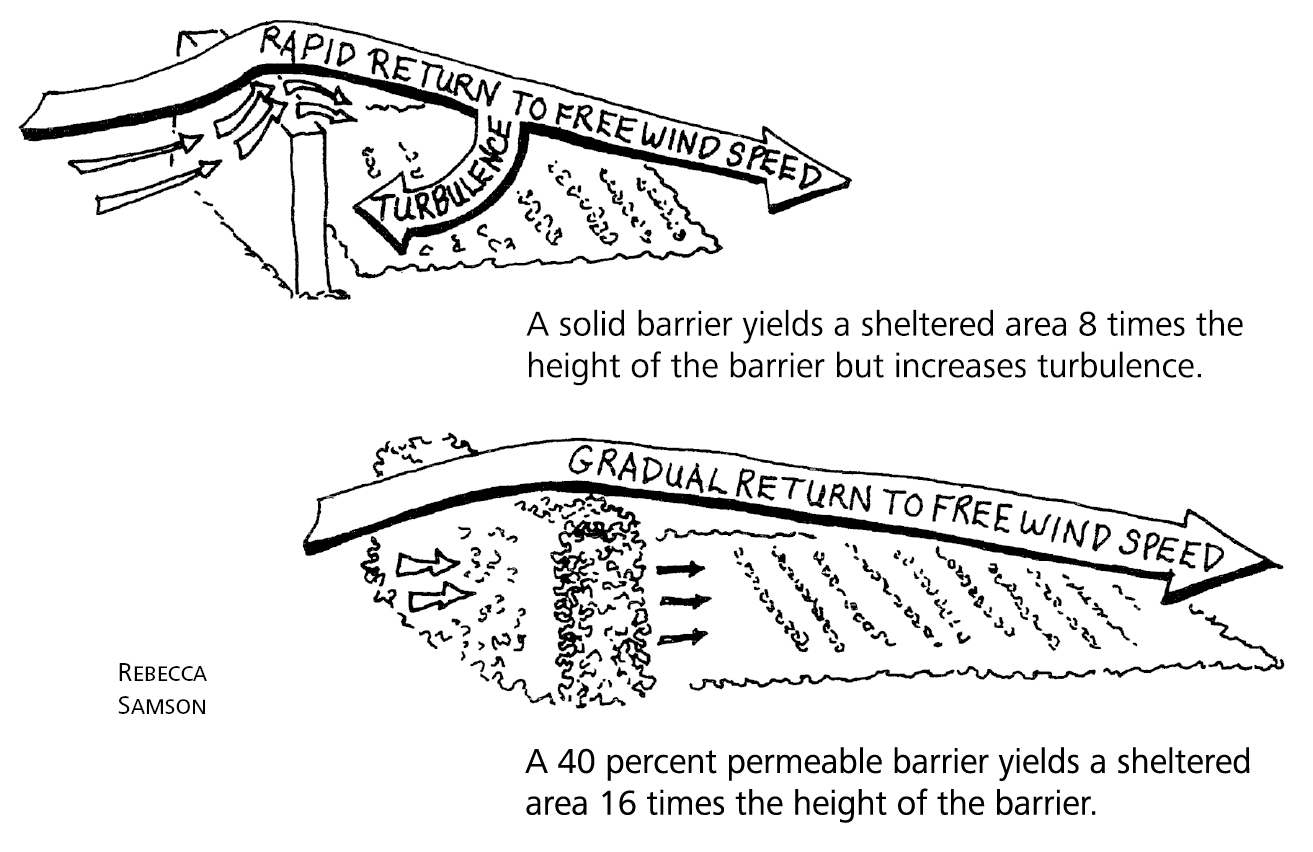
Whichever you choose, fence or hedge, a 40 percent permeability is preferred. This is because solid barriers provide a shorter range of shelter to leeward and increase turbulence. So consider using a slatted fence or hedging material that isn’t too dense. Deciduous shrubs tend to be dense in summer and too permeable in the winter (with the exception of hedging beech, which keeps its leaves until spring), so one of the evergreens might be a better choice for your main planting. With the wealth of plant material available, you can choose varieties that will grow to the height and thickness you desire. You can also consider including plants that are edible or medicinal, either for you or your livestock.
Soil
A great deal can be said about the nature of soil in relation to vegetable gardening. There are some good general books that you can read and at least one excellent video. (See Appendix B.) I will try to limit myself to issues relating especially to winter gardening.
To begin with, if you want decent winter crops you must follow the same procedures of good soil care and improvement that you would use to produce decent summer crops — only more so! This is because winter is a time of stress for most plants.
Soil type affects cool-season crops considerably, especially relating to temperature and drainage. Light soils with plenty of sand warm up quickly and drain well. They are good for later winter sowings and early spring crops. However, because they are not very moisture-retentive and are rapidly influenced by temperature changes, light soils do not grow as fine or as hardy a fall or midwinter crop. This is especially true for members of the Brassica family, which are, in the main, heavy feeders. A silt or clay loam, on the other hand, will be more complicated to improve, trickier to work and slower to warm; however, because such a soil can hold more moisture and nutrients, it can grow excellent late summer, fall and winter crops. Soil color also affects crops grown in the cool seasons. The darker the soil, the better it absorbs heat. This heat is then radiated back out at night, ameliorating temperature swings. For this reason, English gardeners used soot from their stoves as a mulch around early crops. I don’t like the idea much, as handling carcinogenic soot can be dangerous, but coffee grounds are dark and have a good carbon/nitrogen ratio (12/1). And as there seems to be a barista on every corner, it is much easier to find than soot! Also, as you add compost to your soil, it will gradually darken.
The chances are that you don’t have much choice about your garden’s soil type and will have to make do with amending it to improve its suitability. Probably the single most important thing you can do as a year-round gardener is to add organic matter, especially in the form of well-rotted compost. When you are starting a garden, the soil will likely need all of the organic matter you can find to apply, but once this initial phase is past, a minimum of two inches a year of screened compost on the surface of the soil should suffice. Despite its many enthusiasts, I can’t see that double digging, a garden system involving a lot of work, does any good for your vegetable soil. Why put subsoil on top of your good topsoil? This is especially so if you have clay underneath. You’ll just end up with a sticky mess. Maybe there are some nutrients down below that are no longer in the topsoil. But if so, surely it’s a lot easier to put the compost up on top, and let the worms bring them up. And you won’t put your back out in the process.
The use of compost increases the humus content, which aids in balancing the soil’s pH and makes the whole gardening process easier and more fruitful. Humus is the finished product of microbial composting; it is dark in color and very stable. It plays several roles in cool-season production: it aids in aeration, acts as a buffer of pH and thus allows a slower but longer-lasting release of nutrients. During the cold seasons, humus aids in holding a more even soil temperature so that plant roots do not suffer such extremes. For a quick description of humus’s biochemical properties, see Teaming with Microbes (Appendix B).
The best means for adding humus to your soil are composting, mulching and cover crops (both short- and long-term fallowing).
Making compost is an important practice, and you will need to work out a method that suits you and your site. Some of the books I recommend in Appendix B have good lengthy descriptions of methodology.
I personally don’t turn my compost unless I have to move it. I have a metal frame that I move along as it fills up, and other than that I don’t bother it. A frame-full may take 5–6 months to finish, longer than with methods involving frequent turning and aerating, but as I have room for several frames at different stages, the extra time is worth the reduced labor. Gardeners on small lots may feel the need to speed up the composting process in order to get as much as possible from a limited space.
In our climate, with its long, cool rainy season and dry summers, nitrogen will evaporate from the pile if you leave it uncovered; phosphorus will leach out if exposed to frequent rain. Therefore, I think it is best practice to have your compost enclosed. Whether you use wire frames, old pallets, or a commercial synthetic container is not so important as keeping it covered from too much rain and from drying out in the summer. The moist sponge concept is the one to follow; as you add material to your pile, check to see if it needs watering.
If you garden where there are rats, you might want to have a dual system. A vermiculture (worm) box that is mouse- and rat-proof can be used for kitchen scraps, and the main frame for less tempting garden refuse. (When the worms are done with the compost in the box, it is almost pure humus, a rather solid sticky substance.)
Green Manures (Cover Crops)
Green manures, sometimes quite rightly referred to as cover crops, are a very useful component of soil care for year-round gardening in a maritime climate and, if you can, you would do well to include them in your gardening routine. Our high winter rainfall and frequent cloud cover guarantee a leached soil, which also means an acid soil. Minerals and other nutrients are carried down into the subsoil by the steady rain, out of reach of all but the most deeply rooted vegetables. These nutrients can be kept in the topsoil by root activity, which also enhances soil life and helps control erosion. Overwintering vegetables and green manures both do this.
Green manures are crops that are grown in parts of the garden or fields for a period of time and are worked directly into the soil before the space is needed. Green manuring is a very ancient practice, used in China for at least 3,000 years and in the Mediterranean for 2,000. It was not employed in northern Europe until the seventeenth century; a fallowing system was used instead. Each region grew many different plants for the practice, according to availability and season.
A green manure can grow in the soil for as long as a year (at which point it is really a form of fallowing, but the purpose and end result are similar). In our area, green manures are used most often on a temporary basis of several weeks to a few months, if they are used at all.
Some gardeners, even experienced ones, find them awkward:
Cover crops/green manures are great if you have a tiller. For those of us who turn everything in by hand, cereal crops are a pain in the butt. Even legumes such as vetch are difficult to work well into the soil in a timely manner. We prefer to make and buy compost. We have done green manures, but usually end up cursing ourselves.
— Terry Mazuga, Cloud Mountain Farm Manager
Terry has a good point. And, in fact, I think that tilling in green manures in a home garden may actually do more harm than good. However, there are ways to manage green manures by hand that are effective and not too onerous. One way is to use crimson clover and to clip it a week before the site is needed. Turn this in right away, and it should be ready in time. I think that the benefits of a well-chosen cover crop are great enough to make the effort worthwhile.
It is no longer difficult to find seed for green manures. Check with Johnny’s Selected Seeds or Territorial Seed Company, which offer green manure seed in their catalogs (see Appendix A), or try your local feed or garden store.
Suitable green manures include cereals such as rye, winter wheat and oats, or mustards, herbs and legumes. Rye (Secale cereale) is typically used by farmers in this area for a winter cover crop; it is readily available and cheap. Its one great advantage is its ability to germinate and grow in low temperatures. You can sow rye after your late harvests. Unfortunately, rye is so vigorous that it is hard to kill in the spring. In a wet year, when you cannot work your ground enough to kill the rye, it often ends up intercropped with your spinach and peas. If this happens try covering it with black plastic or weighted down cardboard. Oats (Avena sativa) and winter wheat (Triticum aestivum) are alternatives to rye. Some varieties of oats winterkill, but they continue to hold the soil. Winter wheat will survive even extreme cold. Though oats must be sown early in the fall, they are good for beds intended for the earliest spring sowings. Common vetch or tares (Vicia sativa), Bee’s Friend (Phacelia species), radish, buckwheat and peas are also good late-catch crops that usually will winterkill in colder areas.
If you have trouble finding organic forms of nitrogen or can’t afford to buy them, legumes, in a mix or alone, are a preferred green manure. Winter vetch (Vicia villosa), hairy vetch (Vicia hirsuta), lupines, Austrian field peas (Pisum arvense) and crimson clover (Trifolium incarnatum) are good ones. Except for the lupines, they are all easier to remove in the early spring than rye, and they leave varying amounts of nitrogen, as well as root residues, in the soil. (These roots play an important part in making the soil friable and suitable for the next crops.) I prefer not to use the vetches because I find some of the seed will still germinate ten years after you have used them. Last year Johnny’s Selected Seeds offered a summer alfalfa that I am going to try. If you don’t want to send all the way to the East Coast you can buy alfalfa seed locally for sprouting at a co-op or health food store. It does best in an alkaline soil. Alfalfa hay has a C/N ratio of 12/1, the same as coffee grounds. It is a very ancient crop.
Green manures suppress the growth of winter weeds. They can also be undersown in vegetables in the later summer or early fall. If you prefer not to dig out your corn stalks right away try undersowing them with crimson clover.
Another important use for green manures is on empty beds that are waiting for summer-sown winter crops. If you have such a bed open for more than a month at midsummer, it will substantially aid the following crop to sow it to buckwheat (Fagopyrum esculentum). A bed that is open for a little longer can have a clover added in. This will discourage weeds, keep the soil from drying out and add some organic matter and nitrogen when the green manure is worked or tilled in before transplanting. You can also smother it with a plastic cover. Whether tilling or smothering, remember to kill the green manure a good two weeks before sowing or transplanting the new crop. The initial breakdown products are not good for young plants. Some people have too little crop space and have trouble turning in the plants in time. You can try clipping the tops, putting them in the compost and then turning the soil.
Mulches
Where you have not had a chance to grow a green manure, a simple mulch of straw, hay or grass clippings will at least protect the soil and leave it in a better condition for spring sowing. Mulching is an excellent way to increase organic matter, if it is used with discretion. I try to mulch those overwintering crops that stay in the open till April or May. This helps protect their roots and stems during freezing weather and encourages biological activity in the top soil. It also suppresses weeds from late February through April, a period of active weed growth. True, mulch harbors slugs, but with the bigger winter plants I don’t find the damage to be as much of a problem as weedy spots in the spring.
I don’t mulch any spring or early summer sowings; in the wet, cool maritime climate, the soil needs to warm up and lose some moisture. (This is less true of sandy soils than of silt and clay.) Nor do I mulch in frames or under low crops such as corn salad that cover the ground well by the end of October. If you don’t have proper indoor cold storage, some less hardy winter roots like beets can be thickly mulched (leaves are good) to protect them from frosts. In a windy spot you might want to put stakes and netting around the mulch to keep it in place.
Last but not least, I mulch my garden paths. This suppresses weeds in the summer (especially if you use cardboard or several layers of newspaper under the mulch), and makes a dry place to walk in the winter during harvesting. Eventually both the mulch and the paper will break down, and the resultant organic matter can be raked up onto the beds on a dry day in the spring. When starting a new garden, alfalfa hay, due to its high nitrogen content, is the ideal mulch to use if you can afford it.
Fallowing
If your garden is large enough, and especially if you have problems with a hard pan, a heavy clay soil or an excessively light, sandy one, fallowing is a good practice. This consists of taking part of your garden, one-seventh is traditional, and sowing it to green manure crops for a full year. Deep-rooting herbs such as chicory, or legumes such as sweet clover (Melilotus species.), and alfalfa (Medicago sativa), are particularly useful. Buckwheat and Bee’s Friend (Phacelia tanacetifolia) are good annuals to put in the mix to bloom the first summer. Rye is good for bulk in the topsoil. To avoid competition with vigorous summer weeds, early spring or late summer sowings may be best; you can adjust these sowing times to suit your site and garden schedule.
Fallowed sections or beds should be cut occasionally and the cuttings either composted or left to decompose on the soil. This way minerals that are brought up from the subsoil by the roots of the plants are available in the topsoil for the vegetables you grow the following year. The roots also open up passages in the subsoil, helping to aerate it, and add organic matter as they decay.
Fallowing, like green manuring, makes use of the fact that different species of plants utilize and concentrate different nutrients, grow at different rates, have different diseases and pests and respond to different seasons in their growth patterns. For the price of the seed (or less, if you save your own), you can have a host of green friends working for you in your garden. This makes your garden somewhat more like a natural ecosystem. You are encouraging biological processes and de-emphasizing costly industrial ones.
Fertilizers
Correct fertilization is good for any garden, but a proper balance of the major nutrients — nitrogen, phosphorus and potassium (N, P and K) — is particularly important to cold-season crops. Gardeners tend to concern themselves most with nitrogen, especially with our cool springs, but phosphorus and potassium materially aid in bringing a plant to maturity and hardening it for the winter, so these three must be in balance without an excess of nitrogen. You want to avoid high nitrogen toxicity to yourself, and the fast, sappy growth produced by such nitrogen is just what you don’t want for hardy fall crops. The first deep frost will do them in. Though you might not get quite as much fall production out of a plant that is grown with balanced nitrogen, you will get more winter and early spring production because your plants will survive the winter. When the weather begins to warm up in late February or early March, then you can think of side-dressing with a nitrogenous material or foliar-feeding with fish emulsion or the like to produce a flush of growth. If you need it, that is. Some soils, especially certain loams and clays, need spring boosting infrequently, if at all.
One soil I gardened on in the past was not particularly high in nitrogen, but the overwintering spinach and lettuce put on as much growth as I could keep up with in the spring. Lists of materials high in the macronutrients can be found in Rodale’s Encyclopedia of Organic Gardening.Many green manure crops are good phosphorus accumulators: lupines, sweet clover, buckwheat, turnips and mustards.
Other elements may also help plants develop hardiness: calcium and silicon, for example, and perhaps some of the micronutrients and growth hormones in seaweed. (See Appendix B for resources on this subject.)
Another traditional way to add organic matter to your garden is by using animal manures. These should be composted before going on the garden and should include only limited amounts of dry, carbonaceous materials such as hay, straw or wood products (wood shavings or sawdust). Hay and straw are more typically used in the continental climates and Europe. Most gardening and farming books are written for these areas and assume that animals are bedded in these materials. Such barn cleanings compost quickly and completely in four to six months, or at most a year. On the West Coast however, most farmers use the more readily available wood products to bed their animals. Sawdust and shavings are high in carbon and various lignins and generally need three to four times as much nitrogen and time to decompose as do hay and straw. (The Rodale Encyclopedia and Steve Solomon’s books have charts giving you the nitrogen/carbon ratios of various materials. (See Appendix B.)
Often the percentage of sawdust to manure in barn cleanings is such that the nitrogen in the manure is used up in the process of partially decomposing the sawdust. If the cleanings have sat around in the rain for a while, it’s likely that much of the nitrogen will have been leached out. When this mixture is put on the garden, the decomposing bacteria will draw nitrogen from the soil to finish the job. According to Darrell Turner, a retired agronomist formerly with the Washington State University Research Station at Puyallup, this process may tie up the nitrogen for as long as a year, defeating much of the purpose of applying it.
There are two more problems with animal manures. One is that the material sold in bags at the superstores comes from confined animals that lead hideous lives. Do you really want to support that kind of agriculture? The other problem comes from the potential for residual herbicides and pesticides. In 2010, many Northwest Washington gardeners and farmers lost crops to the broadleaf herbicide aminopyralid that was applied to hayfields and then went through the cows’ systems and got concentrated in composted manure.
None of this means that you must avoid manure, only that you should check your sources carefully and make an effort to add supplemental nitrogen and allow more time for composting. It is hard to suggest just how much nitrogen you should add. Most sources recommend adding three and a half pounds of actual nitrogen per cubic yard of raw saw-dust. With barn cleanings you should need less. But really, the only way to tell is to watch the action of your compost pile. If it does not heat up and the wood particles do not break down, you will need to add nitrogen. If, after the pile has cooled off and the worms begin to enter, you still find lots of wood particles, you may be able to finish the process by adding more nitrogenous materials. If you still find a few particles at the end of a year, don’t worry. At that point they will break down very slowly and will not tie up much nitrogen. These particles will also serve to aerate and loosen the soil, which is helpful if you are working with clay or compacted silts.
If you are bedding your own animals and can control the process, well and good. Straw is the preferred bedding. If this is unavailable or expensive, hardwood sawdust is the next best. Alder, maple and birch are common local trees, and you might find hardwood sawdust from oak or other imported woods at a furniture manufacturer. If you get your sawdust from a local mill, choose a time when they are cutting hardwoods, the true firs, spruce or hemlock. All of these rot fairly quickly. (For this reason, of course, they need higher initial amounts of nitrogen in the process.) Way down on the list is Douglas fir, and last of all comes cedar, which is very slow to break down and toxic to seedlings in its fresh state.
Some small animals, such as rabbits, are kept without bedding. Their manure can be composted easily with vegetables and garden refuse. Poultry manure, especially from chickens, is very high in available nitrogen and will compost hardwood shavings fairly quickly if mixed with kitchen and garden wastes. Llama manure also works well.
Making vegetarian compost is entirely feasible. You have to find a good source of nitrogenous material as your own garden may not provide it, but it can be done. Both alfalfa hay and coffee grounds can help make excellent compost.
Behold this compost! behold it well!
Perhaps every mite has once form’d part of a sick person yet behold!
The grass of spring covers the prairies,
The bean bursts noiselessly through the mould in the garden,
— Walt Whitman
A Seed Breeder’s Perspective
Organic growing goes beyond simply avoiding chemicals in the garden. It is part of a much wider view of our role in the ecosystem. Frank Morton, of Wild Garden Seed, elegantly summarizes the power and importance of this kind of work:
… for organic farmers, genetic self reliance and adaptive responsiveness are important. Hybrids, useful as they are, do not deliver these. Only recurrent selection of open-pollinated varieties creates stable incremental improvement in the genetic commons.
The ecological perspective guides our approach to both plant breeding and farming. It’s apparent that organic farms are great places to do selection for organic strains or new varieties. Without synthetic inputs, the true strengths or frailties of a cultivar become clear. Organically managed crop varieties do best if they have competitive traits: large efficient root systems and vigorous leafy seedling that outgrow weeds for example. We’re also looking for varieties and species that help create healthy year-round agroecosystems, extending the growing season for farmers and the opportunity for beneficial species diversity. Working from the whole system perspective, we try to see how species might be bred or managed to create better integrated farming systems. Creating new varieties and devising crop strategies is the fun part of our work.
Every day the services of the larger ecosystem wash over our work, making possible everything we do as farmers. The daily fall of ballooning spiders and endless roving of ground beetles are a small part of the subtle work being done in our favor. The more we enhance the biodiversity and productivity of the untamed agroecosystem, the more productive, sustainable, and enjoyable we expect our farming lives to be.
Varieties and Saving Seed
Even the very best microclimate, a perfect site and great soil won’t produce many winter meals if you use summer varieties for winter cropping. Summer varieties are bred for quick production in sunny long days, not for staying power. Winter varieties, on the other hand, grow slowly (some are in the ground ten months or longer), have higher dry-matter content and have been bred to be harvested late in the fall, over the winter or in early spring.
Winter varieties are also usually much hardier than their summer equivalents. The tendency toward slow growth, and hence the high dry-matter content (which is also associated with higher nutrients), is partly responsible here. Curly Green kale is a good example of that: tough as nails but very nutritious. It takes a lot of cooking until it’s been through a frost or two. Broccoli is another good example. Italian Green Sprouting, DeCicco and Waltham were once commonly available open-pollinated varieties for summer and fall cropping, though they’re rarer now. If I made a later sowing than usual — July or August — these varieties produced some small winter heads. I used to do that in Seattle. But when I started gardening in the foothills out by Arlington, I found they were only hardy to about 15°F (–10°C). This, of course, restricts their deep-winter use to mild areas. The old Purple Sprouting broccoli, on the other hand, would survive down to 5°F (–15°C), which means it could be over wintered through a considerably wider range. Of course, some of that hardiness is due to Purple Sprouting's immature state as it goes into the winter; it won't attempt to form delicate flower heads until the worst of the weather is over.
Another example is leeks. These are a quintessential winter vegetable, and yet, there are varieties of leeks bred for fall harvest by breeders for the continental market. They are super tall with long, white shafts and thin, pale green leaves; they have to grow fast to bulk up in time. This means they disintegrate with a few frosts. Your true winter troupers are short, stubby, dark green and thick leaved (again with a high dry-matter content) and will take the worst weather. Even if damaged at the core by prolonged deep frosts and desiccating winds in January, they will grow new centers and be harvestable again in the home garden by late March.
Unfortunately, these winter-bred heritage open-pollinated varieties are not all that easy to find. You usually can’t just buy them from the seed racks at most local garden stores, even in the maritime Northwest. Most of the vegetable breeders in the United States are busy developing varieties that can all be harvested before the dry, cold arctic air masses sweep down over field and garden. Most of the seed sales in this country are for such continental gardens; there is small economic gain for large US distributors in carrying special winter-bred varieties for the relatively small population of gardeners who are able to grow them. Because of this, most winter gardeners order their seed from a few small, northern-based US and Canadian companies that carry locally adapted varieties. They also order from English, European and Japanese companies which breed such varieties (see Appendix A for addresses).
So, how do you know which winter cabbage, leek or cauliflower to choose for your garden? At the moment, you have to read all the relevant local catalogs and see what is being offered (see Appendix A). Since every garden and taste is different, the variety recommended by any individual seed company may not be the best one for you, but often several companies will offer the same variety, and then you can hope that it will suit your site.
The best way is to try out different varieties, but in a methodical manner. If you grow three varieties and one of them strikes you as pretty close to your ideal, then grow that for several years. This will give you a good idea of its abilities in different seasons and different parts of your garden. Then when you want to try new varieties, you have your “favorite” as a standard. Always grow the new and the old together, using the same sowing dates and cultural practices (fertilizing, transplanting, watering, etc.). Do this for several years. Observe the plants at as many different points in their life cycles as you can, and keep good records. You will learn much more that way.
Saving Seed
Once you have settled on the varieties you like, you may want — or need — to save your own seed. It calls for extra work and space and takes some planning and care, plus a personal vision of what the perfect parsnip (or carrot or kale) is within any given variety. But I think in the long run it’s worth it. For one thing, you can no longer count on seed companies carrying old, tried-and-true, regionally adapted favorites. The rush for “new and better” varieties (usually expensive F1 hybrids) is well under way, and most of the old open-pollinated types have been lost or retired to the National Seed Bank and are no longer commercially available. Some of our new regional companies have been trying to resurrect them, but it’s a time consuming task. Concomitantly, the price of seed goes up every year along with everything else, so saving your own, if you can do it well, has distinct economic advantages.
Since 1977, when this book first went into print, an interesting metamorphosis has taken place in the seed industry. Initially, many of the more hardy and interesting varieties for winter cropping were available only from European catalogs and a few companies in the US. In the early 1980s, there was an increase in the number of small seed companies and more interest in cool-season crops from those companies that already existed. Gardeners began to have more varieties to choose from.
At the same time, though, a devastating phenomenon was taking place in the international seed market. This involved breeders retiring or moving over to corporate companies, those same corporate multinationals buying up local firms, restrictive laws being passed concerning the ownership of genetic material — specifically hybrids — and the consequent loss of open-pollinated varieties through actual banning (loss of registration in the European Market) and neglect. In other words, if the companies couldn’t make any money from an old open-pollinated variety, why should they take care of it? And why should they let anyone else have it? This is but the most recent northern hemisphere wrinkle in the extreme loss of genetic diversity that has been going on all over the world for the last 100 years.
To create an F1 hybrid, plant breeders will take two vegetable lines with qualities that are performing well in their trials, and cross them together to try and produce a plant that out-performs its parents. When they get a good one they release it on the market. (Of course, they keep the parentage secret.) It might do very well in your garden, but it is fairly futile to save seed from it and expect to get something like the original F1. So what does this mean to you as a winter cropper? It means that you are no longer in charge of the growing process, and though you might have success with any given F1 Hybrid, if the company decides to get rid of it, you are out of luck. And it also means that perhaps 95 percent of the good open-pollinated varieties are already in danger of deteriorating and thus are no longer being offered by some of the old seed companies.
On the plus side, there are many active seed people, organizers and gardeners who are working against the flow and trying to preserve and increase genetic diversity. One admirable example is the Organic Seed Alliance, which was formed in 2004 literally out of the ashes (after a fire destroyed 98 percent of their seed collection) of Abundant Life Seeds in Port Townsend, Washington. Committed to local and organic agriculture, they have been teaching classes, advocating for organic seed development and testing and breeding cool-season varieties. Every year they host a conference that draws in farmers from our region. They also provide a downloadable pamphlet, A Seed Saving Guide for Gardeners and Farmers, that you should read.
So if you want to continue growing recommended varieties, or to try them if you are new to winter cropping, these are the kind of groups to turn to. There is also the Seed Savers Exchange, a national group with many Northwest members; for the price of annual membership, you can join and trade seeds of their listed varieties. And in future years, if you do a good job, you can offer seeds that you yourself have grown!
Home-saved seed, if grown, selected, collected and stored properly, can be fresher and have greater vitality. It’s from your garden. And if you continue to save seed, the chances are, as the years go by, that your plants will be better adapted to your site and therefore healthier and more productive.
But saving seed is deceptively easy. If at the end of the winter, you reach the end of the leek row and the five that are left are beginning to bolt, you might be tempted to say, “Oh, well, I’ll save them for seed.” Doing it that way, you get a pig in a poke. You should start the process by reading what you can about saving and storing seed (see Appendix B). Then carefully consider what to start with.
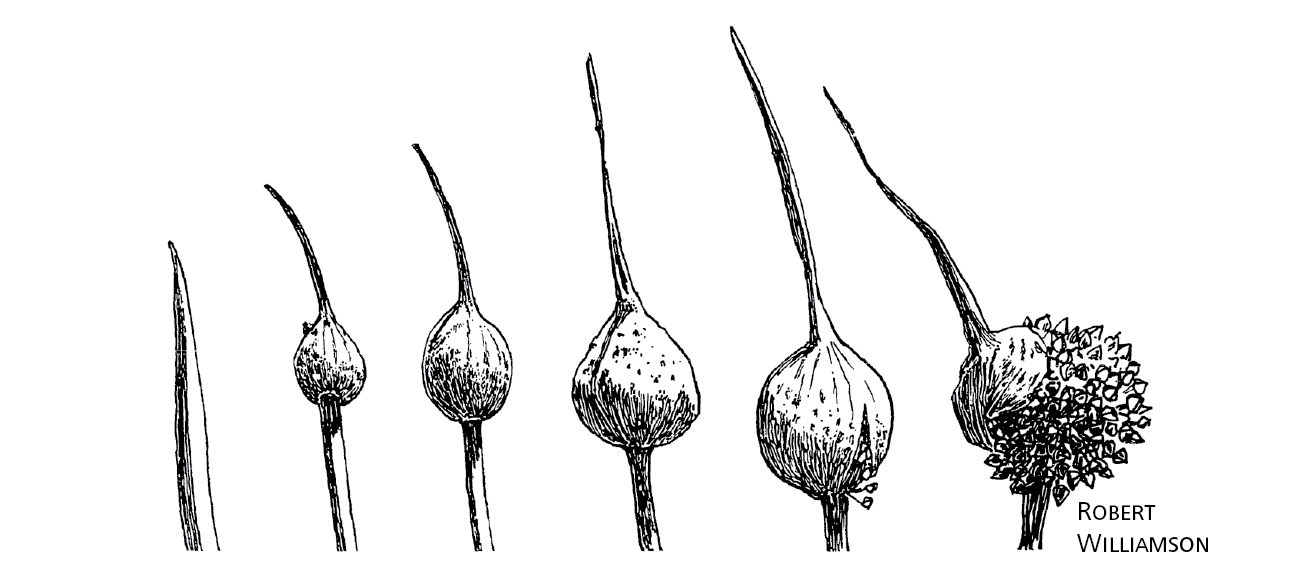
Let’s use leeks as an example again. The first thing to know is that leeks are “out breeders,” which means they tend to cross-pollinate with other leek varieties. And, in order to avoid “inbreeding depression,” a successive weakening over generations of plants that are cross-pollinating among too small a genetic pool, you need to have at least 30 plants of your favorite variety for them to cross-pollinate with. It also helps to have a friend or neighbor who is growing the same variety. Then the two of you can combine and share your seed, maintaining the diversity of your product.
Start the process in the late fall by going over the leeks and picking the ones that you think are best. Mark these so you won’t eat them by mistake. Watch how they do through the winter weather. If their performance is as good as their looks, then save them for seed. If not, then rogue them out ruthlessly!
Because of weed and cultivation problems, it is best to transplant them in late February to a spot on the edge of the garden, or even to a flower bed where they can be admired. Plants in the process of going to seed are usually wider and taller than when in the vegetative state. They often need to be staked.
At that point you will want to make sure that no one else is saving seed of another variety of leek in your neighborhood. Probably a rare occurrence, but if there is, one of you will need to screen your plants to prevent them from crossing. Directions for all of this is in Suzanne Ashworth’s book, Seed to Seed (cf Appendix B and the Organic Seed Alliance pamphlet).
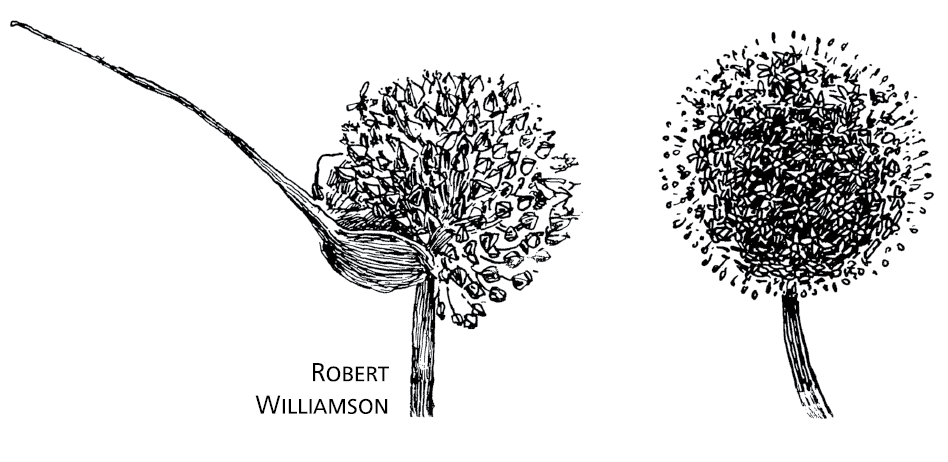
In late summer when you can see the dry black seeds within the husks of the flowers, you can shake them out into a basket or bag and bring them into the house for final drying. And there you are with your own leek seed!
Remember, vegetables are the staff of life, and their seed is an arrow from the heart of time.
Timing
The question of when to sow different plants so that they are in a proper condition for fall, winter or early spring harvest is a complex one. Each winter variety has its own requirements. At our latitude (~49 degrees) parsnips and leeks, typical slow-growing biennials, can be sown early in the spring to have time to reach maturity; Chinese cabbage, a typical winter annual, needs to be sown late enough in the summer so it won’t bolt, but early enough to put on good growth. Carrots and beets, faster-growing biennials, are sown in June and July. Spinach and Russian kale can be sown in the middle of August. Of course, this is a dry time for us, even for those in the Cascade foothills, where gardens may get an additional 15 or more inches of rain a year, so you will have to deal with keeping seeds moist till they are well up.
Reading Appendix D: A Year-Long Planting Guide will give you some idea of how to integrate winter crops into your summer crop activities, and an idea of the general timing needed for cold-hardy crops. You will notice that some of the most valuable winter vegetables are sown in July and August, which is already a busy time with weeding, harvest, vacations and other summer activities. But if you want these crops, you will need to plan ahead and allot time to prepare the beds, sow the seed and keep the plants watered and weeded. To simplify your first season, choose only a few of the more basic types to start with. If you have a local nursery that sells starts of winter vegetables, this will help you get started. After you get the hang of it, you can expand. Remember that you can cut out some of the preserving of summer crops; winter cabbages and leeks mean fewer frozen beans, canned tomatoes or servings of corn are needed for winter meals.
Another aspect to be considered in the timing of winter crops is your climate zone. This is determined by your latitude, topography, proximity to large bodies of water and general weather patterns. The best and most complete discussion of zones for the western US is in the Sunset New Western Garden Book. These Sunset zones are not to be confused with the country-wide USDA hardiness zones. They only cover the area from California up to the northern border of Washington. They are, however, still too general. If you garden in southern British Columbia, you will want to pay close attention to the information available from West Coast Seeds, authors of this Planting Chart. They operate out of the last substantial agricultural valley south of Alaska. This general area includes the city of Vancouver and Vancouver Island and is mostly Sunset zones four and five. A great deal of winter cropping is possible here and is practiced both commercially and by home gardeners. You should also read Linda Gilkeson’s book, Backyard Bounty, which will give you a good idea of coastal gardening techniques a bit further up the coast from Vancouver.
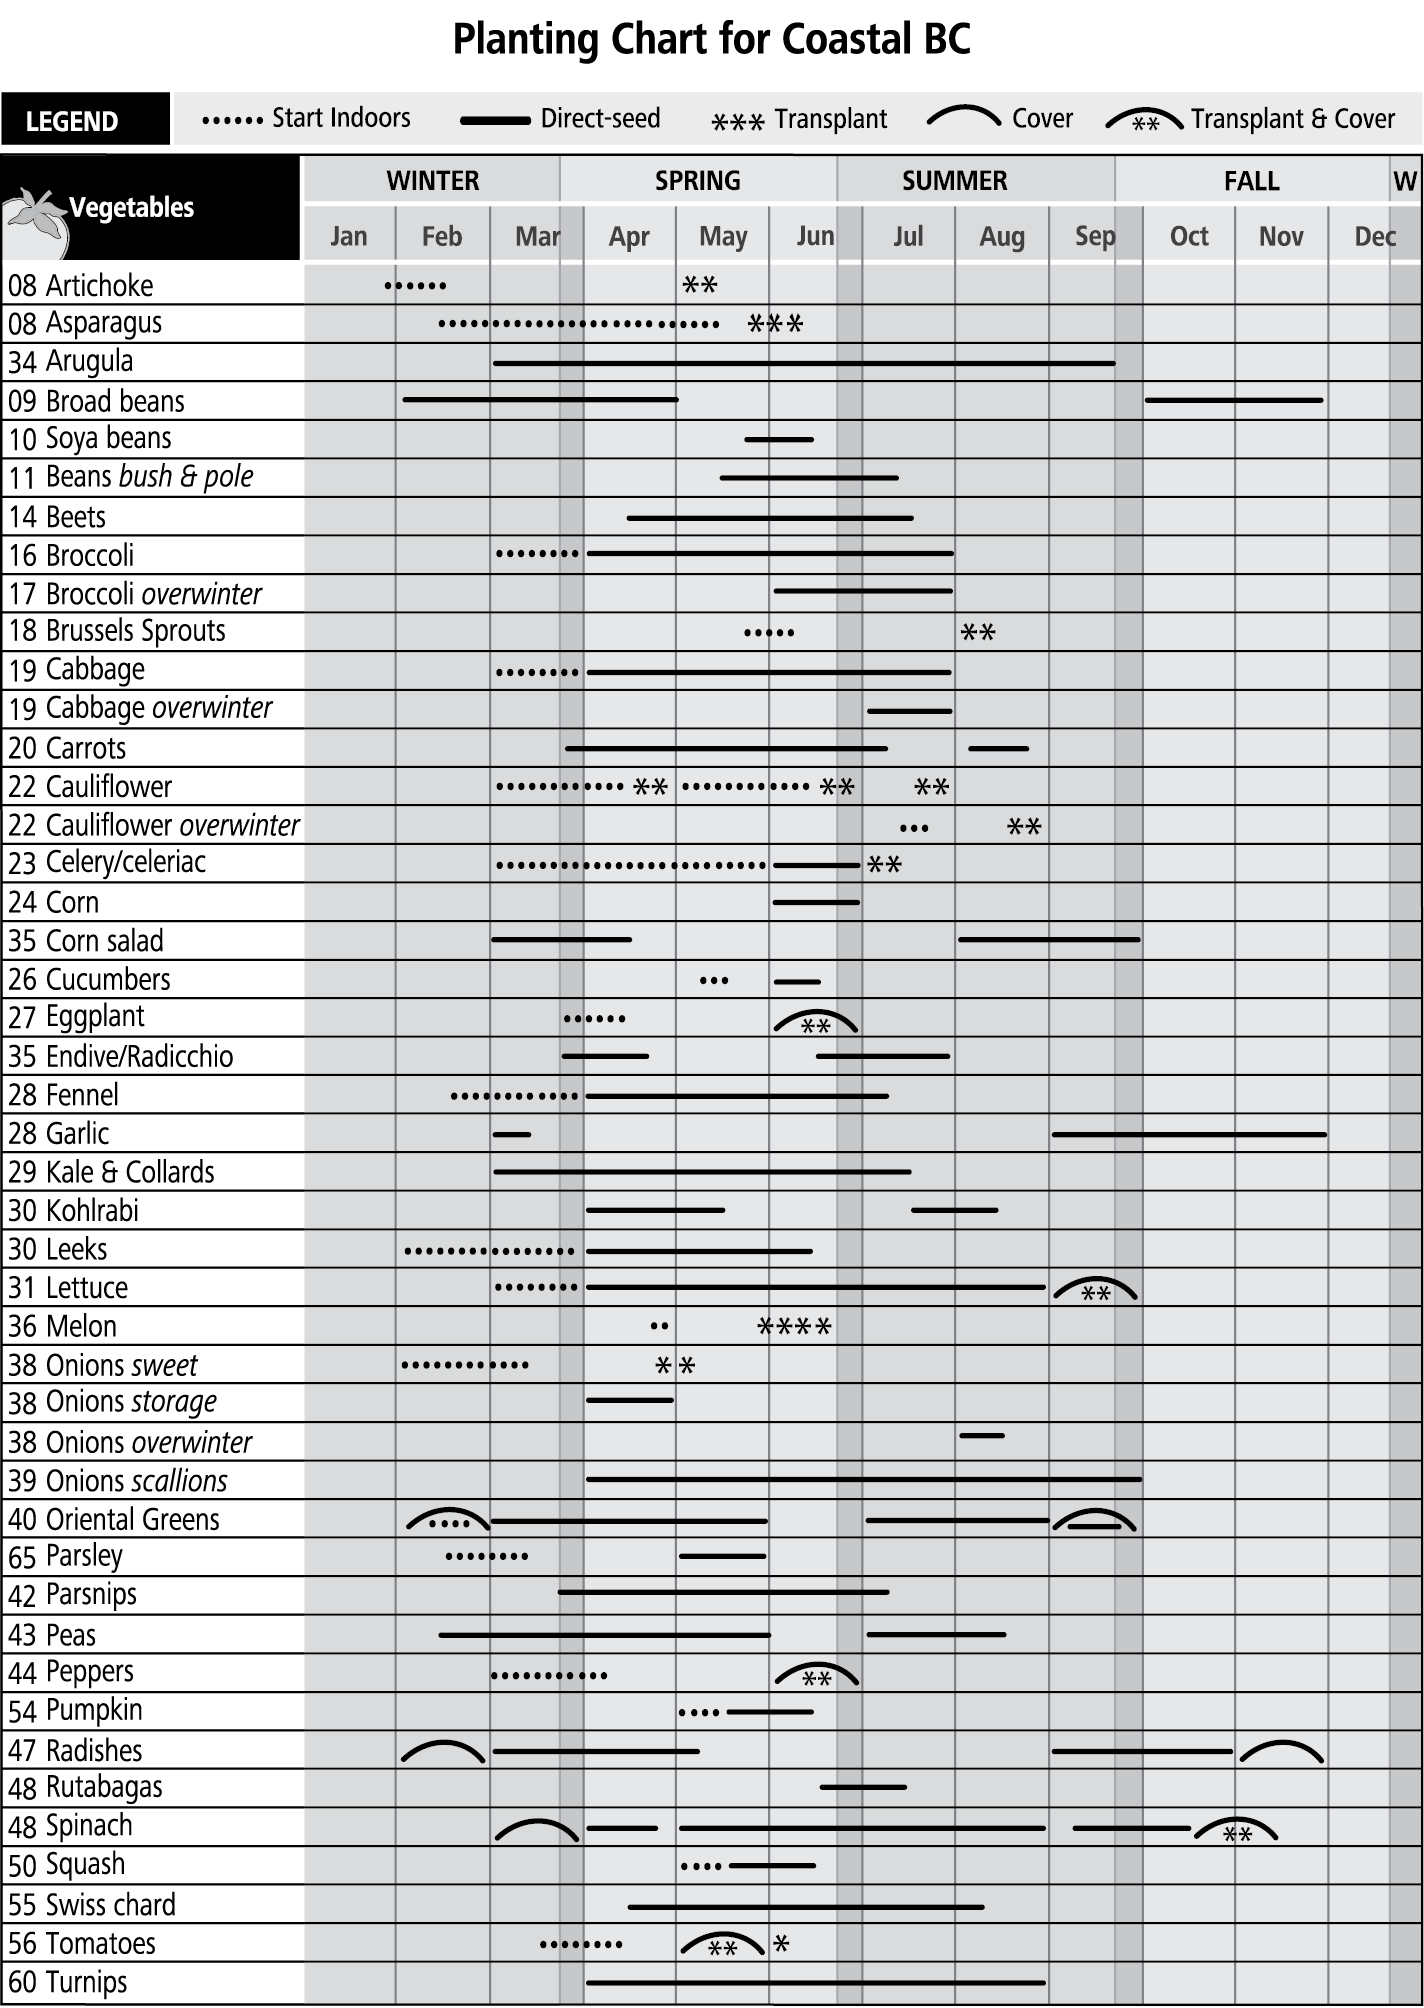
Planting Chart for Coastal BC, courtesy of West Coast Seeds. Reprinted with permission.
Knowing your climate zone will give you a general idea of what you can grow and when you can sow it. But within each zone, though the temperature may be similar at any given point of the year, there will often be differences in rainfall, cloud cover and wind. For example, zone five on the coast of Washington is a lot wetter and windier than zone five along Puget Sound or in the San Juan Islands. Coastal growers might be troubled more by rotting of early seeds and, later, of mature plants. Their cold frames should be designed to protect against frequent rainfall and high wind. In these coastal gardens, although the winter frosts are less severe, the average summer temperature is cooler and plants need a longer time to reach maturity.
Inland in zone four, the frosts are harder, last later into the spring and begin earlier in the fall. But, at least at lower elevations, the days are warmer in the summer, so plants can come to maturity as soon as plants closer to water in the same zone, or even sooner. At higher elevations the seasons are shorter, and the frosts and snow cover are greater, making a climate suited to only the quickest and hardiest of winter and summer crops. Oregon has a similar east/west pattern. The slightly warmer Willamette Valley allows for crops to be sown a week or two earlier in the spring than in northern Washington and a week or two later in the summer and fall, but coast and foothill gardens will have their own timings. South, the Rogue Valley district is a hodgepodge of microclimates created by diverse weather patterns and topography. If all this seems confusing to you, don’t despair! You can probably figure out what to do from your own experiments and with the aid of neighboring gardeners. In Humboldt County, about the bottom of our region, gardener Eddie Tanner has written The Humboldt Kitchen Gardener, to help you out if you live in that area.
In fact, wherever you live, there are local resources. Extension agents or Master Gardeners may be helpful. Local chapters of Tilth (see Appendix B) and other gardening groups may have experimented with extending the season of crop production. Gardening books written by local authors are always useful. Last but not least, seed companies often explain in their catalogs when they sow certain winter crops. The way to adjust those timings to your site is to make a few succession plantings and keep good notes. If you do this, in three or four years you will have a good sense of your winter crop timing.
When you crop year round, you put seeds or starts in the ground eight months of the year. Keeping seeds and sowing dates straight can be wearisome, and it helps to be organized. If your seed packets are in an alphabetical file, you won’t have to spend hours finding the winter lettuce or the kale seed. A list of sowing dates on your refrigerator will remind you when to plant what. I have taken to keeping a small cardboard box in an obvious place filled with the seeds for that month. (The boxes from the seed companies are often the right size and shape.) Here I also store tags and a marking crayon. If you take notes you can keep them in the box, too. Make life easy for yourself. Doing it this way may seem a bit mechanical, but I find that having this basic information on a chart rests my brain. It allows me more time to think about the other variables of gardening, like what the weather’s doing, or even what’s going on in the rest of my life!
Watching the weather provides another guide for when to sow and transplant your vegetables. Keep track of the southern oscillation patterns. El Niño and La Niña have a strong effect on our northern weather, and satellites and radar have really improved weather reporting. Scan the horizon frequently. Keep records (mental or on your calendar) of when the weather did what. Observe the length of wet and dry spells. Does the phase of the moon have an effect in your area? (In northwest Washington, it often clears up or stops raining a few days around the full moon.) Does it seem as though it’s going to be an early, dry spring? A late, wet one? Place your bets and gamble in the garden.
Waiting
Winter is shorter when you know a garden
and can still pull beets in early December.
Even after everything’s turned under
long nights are hours of rest, not death,
earned sleep after the land’s labor
when kitchen tables bear seed packets,
almanacs, sketches,
when conversation
conjures up a tangled trellis of peas
before the first one plumps in a furrow.
That day apple twigs are already knobbier,
crocus tips slice old mulch,
February
is already spring.
Robins watch the hoe.
— Jody Aliesan