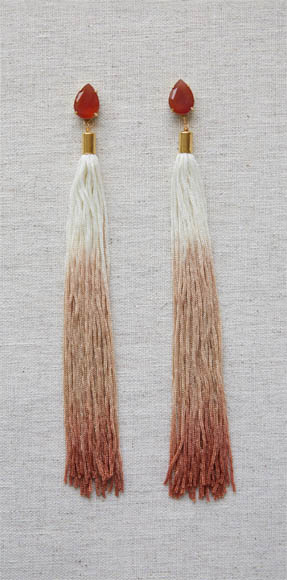
LONG AND LINEAR BUT LIGHT AS A FEATHER, these earrings show movement in a slinky date-night kind of way. With just the right amount of flounce, they look especially elegant against swept-up hair. In such a long tassel, embroidery thread and cord tend to kink, so make your tassels using premade fringe found at most sewing stores. If shoulder dusters are too dramatic for your taste, trim the tassels to a more demure length. When choosing a filigree component, look for one that is slightly smaller than the carnelian teardrop component, with a hole in the filigree that is large enough to attach a jump ring.
2 gold headpins
2 gold end caps, 5 mm dia. × 11 mm long
12 in/30.5 cm of 6-in/15-cm chainette fringe
2 imitation carnelian teardrops, 13 mm wide × 13 mm long
2 small gold filigree components, roughly the same size and shape as the imitation carnelian teardrops
2 gold posts with butterfly backs
2 small gold jump rings
E-6000 glue
Ruler
Scissors
Clippers
Round-nose pliers
Chain-nose pliers
Make the tassels
1 Slide a headpin into an end cap, and add a small dot of glue to the interior of the end cap.
2 Cut 1 in/2.5 cm of chainette fringe and tightly roll it up. Twist the roll into the end cap until it’s snugly secure in the cap.
3 Use the headpin to create a wire-wrapped loop on top of the end cap.
4 Repeat with the second tassel.
Make the top
5 Place a teardrop facedown on the work surface and add an even layer of glue to the back. Add a filigree component so that one hole in the filigree is exposed at the wide end of the teardrop. This will allow you to connect the teardrop to the tassel.
6 Place the pad of the post on the filigree component, toward the top of the teardrop, making sure it’s touching some of the glue that leaked through the filigree component.
7 Repeat steps 5–6 for the second teardrop. Let the posts dry overnight.
Connect the parts
8 Open a small jump ring and connect the filigree peeking out below the teardrop post to the wire-wrapped loop at the top of the end cap above the fringe. Close the jump ring to secure it.
9 Repeat step 8 for the second earring.