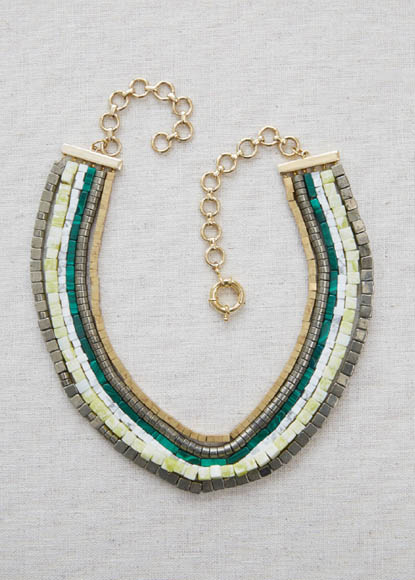
INSPIRED BY ANCIENT BYZANTINE MOSAICS, this structured collar-style necklace creates a bold line of color, which looks lovely peeking out from under a leather jacket. Using cube beads in a mix of sizes and tones shows their subtle sheen in an understated way. Selecting the appropriate end bar component is key to making this style clean and current. Choose an end bar free from ornamentation so it comfortably complements the beads you’re using.
1 strand of brass 4-mm cubes, at least 13 in/33 cm long
1 strand of 3-mm × 6-mm pyrite discs, at least 14 in/35.5 cm long
1 strand of 13-mm × 4-mm malachite rectangles, at least 15 in/38 cm long
1 strand of 4-mm howlite cubes, at least 16 in/40.5 cm long
1 strand of 6-mm dyed howlite cubes, at least 17 in/43 cm long
1 strand of 5-mm pyrite cubes, at least 18 in/46 cm long
6 yd/6 m of 0.024-in-/0.6-mm-thick beading wire
2 gold end bar components with 6 holes on one side and a loop on the other
12 gold crimp beads, 2 mm dia.
3 medium gold jump rings
8 in/20 cm gold link chain cut in half, 12 mm
1 medium gold spring ring clasp
Ruler
Clippers
Tape
Chain-nose pliers
Create the strands
1 One at a time, remove the beads from 1 of the strands and slide them onto the beading wire.
2 Measure 6 in/15 cm from the last bead and cut the wire. Tape the wire ends together to secure, and set aside.
3 Repeat steps 1–2 for the remaining 5 bead strands.
Connect bead strands to the first end bar
4 Begin connecting the wires of beads to the end bars, starting with the innermost (closest to the top) strand of beads. We used the brass beads on the innermost strand. Remove the tape from one end of the beading wire at a time and thread it through the end bar. Attach a crimp bead to secure the wire strand, and use the chain-nose pliers to crimp the crimp bead. Repeat for the other end of the beading wire.
5 Working outward from the innermost bead strand to the outer strands, continue attaching each row to the end bar with crimp beads.
Connect bead strands to the second end bar
6 The outer strand of beads will end up about 4 in/10 cm longer than the inner row, so make sure that the inner row is the shortest before you begin connecting the strands to the second end bar.
7 Like in step 4, connect the innermost row of beads to the second end bar with a crimp bead. Lay the necklace flat on the work surface, in a curved shape, just like it would lie on your neck. Lay the next row next to the inner row, following the same curve.
8 Continue connecting the remaining bead strands to the second end bar until you have a flat, even collar shape.
9 Using a medium gold jump ring, attach one 4-inch section of link chain to the ring on the top of one end bar. Repeat, attaching the other section of link chain.
10 The necklace should sit squarely on your collarbones. If the necklace is too long, cut the chain to a size that fits you.
11 Add the spring ring clasp at one end of the chain using a medium jump ring.