Chapter 3
Creating Your First Documents
Get ready to . . .
Start WordPad and Type Some Text
Save a Document
Add, Delete, Select, and Move Text
Format Text with Bold, Italics, and More
Print a Document
Quit WordPad
Open a Document
Discover How a Dialog Box Works
You use programs — or software, if you prefer that term — to do anything on a computer, including creating documents such as letters, memos, and diaries. That rather dry word document includes drawings and other works you create and save on your computer.
You tell a program what you want to do. Often, you have more than one way to command the program to do something. You may see a menu below the title bar of the window. You may find a button in a toolbar below the menu. Or clicking the right mouse button displays a context menu that may contain just the option you are looking for (see Chapter 1 for a refresher on context menus).
Often, you can use keystrokes to perform the most common commands. You don’t need (or want, I’ll bet) three or four ways to do something, but you have to determine which way is best for you. If the mouse is a problem for you, you may like keystrokes. Buttons in toolbars are often the most obvious choices, but they can be tricky to locate, recognize, or click. In this chapter, I introduce one method for each function and suggest some alternatives to try.
A dialog box is a special window that requires input from you. You interact with a dialog box, choosing groups of related options, such as for printing a document. In this chapter, you use dialog boxes and discover more about common features of a dialog box.
For this chapter, you create a letter or similar text using WordPad, one of the programs included with Windows 7. You can create similar documents with Microsoft Word and other programs. Each program you work with has some unique aspects, but try to generalize your experience with WordPad to see how it applies to other programs.
Start WordPad and Type Some Text
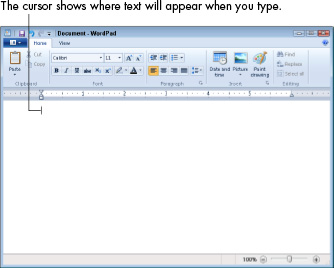
1. Start WordPad, and maximize the WordPad window to fill the screen. (See Chapter 2 for information about starting WordPad and working with individual program windows.) Figure 3-1 shows the WordPad window.
Figure 3-1
2. Start typing any text at all. The cursor — the blinking vertical line that shows where the next character you type will appear — moves as you type. Don’t worry too much about what you’re typing; no one is looking over your shoulder. (You can check to make sure, if you want.) Relax.
 Don’t press the Enter key at the end of every line. Just keep typing; your text automatically wraps (moves down) to the next line.
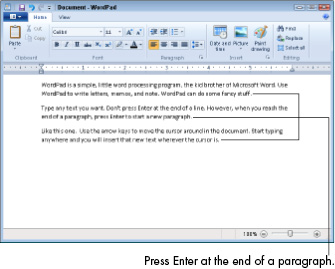
3. At the end of a paragraph, press the Enter key. WordPad puts a blank line after each paragraph. A few paragraphs are all you need right now. See Figure 3-2.
Figure 3-2
4. If you need to move the cursor before you type more text, click the place in the document where you want to move the cursor, or press the arrow keys that point up, left, down, and right. These keys are between the letters and numbers on a standard keyboard.
![]() You can’t click or move the cursor beyond the last line of the document. To make a document longer, click at the end of the last character and start typing new text, or press Enter to create a new paragraph before typing.
You can’t click or move the cursor beyond the last line of the document. To make a document longer, click at the end of the last character and start typing new text, or press Enter to create a new paragraph before typing.
5. Leave your document open for the next task.
Save a Document
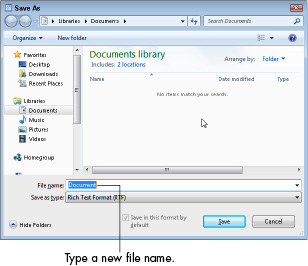
1. To save your document, press the Ctrl key and the letter S at the same time, and then release them. This action, or key combination, is called Ctrl+S. When you do, the Save As dialog box appears (see Figure 3-3). See “Discover How a Dialog Box Works,” later in this chapter. The Save As dialog box needs one piece of information from you: What do you want to call this document? Right now, the File Name text box displays the word Document, which is highlighted and ready to be replaced as soon as you start typing.
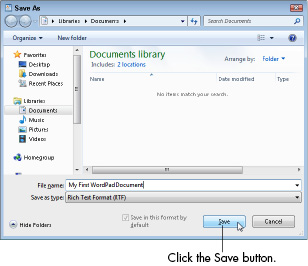
2. In the File Name text box, type a name that you’ll recognize as being the name of this particular document, because you’ll use it later to open the document again (see “Open a Document,” later in this chapter). You could type My First WordPad Document, as shown in Figure 3-4, or something else.
The name can be more than 200 characters long, which may be more characters than you have in the document! A few characters or words may suffice for a name. You can use uppercase and lowercase characters, spaces, dashes, and a few other symbols, including underscore (_), parentheses (()), and brackets ([]). You can’t use slashes (/ or \) or a few other symbols that Windows 7 reserves for other functions, including the asterisk (*) and question mark (?).
Figure 3-3
3. Click the Save button in the dialog box to save your document. When you do, the Save As dialog box closes, and you return to your document. Notice that your document name appears in the title bar to the left of the program name (WordPad).
Saving a document stores it on your computer’s disk as a file that you can open later. (See Chapter 4 for information on files and disks.) The saved document remains open so you can continue to work on it.
Many programs, including WordPad, also have a toolbar button for saving a document. In the WordPad title bar, you see a small icon with a white square on a larger purple square (refer to Figure 3-1). This icon, which represents a disk, is the Save button. You can click this button instead of pressing Ctrl+S, if you prefer; it executes the same Save command and opens the same Save As dialog box. Another way to save your document and open the Save As dialog box is to choose File⇒Save As.
Figure 3-4
4. Type some more text in your document.
5. Save your document again, just as you did in the preceding steps. This time, you don’t see the Save As dialog box. Why? WordPad knows the name of this file from the first time you saved it, so you don’t have to name it again.
Don’t wait until you’re done with a document to save it. Every time you make significant changes in a document, save it. Every time you’re about to do something in a document that you’ve never tried before, save it. If you’re not sure whether you’ve already saved a document, save it. Save frequently to reduce the odds of losing everything if the power goes off or you accidentally delete all your text. You can’t save too many times, so save early and often. Each time you do, the older version of the file without your latest changes is replaced by the newest version of your file.
See Chapter 4 for information on where your saved document is and how to find, move, and rename that document.
Add, Delete, Select, and Move Text
1. Add text to the document you created in earlier tasks or any document with text already in it. Click the place in the document where you want to begin typing, or press the arrow keys to move the cursor to that point (refer to “Start WordPad and Type Some Text,” earlier in this chapter).
2. Click between two words and type something. The existing text moves to the right and down automatically to make room for the new text.
3. Press the Backspace key. Each time you do so, a character to the left of the cursor is erased. Any text to the right of the cursor moves left.
4. To undo what you just did, press Ctrl+Z (press the Ctrl key and the letter Z at the same time, and then let go of both keys at the same time). You can repeat Ctrl+Z to undo previous steps. To redo a step — or undo an undo — press Ctrl+Y. Feel free to undo any steps you wish to repeat.
5. With the cursor under some text, press the Delete key. Each time you do so, the character directly above the cursor is erased. Any text to the right of the cursor moves left.
![]() Delete and Backspace both erase text, but Delete erases the text to the right of the cursor and Backspace erases the text to the left of the cursor.
Delete and Backspace both erase text, but Delete erases the text to the right of the cursor and Backspace erases the text to the left of the cursor.
6. Double-click a word to select the entire word and then press Backspace or Delete to erase it.
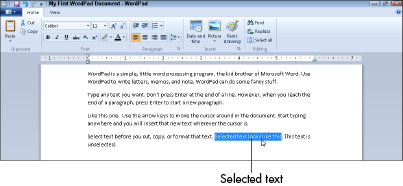
When you select text, it’s highlighted on your screen (see Figure 3-5). You select text when you want to do something to it, such as delete it or format it (see “Format Text with Bold, Italics, and More,” later in this chapter).
Figure 3-5
7. To select more than a single word, click at the beginning of the text that you intend to select; hold down the Shift key; and press the right-arrow key to highlight the text you want to select. Don’t let go of the Shift key until you’ve selected all the text you want. As you hold down Shift, you can also press the down-arrow key to select an entire line of text.
![]() The mouse method for selecting text is clicking and dragging over the text to highlight it (see Chapter 2). Another way to select text with the mouse is to click at the beginning of the text you want to select, hold down the Shift key, and click at the end of the text you want to select. The entire section is highlighted.
The mouse method for selecting text is clicking and dragging over the text to highlight it (see Chapter 2). Another way to select text with the mouse is to click at the beginning of the text you want to select, hold down the Shift key, and click at the end of the text you want to select. The entire section is highlighted.
8. Select any text and then press Ctrl+X to cut it. That text disappears from the screen but is not erased from the document, as it is when you press the Backspace or Delete key (refer to Step 3 and Step 5). Text that you cut is moved to an invisible feature of Windows 7 called the Clipboard, which temporarily holds text and graphics that you cut or copy.
Anything that you cut stays on the Clipboard until you cut or copy something else, which replaces it, or until you turn off your computer.
9. Move the cursor somewhere else in your document, and press Ctrl+V to paste. Windows 7 takes the text you just cut from the Clipboard and puts it in the document at the location of your cursor.
10. To copy text instead of cutting it, select that text and press Ctrl+C to copy; move the cursor to a new location; and press Ctrl+V to paste. Like cut text, copied text goes to the Clipboard and stays there until you copy something else to replace it or turn off your computer.
Most programs use the same key combinations for the Copy (Ctrl+C), Cut (Ctrl+X), and Paste (Ctrl+V) commands. Many programs also have an Edit menu that contains these commands. (WordPad doesn’t.) If you right-click selected text, these same commands appear in a context menu. Also, many programs have Cut, Copy, and Paste buttons in the toolbar. Why do programs give you so many options? To let you find out which one works best for you. Try each method to see what you find.
Format Text with Bold, Italics, and More
1. In any document, select some text (refer to “Add, Delete, Select, and Move Text,” earlier in this chapter), and press Ctrl+B to make that text bold (dark and thick). You see the text become thicker onscreen.
2. With the text still selected, press Ctrl+B again to remove the bold formatting.
3. Select some text, and press Ctrl+I to make the text italic (slightly slanted to the right).
4. With the text still selected, press Ctrl+I a second time to remove the italic formatting.
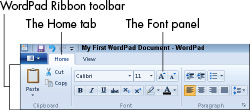
5. Use WordPad’s Ribbon — the toolbar at the top of the window — to add more text effects (see Figure 3-6). In each case, first select the text you want to format; then click one of the following formatting buttons in the Font panel of the Ribbon:
Figure 3-6
• B is bold.
• I is italic.
• U is underline.
• abc is strikethrough.
• X2 is subscript (like the number in H2O).
• X2 is superscript (like the number in E = mc2).
• The highlighter icon to the right of the Superscript button (X2) highlights the selected text. Click the triangle (down arrow) to the right of the button to select a highlighter color. To use that same color the next time, just click the Highlight button, not the arrow.
• The A with a heavy bar under it applies a color to the text itself. Click the triangle (down arrow) to the right of the button to select a text color. To use that same color the next time, just click the Font Color button, not the arrow.
6. Use the buttons in the top row of the Font panel in WordPad’s Ribbon (see Figure 3-7) to make these changes to selected text:
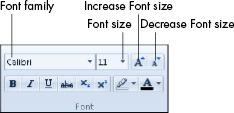
Figure 3-7
• The Font drop-down list shows options that let you change the font, or typeface, in which the text is displayed. Some fonts are easier to read than others; some fonts are prettier than others.
• The Size drop-down list allows you to change the selected text to a specific size measured in points — a traditional unit of measure for fonts. Text that is 72 points, for example, is about an inch tall. Most newspapers and books use text between 10 and 12 points. (This text is 12.5 points.)
• The A with a triangle pointing up allows you to increase the font size without using the Size list.
• The A with a triangle pointing down allows you to decrease the font size without using the Size list.
Programs reward patience and curiosity. Don’t be afraid to experiment with formatting in a document that isn’t precious to you, so that you can see what works and how. Remember: The Undo command is Ctrl+Z.
Print a Document
1. You can print your document at any time. With the printer connected and the power on, click the WordPad button — the button with the little box and down-pointing triangle on it — to the left of the Home tab in the Ribbon. (You can see this tab in Figure 3-1, earlier in this chapter.) Figure 3-8 shows the WordPad menu that drops down from this button.
If you haven’t attached your printer to the computer yet, see Chapter 7.
Figure 3-8
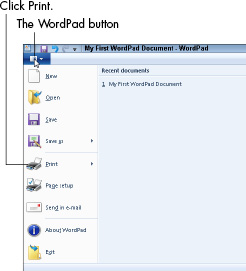
In most programs, the File menu appears in place of the WordPad button. The File menu displays options similar to those on the WordPad button.
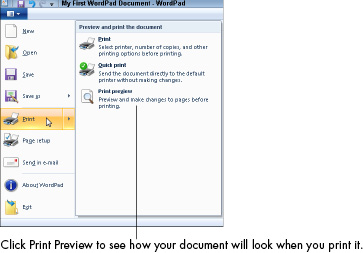
2. Hover over the Print button, halfway down the menu. (Flip to Chapter 1 for a refresher on hovering.) A second menu pops out to the right, listing three printing commands (see Figure 3-9).
3. Click the Print Preview item to see what your document will look like on paper (see Figure 3-10).
When you’re creating a document, you can’t always tell how much of the page the text uses or how many sheets of paper you’ll need to print the whole document. Print Preview shows you exactly what will come out of your printer. It may also help you avoid wasting paper if you see a change that you need to make before printing.
Figure 3-9
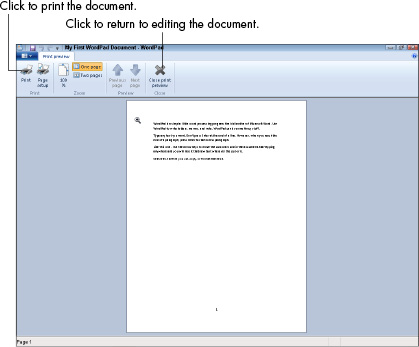
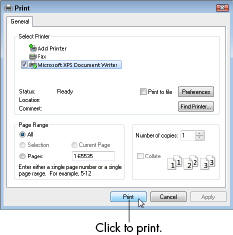
4. If you’re ready to print from Print Preview, click the Print button in the Ribbon (refer to Figure 3-10). If you’re not using Print Preview, repeat Steps 1 and 2, then click Print in the pop-out menu. The Print dialog box appears, as shown in Figure 3-11.
Ninety-nine percent of the time, you don’t need to set any of the options in the Print dialog box.
Figure 3-10
5. Click the Print button to print (or, if you don’t want to print, click the Cancel button).
To skip the Print dialog box, choose File⇒Print⇒Quick Print.
Figure 3-11
Quit WordPad
1. When you’re done with WordPad, click the Close box — the red box with the X on it in the top-right corner of the program window — to quit the program. Quit is also called exit or close. (See Chapter 2 for details on closing.) If you haven’t saved your document since making changes or printing it, WordPad displays the dialog box shown in Figure 3-12.
2. Click one of the three buttons in the dialog box:
• Click the Save button to save your document before quitting WordPad (your most likely choice).
Figure 3-12
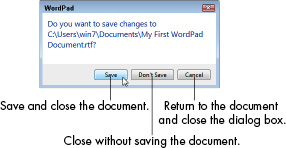
• Click the Don’t Save button to throw away your most recent changes. Whatever you did up to the last time you saved the document is still saved, but any changes you made after the save are discarded.
• Click Cancel to dismiss the dialog box and return to WordPad and your document. (Clicking the Close button in the dialog box does the same thing.)
Open a Document
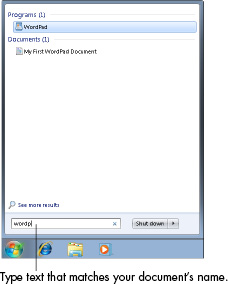
1. To open an existing document to read, change, or print it, click the Start button (see Chapter 1), and start to type the name of the document you intend to open. If you named the document My First WordPad Document, for example (refer to “Save a Document,” earlier in this chapter), you could start to type any of the four words in the document name. The Start menu automatically lists matching documents and programs, as you see in Figure 3-13.
Figure 3-13
2. Click the document name or, if the name is already highlighted, press the Enter key. The document opens in WordPad (or whichever program you used to create the document).
3. Searching for your document from the Start menu, as you just did, is great, but now try this method: Click Start. If you see WordPad in the Start menu, hover over WordPad. A list of recent documents pops out to the right. This list is called a jump list (see Figure 3-14). Click the document you intend to open. See Chapter 15 for more about using jump lists.
Figure 3-14

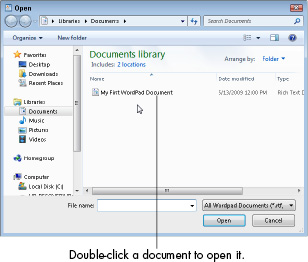
4. Yet another way to open a document: Start WordPad, and click the WordPad button next to the Home tab in the Ribbon (refer to Figure 3-9). Your document may be listed in the menu that drops down. Click the document’s name to open it. If it isn’t, choose File⇒Open. Double-click your document in the dialog box (see Figure 3-15).
See Chapter 4 for information on searching for misplaced documents and opening documents from Windows Explorer.
Figure 3-15
Discover How a Dialog Box Works
Dialog boxes provide multiple options related to a specific action. In the task “Save a Document,” the Save As dialog box provides a text box for you to enter the name of the document. You didn’t need the options that determine where the document is saved and what kind of file it is. Often, you can accept the default options already set in a dialog box. The following features are common to many dialog boxes, though no dialog box contains every one of these. (For that reason, there isn’t an ideal figure to display them all.)
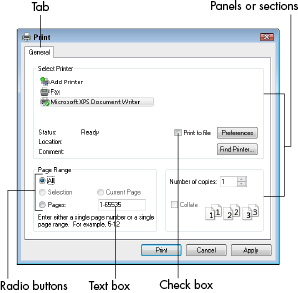
The OK button: When you are done with the dialog box — even if you haven’t actually changed anything — click OK to accept the options in the dialog box and to continue. In some dialog boxes, the label on this button is for the action to be performed, instead of OK. For example, the button displays Print in the Print dialog box (Figure 3-16). To see this dialog box on your screen, click the WordPad button, and then click Print.
Figure 3-16
The Cancel button: This button stops any further action and undoes selections you made prior to canceling. Use it when you open a dialog box you don’t want to continue with.
The Apply button: This button preserves changes you make in the dialog box, unlike Cancel. Also unlike OK, this leaves the dialog box open for further options. Apply is useful in a dialog box with many options, because you can apply the choices you’ve made before you go on to explore others.
Tabs: Some dialog boxes have so many options, those options are grouped into tabs arranged across the top of the dialog box. The Print dialog box (see Figure 3-16) only has one tab, labeled General.
Panels or sections: Within a dialog box, related options may be grouped into panels or sections. In Figure 3-16, three panels appear. Select Printer and Page Range are labeled. The third panel, containing Number of Copies, is not labeled.
Text boxes: You can click in a text box and type. Figure 3-17 shows four text boxes for the margins of the printed page — the area of blank space around the outside of the text. Click in the text box next to Left, backspace to erase the current number, and type a different number. You can change any of the four margins in the same way. To see this dialog box on your screen, cancel the Print dialog box, if it is open. Click the WordPad button, and then click Page Setup.
Menus or lists: You pick some options from a list or menu, which often drops down or pops up when you click on the current selection. In Figure 3-17, Size and Source both use drop-down lists.
Radio buttons: Radio buttons are small circles. If there is a dot in the center of the circle, the option is selected. Deselected radio buttons are empty or hollow. With radio buttons, you can select only one of the available choices. In Figure 3-17, Portrait is selected, which is standard page orientation, taller than it is wide. If you click on Landscape anywhere from the button through the end of the word, you select Landscape (the page is sideways, wider than it is tall) and Portrait automatically becomes deselected. You can’t choose both options.
Figure 3-17
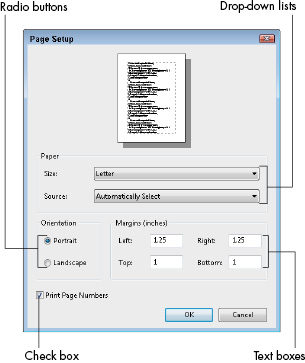
➟ Check boxes: Check boxes are small squares. If a check box is selected, it contains a check mark, an X, or it is filled in solid. In Figure 3-17, Print Page Numbers is checked and every page will have a number on it. If you click anywhere from the check box through the end of the word Numbers, you uncheck this option and page numbers will not print. Unlike radio buttons, multiple check boxes can all be checked or unchecked in any combination.
If you want to use the keyboard instead of the mouse in a dialog box, Ctrl+Tab moves from one dialog box tab to the next. The Tab key moves the selection from one panel to another. The down and up arrow keys move radio button selection. The spacebar selects and deselects check boxes. The Enter key chooses the default button — often OK — which appears highlighted differently from Cancel or Apply.