Chapter 6
Installing and Removing Programs
Get ready to . . .
Determine Which Programs Are on Your Computer
Install a New Program from a CD or DVD
Install a New Program That You Downloaded from the Internet
Remove Programs You Don’t Use
Your toaster oven isn’t getting any smarter. Your computer is different from other machines, in that it can be programmed to do something it’s never done before. You expand your computer’s capabilities by installing new programs. Programs, software, and applications are all terms for the tools you use to do things.
You don’t install new programs because you want your computer to live up to its potential, however. You install new programs so that you can do new things by using those programs — things you can’t do with the programs you already have. You can install a program to add new capabilities to your computer, such as creating greeting cards or drafting legal documents. Some programs are free; others cost money. Programs designed for professional work may cost hundreds of dollars. In this chapter, you install programs from DVD and from the Internet.
On the other hand, your computer may already have programs that you haven’t begun to explore. The company that sold your computer or the person who set it up for you may have installed extra software.
Your computer may have some programs that you’ll never use and wouldn’t miss. You don’t have to get rid of them, but doing so is easy enough and frees a little space on your computer. In this chapter, you have the option to uninstall a program you are absolutely sure you don’t need.
Determine Which Programs Are on Your Computer
1. To take stock and see what’s on your computer, click the Start button, and examine the programs listed on the left side of the Start menu, which may look something like Figure 6-1. The programs you see include any that you have run recently. Other programs may be recommended by Microsoft or your computer maker.
Figure 6-1

2. Click All Programs at the bottom of the menu. Windows 7 displays the All Programs menu — an alphabetical list of programs followed by a second list of yellow folder icons representing program groups (see Figure 6-2).
Figure 6-2

3. Click one of the folder icons, such as Accessories or Games, to see a submenu of all the programs in the group. Some program groups have other program groups inside them.
4. Click the folder icon again to hide the group submenu.
5. To start any program listed in any of these menus, click its name.
![]() Starting a program by clicking through menus seems slower to me than typing part of the program name in the Start search box, especially if you don’t know which program group a program is in or if it’s several folders deep. However, sometimes you need to see what programs are available by digging a little.
Starting a program by clicking through menus seems slower to me than typing part of the program name in the Start search box, especially if you don’t know which program group a program is in or if it’s several folders deep. However, sometimes you need to see what programs are available by digging a little.
Install a New Program from a CD or DVD
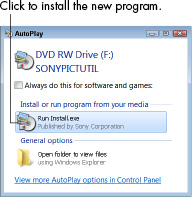
1. To install a program that comes on a CD or DVD, insert the program disc into your computer’s disc drive or tray, label side up (or, if your computer has a vertical disc slot instead, insert the disc with the label side facing left). The AutoPlay dialog box appears (see Figure 6-3). Click the option to run Install or Setup. User Account Control may ask if you really want to run this program. (Windows 7 tries to keep you from installing software unintentionally by asking for confirmation.)
Figure 6-3
![]() If nothing happens when you insert the disc, choose Start⇒Computer to open the Computer window; double-click the icon for your DVD or CD drive; and then double-click a program named Setup or Install.
If nothing happens when you insert the disc, choose Start⇒Computer to open the Computer window; double-click the icon for your DVD or CD drive; and then double-click a program named Setup or Install.
2. If the installer offers a language selection, choose yours.
3. Many installers require you to accept an end-user license agreement (EULA). You can read the EULA or not, but you can’t install without agreeing to its terms.
4. If the installer offers Express or Custom installation options, choose the Express option to let the installer set up the program without further input from you. The Custom option or Advanced Settings allows you to specify where to install the program and, perhaps, which parts of the program to install. Some installers provide other options, such as the one shown in Figure 6-4, to install documentation, other programs, or to register the program.
5. As the installer program continues to run and display dialog boxes, click the Next or Continue button in each dialog box to proceed to the next step.
6. Click the Finish or Close button in the last step of the installer program to complete the process. In a few cases, the setup program may ask you to restart Windows 7. In this case, you don’t have to restart immediately, but you won’t be able to use the new program until you do restart.
Figure 6-4

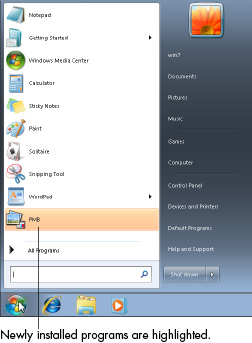
7. The new program may appear automatically at the bottom of the first screen of the Start menu, as shown in Figure 6-5. Look under All Programs, as well. Newly installed programs are highlighted in color. Some installers add a program icon to the desktop.
 Many programs try to connect to the Internet for updates during installation or when you run the installed program. The first time you run a program, you may be asked if you want to register the program or configure some aspect of the program. Go with default (assumed) responses, if you’re not sure.
Figure 6-5
Install a New Program That You Downloaded from the Internet
You may want to read Chapter 8, about connecting to the Internet, and Chapter 9, about using Internet Explorer, before you try this task. You need to download a program to perform these steps.
1. To install a program that you’ve downloaded from the Internet, choose Start⇒Computer to open the Computer window; then click Downloads on the left side of the window. The contents of the Downloads folder appear under your user name. See Figure 6-6 (your folder surely has different contents).
Figure 6-6

2. Double-click the downloaded program to start the installer. User Account Control may ask if you really want to run this program. (Windows 7 tries to keep you from installing software unintentionally by asking for confirmation.)
3. If the installer offers a language selection, choose yours.
4. Many installers require you to accept an end-user license agreement (EULA). You can read the EULA or not, but you can’t install without agreeing to its terms.
5. If the installer offers Express or Custom installation options, choose the Express option to let the installer set up the program without further input from you. The Custom or Advanced Settings option allows you to specify where to install the program and, perhaps, which parts of the program to install.
6. As the installer program continues to run and display dialog boxes, click the Next or Continue button in each dialog box to proceed to the next step.
7. Click the Finish or Close button in the last step of the installer program to complete the process. In a few cases, the setup program may ask you to restart Windows 7. In this case, you don’t have to restart immediately, but you won’t be able to use the new program until you do restart.
8. The new program may appear automatically at the bottom of the first screen of the Start menu (refer to Figure 6-5). Look under All Programs, as well. Newly installed programs are highlight in color. Some installers add a program icon to the desktop.
Many programs try to connect to the Internet for updates during installation or when you run the installed program. The first time you run a program, you may be asked if you want to register the program or configure some aspect of the program. Go with default (assumed) responses, if you’re not sure.
This tip is a warning, really: Although you can download many good programs from the Internet, you can also download dangerous ones. Never install a program that you get in an e-mail message, for example, no matter who sent it. See Chapter 18 for more information about protecting your computer.
Remove Programs You Don’t Use
1. If you don’t want a particular program on your computer, you can uninstall it. Begin by clicking the Start button, typing programs, and then clicking Programs and Features (not Default Programs). The Programs and Features window opens, listing all the programs that you can uninstall (see Figure 6-7).
Figure 6-7

Just because you can uninstall a program doesn’t mean you should. You can ignore programs you don’t use. Look at program names, publisher, and date installed to determine whether you actually use a program.
2. Double-click the program you want to remove. A confirmation dialog box appears (see Figure 6-8).
Figure 6-8
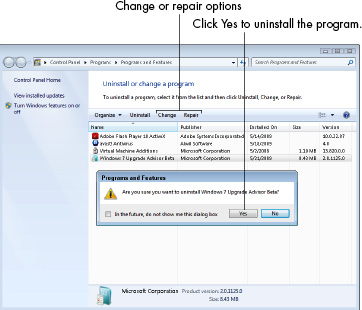
Some confirmation dialog boxes are larger than the one shown in Figure 6-8 and may have other options, such as Repair or Change. Choose one of those options if you decide that you want to keep the program but are having a problem with it. A series of dialog boxes will lead you through the repair or change process.
3. Click Yes to remove the program. Uninstallation may take anywhere from a few seconds to several minutes. When the process is complete, the program no longer appears in the All Programs menu (refer to “Determine Which Programs Are on Your Computer,” earlier in this chapter).
4. If Windows 7 tells you to restart the computer after it uninstalls a program, you can restart now or later, at your convenience.
Before you uninstall a program that you may want to reinstall later, make sure that you have a copy of it on a CD or DVD (or that you know where to download it from the Internet again). You have no undo option when you uninstall a program.