Chapter 19
Keeping Your Data Safe
Get ready to . . .
Back Up Your Documents and Photos
Restore Files from Backup
Create a System Repair Disc
Use the System Repair Disc
If your computer is stolen, lost, or destroyed, you can replace it — at a price. But, the documents and photos you create — your data — are irreplaceable. Consider how miserable you might be if you lost a favorite photo or precious document forever.
As you work with your computer, any number of things can go wrong. Everyone loses something on the computer eventually. This is no reason to fear, but it is good reason to create backups, which are duplicates of your data that you keep in separate storage. You can back up just your most precious files, all of your files, or even the entire computer if you have the space for a very large backup.
In this chapter, you find out how to use Windows 7’s tools to back up selected data or everything on your computer. I also show you how to restore files (put them back on the computer) and urge you to practice with at least one file so that you’re ready for the real drill. You can also follow the steps in this chapter to create an emergency disc for starting the computer and repairing problems with Windows 7.
![]() If you just have a few precious photos or documents, you can copy those files to a flash drive. See Chapter 4 for those simple steps.
If you just have a few precious photos or documents, you can copy those files to a flash drive. See Chapter 4 for those simple steps.
Back Up Your Documents and Photos
1. Open the Start menu and type backup in the Search Programs and Files text box. Choose Backup and Restore from the list of matching results. The Backup and Restore window opens, as shown in Figure 19-1.
Figure 19-1

2. Click the Set Up Backup link. A dialog box shows up and displays the message Starting Windows Backup. Wait for this process to finish. The next dialog box allows you to select where you want to save your backup. If the Save Backup On list box is empty, you don’t have a device to back up to. Suitable backup media, as shown in Figure 19-2, includes:
• Recordable DVD or CD: This is the option of last resort, assuming you have no other options. Discs are less convenient to handle, carry, and store than other options.
• Memory card: This option uses the same kind of memory card as digital cameras. If you have a spare card and a card slot or reader, this may suffice.
• Flash drive: This option may be better than the previous options for ease of use and capacity.
• External hard drive: This is the best option. An external hard drive allows you to back up much more than any other option, creating a more complete backup.
If necessary, attach or insert the backup media you intend to use and click the Refresh button. If [Recommended] appears next to one of the choices, that’s the one you should use. If none is recommended, choose the media with the most free space. Click Next.
 Removable media (such as discs, memory cards, and flash drives) are marked as unsuitable for a system image. A system image is the most complete backup, which can be used to restore your entire disk, including all changes to Windows 7 and all installed programs, as well as your data. You may be able to back up your own files — all your documents, photos, music, and so on — to media that doesn’t have sufficient room for an entire system image.
Figure 19-2

You can move backward through the Set Up Backup dialog boxes by clicking the Back button (an arrow on a blue circle) in the upper-left corner. Use it if you need to review or change an earlier step.
3. The What Do You Want to Back Up? dialog box appears. Only one of the two following options may be available, depending on the backup media you chose earlier:
• Let Windows Choose: Windows 7 backs up all data files that are in standard libraries and folders for all users. If the backup media has sufficient space, a system image is created. Choose this option if you have an external hard drive attached.
• Let Me Choose: You select the folders to back up on the next screen. Only data files are backed up; files belonging to programs or Windows 7 are not backed up. This option requires less free space on the backup media and less time to perform the backup. However, you risk missing something in the backup.
Click an option button and then click Next.
4. If you selected Let Windows Choose in the previous step, skip to the next step.
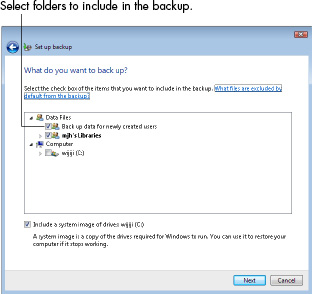
If you selected Let Me Choose in the previous step, the What Do You Want to Back Up? dialog box enables you to select folders to back up, as shown in Figure 19-3. The data files for your username should remain selected. You need to select other folders only if you store files outside the standard Windows 7 user folders. See Chapter 4 for information on using these standard folders. Click Next.
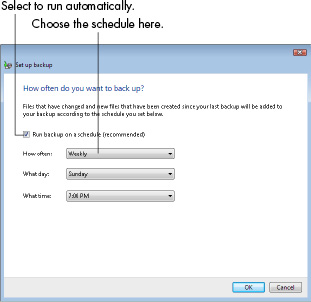
5. In the next dialog box, review your backup settings. Click the Change Schedule link, and the How Often Do You Want to Back Up? dialog box appears, as shown in Figure 19-4. If you don’t want the backup to run automatically, deselect the Run Backup On a Schedule check box. If you do want an automatic backup, how often do you want to do it? Schedule a backup when the computer is likely to be on but not in heavy use; if you use removable media, such as a flash drive, you need to leave it in place when the backup is scheduled or be present to insert the media when it’s needed.
• How Often: A daily backup provides the greatest insurance against data loss. A weekly backup may suffice, although you put six days of document changes at risk if something goes wrong before the next backup. A monthly backup may not be frequent enough to keep your data safe.
Figure 19-3
• What Day: If you select Weekly in the previous option, choose a day of the week. If you select Monthly, choose a day of the month.
• What Time: What time of day is the computer on but not in heavy use? For me, that’s lunch- or dinnertime.
Click OK to close the dialog box.
6. In the Review Your Backup Setting dialog box (see Figure 19-5), click the Save Settings and Run Backup button to begin the backup.
Figure 19-4
7. The original Backup and Restore window appears with an indication that the backup is in progress. Click the View Details button if you want the nitty-gritty; click Close on the View Details screen to return to this dialog box.
Although you can use the computer during backup, the process may be faster if you don’t run other programs at the same time. Also, don’t shut down or turn off the computer until the backup is complete. Leave your computer on overnight, if necessary.
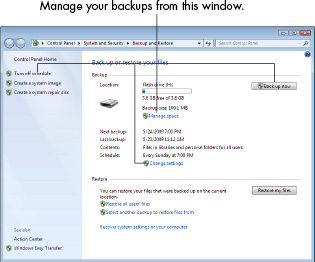
8. When the backup is complete, the Backup and Restore window displays the time of the next backup and the last (previous) backup, which just completed (see Figure 19-6). At any time after setting up backup, you can do the following from this window:
Figure 19-5

• Change Settings: Clicking this link takes you through all of the preceding steps in this list so you can adjust when, where, and what you’re backing up.
• Manage Space: Click this link only if your backup media is 80 percent full. You can delete older backups to make room for newer backups.
• Back Up Now: Click this button to run an unscheduled backup.
If you don’t want a scheduled backup to run, click the Turn Off Schedule link on the left side of the screen. You can still run a backup manually whenever you like or click the Turn On Schedule link.
Figure 19-6
Restore Files from Backup
1. If you’re lucky, you’ll never need your backup. However, if you lose a file (or more), you can restore the missing files from your backup. Consider restoring a file for practice, just so you have some experience before you really need to restore a file (under the pressure of loss). Open the Start menu and type backup in the Search text box. Choose Backup and Restore from the resulting list. The Backup and Restore window opens (refer to Figure 19-6). Click the Restore My Files button.
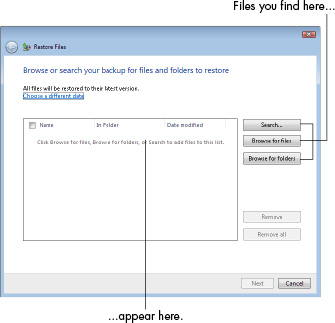
2. In the Restore Files dialog box (see Figure 19-7), use any of three ways to locate files or folders you intend to restore:
• Search: Click this button if you know the filename but not the location of the original. In the search dialog box, type part of the name of the file you intend to restore. Click the found file to select it to restore. Click Select All if you intend to restore all the found files. Click OK.
• Browse for Files: Click this button to open a dialog box of folders. Click the backup name and then open the folder that contained the original file. Click the found file to select it to restore. Click Add Files.
• Browse for Folders: Click this button to open a dialog box of folders. Click a folder to restore all the files in that folder. Click Add Folder.
The files you select with the preceding methods appear in the dialog box. Repeat these steps if you need to select additional files or folders to restore.
If you can’t find a backup of the file you want to restore and you made more than one backup, in the first Restore Files dialog box, click the Choose a Different Date link. Choose All from the Show Backups From drop-down list. Pick a backup that is likely to have the file you intend to restore. You may have to repeat this process for more than one backup.
3. After you’ve selected one or more files or folders in the preceding step, click Next in the original Restore Files dialog box (shown in Figure 19-7).
Figure 19-7
4. The next dialog box (see Figure 19-8) asks for the location to which you want these files restored:
• In the Original Location: Puts the file back where it was originally. This is the more likely choice.
• In the Following Location: Allows you to specify a different location from the original. Use this if you want the restored file in a different location from the original. If you choose this option, you have to specify the new location and indicate whether you want subfolders to be restored with the restored files.
Figure 19-8

5. If you restore a file to a location that already contains a file of the same name, such as restoring a backup when the original is still in the folder, you see the dialog box shown in Figure 19-9. Consider these choices:
• Copy and Replace: The file in the original location will be replaced by the file restored from backup. Choose this option if the current file is wrong and the backup is a better file.
• Don’t Copy: The backed-up version isn’t restored. Nothing changes.
• Copy, But Keep Both Files: The original file and the restored file will both be in the original location. The restored file will include (2) in the filename.
• Do This for All Conflicts: Select this check box if you’re restoring multiple files and intend one of the preceding choices to apply to every file with a duplicate filename.
Figure 19-9

6. The final dialog box appears. Your files have been restored. You can click the View Restored Files link, which opens the folder you restored these files to. Click Finish to close the dialog box.
Create a System Repair Disc
1. If your computer came with a Windows 7 DVD, you can use that DVD to start the computer and effect some repairs, including restoring a system image created in Backup and Restore. Restoring a system image resets everything to the conditions at the time the image was created, and of course, having a recently created system image is best. See the earlier task “Back Up Your Documents and Photos” for instructions on the type of backup media and choices to make. If you don’t have a Windows 7 DVD, you need to create a Repair Disc for this purpose. Open the Start menu and type backup. Choose Backup and Restore. The Backup and Restore window opens, as shown in Figure 19-10.
Figure 19-10

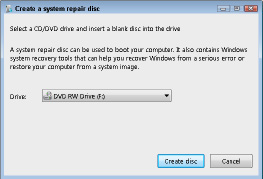
2. Click the Create a System Repair Disc link. The dialog box shown in Figure 19-11 appears.
3. Insert a blank DVD into your DVD drive. (Look for a button to open the DVD tray on the front of a desktop or around the edge of a laptop. Some computers have a DVD slot into which you insert the DVD.) Click the Create Disc button.
Figure 19-11
4. Windows 7 prepares the System Repair Disc. When the process is done, an informational dialog box pops up, indicating you should label the disc. Close the message dialog box. Click OK to close the Create dialog box. Eject the disc by pressing the button on the computer. Put the disc in a safe place, where you can find it in an emergency.
When the disc is done, Windows 7 may start the AutoPlay dialog box. Close AutoPlay, if it opens.
![]() Many computers come with a Restore Disc from the computer manufacturer. That disc restores your computer to the exact condition it was in when you received it (using a restore hard disk partition you may notice in Windows Explorer). A Restore Disc isn’t the same as a Windows 7 Repair Disc. You may want both.
Many computers come with a Restore Disc from the computer manufacturer. That disc restores your computer to the exact condition it was in when you received it (using a restore hard disk partition you may notice in Windows Explorer). A Restore Disc isn’t the same as a Windows 7 Repair Disc. You may want both.
Use the System Repair Disc
1. If Windows 7 won’t start or starts with significant problems, you may need to use the System Repair Disc to fix problems. (See the preceding section for instructions to create a System Repair Disc.) Insert the System Repair Disc in the DVD drive and restart the computer. If necessary, turn off the power, count to ten, and turn the power back on.
2. For just a few seconds, the screen displays Press any key to boot from CD or DVD. Press any key. If you aren’t quick enough, you’ll have to start the computer again.
3. The screen displays white text on a black background: Windows is loading files. The first System Recover Options dialog box appears. Change the keyboard input method if US isn’t correct. Click Next.
4. The next dialog box indicates System Recover is searching for Windows installations. Click Next.
5. The next screen offers these choices:
• Use Recovery Tools That Can Help Fix Problems Starting Windows. Choose this option.
• Restore Your Computer Using a System Image That You Created Earlier. Choose the other option unless you’re certain this is the one you want. (You have a second chance to take this option after choosing the other.)
6. Click Next.
7. Choose a Recovery Tool:
• Startup Repair: Automatically fix problems that are preventing Windows from starting. Choose this option if Windows 7 won’t start. This option isn’t likely to do any harm.
• System Restore: Restore Windows to an earlier time. Choose this option if Windows 7 starts but you think something significant about how it runs has changed. This might happen after you install a new program or update a program. You’ll pick from a list the most recent restore point based on date and time. Because this option rolls back Windows 7 settings, you may lose recent changes you made to Windows 7 or other programs, but not your data.
• System Image Recovery: Recover your computer using a system image you created earlier. Choose this option if the first two don’t fix a problem and you have a relatively recent system image. Attach the backup media you used to create the system image. (See the earlier task “Back Up Your Documents and Photos.”) Because this option rolls back the entire computer to the date and time the image was created, you’ll lose data created or changed since the image was created, unless you have that data on a separate device, such as a flash drive.
• Windows Memory Diagnostic: Check your computer for memory hardware errors. Choose this harmless diagnostic if your computer mysteriously hangs, freezes, or crashes. See Chapter 18 for information on scheduling a disk check as a separate measure.
• Command Prompt: Open a command prompt window. Use this if you’re familiar with typing commands at a prompt.
Use the first three options in the order listed, restarting after each one.
8. After using any of these tools, click Restart. Click Shut Down if you’ve had enough for now.