Chapter 1
Examining the Default Theme: Twenty Nineteen
IN THIS CHAPTER
 Discovering Twenty Nineteen’s layout features
Tweaking your logo and colors
Installing custom navigation menus
Exploring widgets on your website
Bundled with the release of WordPress 5.0 in December 2018 is the new default theme, Twenty Nineteen. The goal of the core development team for WordPress is to release a new default theme every year, which is why, with every new installation of WordPress, you find themes called Twenty Fifteen, Twenty Sixteen, and Twenty Seventeen (named to correspond with the year when they were created). Version 5.0 of WordPress was a pretty big release that took more than a year to complete; therefore, WordPress ended up skipping a Twenty Eighteen theme and ended up naming the new default theme Twenty Nineteen because it was released at the end of 2018.
Twenty Nineteen is a powerful theme with built-in support for the new block editor, custom menus, footer widgets, custom colors, social icon colors, and more. These features make Twenty Nineteen an excellent base for your site needs.
This chapter shows you how to manage all the features of the default Twenty Nineteen theme, such as handling layouts; editing the logo, social icons, and background colors; installing and using custom navigation menus; and using widgets on your site to add some great features.
Exploring the Layout and Structure
If you want a simple look for your site, look no further than Twenty Nineteen. This theme offers a clean design style that’s highly customizable through the use of the WordPress Block Editor, covered in Book 4, Chapter 1. As such, the font treatments are sharp and easy to read. Many of the new built-in theme features enable you to make simple yet elegant tweaks to the theme, including uploading your logo and adjusting the color scheme. Figure 1-1 shows the Twenty Nineteen WordPress default theme as it looks out of the box, meaning that it’s a brand-new installation, and I haven’t made any modifications to it yet.

FIGURE 1-1: The default theme for WordPress, Twenty Nineteen.
The Twenty Nineteen theme’s distinctive layout features include
- One-column, no-sidebar default layout: A one-column, full-width layout that lacks a sidebar of any kind is a trend you see on many blogs these days. It’s the default display in Twenty Nineteen, providing a clean look and feel that lacks clutter.
- Site Logo: Twenty Nineteen allows you to upload and display a logo of your choosing by using the theme customizer, covered in “Adding a Logo to Your Website” later in this chapter.
- Footer widget area: Twenty Nineteen’s one-column, full-width layout doesn’t lend itself to having a sidebar on full display, making the content of your post or page the focal point of the site when your readers first view it. But a full widget area in the footer of Twenty Nineteen can be populated with WordPress Widgets, enabling you to include a search bar or a listing of recent post and categories, for example. Discover how to use widgets in WordPress in “Enhancing Your Website with Widgets” later in this chapter. Figure 1-2 shows the footer widget area of Twenty Nineteen with the default widgets on display.
- Primary color: By default, design elements such as links, buttons, and labels in the Twenty Nineteen theme are blue, and the background color is white. You can change the colors of the design elements by using the theme customizer (see “Customizing Colors in Twenty Nineteen” later in this chapter).

FIGURE 1-2: Twenty Nineteen’s footer widget area.
Adding a Logo to Your Website
Another feature in Twenty Nineteen is the logo uploader, which allows you to upload a unique logo graphic or photo for display in the header area of your WordPress site.
The logo area in the Twenty Nineteen header is pretty small and doesn’t lend itself well to large logos or graphics that have a lot of detail or text. Follow these steps to upload a logo to the Twenty Nineteen theme, and you’ll see what I’m talking about with regard to the logo size in the header area:
Click the Customize link on the Appearance menu in the Dashboard.
The Customizer panel opens on the left side of the screen.
Click the Site Identity link in the Customizer.
The Site Identity section of the customizer displays, as shown in Figure 1-3.
Click the Select Logo button to add your logo to your website.
The Select Logo screen opens.
- Upload an image from your computer’s hard drive or select an existing image from the WordPress Media Library.
(Optional) Crop the image to your liking.
To resize and crop your image, drag one of the eight boxes located at the corners and sides of the image. You also can click within the image and move the entire cropping field up or down to get the optimal placement and cropping effect that you want. (See Figure 1-4.)
 The aspect ratio for the logo uploader in the Twenty Nineteen theme makes sure that your logo image remains perfectly square. You’ll notice as you crop your logo image that all four sides of the cropping field remain equal in size; you can’t create a nonsquare rectangular image.
Click the Crop button.
The Crop Logo image goes away, and you see the Customizer panel with your new logo image displayed in the Site Identity section. You also see your new logo displayed on your site to the right of the Customizer panel. Your logo hasn’t yet been published to your site; the area to the right of the Customizer panel shows you only a preview of your site and how it would look with the changes you’ve just made.
Click the Publish button at the top of the Customizer panel to save and publish your logo to your site.
Figure 1-5 displays my site with an image in the logo area.

FIGURE 1-3: The Customizer screen for the default Twenty Nineteen theme.

FIGURE 1-4: Using the crop tool.
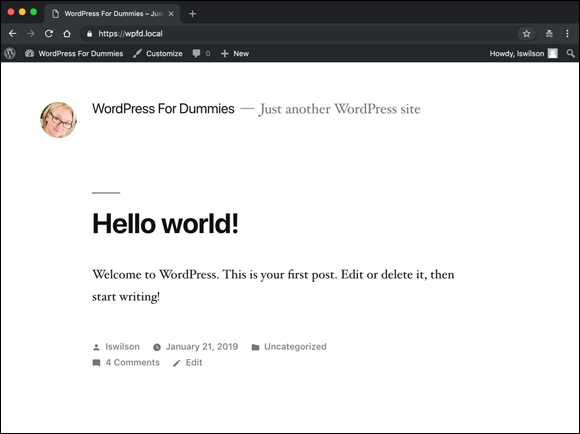
FIGURE 1-5: The Twenty Nineteen theme with new header image.
You can see in Figure 1-5 that the logo image is a small circle, which is how the Twenty Nineteen theme crops and displays your logo. As you can imagine, if you have a logo that’s rectangular or some other shape, it won’t work very well in this area. The Twenty Nineteen theme wasn’t developed to be used as theme for a business website, really. Most businesses have a larger logo that has more detail or text on it, whereas the logo area in the Twenty Nineteen theme is meant for an avatarlike photos rather than logos. When you’re selecting a theme for your business website, you may want to use a different theme unless your logo is a small circle.
Customizing Colors in Twenty Nineteen
After you explore the header logo settings, you may want to pick a color of that corresponds with your logo. The default color in the Twenty Nineteen theme is blue, but with the Color options in the Twenty Nineteen theme, you can change the default color to something different. Here’s how:
Click the Customize link on the Appearance menu in the Dashboard.
The Customizer panel opens on the left side of the screen.
Click the Colors link in the Customizer.
The Customizing Colors section appears.
Select the Custom option below the Primary Color heading.
The custom color bar displays, allowing you to click and drag the slider along the color spectrum to select the color you’d like to use, as shown in Figure 1-6.
It’s hard to illustrate the color changes in Figure 1-6 because the figures in this book are black and white, but when you drag the slider in the color bar in step 3, you notice color changes in certain design elements on your site preview, displayed on the right side of your screen. The elements that change color include hyperlinks, buttons, and forms.Select or clear the check box below the color picker, based on your preference.
The option is labeled Apply a Filter to Featured Images Using the Primary Color. By default, this option is selected; it tells WordPress to apply the color you chose in step 2 as an overlay color for your feature’s images throughout your site. See Book 4, Chapter 3 for information about color overlay and opacity.
- Click the Publish button at the top of the Customizer panel to save and publish your color preferences to your site.
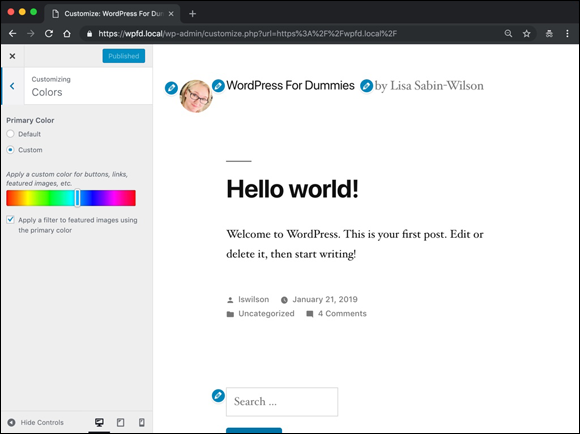
FIGURE 1-6: The Twenty Nineteen theme’s color options.
Including Custom Navigation Menus
A navigation menu is a list of links displayed on your site. These links can be to pages, posts, or categories within your site, or they can be links to other sites. You can define navigation menus on your site by using the built-in Custom Menu feature of WordPress.
Navigational menus are vital parts of your site’s design. They tell your site visitors where to go and how to access important information or areas of your site.
Similar to the WordPress Widgets feature (covered in “Enhancing Your Website with Widgets” later in this chapter), which lets you drag and drop widgets, the Menus feature offers an easy way to add and reorder a variety of navigational links to your site, as well as create secondary menu bars (if your theme offers multiple menu areas).
It’s to your advantage to provide at least one navigation menu on your site so that readers can see everything your site has to offer. In addition to providing a visual navigation aide to your visitors, search engines will be able to see the links you’ve added to a menu. This menu also helps the search engines discover other sections and pages of your site to catalog your pages in their listings.
Configuring the Primary menu
Twenty Nineteen, like almost all WordPress themes, comes with built-in WordPress menu support, which means that you can use the menu builder in the Customizer to build navigation menus on your site. Twenty Nineteen provides three menu locations in the theme:
- Primary: A navigation menu that displays directly below the site title and tagline
- Footer: A navigation menu that displays at the bottom of your website
- Social Links: A navigation menu of social media icons that displays directly below the Primary navigation menu
To create a Primary menu in the Twenty Nineteen theme, follow these steps:
Click the Customize link on the Appearance menu in the Dashboard.
The Customizer panel opens on the left side of the screen.
Click the Menus link in the Customizer.
The Menus section appears, with a message telling you to create a menu because currently there aren’t any menus (see Figure 1-7),
Click the Create New Menu button.
The New Menu screen opens in the Customizer panel.
Enter a name in the Menu Name field.
You can use any name you want for the menu.
Select the check box to the left of the Primary label.
This step assigns the new menu to the Primary location.
Click the Next button at the bottom of the Customizer.
The Customizer panel reloads and displays the menu screen with the name of your new menu at the top.
Click the Add Items button.
A new panel opens, with options for adding new links to the menu you’re creating. (See Figure 1-8.) Those options include
- Custom Links: You can add a link to any web page on the internet by using the Custom Links module. Type the URL in the Link text box and then type the title of the link in the Link Text field.
- Pages: Pages you’ve created in WordPress appear here. Click the plus sign to the left of the page title to add it to your menu.
- Posts: Posts you’ve created in WordPress display here. Click the plus sign to the left of the post title to add it to your menu.
- Categories: Categories you’ve created in WordPress display here. Click the plus sign to the left of the category title to add it to your menu.
- Tags: Tags you’ve created in WordPress display here. Click the plus sign to the left of the tag title to add it to your menu.
- Click the Publish button at the top of the Customizer screen to save the settings for the Primary menu.

FIGURE 1-7: The Menu section of the Customizer panel for the Twenty Nineteen theme.

FIGURE 1-8: The Menu section of the Customizer panel for the Twenty Nineteen theme.
After you save your navigation menu, you can use the drag-and-drop interface in the Customizer to reorder and rearrange your menu items. In Figure 1-9, I’m dragging the Blog menu item above the About Me menu item. You can accomplish this task by clicking a menu item and, without releasing the button on your mouse, dragging it to the position where you want it. When you release the mouse button, the menu item drops into place. Additionally, you can create submenus below top-level menu items by moving menu items slightly to the right below the top-level items.

FIGURE 1-9: The drag-and-drop interface of the WordPress Menus feature.
Use the submenus feature to avoid cluttering the navigation bar if you have a large quantity of items that you want to include in the navigation menu. By organizing content logically, you can help readers find what they want faster even if you have lots of content for them to look through.
Configuring the Footer menu
To set up the Footer menu, follow the same steps as for the Primary menu. The only difference is in step 5 where you select the Footer menu location in the Customizer to tell WordPress that the menu you’re building is one that you want to display in the footer (at the bottom) of your website.
When you’re done building the Footer menu and publishing it to your site, it appears as shown in Figure 1-10.

FIGURE 1-10: Footer menu displayed on a website with the Twenty Nineteen theme.
Often, website owners include the same links in the Footer menu as they do in the Primary menu. That way, the navigation links at the top of the site when visitors come to your site also are available at the bottom of your site when they finish scrolling through your content. Providing the same menu at the bottom of your site is a nice feature; visitors don’t have to scroll all the way back to the top of your site to click another link on your navigation menu.
Configuring the Social Links menu
The Social Links menu in the Twenty Nineteen theme is unique because instead of inserting text links into the menu, it inserts social media icons. This is a nice little feature; on most websites, when people link to their Twitter or Facebook profiles, you see the icons from those sites instead of a text link. The Social menu in the Twenty Nineteen theme makes it easy to do that without having to get your hands dirty inside the code of the theme.
The Twenty Nineteen theme accomplishes the addition of social media icons through the automatic recognition of various social media URLs. The social links menu configured in the Twenty Nineteen theme knows, for example, when you’ve typed in a URL that points to the Twitter website by recognizing the twitter.com domain and inserting the Twitter icon instead of a text link. Add links to Twitter, Facebook, and Instagram by following these steps:
Click the Customize link on the Appearance menu in the Dashboard.
The Customizer panel opens on the left side of the screen.
- Click the Menus link in the Customizer.
Click the Create New Menu button.
The New Menu screen opens in the Customizer panel.
Enter a name in the Menu Name field.
You can use any name you want for the menu.
Select the check box to the left of the Social Links Menu label.
This step assigns the new menu to the Social Links Menu location, which appears directly below the Primary navigation menu on your website.
Click the Next button at the bottom of the Customizer.
The Customizer panel reloads and displays the menu screen with the name of your new menu at the top.
- Click the Add Items button.
Click the Custom Links section.
The Custom Links section drops down, revealing two text fields.
Type the URL of your Twitter profile in the URL field.
My Twitter profile URL, for example, is
https://twitter.com/lisasabinwilson.- Type the word Twitter in the Link Text field.
Click the Add to Menu button.
WordPress adds the link to the Social Links menu.
- Repeat steps 9–11 for your Facebook and Instagram profiles.
- Click the Publish button at the top of the Customizer panel.
- Load your website in your browser to see your social media icons displayed below the Primary navigation menu (see Figure 1-11).
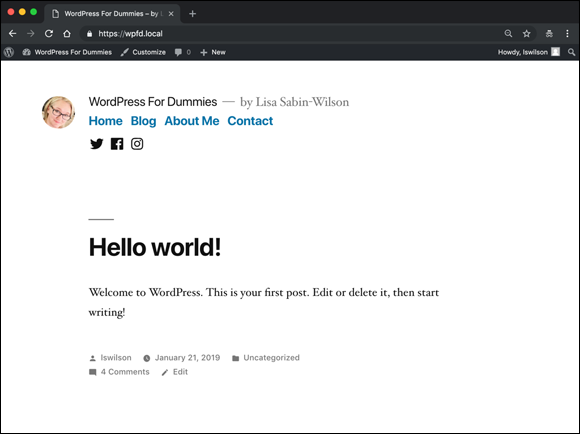
FIGURE 1-11: The Social Links menu appears below the Primary navigation menu.
For the Social Links menu, you’re not limited to the Twitter, Facebook, and Instagram links that you added in this section. The Twenty Nineteen theme recognizes links from several other popular social media platforms, including YouTube, LinkedIn, and Pinterest. You can find a full listing of services supported by the Twenty Nineteen theme in the WordPress Codex at https://codex.wordpress.org/Twenty_Nineteen#Add_Social_Icons.
Enhancing Your Website with Widgets
WordPress widgets are helpful tools that are built into the WordPress application. They allow you to arrange the display of content in your site sidebar, such as recent posts, and monthly and category archive lists. With widgets, arrange and display the content in the sidebar of your blog without having to know a single bit of PHP or HTML.
Widget areas are the regions of your theme where you can insert and arrange content (such as a list of your recent blog posts or links to your favorite sites) or custom menus by dragging and dropping (and editing) available widgets (shown on the Dashboard’s Widget page) into those corresponding areas.
Many widgets offered by WordPress (and those added by some WordPress themes and plugins) provide drag-and-drop installation of more advanced functions that normally are available only if you write code directly in your theme files.
Click the Widgets link on the Appearance menu of the Dashboard to see the available widgets on the Widgets screen. This feature is a big draw because it lets you control what features you use and where you place them without having to know a lick of code.
The Twenty Nineteen theme has one widget area called Footer. Figure 1-10 earlier in this chapter shows the footer area of a website that uses the Twenty Nineteen theme. Figure 1-12 shows the Widgets screen of the Dashboard, where you find widgets to add to the Footer widget area in the Twenty Nineteen theme.

FIGURE 1-12: The Widgets screen of the Dashboard.
Adding widgets to the footer in Twenty Nineteen
The Widgets screen lists all the widgets that are available for your WordPress site. On the right side of the Widgets page is the Footer widget area designated in the Twenty Nineteen theme. You see that the Footer widget area is already populated with a few widgets to get you started:
- Search: Contains a search form for your website
- Recent Posts: Provides a list of the most recent posts you’ve published to your site
- Recent Comments: Provides a list of the most recent comments left on posts published to your site
- Archives: Provides a list to the monthly archives of the posts published to your site
- Categories: Provides a list of the category archives on your site
- Meta: Provides a list of a few helpful links, such as the login and register links for your website
If you want to remove any of the existing widgets in the Footer widget area, click the widget you want to remove to open the settings for that widget; then click the Delete link. For the purposes of this chapter, remove all the existing widgets in the Footer widget area so that you can practice adding them in the next section. Go ahead; delete them all!
To add new widgets to the Footer widget area, follow these steps:
Locate the widget that you want to use.
The widgets are listed in the Available Widgets section on the left side of the Widgets screen. For the purpose of these steps, choose the Recent Posts widget.
Drag the Recent Posts widget into the Footer widget area section on the right side of the page (see Figure 1-13).
The widget is now located in the main sidebar widget area section, and the content of the widget appears on your site’s sidebar.
Click the arrow to the right of the widget title.
Options for the widget appear. Each widget has different options that you can configure. The Recent Posts widget, for example, lets you configure the title, the number of recent posts you want to display (the default is 5; the maximum is 15), and the date. (See Figure 1-14.)
Select your options, and click the Save button.
The options you’ve set are saved.
Arrange your widgets in the order in which you want them to appear on your site by dragging and dropping them in the list.
Repeat this step until your widgets are arranged the way you want them.
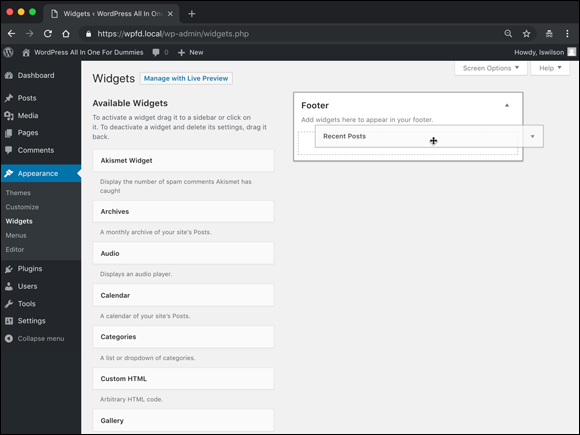
FIGURE 1-13: Adding the Recent Posts widget by dragging it into place.

FIGURE 1-14: Editing the Recent Posts widget.
To remove a widget from your sidebar, click the arrow to the right of the widget title to open the widget options; then click the Delete link. WordPress removes the widget from the right side of the page and places it back in the Available Widgets list. If you want to remove a widget but want WordPress to remember the settings that you configured for it, instead of clicking the Delete link, drag the widget into the Inactive Widgets area, at the bottom of the Widgets screen. (See Figure 1-15.) The widget and all your settings are stored for future use.
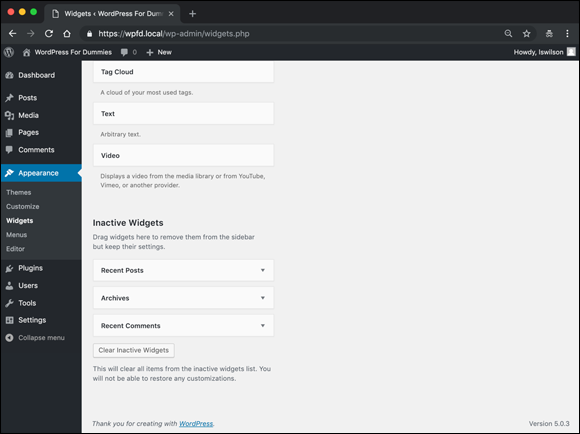
FIGURE 1-15: The Inactive Widgets section of the Widgets screen.
 The number of options available for editing a widget depends on the widget. Some widgets have several editable options; others simply let you write a title. The Recent Posts widget (refer to Figure 1-14), for example, has three options: one for editing the title of the widget, one for setting how many recent posts to display, and one for specifying whether to display the post date.
Using the Text widget
The Text widget is one of the most popular and useful WordPress widgets because it enables you to add a simple block of text and even HTML code to widget areas without editing the theme’s template files. Therefore, you can designate several types of information on your site by including your desired text within it.
I mentioned that you can add HTML code to the Text Widget, however there is the Custom HTML widget included in WordPress is specifically for HTML. Try out the Custom HTML widget, as well!
Here are some examples of how you can use the Text widget:
- Add an email newsletter subscription form. Add a form that allows site visitors to sign up for your email newsletter. Because adding an email newsletter subscription form often involves HTML, the Text widget is especially helpful.
- Display business hours of operation. Display the days and hours of your business operation where everyone can easily see them.
- Post your updates from social networks. Many social networking sites, such as Twitter and Facebook, offer embed codes that let you display your updates on those sites directly on your website. Social networking embed codes often include JavaScript, HTML, and CSS, which you can easily embed with the Text widget.
- Announce special events and notices. If your organization has a special sale, an announcement about a staff member or an important notice about weather closings, for example, you can use the Text widget to post this information to your site in a few seconds.
 The WordPress Text widget doesn’t allow you to include PHP code of any kind. Because of the nature of this widget, it doesn’t execute PHP code, such as special WordPress template tags or functions (like the ones you find in Book 6, Chapter 3). There is, however, a plugin called the Advanced Text Widget that does allow you to insert and execute PHP code within it. You can download the Advanced Text Widget from the WordPress site at
 https://wordpress.org/plugins/advanced-text-widget. (You can find more information about using and installing WordPress plugins in Book 7.)
To add the Text widget, follow these steps:
- On the WordPress Dashboard, click the Widgets link on the Appearance menu.
- Find the Text widget in the Available Widgets section.
Drag the Text widget to the desired widget area.
The Text widget opens, as shown in Figure 1-16.
Type a title in the Title field and any desired text in the content text box.
You can use the WYSIWYG (What You See Is What You Get) editor above the content text box to format your content with options such as including bold or italic text or adding links, a bulleted or numbered list, or an image.
- Click the Save button.
- Click the Close link at the bottom of the Text widget box.

FIGURE 1-16: The Text widget.
Using the RSS widget
The RSS widget allows you to pull headlines from almost any RSS feed, including recent headlines from your other WordPress sites. You also can use it to pull in headlines from news sites or other sources that offer RSS feeds. This practice is commonly referred to as aggregation, which means that you’re gathering information from a syndicated RSS feed source to display on your site.
After you drag the RSS widget to the appropriate widget area, the widget opens, and you can enter the RSS Feed URL you want to display. Additionally, you can easily tweak other settings, as shown in Figure 1-17, to add information to the widget area for your readers.

FIGURE 1-17: The RSS widget.
Follow these steps to add the RSS widget to your site:
Add the RSS widget to your sidebar on the Widgets screen.
Follow the steps in “Adding widgets to the footer in Twenty Nineteen” earlier in this chapter to add the widget.
Click the arrow to the right of the RSS widget’s name.
The widget opens, displaying options you can configure.
In the Enter the RSS Feed URL Here text box, type the RSS URL of the site you want to add.
You can usually find the RSS Feed URL of a site listed on the sidebar.
Type the title of the RSS widget.
This title appears in your site above the links from this site. If I wanted to add the RSS feed from my business site, for example, I’d type WebDevStudios Feed.
Choose the number of items from the RSS feed to display on your site.
The drop-down menu gives you a choice of 1–20.
(Optional) Select the Display the Item Content check box.
Selecting this check box tells WordPress that you also want to display the content of the feed (usually, the content of the post from the feed URL). If you want to display only the title, leave the check box deselected.
(Optional) Select the Display Item Author If Available check box.
Select this option if you want to display the author’s name with the item’s title.
(Optional) Select the Display Item Date check box.
Select this option if you want to display the date when the item was published along with the item’s title.
Click the Save button.
WordPress saves all the options and reloads the Widgets page with your RSS widget intact.