Chapter 2
Installing and Managing Plugins
IN THIS CHAPTER
 Installing WordPress plugins via the Dashboard
 Manually installing WordPress plugins
 Updating plugins
 Activating and deactivating plugins
 Deleting plugins
With more than 55,000 plugins available, you have a huge number of options for customizing your site. Book 7, Chapter 1 details what types of plugins are available and where to find them. In this chapter, you start putting these plugins to use. This chapter is dedicated to helping you install, activate, deactivate, update, and delete plugins.
Installing Plugins within the WordPress Dashboard
When you’ve found a plugin in the Plugins page(see Book 7, Chapter 1) that you want to install, you can install it directly from the Dashboard. (If you’ve found a plugin that isn’t in the Directory, you have to install it manually. See the later section “Manually Installing Plugins.”)
WordPress makes it super-easy to find, install, and then activate plugins for use on your blog. Just follow these simple steps:
Click the Add New link on the Plugins menu.
The Add Plugins screen opens, allowing you to browse official WordPress plugins from your WordPress Dashboard.
Search for a plugin to install on your site.
Enter a keyword for a plugin you’d like to search for. For this example, you want to install a plugin that integrates your site with Twitter. To find it, select Author in the drop down to the left of the search box, then enter Twitter in the Search text box on the Add Plugins screen; then click the Search button.
Figure 2-1 shows the results page for the Twitter search phrase. The first plugin listed, called simply Twitter, is a plugin developed by the developers at Twitter. This plugin is the one you want to install.
 You can also discover new plugins by clicking any of the categories at the top of the Add Plugins screen, such as Featured, Popular, and Recommended.
Click the More Details link.
A Description window opens, displaying information about the Twitter plugin (including a description, version number, and author name) and an Install Now button.
Click the Install Now button.
The Install Now button changes to an Installing button with a spinner icon that spins until it’s done installing; then the button text changes to Activate.
Decide whether to activate the plugin now or later.
You have two methods of installing the plugin:
- Click the Activate button: Click this button to immediately activate the plugin you just installed on your site.
- Return to the Plugins screen: Click the Plugins link on the Plugins menu to load the Plugins screen in your Dashboard. You see the plugin listed there, but it isn’t activated. When you’re ready, click the Activate link below the plugin’s name.
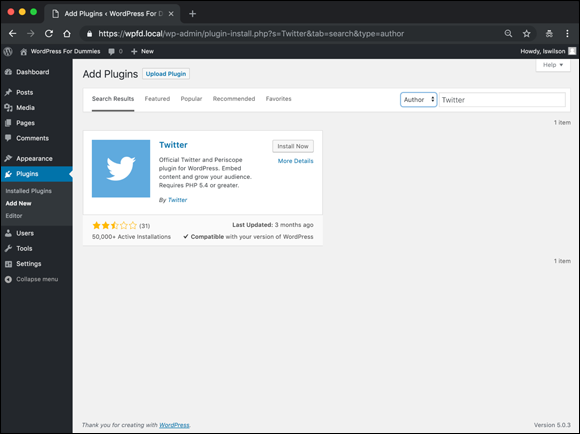
FIGURE 2-1: The Add Plugins screen’s search results for the Twitter plugin.
Manually Installing Plugins
Installing plugins from the Dashboard is so easy that you’ll probably never need to know how to install a plugin manually via SFTP. (Book 2, Chapter 2 explains how to use SFTP.) But the technique is still helpful to know in case the WordPress Plugins page is down or unavailable, or if you are installing a plugin that is not available on the WordPress website.
Finding and downloading the files
The first step in using plugins is locating the one you want to install. The absolutely best place to find WordPress plugins is the WordPress.org website at https://wordpress.org/plugins, where, at this writing, more than 55,000 plugins are available for download.
To find the Twitter plugin, follow these steps:
- Go to the official WordPress Plugins page at
https://wordpress.org/plugins. - In the search box at the top of the page, enter the keyword Twitter; then click the Search Plugins button.
Locate the Twitter plugin on the search results page (see Figure 2-2), and click the plugin’s name.
The Twitter plugin page of the WordPress website opens, displaying a description of the plugin as well as other information about the plugin. In Figure 2-3, take note of the important information on the right side of the page:
- Version: The number shown in this area is the most recent version of the plugin.
- Last Updated: This date is when the author last updated the plugin.
- Active Installations: This number tells you how many times this plugin has been downloaded and installed by other WordPress users.
- WordPress Version: Figure 2-3 shows that the Twitter plugin is compatible up to WordPress version 4.7 or higher.
- Tested Up To: This section tells you what version of WordPress this plugin is compatible up to. If it tells you that the plugin is compatible up to version 5.0, for example, you usually can’t use the plugin with versions later than 5.0. I say usually because the plugin developer may not update the information in this section — especially if the plugin files themselves haven’t changed. The best way to check is to download the plugin, install it, and see whether it works! As shown in Figure 2-3, the Twitter plugin has been tested up to WordPress version 5.0.3.
- Languages: A link is provided that displays the number of languages the plugin offers translations for. When you click the link, a window opens that displays the list of specific languages. The Twitter plugin provides 19 translations, as shown in Figure 2-3.
- Tags: This is a list of keywords that describe the plugin type. Clicking any of these words will take you to a page on the WordPress website that displays plugins that are associated with, or related to, the keyword you clicked on.
- Ratings: With a rating system of 1 to 5 stars (1 being the lowest and 5 being the highest), you can see how other WordPress users rated this plugin.
Click the Download button for the plugin version you want to download.
If you’re using Internet Explorer, click the Download button. A dialog box opens, asking whether you want to open or save the file. Click Save to save the
.zipfile to your hard drive, and remember where you saved it.If you're using Mozilla Firefox, click the Download button. A dialog box opens, asking what Firefox should do with the file. Select the Save File radio button and then click OK to save the file to your hard drive. Again, remember where you saved it.
For other browsers, follow the download instructions in the corresponding dialog box.
Locate the file on your hard drive, and open it with your favorite decompression program.
If you’re unsure how to use your decompression program, refer to the documentation available with the program.
- Unpack (decompress) the plugin files you downloaded for the Twitter plugin.
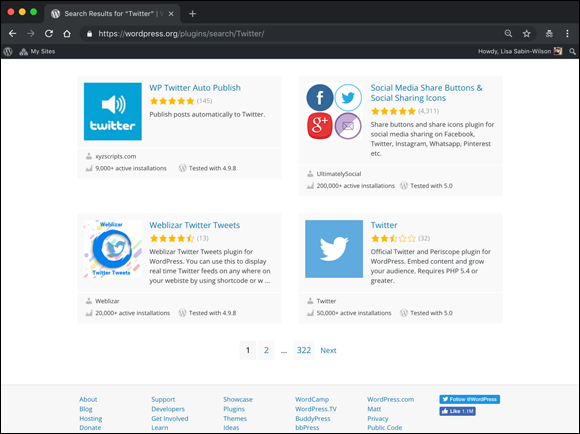
FIGURE 2-2: Use the search feature on the Plugins page to find the plugin you need.
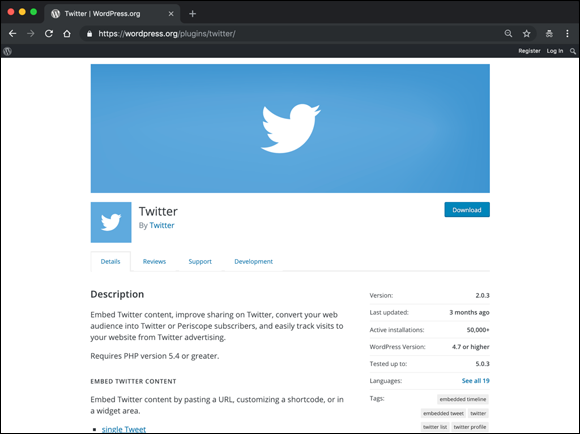
FIGURE 2-3: The download page for the Twitter plugin.
Reading the instructions
Frequently, the plugin developer includes a readme file inside the .zip file. Do what the title of the file says: Read it. Often, it contains the same documentation and instructions that are on the plugin developer's website.
Make sure that you read the instructions carefully and follow them correctly. Ninety-nine percent of WordPress plugins have great documentation and instructions from the developer. If you don’t follow the instructions correctly, the best scenario is that the plugin just won’t work on your site. At worst, the plugin will create all sorts of ugly errors, requiring you to start the plugin installation over.
In the case of the Twitter plugin, the readme.txt file contains information about the requirements of the plugin and how to use it on your site.
Upgrading Plugins
Plugins receive updates that fix bugs, add new features, and update existing features. Some plugins are updated multiple times a week. Other plugins may never be updated. Fortunately, WordPress makes it easy to know when a new plugin version is available and also makes it very easy to update your local Plugins page from the Dashboard.
One of the easiest ways to know that plugin updates are available is to check the version number displayed on the Plugins screen on your Dashboard, directly below the plugin's description. Figure 2-4 shows that the Akismet plugin has an available update, as evidenced by the phrase below the Akismet description There is a new version of Akismet Anti-Spam available. Figure 2-4 also shows that the Dashboard page provides alerts about upgrades (the small circle shown next to the word Plugins on the left navigation menu).
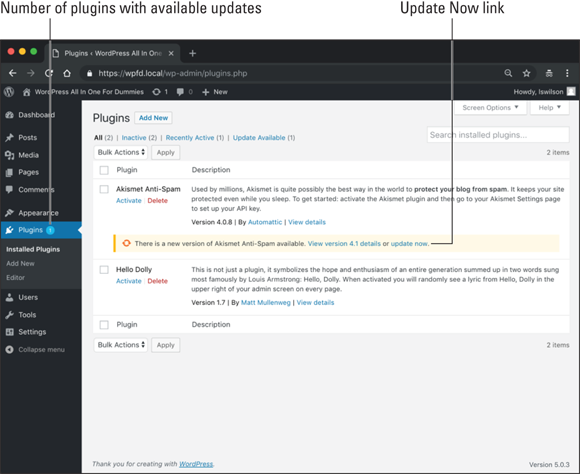
FIGURE 2-4: A WordPress plugin with an available update.
You have three ways to update a plugin: from the Plugins page, from the Updates submenu accessible on the Dashboard menu, and a manual update via SFTP.
Updating on the Plugins screen
Updating a plugin on the Plugins screen is easy. You can update plugins one at a time or update all the plugins that need updating in one fell swoop.
To update an individual plugin, click the Update Now link at the bottom of the plugin's row (refer to Figure 2-4). WordPress automatically updates the plugin with the files from the new release, displays the message Updated, and removes the small icon next to the Plugins-menu link (see Figure 2-5).
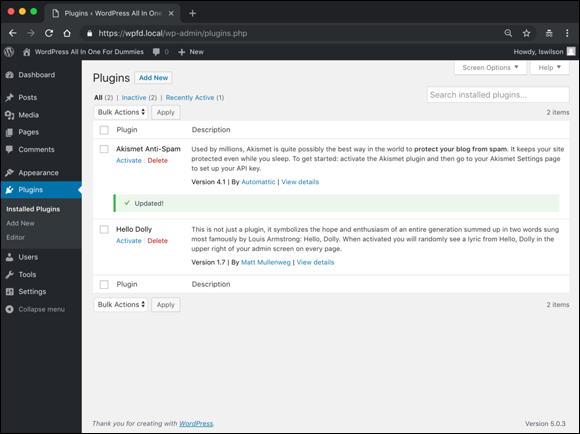
FIGURE 2-5: The result of updating a single plugin from the Plugins screen.
Although clicking the Update Now link is simple and quick, this process can get tedious if you have a large number of plugins.
To update all your plugins at the same time, click the check mark to the left of each plugin, choose Update from the Bulk Actions drop-down menu, and click the Apply button. All your plugins are updated. Figure 2-6 shows a message at the top of the screen stating that two plugins have been updated.
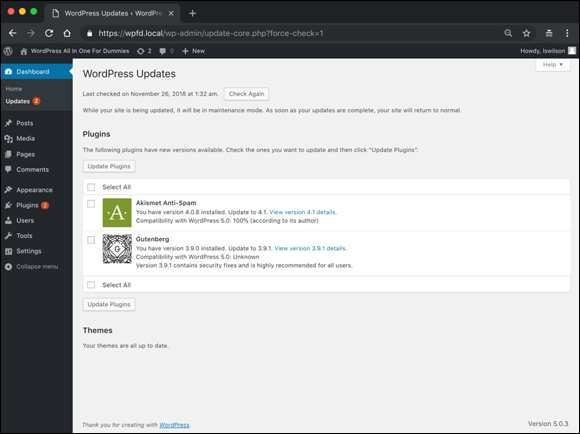
FIGURE 2-6: The results of updating multiple plugins from the Plugins screen.
Updating on the Updates screen
The WordPress Updates screen (see Figure 2-7), accessible from a submenu of the Dashboard menu, provides a quick way to update WordPress, plugins, and themes in one place. This screen is a one-stop shop for all the updates across your site.
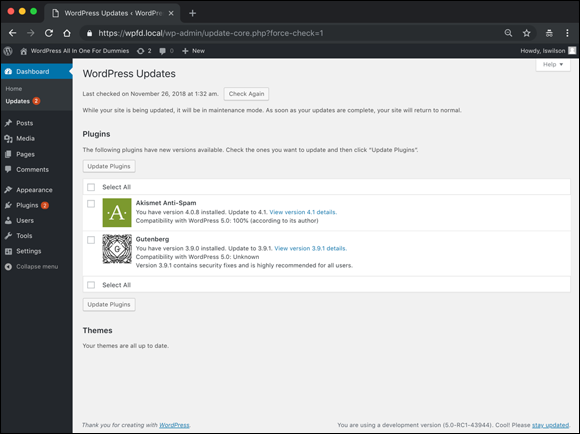
FIGURE 2-7: The WordPress Updates screen.
To update all the plugins, click the check box next to the Select All header (refer to Figure 2-7) and then click the Update Plugins button. All your selected plugins are updated.
Updating manually
The process of updating a plugin manually is nearly identical to the process of installing the plugin manually, as detailed earlier in this chapter. The only change is to delete the plugin's directory before uploading the new files. Follow these steps:
- Download the latest version of the plugin from the WordPress website or the plugin developer’s website.
Connect to your server via an SFTP application, and go to the
pluginsdirectory in thewp-contentdirectory.You should see a folder with the same name as the plugin you want to upgrade.
Rename this folder so that you have a backup if you need it.
Any memorable name, such as
plugin-old, should suffice.- Upload the new version of your plugin via SFTP to your server so that it's in the
wp-content/pluginsfolder. - Log in to the WordPress Dashboard, and activate the upgraded plugin.
Activating and Deactivating Plugins
After a plugin is on your site, activating it is extremely simple. To activate a plugin, do the following:
- Log in to the WordPress Dashboard.
- Navigate to the Plugins screen by clicking the Plugins menu link.
- Find the plugin you want to activate on the Plugins screen.
- Click the Activate link just below the plugin's name in the listing.
If everything goes well, you see Plugin activated at the top of the screen, which means that the plugin has been activated successfully. (See Figure 2-8.) If a long error message appears in the activation notice, the plugin has an issue that’s preventing it from activating. Copy the message that appears in the notice and send the details to the plugin author for help fixing the issue.
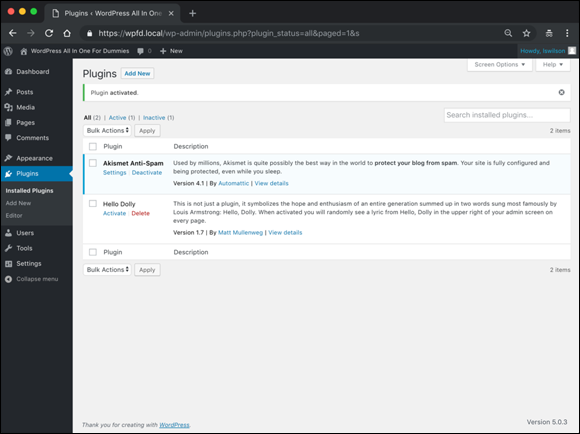
FIGURE 2-8: The Plugins screen when a plugin is activated.
The process of deactivating a plugin is nearly the same as the process of activating a plugin. Follow the same steps, but click the Deactivate link for the plugin that should be deactivated. A message at the top of your Dashboard tells you the plugin has been successfully deactivated.
Deleting Plugins
Sometimes, it’s simply time to let go of a plugin and remove it from the site. You could have many reasons for deleting a plugin:
- You no longer need the feature offered by the plugin.
- You want to replace the plugin with a different one.
- You’re retiring the plugin because its functionality has been replaced with features built into a new version of WordPress.
- You’re removing it due to performance issues (such as the plugin required too many resources to run).
It may be tempting to deactivate undesired plugins and leave them sitting in your plugins directory, but take the extra step of deleting plugins that you no longer need. The PHP files of the plugin can still be run manually if someone (or some automated computer program) directly requests that PHP file. If the plugin had a security flaw that could allow direct execution of the code to compromise the security of the server, having old code lying around is a problem waiting to happen.
Deleting via the Dashboard
You can deleting plugins from the Plugins screen. Before you can delete a plugin, you must deactivate it. (See the earlier section “Activating and Deactivating Plugins.”)
Ready to delete the plugin? Click the Delete link listed below the plugin's name. As shown in Figure 2-9, confirm that you want to delete a plugin before that action takes place.

FIGURE 2-9: The confirmation message for deleting a plugin.
After confirming the deletion of a plugin, you return to the Plugins screen, which confirms that the plugin was deleted, as shown in Figure 2-10.
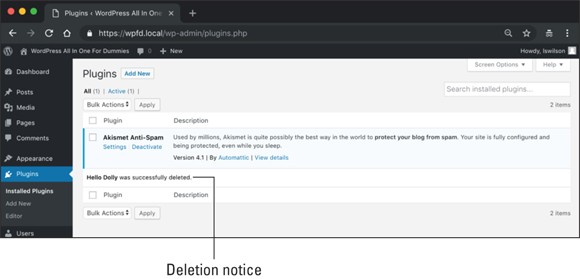
FIGURE 2-10: A notice confirming the deletion of a plugin.
Deleting manually
You can delete a plugin manually by removing its directory from the wp-content/plugins directory. Because the files no longer exist, the plugin simply stops running. It may be helpful to deactivate the plugin first, but doing so isn’t required.
Manually deleting a plugin can be very helpful when a plugin has a fatal error that causes the site to crash. If you can’t gain control of the site again, manually deleting the plugin’s directory could help you regain control of your site quickly.
Because this process involves using SFTP, this process is similar to installing a plugin manually. The main difference is that rather than uploading the plugin’s directory, you’re deleting it.
The process works as follows:
- Connect to your site’s server, using SFTP.
- Navigate to the site’s directory.
- Navigate to the
wp-content/pluginsdirectory. - Delete the plugin’s directory.
The Plugins screen shows a message confirming that the plugin is deactivated due to the missing files. (See Figure 2-11.) Note that this message appears only when you go to the Plugins screen after deleting an activated plugin manually, and it appears only once.
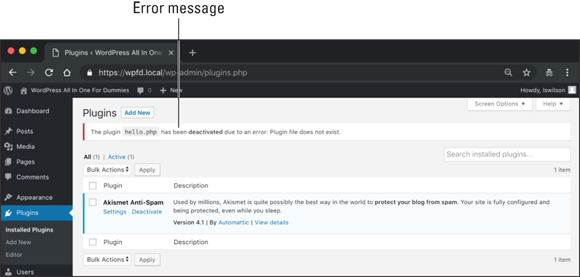
FIGURE 2-11: The error message shown after an active plugin is deleted manually.
 Installation of plugins from your WordPress Dashboard works in most web-hosting configurations. Some web-hosting services, however, don’t allow the kind of access that WordPress needs to complete installation. If you get any errors or find that you’re unable to use the plugin installation feature, get in touch with your web-hosting provider to find out whether it can assist you.
 Installing the Twitter plugin takes you through the process, but keep in mind that every plugin is different. Reading the description and installation instructions for each plugin you want to install is very important.