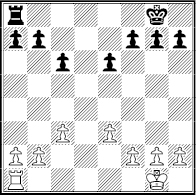
White to play
Every serious player knows the basic tactical devices, the ones with names like pin, skewer and fork. These have little to do with where the pawns are and everything to do with where the pieces are.
But there are strategic devices which depend on pawn structure. The only name we have for them is the one the Russians use: priyome.
You already know some simple examples of it even if you’ve never heard the word. Imagine a rook endgame with one pair of pawns traded.

White to play
The priyome calls for 1  d1! and 2
  d7. White gets a huge advantage.
Other priyomes are only a bit more elaborate and only slightly improve a position. After 1 e4 d6 2 d4  f6 3
f6 3  c3 g6 4 f3
  g7 White may want to trade off Black’s bishop. The priyome consists of three or four steps, a bishop move such as
  e3 or
e3 or  g5 followed by
  d2 and
  h6xg7.
Alexey Suetin, one of the deans of the Soviet Chess School, said mastering priyomes was a key to success. Each would-be master should collect his own ‘personal fund’ of priyomes, as he put it, study them and – when the same patterns arise during a game – apply the priyomes.
Priyomes can be very general, like seizing a file with a rook in the last diagram. They can be described in words, not moves, as Vladimir Kramnik did in the next:
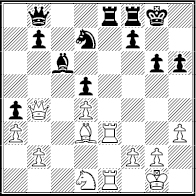
Kramnik – Zviagintsev
Tilburg 1998
White to play
After 1  b5!, he wrote “My opponent underestimated this standard priyome.” He explained what he meant – “the exchange of the ‘bad’ bishop but one that defends many of his pawns.” Once the bishops are gone, Black had to lose the a- or d-pawn.
Other priyomes apply only to certain pawn structures. A priyome may consist entirely of piece maneuvers, like  b5xc6 and
  e5 as in the Bird Bind, the first priyome we will look at. Or it can begin with a piece move, followed by a pawn move, such as Harry Pillsbury’s
  e5 and f2-f4. Or it may begin with a pawn move like h2-h4 in response to … g6 or …
  g6.
g6.
The Russian trainer Anatoly Terekhin estimated that masters know about 100 priyomes. But you don’t need to know nearly that many. We’ll examine 25 of the most common and useful.
Henry Bird, the 19th century English master, deserves credit for popularizing a priyome based on trading a bishop for a knight so that he could occupy the center with his own knight.
He did it with his favorite 1 f4 and then 1 … d5 2  f3 c5 3 e3
  c6 4
c6 4  b5! in order secure e5 as an outpost after
  xc6. An 1885 game of his went 4 …
  d7 5 0-0 e6 6 b3
  f6 7
f6 7  b2
b2  e7 8
e7 8  xc6!
xc6!  xc6 9
xc6 9  e5
e5  c7 10 d3.

Black to play
White can continue with  d2,
d2,  e2 and eventually e3-e4 and/or c2-c4 with a small edge. This priyome has been adopted in similar positions, by players from Bobby Fischer to Aron Nimzovich, who adopted it with colors reversed in the Nimzo-Indian Defense: After 1 d4
  f6 2 c4 e6 3
  c3
c3  b4 Black often equalizes with a timely …
  xc3 and …
  e4.
e4.
Aside from the strategic value, the  xc6 idea can have a tactical punch:
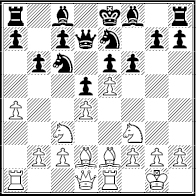
Geller – Petrosian
Moscow 1963
Black to play
There wasn’t a vacant central square to exploit – until Black innocently played 1 … fxe5?? and was stunned by 2  b5!.
b5!.
White will win e5 for his pieces, ideally the knight. Bad would be 2 … exd4 3  xd4, e.g. 3 …
  d6 4
d6 4  xc6
xc6  xc6 5
xc6 5  f4!
f4!  d7 6
d7 6  xd5!.
xd5!.
And Black would be blown off the board after 2 … e4 3  e5
e5  d6 …
d6 …
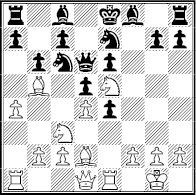
White to play
… 4  f4! because he has no good defense to
  g6.
g6.
In the game, Black tried to bail out after 2  b5 with 2 …
  g6. But he had no good defense after 3
  xe5
xe5  gxe5 4
  xe5.
xe5.
For instance, 4 …  d6 5
d6 5  xe6+
xe6+  xe6 6
xe6 6  xc6+. Or 4 …
  e7 5
e7 5  f3
f3  f6 6
f6 6  xd5!
xd5!  xe5 7
xe5 7  f6+! and 8
  xc6. Or, as the game went, 4 … a6 5
  xc6
xc6  xc6 6
xc6 6  xd5 and White won.
This priyome also works in a mirror image. In that case White wins control of d5 by means of  xf6, as in variations of the Sicilian Defense.
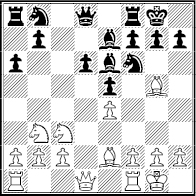
Tal – Najdorf
Bled 1961
White to play
White began the priyome earlier with  g5 and completed it with 1
  xf6!
xf6!  xf6 2
xf6 2  d3
d3  c6 3
c6 3  d5. Then 3 …
  xd5 4
xd5 4  xd5 would confer a major positional edge because of his better bishop and the target pawn at d6.
It’s revealing that this game began as a Najdorf Variation – and that Black, Miguel Najdorf himself, did not understand that the best defense is a counter-priyome, eliminating the d5-knight with …  g5 and …
  e7!.
e7!.
The game went 3 …  g5 4
g5 4  fd1 and now instead of 4 …
  c8 5 c3
  e7!, Black tried to get counterplay on the f-file, with 4 …
  h8 5 c3 f5? 6
  f3.
f3.
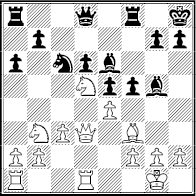
Black to play
Now 6 …  e7 7
e7 7  xe7
xe7  xe7 and 8 exf5
  xf5 9
xf5 9  e4 allows White to exploit e4 as well as d5.
Black ended up in a poor middlegame after 6 …  xd5 7
xd5 7  xd5 fxe4 8
  xe4
xe4  e7 9
e7 9  d5
d5  f6 10
f6 10  d2!, with the idea of 11
  e4.
e4.
He was headed for a bad endgame after 10 …  xd2 11
  xd2
xd2  c7 12
c7 12  e1
e1  af8 13
  e3 g6 14
  e4
e4  g7 15
g7 15  f3
f3  xf3 16
  xf3
xf3  f6 17
f6 17  e4
e4  f7 and lost.
Black often expands on the queenside with … a6 and … b5 in a wide variety of openings, from the Queen’s Gambit Declined to Sicilian and King’s Indian Defenses. But this comes with a risk: White can train more firepower on b5 than Black – and that makes a2-a4! dangerous.
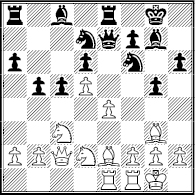
Najdorf – Fischer
Santa Monica 1966
White to play
White has more of his pieces on the kingside, so 1 f4 looks natural. But after 1 … gxf4 2  xf4
xf4  e5! Black would stand well.
However, 1 a4! led to a positional rout. The problem with 1 … bxa4 is 2  c4!, threatening to capture on d6. After 2 …
  e5 3
e5 3  xe5! dxe5 4
  xa4 White would have a big positional edge: He has a protected passed pawn and can attack pawns at c5 and a6. Black has a bad dark-squared bishop.
So, Black bought time with 1 … b4. But after 2  d1! and 3
  e3! White had two knights to control c4 and Black only had one.
Since 2 …  xe4? 3
  d3 would open the center too quickly, Black chose 2 …
  e5 3
e5 3  e3
e3  g6. But then came 4
  ec4, attacking d6.

Black to play
If Black has to defend it with 4 …  d8 White can exploit other holes in Black’s camp with 5
  b6, e.g. 5 …
  b8 6
b8 6  xc8 and
  xa6 or 5 …
  a7 6
a7 6  dc4 with the idea of
  xc8/
xc8/ xd6 or
  a5-c6.
Instead, Black chose 4 …  f4 5
f4 5  xf4 gxf4. But White’s knights ran riot after 6 e5! dxe5 7
  f3
f3  f8 (7 …
  d7? 8 d6 costs a rook) 8
  xe5.
xe5.
He won after 8 …  b7 9
b7 9  dc4
dc4  ad8 (9 …
  xd5 10
  d7!) 10
  c6.
c6.
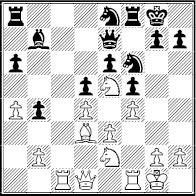
It’s not just the square at c4 but also c5 and even b6 that can be exploited by a2-a4:
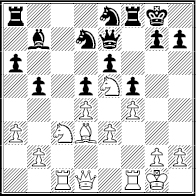
Euwe – Sanguineti
Mar del Plata 1948
White to play
White can see that c6 is potentially vulnerable and might have considered 1  a2 and 2
  b4. But Black can get good play from his own priyome, the ‘Philidor Ring,’ as we’ll see, with …
  b6-c4.
Instead, White played the forcing 1 a4!. Then 1 … bxa4 2  xa4 followed by 3
  c5 or 3
  xd7/ 4
  b6 – or even 2
  xa4 – assures him a small edge.
Black replied 1 … b4 and White had a choice. In many similar positions, 2  b1 followed by
  d2-b3 is best. The knight can then occupy either c5 or a5 with a powerful cramping impact.
On this day, White chose 2  e2 so that the knight can occupy d4 after 2 …
  xe5 3 dxe5. Black replied 2 …
  df6 (not 2 …
  d6 3
d6 3  c7!).
c7!).
White to play
White took further advantage of the priyome with 3 a5!. Both of Black’s queenside pawns became potential targets now that … a5 is ruled out.
Black protected his a-pawn with 3 …  d6 4
d6 4  a4!
a4!  de4. However, White made progress with 5
  c2!
c2!  ac8 6
ac8 6  fc1
fc1  xc2 7
xc2 7  xc2. He would be winning if he can play
  c1-a2 or
  c1-b3-c5.
Black lacks counter play. If he tries 7 …  c8 8
c8 8  xc8+
xc8+  xc8 White invades with 9
  c6
c6  b7 10
b7 10  b6. Black tried 7 …
  g4 but was lost after 8
  xg4 fxg4 9
  xd4 dxe4 10
  c5 and
  xb4.
xb4.
The simplest and often best defense to a2-a4 is to liquidate, … bxa4:
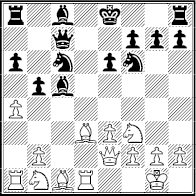
Alekhine – Flohr
Bled 1931
Black to play
Black responded to a2-a4 with 1 … b4?. White established positional superiority with routine moves: 2  bd2 0-0 3
  b3
b3  e7 4 e4
  d7 5
d7 5  e3 and then 5 …
  de5 6
de5 6  xe5
xe5  xe5 7
xe5 7  ac1
ac1  b8 8
b8 8  c5!
c5!  xc5 9
xc5 9  xc5. Black’s weak a-pawn and bad-bishop helped cost him the game.
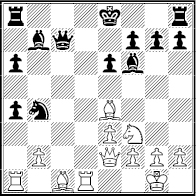
How could he have improved? With 1 … bxa4!.
White’s advantage would be minimal after 2  c3
c3  b4 3
b4 3  e4
e4  e7 for instance (4
  xf6+
xf6+  xf6 5
xf6 5  e4
e4  b7).
b7).
White to play
Once White retakes on a4, his b-pawn will be about as weak as Black’s a-pawn. Neither side’s pieces are superior. Chances are roughly equal.
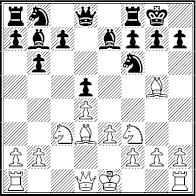
One of the most famous priyomes was popularized by Harry Nelson Pillsbury, from a position that has been arising out of a Queen’s Gambit Declined for more than a century. There are very similar ones with slightly different pawn structures, such as Black pawns at c6 and b7.
White to play
Pillsbury played 1  e5, 2 f4! and
  f3. This entrenches his knight and if it’s captured he can retake fxe5! and exploit the half-open f-file.
One of Pillsbury’s games went 1 …  bd7 2 f4 c5 3 0-0. Black began his own priyome, the queenside phalanx that we will examine later in this chapter. But this time it’s bad, 3 … c4? 4
  c2 a6 5
  f3 b5.
This is a case of timing. Black’s queenside might become significant if it were not for White’s initiative after 6  h3!. He targets h7 and threatens 7
  xd7 (7 …
  xd7 8
xd7 8  xh7 mate; 7 …
  xd7 8
xd7 8  xh7+!
xh7+!  xh7 9
xh7 9  xd7).
xd7).
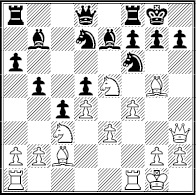
Black to play
His attack exploded, 6 … g6 7 f5 b4 8 fxg6! hxg6 9  h4! bxc3 10
  xd7
xd7  xd7 11
  xf6! and 12
  af1. Or 6 … h6 7
  xh6 gxh6 8
  xh6 (8 …
  xe5 9 fxe5
  e4 10
e4 10  xe4 dxe4 11
  f3!). Such games were known as ‘Pillsburials.’
This priyome typically works best with at least three sets of minor pieces on the board. A good defense was eventually found in 3 …  e4, which blocks the b1-h7 diagonal and trades pieces.
But in other forms,  e5/f2-f4 remains vibrant: Pillsburials still occur.
Certain pairs of pawn moves, one by White and one by Black, are linked by bonds both tactical and strategic. We saw f2-f4 and … c5 in the Pillsburial and we’ll consider that pair in more detail later in this chapter.
In the Sicilian Defense, e4-e5 is linked with … b4, like brothers who never get along. Often the best defense to e4-e5 is … b4. And when Black drives a knight off c3 with … b4, the best counter may be e4-e5.
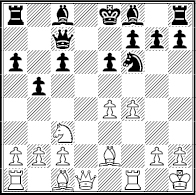
Aronin – Larsen
Moscow 1959
Black to play
At first it seems that 1 … b4 just wins a pawn (2  a4
a4  xe4). A further look reveals that White has some compensation after 3
  d4
d4  f6 4
f6 4  b6.
b6.
But the priyome tells us that when you see … b4, you should look for its brother. Here 2 e5! and then 2 … bxc3 3 exf6 gxf6 is promising for White after 4 b3 or 4 f5 cxb2 5  xb2.
xb2.
In this case White can exploit the position tactically because he was well developed. But if both players have their pieces well deployed, it’s usually bad to be the second to act in the e5/… b4 chain reaction:
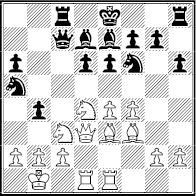
Boudre – Shirov
Val Maubuee 1989
White to play
Black’s last move, … b4!, ensures an advantage. For example, 1  ce2 e5! 2
  f5
f5  b5 3
b5 3  d2
d2  c4 with favorable complications.
White tried 1 e5. He was right in thinking that if the Black knight moves from f6 he can play a good  e4. And on 1 … dxe5 2 fxe5
  xe5, White can complicate with 3
  xh6 and 3 …
  b8 4
b8 4  xg7 bxc3 5
  b3.
b3.
But Black replied 1 … bxc3! 2 exf6  xf6. Then 3 bxc3 or anything that allows 3 … cxb2 would weaken White’s king position considerably.
He kept the position semi-closed with 3 b3 and Black replied 3 … d5.
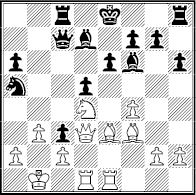
White to play
White’s 1 e5 has failed: Black is a pawn ahead and has the better attack, as 4  c1 0-0 and then 5 g4
  b5! 6
b5! 6  xb5 axb5, showed. Black threatened 7 …
  xb3! (8 cxb3? c2+; 8 axb3
  a5 and …
  a8) and won.
The moral is: When you see e4-e5, look for … b4, and vice versa – but be careful when you’re the second to act.
The Russians say a knight that is supported by two pawns inside enemy territory is a ‘ring,’ such as Pillsbury’s  e5, with pawns at d4 and f4. Trainer Anatoly Terekhin named this priyome after Andre Philidor because of this game:
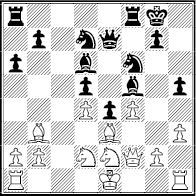
Bruehl – Philidor
London 1783
Black to play
Black can claim a positional advantage but he has no point of penetration on the c-file to make it count. On 1 …  ac8 2 0-0 and 3
  ac1, a swap of rooks will nudge White closer to a draw.
Philidor’s solution was 1 … b5! 2 0-0  b6! and then 3
  g3 g6 4
  ac1
ac1  c4. This attacks b2 and looks for an opportune time for …
  xe3. Since the file is plugged up, Black may add to the queenside pressure with … a5-a4 or double rooks on the c-file, without allowing a trade of rooks.
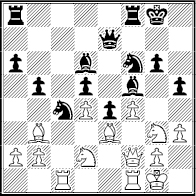
White to play
Moreover Black does not fear a capture on c4 because he would get a protected passed pawn. After 5  xc4 he might opt for 5 … dxc4 and occupy the excellent d5 square with a knight.
White tried to exploit the kingside, 5  xf5 gxf5 6
  g3+. But 6 …
  g7! 7
g7! 7  xg7+
xg7+  xg7 turned out to be an excellent endgame for Black.
Philidor went on to win after 8  xc4 bxc4!? 9 g3
  ab8 10 b3
  a3 11
a3 11  c2 cxb3 12 axb3
  fc8 13
  xc8
xc8  xc8 14
  a1
a1  b4 15
b4 15  xa6
xa6  c3 and then 16
  f2
f2  d3 17
d3 17  a2
a2  xd2 18
  xd2
xd2  xb3 19
  c2 h4!. But the key to victory was 1 … b5, 2 …
  b6 and 4 …
  c4!.
c4!.
Philidor’s Ring is often effective after  b3 and …
  b6 followed by a queen swap that opens half of the a-file:
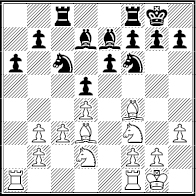
Janowski – Marshall
Match 1905
White to play
Three moves before, Black traded queens on b3. White had a choice of recaptures and chose axb3! so that he could continue 1 b4!  e8 2
e8 2  b3!.
b3!.
White is in no rush to dissolve his doubled pawns with b4-b5 because a pawn at b4 supports  c5!. He also wants as many Black pawns left on the queenside so they can become targets.
Black was able to defend b7 with 2 …  d6 3
d6 3  xd6
xd6  xd6 4
xd6 4  c5.
c5.

Black to play
White’s pressure increased after 4 …  c7 5
c7 5  fe1
fe1  c8 6
c8 6  d2
d2  e8 7 f4 f5 8
  f3
f3  e4 but he had not broken through.
So he played 9 b5! axb5 10  xb5 with the idea of
  e5/
e5/ xc6 and
  a8/
a8/ ea1. Black ended up in a very poor case of bad-B-versus-good-N, 10 …
  xc5 11 dxc5
  d7 12
d7 12  xc6! bxc6 13
  d4
d4  f7 14
f7 14  a6! h6 15 b4, and lost.
An ancient axiom says: ‘The best defense to an attack on a wing is a counterattack in the center.’
Good advice. But how? The most common way is … d5.
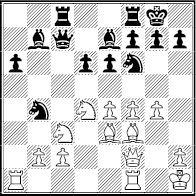
Michel – Stahlberg
Mar del Plata 1947
Black to play
White’s last move, g2-g4, threatens to drive away the f6-knight, Black’s best kingside defender. Once that is done, White can choose between promising pawn action (f4-f5) and promising piece play (perhaps  g2,
g2,  h4 and
  f3-h3).
Black appreciated that if he was going to strike back, 1 … d5! was the right way. Opening the long diagonal favors him (2 exd5  fxd5 3
  xd5
xd5  xd5, e.g. 5 c3
  c5 and …
  fd8/ …
  xe3).
xe3).
But why isn’t 2 e5 good? The center remains closed and White can continue on the kingside after 2 …  d7.
d7.
The answer is 2 …  e4!. For better or worse, this is what the … d5 priyome calls for. After 3
  xe4 dxe4 4
  g2 Black should have ample play with …
  c5, …
c5, …  fd8, …
  c4 and …
  d5. (But not 4 …
  xc2 5
xc2 5  ac1.)
ac1.)
White preferred 3  xe4 dxe4 and then 4 h4?.
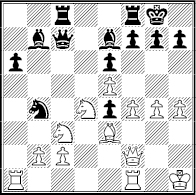
Black to play
But this was a blunder that was punished by 4 …  d8! 5 g5 (to stop 5 …
  xh4) and then 5 …
  xd4! 6
  xd4 e3+. Among the improvements is 4
  ac1, to safeguard c2. But 4 …
  fd8 5
fd8 5  g1
g1  c5 offers good chances.
There is a downside to this priyome. After … d5 Black may end up losing a pawn, either on d5 or on e4 after …  e4/
e4/  xe4. But he often gets excellent compensation because of the loosening effect of g2-g4.
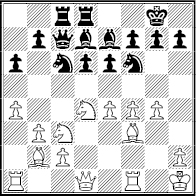
Baturinsky – Panov
Moscow 1936
Black to play
White’s last move, g2-g4?, was a mistake that was punished by 1 … d5!.
Then 2 e5  e4 3
e4 3  xe4 dxe4 4
  xe4 would favor Black after 4 …
  xd4 5
xd4 5  xd4
xd4  c6 because of the threats of 6 …
  c5 and 6 …
  xe4+.
xe4+.
White chose 2 exd5 and then 2 …  xd4 3
xd4 3  xd4
xd4  c5!. If the queen goes to d3 or d1 he loses the f-pawn. Worse is 4
  d2?, which costs a piece (4 …
  b4).
b4).
Play went 4  c4 exd5 5
  xd5
xd5  xd5 6
xd5 6  xd5 (or 6
  xd5
xd5  c6 7
c6 7  g5
g5  d4!).
d4!).

Black to play
White is hoping for 6 …  xg4 7 f5!. Then he would threaten
  xg4 and survive the crisis (7 …
  h5 8
h5 8  c3
c3  f8 9
f8 9  xc7 and 10 c4).
But Black shot back 6 …  c6!. Thanks to opening the long diagonal, he would win after 7
  ad1
ad1  xd5 8
xd5 8  xd5
xd5  d8 9
d8 9  d1
d1  xd5 10
  xd5
xd5  d6!.
d6!.
White played the forced 7  f3 but 7 …
  d7 threatened 8 …
  xf3+ 9
  xf3
xf3  xg4 as well as 8 …
  a3! (and the immediate 8 …
  xg4). Black won after 8
  c3
c3  xg4 9
xg4 9  xc6
xc6  xc6 10
  f3
f3  xf3+ 11
  xf3
xf3  d2.
d2.
A queenside pawn majority is often an endgame asset. But it can also be a middlegame target for an enemy b-pawn supporting a Philidor knight.
In the following position, Black has two good ways of proceeding. One is 1 …  c4 to force 2
  e2
e2  fc8 3 c3. Then he can favorably blow open lines with … b5-b4. But there’s a tactical problem: 3 …
  c6 allows 4 b3, trapping the rook.
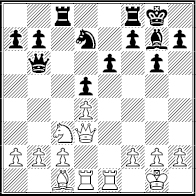
Platonov – Petrosian
Moscow 1964
Black to play
Black chose the alternative, 1 …  c6!. His idea is 2 … a6 and 3 … b5, since that would threaten to win the c-pawn after 4 … b4.
In this case, the tactics help Black, e.g. 2  e2 a6 3 a4 walks into 3 …
  b6, which threatens …
  xa4 (4 b3?
  xc3 or 4 a5
  c4).
c4).
White chose 2  h3? instead and Black made steady progress: 2 … b5 3 a3 a5 4
  d2 b4 5 axb4 axb4 6
  d1
d1  a8!.
a8!.
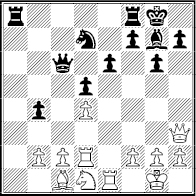
White to play
White has protected c2 but ruined his piece coordination. Black will exploit it with …  a1 and …
  f6-e4 or …
  b6-c4.
White didn’t last long: 7  e3
e3  f6 8
f6 8  d3
d3  e4 9
e4 9  ed1
ed1  a1 10
a1 10  h4
h4  b6 (threat of 11 …
  xd4 12
  xd4
xd4  xc1). He resigned after 11
  g4 h5 in light of 12
  e5
e5  f6 13
f6 13  h3
h3  xe5 14 dxe5
  xf2 or 13
  f4
f4  g5. Another case:

Perelshteyn – Atalik
Philadelphia 2000
Black to play
Since White’s bishop discourages …  b8 it doesn’t seem that Black can achieve much by opening the b-file. But he got good things going with his queen, 1 …
  c6!.
c6!.
Black readied … b5 followed by … a5, …  d7, …
d7, …  d6, …
d6, …  fb8 and eventually … b4. If White opens the center, 2 c4 dxc4 3
  xc4, Black has the better of 3 … b5 and …
  d5.
d5.
Instead, White tried to attack the king, 2  e3 b5 3 g4 a5. But by then it was clear the attack wasn’t working. White should have tried to cut his losses by trading queenside pawns (4 a3 b4 5 axb4 axb4).
Instead, the game went 4  d1 b4 5 h4 a4.
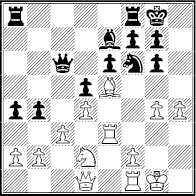
White to play
Black threatens to collapse the queenside chain with … a3. For example, 6 h5 a3! 7 hxg6 fxg6 8  c2 axb2 and now 9
  xg6 bxc3!. Black’s king would be safe but White has lost the queenside.
White’s best try may be 6  xf6
xf6  xf6 7 h5. Instead, he went downhill, 6
  b1
b1  e4 7 f3
  d6 8
d6 8  g3
g3  fb8 9
fb8 9  f2
f2  b6 10
b6 10  g2
g2  c4 11
c4 11  e1
e1  d6, and lost.
In several 1 d4 and 1 c4 openings Black’s best method of developing his light-square bishop is a fianchetto, …  b7. But … b6 creates a hole at c6. How to exploit this is a trade secret known to every master.

Botvinnik – Donner
Amsterdam 1963
White to play
The priyome typically consists of three steps: (a) trade light-square bishops, (b) secure c6 with b4-b5, and (c) occupy the hole with a knight.
White began with 1  d4!
d4!  xg2 2
xg2 2  xg2. Black could avoid the bishop swap only through concessions. For example, 1 …
  d5 2 e4!
  5f6 and 3 e5!
  d5 4
d5 4  c4
c4  c8 5
c8 5  c1 and
  g4 gives White a serious edge in space (3 …
  xg2 4 exf6!).
The trade prompted a battle for control of the g2-a8 diagonal. Play went 2 …  c7 3
c7 3  b3
b3  fc8 4
fc8 4  fc1
fc1  b7+ 5
b7+ 5  f3!.
f3!.
Now 5 …  xf3+ 6
  2xf3 and
  c6/
c6/ c2/
c2/ ac1 is quite bad for Black. So the game continued 5 …
  d5 6 e4
  5f6 and now 7 b5! a6 8
  c6!
c6!  f8 9 a4!.
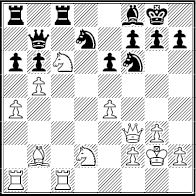
Black to play
The priyome has shut Black’s heavy pieces out of the game. Trying to oust the c6-knight with 9 …  b8? allows 10
  xf6!. And if he prepares …
  b8 with 9 …
  e8 he invites 10 e5!, threatening
  e7+ and
  xb7.
xb7.
Black tried to escape via trades, 9 … axb5 10 axb5  xa1 11
  xa1
xa1  a8. But 12
  d1! kept enough material on the board to make the c6-knight matter.
After 12 …  e8 13
e8 13  c4
c4  c5 14 e5! there were tricks on the long diagonal (14 …
  c7 15
c7 15  d7!
d7!  xd7 16
  e7+ and 17
  xb7).
xb7).
The end was 14 …  c8 15
c8 15  a1
a1  c7 (15 …
  a8 16
a8 16  xa8
xa8  xa8 17
  e7+) 16
  a7
a7  xa7 (16 …
  c8 17
c8 17  xb6 and wins) 17
  xa7
xa7  xa7 18
  xb6 resigns.
Even if White does not occupy c6, the threat to do so can be powerful:
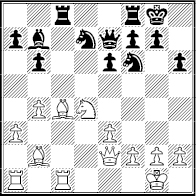
Aronian – Carlsen
Elista 2007
White to play
There’s an alternative priyome in this kind of position. White can try to shut out Black’s bishop and KN with f2-f3 and e3-e4. But 1 f3 is ineffective here because after 1 …  d5! 2 e4
  f4 gives Black kingside play he doesn’t deserve (3
  e3
e3  g5; 3
g5; 3  f2
f2  e5).
e5).
White preferred targeting c6 with 1  a6!. Play went 1 …
  xa6 2
xa6 2  xa6
xa6  xc1+ 3
  xc1
xc1  b8.
b8.
Before White can exploit c6 he prepared with 4  c4
c4  d8 and 5 h3
  e8 6 b5!. He may decide to create a passed pawn with
  c6/ …
c6/ …  xc6/bxc6. Or he could restrict Black further with a3-a4 and a supported
  a3.
a3.
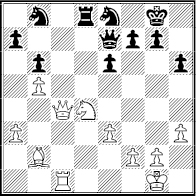
Black to play
What’s more, White need not hurry. The game went 6 …  d5 7
d5 7  e2
e2  c5 8
c5 8  d1!
d1!  c8 9
c8 9  f3
f3  d8 10
d8 10  c1
c1  d6 11 a4.
Black’s pieces are still restricted (11 …  d7? 12
  c6) and
  a3 is coming. Black chose to force matters, 11 … e5 12
  f5
f5  xf5 13
  xf5 f6 14
  e4
e4  f7.
f7.
But after 15  a3!
a3!  h8 16
h8 16  h2
h2  g8 17
g8 17  d6 White methodically enlarged his advantage until it won.
Pushing White’s h-pawn to h5 is a fundamental idea after … g6. What makes it particularly attractive is when Black cannot keep the file closed.

Botvinnik – Gligoric
Moscow 1956
White to play
Black has just played …  h6. His goal is to occupy d4 with a knight.
But there’s a drawback: After 1 h4! Black cannot play 1 … h5. The knight move is a priyome tipoff. When a master sees … g6 and …  h6 he at least looks at h2-h4. It’s simple pattern recognition.
There followed 1 … d6 2 d3  b8. Black lacked an easy defense on the kingside because 2 …
  g4 3 h5!
  xh5? loses a piece (4
  xh6
xh6  xh6 5 g4!).
The game went 3 h5  d7 and then 4
  xh6
xh6  xh6 5 hxg6 hxg6.

White to play
White played the dramatic 6  c1!. It’s based on 6 …
  xc1?? 7
  xh8 mate.
After the forced 6 …  g7 and 7
  xh8+
xh8+  xh8 8
xh8 8  h6 Black could have defended better with 8 …
  f6 but lost after 8 …
  xc3+ 9 bxc3 e6?. White can mount a strong attack with 10
  d2 and
  h1/
h1/ g5.
g5.
There’s another trigger that prompts a master to consider pushing his h-pawn. This occurs when his opponent plants a knight on g3 or g6.
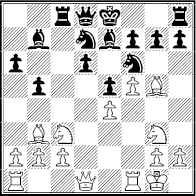
R. Byrne – Fischer
Sousse 1967
Black to play
White has just played  g3, to protect the e4-pawn and prepare
  h5. His position appears promising, e.g. 1 … b4 2
  xf6
xf6  xf6 3
xf6 3  d5.
d5.
But after 1 … h5! he had no good answer to the threat of 2 … h4 and 3 …  xe4. White had to try 2 h4.
But this made 2 … b4! stronger because White would be losing after 3  d5
d5  xd5 4
xd5 4  xd5
xd5  xg5 5
xg5 5  xb7??
xb7??  e3+ or 5 hxg5
  xd5 6
xd5 6  xd5
xd5  xg5.
xg5.
Instead, White went 3  xf6
xf6  xf6! 4
  d5
d5  xh4 but after 5
  xh5
xh5  g5! his kingside was fatally loosened.
The h-pawn charge is a familiar priyome in many openings with an early  g3. For example, 1 d4
  f6 2 c4 e6 3
  c3
c3  b4 4 e3
  c6 5
c6 5  e2 d5 6 a3
  e7 7
e7 7  g3 and now 7 … h5! 8
  d3 h4 9
  ge2 h3!.
But driving away a knight should be part of a greater goal, as in that case, when Black induced weaknesses with 9 … h3. Another example:
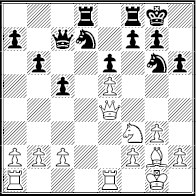
Geller – Flohr
Moscow 1950
White to play
Black’s last two moves were …  g6 and … 0-0. The priyome is in the air – but the timing has to be right. White played 1 h4? and had nothing after 1 … c4! 2 h5
  e7.
e7.
His attempt to force matters on the kingside, 3 g4 b5 4 g5?!  c5 5
c5 5  f4
f4  f5 6
f5 6  h1 hxg5 7
  xg5
xg5  e7, left him overexposed and he eventually lost.
What went wrong? White should play 1  f1!. Then when h2-h4-h5 drives the knight off g6, White can threaten mate on h7 with
  d3!.
d3!.
An isolated d-pawn often gives a player more space and ample opportunity to attack the wings. But there is an anti-Isolani priyome.
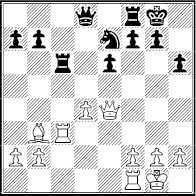
Korchnoi – Karpov
World Championship 1981
Black to play
The priyome calls for swapping all or most minor pieces and then tripling heavy pieces against the pawn. Here White had helped Black by mistakenly trading a wonderful knight on e5 for a bishop on c6.
Then came 1 …  d6 2 g3
  d8 3
d8 3  d1
d1  b6 (not 3 …
  d7? 4
d7? 4  a4) 4
a4) 4  e1
e1  d7 5
d7 5  cd3
cd3  d6. But White can defend d4 with 6
  e4 and meet a knight maneuver to f5 with d4-d5!.
There followed 6 …  c6 7
c6 7  f4
f4  d5! so that 8
  e4
e4  b4! forces a favorable queen trade (9
  xc6
xc6  xc6 10 d5
  b4!).
b4!).
White retreated 8  d2 but after 8 …
  b6 the threat of …
  b4 prompted 9
  xd5
xd5  xd5 and then 10
  b3
b3  c6 11
c6 11  c3
c3  d7!.
d7!.

White to play
Black is not threatening the pawn because after trades on d4 White has  xb7. But Black is threatening 12 … e5!.
White’s 12 f4 was forced and then came 12 … b6! 13  b4 b5 (threat of 14 … a5) 14 a4 bxa4 15
  a3 a5 16
  xa4
xa4  b5 17
b5 17  d2.
d2.
Black could penetrate with his rook, 17 …  c8 and …
  c1+. But he preferred 17 … e5! 18 fxe5
  xe5 19
  a1
a1  e8! 20 dxe5
  xd2 and soon won.
If no minor pieces have been traded, the priyome calls for a swap of the knights. The reason is that knights tend to benefit from the outpost squares on the c- and e-files that the d-pawn controls. Also knights tend to interfere with the doubling or tripling of enemy heavy pieces.

Karpov – Spassky
Montreal 1979
White to play
White began with 1  e5!, which prepares
  f3 and
  b3/
b3/ xd5. Then came 1 …
  e6 2
e6 2  xc6!.
xc6!.
Note that 2 … bxc6 would create the more easily defended ‘hanging pawns.’ But 3  a6! would cost the Exchange.
So Black retook 2 …  xc6 and then came 3
  f3
f3  b6 4
b6 4  e5, raising the prospect of
  xf6/
xf6/ xd5 at some point.
Black felt obliged to trade knights, 4 …  e4 5
e4 5  e2
e2  xc3 6
xc3 6  xc3
xc3  d8.
d8.
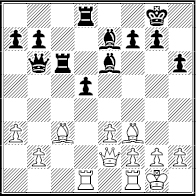
White to play
White proceeds with the tripling of heavy pieces, with the queen in the rear, 7  d3
d3  cd6 8
cd6 8  fd1
fd1  6d7 9
6d7 9  1d2!
1d2!  b5 10
b5 10  d1 b6.
But Black is not vulnerable to the pin that won the previous game (11 e4? dxe4).
Instead, White probed for a kingside weakness while Black’s pieces were tied to d5: 11 g3  f8 12
f8 12  g2
g2  e7 13
e7 13  h5 a6 14 h3
  c6 15
c6 15  h2 a5.
White’s winning plan began with 16 f4 and a threat of f5-f6. Then came 16 … f6 17  d1
d1  b5 18 g4. Black overlooked the threat and played 18 … g5 18
  h1
h1  c6, allowing 19 f5!
  f7 20 e4!. Now 20 … dxe4?? loses a rook, 21
  xd7. So Black answered 20 …
  g7 and was lost after 21 exd5.
Computers have taught us not to be afraid of advancing our g-pawn two squares. That push is crucial in many attacks but is also useful in purely positional middlegames because it gains so much kingside space.
Yet g2-g4 can begin a positional horror story if it’s met strongly by … h5.
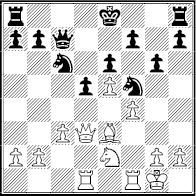
Nimzovich – Capablanca
New York 1927
White to play
Textbooks used to say White was wrong for seeking g2-g4 in this much-anthologized example. Today we know he would stand well after 1  f2 and 2 g4!. Also after 1 … h5 2
  d2, 3
d2, 3  c1 and 4 c4.
But he rushed into 1 g4? and was met by 1 …  xe3 2
xe3 2  xe3 h5!. Then if 3 gxh5?
  xh5 Black can exploit the pawn structure by securing king’s safety (perhaps …
  g8-g7) and then …
  ah8 and …
  e7-f5.
The other problem for White is that 3 h3? is also poor after 3 … hxg4 4 hxg4 and 4 … 0-0-0. Black would be able to use the h-file with …  h4/ …
h4/ …  dh8. He can also undermine the White center with … g5!.
So, White played 3 g5. That’s an ugly move because it virtually rules out f4-f5. It’s not easy to exploit that. But 16 moves later:
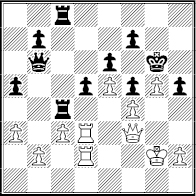
Black to play
Black was ready to invade with heavy pieces and eventually won after …  e4 and …
  cc4!.
cc4!.
This priyome has become familiar in the Berlin Defense endgame. White often plays g2-g4 to drive a knight off f5 and prepare f2-f4-f5.
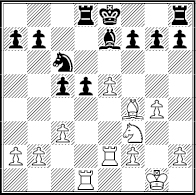
Gligoric – Neikirch
Portoroz 1958
Black to play
White’s bishop is a bit bad and Black has a healthier pawn majority. But Black can’t castle because his king has moved. The position is roughly equal.
White has just played 1  e2, instead of the safer 1
  g2. The difference was revealed by 1 … h5!.
White would like to maintain his pawn on g4 by means of 2 h3 hxg4 3 hxg4. But 3 … d4! would be strong because 4 cxd4 walks into 4 …  h3! 5
h3! 5  g2
g2  xf3 (6
  xf3
xf3  xd4 – with check and advantage).
White felt forced into 2 g5. Black can’t play 2 … 0-0. He might be attracted by 2 … d4 3 cxd4 cxd4 because of 4  c2 d3 5
  c3
c3  b4 6 a3
  d5.
d5.
But he decided to activate his king at the cost of a pawn: 2 …  d7! 3
d7! 3  xd5+
xd5+  e6 4
e6 4  xd8
xd8  xd8. Thanks to … h5/g4-g5 he prepared 5 …
  f5!. White replied 5 h4.
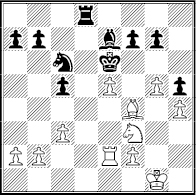
Black to play
Thanks to the f5 square that Black won with 1 … h5 and the crippled White pawn majority, Black is at least equal.
One good winning try is 5 …  d1+ followed by 6 …
  a1 and … a5-a4/ …
  a5-c4. Black chose another, 5 …
  d5 6
d5 6  g3
g3  f5 7
f5 7  g2
g2  d8 – headed for c7 – and had equal chances.
When the e-pawns oppose one another at e4 and e5, a very common priyome is the transfer of a White knight to f5 or a Black one to f4.
Since the kings are typically castled on this wing, the maneuver often exerts attacking pressure in the same way that a White knight on c5 – or a Black one on c4 – exerts positional pressure in 1 d4 d5 games.
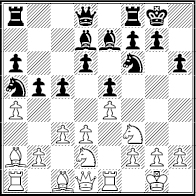
Svidler – Jakovenko
Moscow 2008
White to play
A master knows when the kingside knight shift is effective, such as when his opponent has weakened his king position. Here the tipoff was Black’s last move, … h6.
White replied 1  h4! since Black cannot prevent
  f5 (1 … g6? 2
  xg6!).
There would have been complications after 1 …  xe4!?, threatening
  xh4, and 2
  g6
g6  xd2 3
xd2 3  xf8
xf8  db3!.
db3!.
But Black averted  g6 with 1 …
  h7 and 2
  f5!
f5!  xf5? 3 exf5
  c6.
c6.
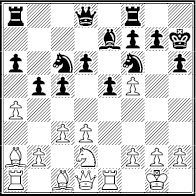
White to play
The basic priyome was over with 2  f5. But experience in this kind of position tells us to take advantage of the pawn structure further with 4 g4!.
White will exploit d5 and e4 once the knight is driven off f6. There followed 4 …  g8 5 h4!
  h7 6
h7 6  d5
d5  c8 7 axb5 axb5 8
  f3!
f3!  b8 and now 9 g5! hxg5 10
  e4!.
e4!.
The attack would roll on after 10 … gxh4 11  h1!
h1!  f6 12
f6 12  xf6+
xf6+  xf6 13
  g1 or 10 …
  f6 11
f6 11  xf6+!
xf6+!  xf6 12
  h1! and
  g1.
g1.
Black tried 10 …  d7 instead. After 11 hxg5
  xg5 12
  xg5
xg5  xg5 White eventually won with 13
  a6
a6  e7 14
e7 14  a7 – and 13
  xd6! is even stronger.
But when an intruding knight can be driven back it can turn out to be liability.
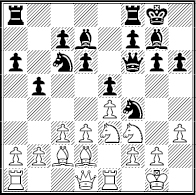
Vallejo-Pons – Illescas
Dos Hermanas 2001
White to play
Black’s knight has just landed on f4. It watches g2, discourages  d5, and may prepare a pawn storm, … g5/ … h5 and … g4.
But 1 h4! was strong because it threatens 2 g3!, now that White is not losing a pawn at h3.
Black would simply drop a pawn after 1 …  e6? 2
e6? 2  g4. Better is 1 …
  d8 but Black would be clearly in retreat after 2 g3!
  e6 3 a4.
So he played 1 …  e7. But after 2 g3! it was clear that 2 …
  h5 3
h5 3  h2!
h2!  h7 4
h7 4  hg4! would be more than unpleasant.
The poor knight advanced, 2 …  h3+ and 3
  g2 g5 4 hxg5 hxg5 5
  e2!.
e2!.
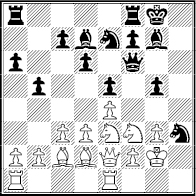
Black to play
White has met the threat of 5 … g4 6  -moves
  xf2+. He also made a threat of his own,
  h2-g4/
 h1, to win the trapped knight.
Black’s best practical chance would have been 5 …  f4+!? 6 gxf4 exf4 – a variation on the
  f5 sacrifice we’ll examine in Chapter Three.
But he underestimated how much trouble the knight at h3 is in and lost after 5 …  h6 6
h6 6  h2!
h2!  g6 7
g6 7  h1 g4!? 8
  exg4
exg4  xd2 9
xd2 9  xd2 f5 10 exf5
  xf5 11
  xh3!. Or 9 …
  f4+ 10 gxf4
  xg4 11
  ag1 and White wins.
The knight shift is common on the Black side of a King’s Indian Defense and the White side of a Ruy Lopez, Giuoco Piano or Two Knights Defense. In the latter cases, White typically plays  bd2-f1-g3-f5 or -e3-f5. In fact, Wilhelm Steinitz made the maneuver to f5 famous by adopting it even before he castled.
‘Pawns should capture towards the center’ is sound advice to beginners. But you’re no longer a beginner. Masters use a priyome to break the rule.
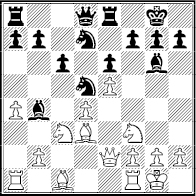
Spassky – Petrosian
World Championship 1969
White to play
White has just played e4-e5, prompting …  d5. He intends to use the e4 square, after 1
  xg6 hxg6, in a kingside attack.
For example, 2  e4 would prepare
  fg5 followed by
  g4-h4 and
  h7+. By retaking towards the center Black can’t counter
  g5 with … h6!.
True, he could play 2 … f6 instead. But 3 exf6 gxf6 4  h4 favors White. Also, White has the edge after 2 … c5 3
  d6. And on 2 …
  e7 3
e7 3  g5:
g5:
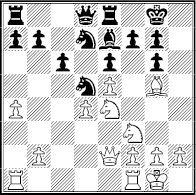
Black to play
The  xe7 trade is excellent in view of
  d6 or
d6 or  fg5/
fg5/ g4-h4/
 a3-h3.
But this didn’t happen. Black answered 1  xg6 with 1 … fxg6!. That killed White’s kingside hopes since
  g5 can now be met by … h6.
Yes, f7 and e6 are weakened. But they cannot be exploited. White tried to exert positional pressure with 2  d2
d2  e7! 3
e7! 3  e4
e4  f8 4 a5 but ran out of steam after 4 …
  c8 5
c8 5  fc1 a6 6
  g4 h6 7
  e4
e4  d7 8 h4
  ed8 and drew.
The power of … fxg6 is so great that allowing it can be a grave mistake.
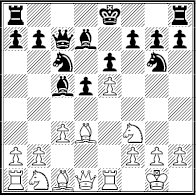
Sveshnikov – Balashov
Moscow 1976
White to play
Instead of defending the threatened e-pawn, White preferred 1  xg6.
xg6.
It’s not hard to understand why: If Black castles kingside after 1 … hxg6 White would have an easy attack based on  f4,
f4,  g5 and
  g4-h4.
White might prefer 2  g5 to stop … 0-0-0. If Black responds 2 …
  e7, he can land in a bad-B-vs.-N middlegame after
  xe7 and
  bd2-b3-d4.
Nevertheless, 1  xg6? was bad because of 1 … fxg6!. Then Black can safely castle kingside – because of … h6! – and use the half-open file.
Play went 2  f4 0-0 3
  g3
g3  e7 4
e7 4  bd2
bd2  f5.
f5.
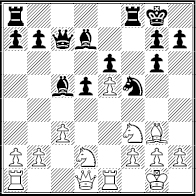
White to play
Black has a strong plan of attacking f2 with … h6!, …  f7, …
f7, …  af8, …
  b6 and a mixture of …
  xg3 and … g5-g4!.
White could not establish his d4 outpost with 5  b3 because of 5 …
  a4! and he eventually lost after 6
  h1
h1  b6 7
b6 7  c2
c2  ad8 8
ad8 8  e2 h6! 9 h3 g5!.
One of the more elaborate priyomes arises in the King’s Indian Defense/Reversed. The key is the space-grabbing advance of the e-pawn.
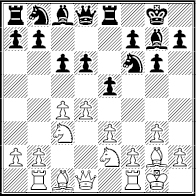
E. Nikolic – Fischer
Vinkovci 1968
Black to play
By not advancing his e-pawn to e4, White reduces the center play Black gets from … exd4. But Black gains ground for attack after 1 … e4!.
The basic moves of this priyome are …  f5/ … h5 and …
  bd7-f8-h7. That’s a lot more than for most priyomes. But it puts Black into position for a potent attack based on …
  d7/ …
d7/ …  h3 and/or …
  g5/ … h4.
White has so few defensive resources that he tried to open the queenside or center to distract Black, 2 b4!  f5 3 h3 h5 4
  f4
f4  bd7 5 a4
  f8.
f8.
But after 6 c5? Black sealed the center with 6 … d5!. It was evident after 7 b5  8h7 8
8h7 8  d2
d2  g5 9
g5 9  b2
b2  d7 10
d7 10  h2
h2  h6 that Black’s attack was faster.
White’s last chance for play was 11 a5, intending 12 a6!.
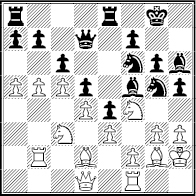
Black to play
Black crashed through with 11 …  g4! 12 hxg4 hxg4. He is preparing to invade on the h-file with …
  g7/…
g7/…  h8 and also has …
  f3+ coming up.
White was lost soon after 13  h1
h1  f3+! 14
  xf3 gxf3 15
  g1
g1  xf4! 16 exf4
  g7! and …
  h8.
h8.
The kingside expansion allows for a variety of sacrifices and methods to pursuing an attack. Here’s a colors-reversed version of it.
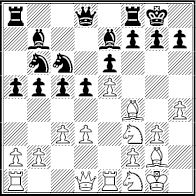
Chuchelov – Arlandi
Mondariz 2000
White to play
White may try to push his pawn to h6. If Black replies … g6, he creates a hole at f6 that White can exploit with  d2/
d2/ g5/
g5/ xe7 and
  h2-g4-f6+.
Instead, White went for mate with 1  g5. Then on 2
  h5 h6, he could decide whether to retreat the knight – followed by a piece sacrifice on h6 – or 3
  e3 with the idea of 3 … hxg5 4 hxg5 and
  g4-f6+!.
Black met 1  g5 with 1 …
  e8 so that 2
  h5?
h5?  xg5 3 hxg5 (or 3
  xg5) f5! would secure the kingside (4 gxf6??
  xh5).
xh5).
After 2  e3 b4 3
  g4. Black needed to take defensive steps such as 3 … h6 or 3 …
  h8. Instead, he allowed a standard sacrifice, 3 …
  a6? 4
a6? 4  f6+! gxf6 5 exf6
  xf6 6
xf6 6  h5.
h5.
White would win quickly after 6 …  xg5 7
xg5 7  xg5+
xg5+  h8 8
h8 8  f6+ and
  h6.
h6.
Black created a flight square for his king, 6 … h6 and then 7  xh6
xh6  xg5 8
xg5 8  xg5+
xg5+  h7. But White finished off with 9
  h5+
h5+  g8 10
g8 10  h6 and a check.
Pawns become harder to defend as they advance. Doubled pawns become even weaker. But in this priyome, a liability becomes an asset, as a doubled pawn advances to serve as anchor for a knight outpost.
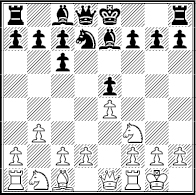
Ross – Lesiege
Quebec 1990
Black to play
White wants to attack the e5-pawn and force … f6 or …  d6. Then he can open the center with f2-f4 or d2-d4. Or he could leave the pawn structure intact and try to exploit it with the knight shift to f5.
Black replied with a priyome, 1 … c5! and 2  b2 f6 3 d3
  b8!. He stopped d3-d4 and readied …
  c6-d4, which would make the knight the best minor piece on the board.
Then if White captures the knight, … cxd4 will undouble the pawns. White would have no compensation for his lack of space and unfavorable N-vs.-B matchup. On the other hand, if White ousts the knight from d4 with c2-c3, he grossly weakens his d3-pawn.
Play went 4  c3
c3  e6 5
e6 5  d1
d1  c6 6
c6 6  e3.
e3.
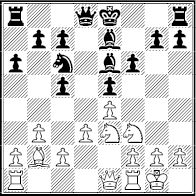
Black to play
Now 6 …  d4 would have given Black a fine game. He chose to prepare queenside castling first, with 6 …
  d7 and 7
  h4 g6.
White appreciated how good 8 … 0-0-0 and …  d4 would be so he tried, 8 f4 exf4 9
  xf4 g5! and 10
  xf6
xf6  xf6 11
  xf6. But he was lost after 11 …
  f8! 12
  xg5
xg5  g7! (13
  f3
f3  xf3 and …
  xg5).
xg5).
This priyome has a kingside version, when  xf6 and … exf6 have been played. For example, 1 d4
  f6 2
f6 2  c3 d5 3
  g5 c6 4
  xf6 exf6 5 e3:

Black to play
Should Black make his bad bishop worse? Yes, because 5 … f5! secures a fine outpost at e4. White will be reluctant to play f2-f3, because that weakens e3. And only one bishop is left to attack e3 – Black’s.
In one instructive game White tried 6  d3 g6 7
  ce2, preparing c2-c4. Then came 7 …
  d7 8
d7 8  f3
f3  d6! and 9 0-0 0-0 10 b3
  f6 11 c4
  e4.
e4.
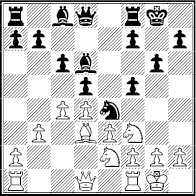
White to play
Ousting or capturing the e4-knight will favor Black. He gave his opponent another way to undouble the pawns, after 12 cxd5 cxd5 13  f4
f4  e6. White passed up
  xe6 but lost after 14 a3
  f6 15 b4 g5! and … g4.
When White trades his d-pawn in a Sicilian Defense (1 e4 c5 2  f3 and 3 d4 cxd4) he gets a splendid square at d4 for a knight. Black has his own outpost at e5 but White can challenge it with f2-f4. The sharpest way for Black to secure control of e5 is the doubled-edged priyome … g5.
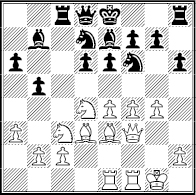
Milos – J. Polgar
Sao Paolo 1996
Black to play
White has a typical attacking setup that would allow him, for example, to meet … 0-0 with h2-h4 and g4-g5, with good chances.
If Black counters with the … d5 priyome she doesn’t have enough compensation for a pawn after 1 … d5?! 2 e5  e4? 3
e4? 3  xe4 dxe4 4
  xe4.
xe4.
But 1 … g5! wins control of e5. The Black knights would take over the game after 2 fxg5 hxg5 3  xg5
xg5  e5 and then 4
  g3
g3  fxg4 5
  xe7
xe7  xe7!.
xe7!.

White to play
Black retakes with his king because she wants her queen to threaten …  b6!. For example, 6 h3
  b6! 7
b6! 7  e2
e2  cg8! and White crumples.
But 1 … g5 is not just a tactical shot. It’s a strategic idea that wins e5 one way or the other. Instead of 2 fxg5, White tried 2 f5. But after 2 …  e5 3
e5 3  h3
h3  d7! it was evident that the safer king was Black’s.
White defended his g-pawn with 4  e2 but Black had a series of blows: 4 … h5! 5 fxe6+ fxe6 6 gxh5 g4 7
  g2
g2  xc3!.
xc3!.
Then came 8 bxc3  xe4 9
xe4 9  f2
f2  xh5 10
  f4 g3! 11 hxg3
  xf4 12
  xf4
xf4  h1+ 13
  f2
f2  h2+ 14
  e3
e3  g5 and Black won. Or 14
  g1
g1  g2+ 15
  h1
h1  h8+.
h8+.
Of course, … g5 weakens many squares in Black’s camp. When White can maintain an initiative, this priyome can turn out badly:
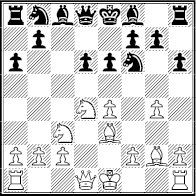
J. Polgar – Topalov
Hoogeveen 2006
Black to play
Black played 1 … g5!? and then 2  e2
e2  bd7. White rejected 3 h4
  g8! 4 hxg5 hxg5 because after …
  e5 her own g-pawn will be under fire and she hasn’t benefited from opening the h-file.
So the game proceeded with 3 0-0-0  e5 4 h3
  fd7 5 f4! and then 5 … gxf4 6
  xf4 b5 7
  hf1
hf1  b7 8
b7 8  f2. White is taking aim at f7 but that square is safe as long as
  xe5 can be met by …
  xe5.
xe5.
However, it is easier to play White’s position than Black’s. She executed a nice knight maneuver, 8 …  c8 9
c8 9  ce2!
ce2!  g7?! 10
  g3
g3  h7 11
h7 11  h5!
h5!  h8 12
h8 12  b1. An inexact move, 12 …
  c5?, weakened control of e5.
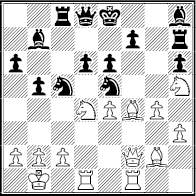
White to play
White could have broken through with 13  f5! exf5 14
  xe5!
xe5!  xe5 15
  xf5 and
  xh7 (15 …
  h8?? 16
  xf7 mate).
As mentioned earlier, the advance of one player’s f-pawn may be linked indirectly with the other player’s c-pawn: When White plays f2-f3 or f2-f4, a master playing Black may react by looking at … c5.
Why? Because f2-f3 loosens the g1-a7 line. If the diagonal is blocked by a White pawn at d4, the best way to unblock it is with … c5!?.
This is a feature of 1 d4 openings, like 1 d4 d5 2  c3
c3  f6 3
f6 3  g5
g5  bd7 4 f3. The most challenging responses by Black are … c5 and … c6. For example, 4 … h6 5
  h4 c5! leads to sharp play after 6 e4 cxd4 7
  xd4 e5 8
  a4 d4 or 6 dxc5
  a5.
a5.
On the other hand, … c5 can leave Black with an isolated d5-pawn following a dxc5 or … cxd4 trade. Whether that is more of a liability than the White pawn at e3 will depend on piece play.
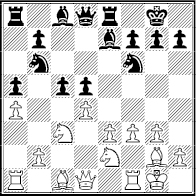
Spassky – Gurgenidze
Moscow 1957
White to play
This position arose out of a Nimzo-Indian Defense when Black met f2-f3 with … c5!. He wanted to forestall a strong plan of e3-e4-e5!.
Now 1 dxc5?  xc5 makes the e3-pawn the main topic of conversation (2
  d4
d4  c4). White switched instead to kingside attack with 1 g4!.
Then … c4 would cripple Black’s counterplay. He preferred 2 … h6 3 b3  d7. White cleared d4 and safeguarded his queenside with 4 dxc5!
  xc5 4
xc5 4  d3
d3  c8 5
c8 5  d2
d2  c6 6
c6 6  d4.
d4.
It’s harder to improve Black’s position. He tried 6 …  bd7 7
bd7 7  ad1
ad1  a7 8
a7 8  ce2!
ce2!  e5 9
e5 9  b1
b1  g6 10
g6 10  f5!
f5!  c7 11
c7 11  b2.
b2.

Black to play
White has made huge progress. He will target g7 with  eg3-h5 and/or h2-h4 and g4-g5. His immediate threat is
  xh6+.
xh6+.
His attack grew after 11 …  h7 12
h7 12  h1
h1  b8 13
b8 13  eg3 and won after 13 …
  e5? (13 …
  e7!) 14 f4!
  d3 (14 …
  exg4 15 h3!) 15
  d4
d4  b4 16 g5!.
When the center is locked with pawns at e4 and e5, the most promising plan is often an advance of the f- and g-pawns. The less enemy counterplay, the greater the chance of success for this pawn phalanx.
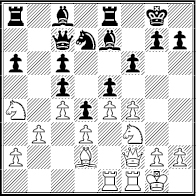
Lazarevic – Gresser
Ohrid 1971
White to play
Black lost her best chance for queenside play when she doubled her c-pawns earlier. But she appears secure against an opening of the f-file (1  g3
g3  d6 or 1 fxe5 fxe5 2
  g5
g5  f6).
f6).
However, 1 f5! is strong. The priyome will be close to decisive if White can get her g-pawn to g5. Slowing that advance with … h6 only ensures that more of the kingside will be opened after h2-h4!.
Play went 1 …  d6 2 g4
  h8 3 h4
  g8 4 g5. Black’s best was to compete on the kingside (4 … g6!) but she chose 4 …
  b7 5
b7 5  h1
h1  ae8 6
ae8 6  g1
g1  d8.
d8.
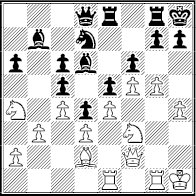
White to play
The difficulty of defending against this priyome was illustrated by 7 g6!. Then 7 … h6 appeared to shut the kingside door. But 8  g5! threatened a killing check (or mate) on f7. The rest was 8 … fxg5 9 hxg5
  e7 10
e7 10  h2
h2  f8 11 gxh6
  f6 12 hxg7+ and mates.
That was an ideal version of the advancing phalanx. Usually the defender has chances for counterplay or for stopping a strong f4-f5!.
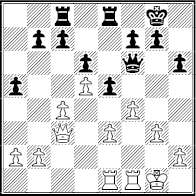
Keres – Euwe
Amsterdam 1940
White to play
White felt he had a free hand to double on the f-file. Instead of 1 f5! he chose 1  f2?! b6 2
  ef1?.
ef1?.
Both players underestimated 2 … exf4!. Then White would have been only slightly better in the 3  xf6 gxf6 endgame.
Instead, Black played 2 …  g6?, allowing White to begin the priyome with tempo, 3 f5! and 3 …
  f6 4 e4.
White threatened to mobilize the phalanx, with h2-h4,  h2 and g3-g4-g5. Black tried 4 … c6 but then came 5 dxc6
  xc6 6 a4!.

Black to play
Black’s counterplay is dead: There will be no … d5 or … b5.
In the face of an inevitable g3-g4-g5, Black’s king made a dash:
6 …  f8 7
f8 7  d1
d1  ec8 8 b3
  e7 9
e7 9  f3
f3  d7 10 h4
  c7 11
c7 11  f1
f1  b7 12
b7 12  e2
e2  8c7.
8c7.
But White can open a kingside file for his pieces. He played 13  h2
h2  d8 14 g4 f6 15
  g2
g2  c8 16
c8 16  g3
g3  d7 17
d7 17  d3
d3  f7 18
f7 18  h1
h1  h8 19
h8 19  hh3
hh3  cc8.
cc8.
The end came soon after 20 g5! hxg5 21 hxg5  c7 22
c7 22  d5+
d5+  a7 23
a7 23  d3
d3  xh3? (23 … fxg5!) 24
  xh3 fxg5 25
  h7
h7  e7 26
e7 26  f3
f3  f8 27
f8 27  g4
g4  f7. Black was so tied to the kingside that White won after 28 b4! axb4 29 a5!.
The maneuver of a bad, pawn-bound bishop from the queenside to a new life on the kingside is one of the most transforming of priyomes.
It is particularly common in Stonewall formations, such as when Black has pawns at d5, e6 and f5 and slides his ugly light-square bishop from c8 to d7, then e8 and it magically comes to life as a fine piece on h5.
The bishop can also make a powerful entrance in French Defenses.
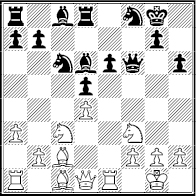
Hagarova – Gleizerov
Cappelle la Grande 1995
Black to play
Black seems to have been stuck with several disadvantages – backward e-pawn, bad bishop at c8, weakened kingside. This changed with 1 …  d7 2
d7 2  e3
e3  e8!.
e8!.
If White had seen …  h5 as a threat, he would have tried something like 3
  d2
d2  h5 4
h5 4  d1!.
d1!.
But instead, there came 3  c1?
c1?  h5!. Suddenly White was in a bad pin and facing …
  g6-h4 or …
  d7-f7/ …
  af8.
af8.
Black won shortly after 4  b1
b1  d7 5
d7 5  a4
a4  f7 6
f7 6  c5
c5  e7 7
e7 7  d3
d3  g6 8
g6 8  c2 – positional surrender – 8 …
  xf3 9 gxf3
  f5 10 f4
  h4 and …
  xd4.
xd4.
In the next diagram White is preparing  c2/
c2/ g5 to threaten h7 and force a kingside weakness. Black had a good choice:
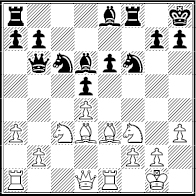
Wang – Akobian
Los Angeles 2003
Black to play
He could have anticipated White with …  e7 and …
  g6. Then he rids himself of his bad B, a common idea we’ll examine in the next priyome.
But he preferred 1 …  h5 and then 2 g4
  f7. Even though the bishop looks strange after 3
  c2
c2  g8!, Black’s position can steadily improve.
It did after 4  g2
g2  ac8 5 b4
  d8 6
d8 6  d2 e5!. White’s porous king position was exposed before he got a chance to play
  f4!.
f4!.
Black had the edge after 7  f5 e4! and 8
  g5
g5  a8 9
a8 9  e6?!
e6?!  xe6 10
  xe6 because of 10 …
  e8!.
e8!.
Then 11  f5 g6 would trap the bishop. Black won after 11
  xd5
xd5  xd5 12
  xd5
xd5  f7 followed by …
  xd5 or …
  f3+.
f3+.
The pawn structure we just looked at suggests another maneuver, a circular tour by a problem bishop. Suppose we scroll back a few moves:
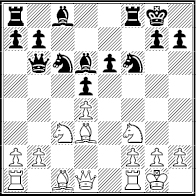
White to play
Instead of 1  e3 – which would lead to the previous diagram after 1 …
  h8 2 h3
  d7 3
d7 3  e1
e1  e8! 4 a3 – White can play the more ambitious 1
  g5.
g5.
This is based on a sound offer of a poisoned b-pawn (1 …  xb2 2
xb2 2  b5!, which threatens
  xd6 as well as
  e1-e2, to trap the queen).
But what is the bishop doing on g5? The answer is that White is getting it to its best diagonal: He aims for  h4-g3!. A trade of bishops would make e5 more vulnerable and leave one bad bishop, Black’s.
This priyome is more common in 1 d4 openings when it is Black’s light-square bishop that is the problem piece.
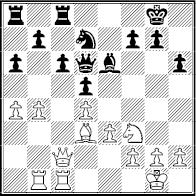
Capablanca – Alekhine
World Championship 1927
Black to play
White is poised to carry out a version of the b-pawn bayonet, the minority attack with a well-timed b4-b5. He wants to isolate one of Black’s queenside pawns and pound it with heavy pieces.
There are several defensive ideas for Black but his best option is to begin the bishop tour, 1 …  g4!.
g4!.
It may seem that his threat of …  xf3 just drives White’s knight to where it wants to go, b3. But his intent was revealed after 2
  d2
d2  c7 3
c7 3  b3
b3  h5! (not 3 …
  xb4?? 4
  c5
c5  a3 5
a3 5  b3 and the queen is trapped).
The bishop will go to g6. Then White will either allow a trade or concede the splendid b1-h7 diagonal to Black. But White chose 4  c5
c5  xc5 5
xc5 5  xc5 and drew after 5 …
  f6 6 b5 axb5 7 axb5
  g6! 8
g6! 8  xg6
xg6  xg6.
xg6.
This subtle priyome employs a bishop to provoke an enemy e-pawn to advance to the fourth rank and concede control of key squares.
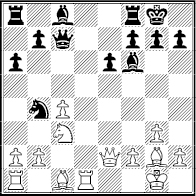
Adams – J. Polgar
London 2012
White to play
It’s time for White to develop his QB. He can do that on e3. Or even d2, if he’s really afraid of …  xc3. But he chose 1
  f4!.
f4!.
If Black’s queen moves, she allows 2  d6!. So play went 1 … e5 2
  e3. How is this position different from the one that occurs after 1
  e3 ?
e3 ?
The answer is a gaping hole at d5. White threatens to exploit it with 3 a3  c6 4
c6 4  d5!.
d5!.
Black fought for d5 with 2 …  e6. But then came 3
  d5!
d5!  xd5 4 cxd5.

Black to play
The hole is gone but White has created a powerful passed d-pawn. It grew in strength after 4 …  f5 5 d6
  d7 6
d7 6  b6 and 6 …
  ac8 7
ac8 7  c7!.
c7!.
Black’s heavy pieces were shut out of the game and she was lost after 7 …  g4 8
g4 8  f3 h5 9
  ac1
ac1  fe8 10
  xg4 hxg4 11
  e4
e4  g5 12
g5 12  c5.
c5.
Of course, a pawn may increase in strength on the fourth rank. The double-edged nature of this priyome is shown by the next two examples:

Taimanov – Smejkal
Leningrad 1973
White to play
Black’s last move, …  h6, threatens 1 …
  xd2 and 2 …
  xc4.
xc4.
As weakening as it may seem, 1 f4 is perfectly safe – and more ambitious than the humble retreat, 1  cb1.
cb1.
But White played 1 e3? and didn’t have a good answer for 1 …  f5!.
f5!.
Then 2  c1 would lose a pawn to 2 …
  d3. No better is 2
  ce4
ce4  xe4 3
xe4 3  xe4 in view of 3 …
  xe4 4
xe4 4  xe4
xe4  xc4! 5
  xc4
xc4  xb2.
xb2.
In the end, White played 2 e4  xd2 3
xd2 3  d1!?. But this allowed 3 …
  d7 4
d7 4  xf6 exf6 5
  xd2
xd2  xc4. The provoking 1 …
  f5! won. Now consider this:
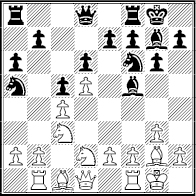
Banusz – Arsovic
Sarajevo 2012
White to play
Black has just played …  f5. White will choose between 1 e4 and moving the attacked rook. (Not 1
  ce4 because 1 …
  xe4 costs the c4-pawn.)
Did Black just give his opponent a free move? Or can he take advantage of the pawn on e4 and the weakening of d3 and f3?
After 1 e4!  d7 2 b3 he played 2 … e5 and prepared … f5, a sound policy in similar positions. But here, after 3
  c2
c2  g4 4 h3
  h6 5
h6 5  e2 f5, White stood better with 6 exf5!.
Then if Black retakes on f5 with a piece, White gets a fine outpost for his knight at e4 and Black’s knight is badly placed at a5.
Black preferred 6 … gxf5. But White was winning after 7 f4 and 7 …  e7?! 8 fxe5 dxe5 9
  a3 and 10 b4!.
In retrospect, …  f5 wasn’t bad. Black should have played for … b5, rather than … f5.
 b3/
b3/ c2 and …
  b6/ …
b6/ …  c7
c7When a knight occupies a center square, it may be challenged by an enemy knight. After 1 e4 c5 2  f3
f3  f6 3 e5
  d5, for instance, the best move is 4
  c3! since 4 …
  xc3 5 dxc3! – another irregular recapture – will expose Black to pressure along the d-file after
  f4/
f4/ d2 and
  d1 or 0-0-0. Black could, of course, retreat rather than trade. But that costs time.
The unwillingness to lose time is why it took so long to appreciate the strategic retreat of a White knight to c2 or b3 or a Black one to c7 or b6.
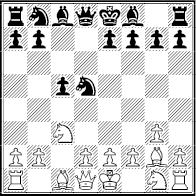
Kirillov – Botvinnik
Moscow 1931
Black to play
Since an 1894 (!) game, the correct move in this position was believed to be 1 …  xc3, even though 2 bxc3 is quite nice for White.
But in this game Black chose 1 …  c7! and a new era in strategy began. Unless White can play d2-d4, Black will dominate the center with … e5/ …
  c6 and eventually …
  e6-d4.
Play went 2  f3
f3  c6 3 0-0 e5! 4 b3
  e7 5
e7 5  b2 0-0 6
  c1 f6. White’s only counterplay stems from threats to the c-pawn and the prospect of f2-f4.
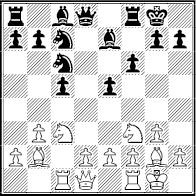
White to play
But he achieved little from the former and never accomplished the latter after 7  e1
e1  f5 8
f5 8  a4
a4  a6 9
a6 9  a3
a3  a5.
a5.
Black’s edge grew after 10  c2
c2  fd8 11
  e3
e3  e6 12 d3
  ac8 and it became a winning advantage after his knights landed on d4 and b4.
This pawn structure, the Maroczy Bind, is regarded as slightly favorable for the player with the advanced c- and e-pawns. The strategic retreat is a common feature of it, e.g. 1 e4 c5 2  f3
f3  c6 3 d4 cxd4 4
  xd4 g6 5 c4
  f6 6
f6 6  c3
c3  g7 and now 7
  c2!?.
c2!?.
But even when the Bind is not possible, the retreat can make sense. If White plays 5  c3 instead of 5 c4, then 5 …
  g7 6
g7 6  e3
e3  f6 7
f6 7  e2 0-0 is typically met by 8
  b3! to avoid an equalizing … d5 and prepare a possible
  d5.
d5.
The key to the retreat is restraining the enemy center. In the Vienna Game, 1 e4 e5 2  c3
c3  f6 3 g3 d5 4 exd5
  xd5 5
xd5 5  g2, the retreat 5 …
  b6 is second best. White’s lead in development counts after 6
  f3
f3  c6 7 0-0
  e7 8
e7 8  e1! and 8 … f6 9 d4! exd4 10
  b5 0-0 11
  bxd4.
bxd4.
But Black equalizes with 5 …  xc3! 6 bxc3
  d6.
d6.
And it should be noted that the strategic retreat is not limited to c7 and b6 for Black: 1 e4  f6 2
f6 2  c3 d5 3 e5
  fd7 4
fd7 4  xd5
xd5  xe5 5
xe5 5  e3 c5 6 b3:
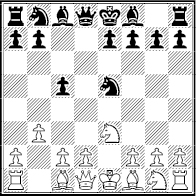
Black to play
Here the surprising 6 …  ec6! followed by 7 … e5! secured Black superiority in Groszpeter – Suba, Keskemet 1979.
The hanging pawns and their relatives are among the most double-edged pawn structures, and there are several priyomes available:
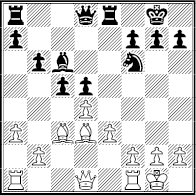
Gligoric – Spassky
Bugojno 1978
White to play
One that occurs often in similar positions is 1 dxc5 bxc5 and then 2 b4. White wants to isolate the d5-pawn or to force the c-pawn forward.
But 2 b4? has a tactical flaw that is exposed by 2 … d4! 3 cxd4 exd4 4  xd4? and now not 4 …
  xd4?? 5
  xh7+ but 4 …
  d5! (5 f3
  xd4+).
The proper way is 2  xf6! and 2 …
  xf6 3
xf6 3  c2, attacking h7 and c5.
Instead, White played 1  c1?. This allowed a powerful priyome, 1 … c4! 2
  b1 b5. Black will mobilize his pawn phalanx with … a5 and … b4.
White needs to counter that in the center or kingside. But 3 f3?  xe3 just drops a pawn. Play went 3
  e1
e1  e4! 4 f3
  xc3 5
xc3 5  xc3
xc3  b6 and White’s center was frozen (6 e4? allows 6 … dxe4 7 fxe4
  ad8!).
The next stage was 6  c2 g6 7
  f2
f2  ad8 8 f4 f5!.

White to play
Yes, Black’s bishop has become very bad. But what’s more important is that he is carrying out a strong queenside plan begun with 1 … c4.
White needs counterplay, such as with g2-g4. But he temporized with 9  h4
h4  d7 10
d7 10  h1?!
h1?!  g7 11
g7 11  f1
f1  f6! 12
  f2. The phalanx prevailed after 12 … a5 13
  cc1 b4 14 axb4 axb4 and …
  a8-a1/ …
  c8/ … c3!.
But pushing the c-pawn to the fifth rank kills Black’s influence on the center. That becomes significant if White can muster kingside pressure.
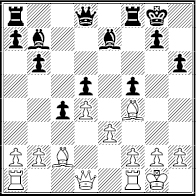
Bologan – Short
Sarajevo 2004
White to play
Black began the priyome with … c4 and found he had to defend the kingside with … f5, e.g. 1  h5
h5  e8. Black would benefit from a queen trade because he can create a passed queenside pawn.
But White has a strong counter, 1  e5! and 1 … b5 2 f4!. He can follow up with g2-g4 or
  f3-g3 with serious kingside threats.
Black defended with 2 …  c8 3
c8 3  f3
f3  f6 and 4
  g3
g3  e8 5 h4 a5 6 h5
  h8.
h8.
White’s rook is headed to g6. His kingside play is at least as promising as Black’s queenside pawns. There followed 7  f3
f3  e6 8
e6 8  g6 b4 9 b3.
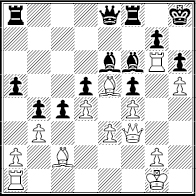
Black to play
Black needed an open line but now … a4 and … b3 is stopped. After 9 … cxb3 10  xb3 he has to worry about defending the d-pawn.
His passed pawn may look good after 9 … c3. But he would lack play to counter a White buildup, say with  h3-h4 and
  f1-f3-g3.
Instead, Black tried 9 …  xe5 10 fxe5
  c8 11
c8 11  f1 cxb3 12
  xb3 and lost soon after 12 …
  f7 13
f7 13  d6
d6  xh5 14
  f4
f4  h6 15
h6 15  xd5 and e3-e4.
If the hanging pawns are created, they can be a strength or weakness if one of them advances to the fifth rank. An instructive example was:
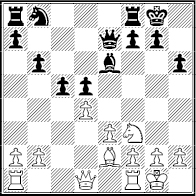
Bertok – Fischer
Stockholm 1962
White to play
White should not fear the phalanx because it is premature and would collapse after 1  e5 c4? 2 b3! b5 3 a4! and 3 … a6? 4 axb5 axb5?? 5
  xa8.
xa8.
But White erred with 1 dxc5?, thinking the pawns would be weak after 1 … bxc5 2  a4 followed by
  a3 and
  ac1/
ac1/ fd1.
fd1.
They turned out to be quite strong following 2 …  b7 3
b7 3  a3
a3  d7 4
d7 4  e1 a5 because …
  b4! or …
  fb8! was coming up.
Black was happy to push his c-pawn, 5  d3 c4! and 6
  f4
f4  fb8! because the b-pawn is doomed (7
  ab1
ab1  f5). He won.
When a knight is pinned –  g5 vs. …
  f6, for example – it’s natural to ‘put the question to the bishop.’ This means forcing it, with … h6, to choose between capturing or retreating. If the bishop retreats and maintains the pin, it risks becoming buried by pawns.
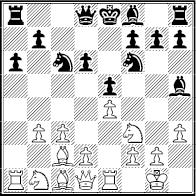
Movsesian – Brkic
Kallithea 2008
White to play
White posed the question with h2-h3 and Black answered it with …  h5. If White plays quietly, say with 1 d3, Black will castle and equalize with … d5!.
The priyome consists of 1 g4! and not much more. White has to be sure that a sacrifice on g4 is unsound. In this case, he can defend after 1 …  xg4 2 hxg4
  xg4 in various ways, including 3
  d3
d3  f6 4
f6 4  e3 and
  f1-g2.
Black retreated 1 …  g6 and that freed White to advance in the center, 2 d4
  e7 3 d5!
  b8. The most important feature of the position is simply that Black’s bishop doesn’t play.
True, Black has … h5. That is the traditional drawback to the burying priyome. But here, the kingside was easily protected, 4  h4
h4  g8 5
g8 5  g2! – not 5
  xg6 hxg6 when the bishop is no longer a liability.
Play continued 5 … h5 6  d2 hxg4 7 hxg4
  f6 8
f6 8  e3
e3  c7 and then 9 c4
  bd7 10
  g2!
g2!  c5? 11 f3.

Black to play
Black missed his chance to exact some compensation for his bishop by doubling rooks on the h-file (10 … 0-0-0 11  b2
b2  h7! 12
  h1
h1  dh8) although White would stand better.
Instead Black chose 11 …  h7? with the idea of …
  g5-f4 and …
  g5. White executed a good version of the c4-c5 sacrifice that we’ll examine in Chapter Three, 12 b4
  d7 13 c5! dxc5 14
  dc4! with a threat of 15 d6.
He won after 14 …  d8 15 d6
  h4 16
h4 16  h1 cxb4 17
  d5!. No better was 14 …
  d6 15
d6 15  xd6+
xd6+  xd6 16
  c4
c4  c7 17 bxc5
  xc5 18
  d3 and 19
  a3.
a3.
Perhaps the most famous example of the bishop burial was this:
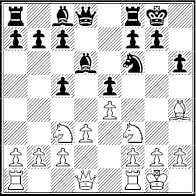
Winter – Capablanca
Hastings 1919
White to play
White should play 1  d2 followed by
  c4 and f2-f4, a useful priyome in similar positions. He shouldn’t fear 1 … g5 2
  g3 because his bishop will emerge at f2 after f2-f3.
This occurs in positions like 1 e4 c5 2  f3 d6 3 d4 cxd4 4
  xd4
xd4  f6 5
f6 5  c3 a6 6
  e3
e3  g4 7
g4 7  g5 h6 8
  h4 g5!? 9
  g3
g3  g7. White plays 10 h3
  e5 11 f3! and
  f2/
f2/ d2 with a nice game.
In the diagram White tried to exploit the pin immediately with 1  d5? and was surprised by 1 … g5!. This was based on tactics – the 2
  xg5? hxg5? 3
  xg5 sacrifice is refuted by 2 …
  xd5!.
xd5!.
So White played 2  xf6+
xf6+  xf6 3
xf6 3  g3 and his bishop was hopelessly out of play following 3 …
  g4! 4 h3
  xf3 5
xf3 5  xf3
xf3  xf3 6 gxf3 f6!.
When an opponent has advanced queenside pawns that are qualitatively – or quantitatively – superior to yours, they can be challenged by your b-pawn. This is a variation on the minority attack and b-pawn bayonet when the enemy pawns are not advanced.
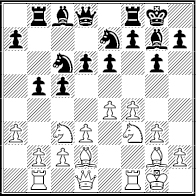
Black to play
White’s last two moves were  b1 and a2-a3. At first glance he seems to be safeguarding his queenside so he can meet 1 … b4 with 2 axb4 cxb4 3
  e2 and avoid losing the b-pawn now (or the a-pawn later).
But White has two other ideas. One is to go on the offensive with b2-b4!?. One Spassky game went 1 …  a6 2 b4! and 2 …
  b6 3
b6 3  h1 with ideas such as
  e2/
e2/ e3 to target the c-pawn. White had the edge after 3 … cxb4 4 axb4
  fc8 5
fc8 5  e2.
e2.
The second idea comes when Black plays 1 … a5, so that he can open the a-file after 2 … b4 3 axb4 axb4. Spassky’s answer to that was 2 a4!, taking advantage of Black’s inability to push his a-pawn back to a6.
White neutralizes the queenside after 2 … bxa4 3  xa4 and 4 b3. The same for 2 … b4 3
  b5 and 4 c4! (after 3 …
  a6, 3 …
  d4 or 3 … d5).
A similar b2-b4 idea occurs when Black has a queenside majority.
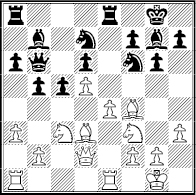
White to play
This is a popular position from the Modern Benoni Defense and is similar to several others. White’s a2-a3 may seem designed to discourage … b4, as in the previous example.
But the real intent is to play 1 b4!. Then the queenside turns out to be a Black liability after 1 …  ac8 2
ac8 2  ac1 cxb4 3 axb4 followed by
  c2/
c2/ ec1.
ec1.
True, 1 … c4 creates a protected passed pawn. But after 2  c2 White obtains d4 (3
  e3 and 4
  d4 or 4
  d4). That, and prospects for kingside attack with g2-g4 or a minority attack with a3-a4, counts more.
It’s time to see what you’ve learned. In each of the following positions there is a priyome to follow. First, try to recognize it. Then see if it is appropriate. Does it work in this position?
Some positions seem perfect for a priyome that we’ve examined – but it fails tactically. Answers to Quizzes are on pages 207-215.
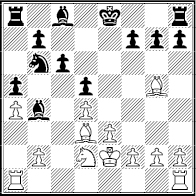
1 Karpov – Kasparov
World Championship 1985
Black to play
Black has a development problem to solve. How does he do it?
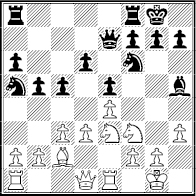
2 Alekhine – Novotny
Prague 1943
White to play
Should White try to exploit … b5 with 1 a4 – or play elsewhere?
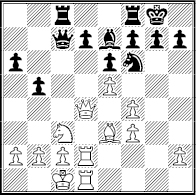
3 Ehlvest – Andersson
Belfort 1988
Black to play
Is there a priyome that suggests itself? And would it work?
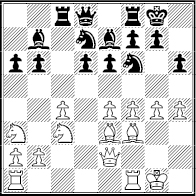
4 A. Rodriguez – Polugayevsky
Moscow 1985
Black to play
White’s last move was h2-h4. What should Black do?
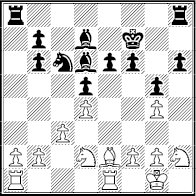
5 Kostic – Capablanca
Havana 1919
Black to play
What’s the appropriate priyome and how would it turn out?
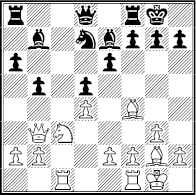
6 Fuster – Sanguineti
Portoroz 1958
White to play
You can probably spot the priyome. But is this the right time for it?
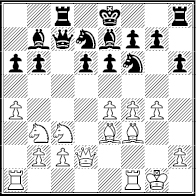
7 Mahesh Chandran – Novikov
Dallas 2004
Black to play
There is more than one priyome available for Black. Which is best?
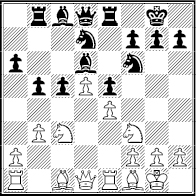
8 Polugayevsky – Biyiasas
Petropolis 1973
White to play
What should White do – and how should Black respond?

9 Hou Yifan – Kosteniuk
Nalchik 2008
Black to play
White is preparing the  g3-f5 priyome. What can Black do?
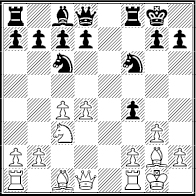
10 Tal – Plaskett
Sochi 1984
Black to play
Black is virtually forced into 1 … fxg3. Is there any benefit to 2 fxg3 ?