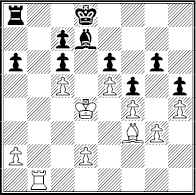
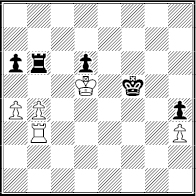
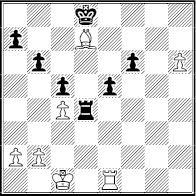
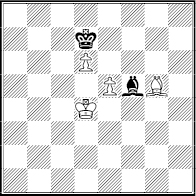
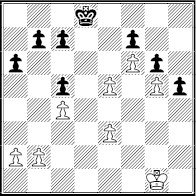
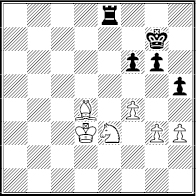
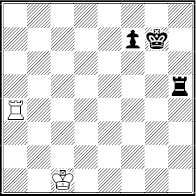
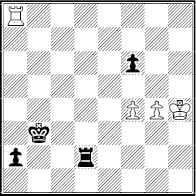
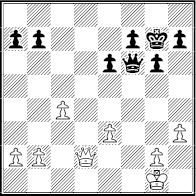
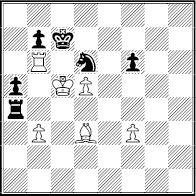
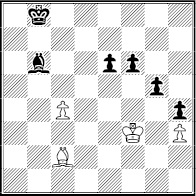
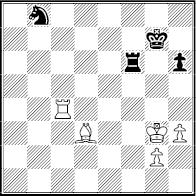
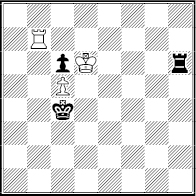
Cosma – Schut
Istanbul 2012
White to play
Mastering the endgame means acquiring two very different kinds of know-how. The most important are techniques. These are the recurring devices that enable you to win favorable endings and draw unfavorable ones.
You already know many of these techniques. Everyone who takes chess seriously has won endgames with zugzwang, even if he or she can’t pronounce it. You can’t win K+R-vs.-K without zugzwang.
Other techniques are more subtle and remain the trade secrets of masters. In this chapter we’ll examine 25 of the most essential.
In most endgames, you must penetrate an enemy defense to win. Even with a significant positional or material edge, you can fail to win because you are simply locked out.
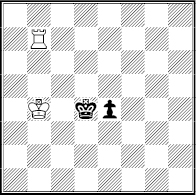
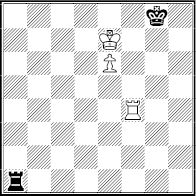
Cosma – Schut
Istanbul 2012
White to play
White has a vastly superior bishop, better pawns and control of the only open file. But there is no way for her king or rook to penetrate.
Black can defend indefinitely with ‘pass’ moves like …  c8-d8. After 20 moves of fruitless maneuvering, White agreed to a draw.
To become a master you need to know how to create an entry for yourself – and how to deny one to an opponent.
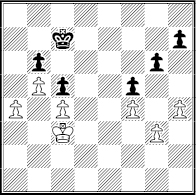
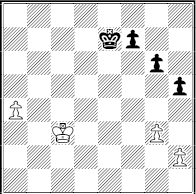
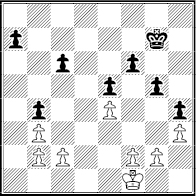
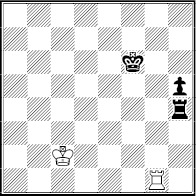
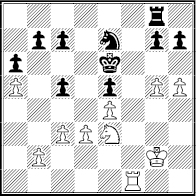
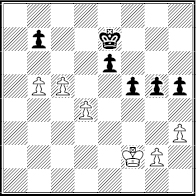
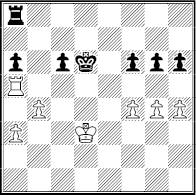
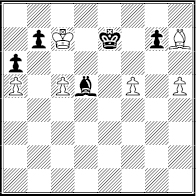
Kengis – Yuneev
Daugavpils 1989
Black to play
White’s king can’t get through the center. His best winning chance lies on the kingside. But Black can shut the door with 1 … h5!.
White could still try to win, through zugzwang – 2 b3 b7 3 a5 bxa5 4 a3!.
That would be rewarded by 4 … b6?? 5 a4! and 6 xa5. But if Black is alert he can draw with 4 … a7 5 a4 b6.
Instead of this, Black blundered with 1 … b7??. That allowed White to create an entry with 2 h5! gxh5 3 d3.
His plan was e3-f3-g2-h3-h4xh5 and the eventual win of the f- or h-pawn.
If Black’s king runs to the kingside, 3 … c7 4 e3 d6 5 f3 e6 6 g2 f6, he allows White to queen on the abandoned queenside, 7 a5! bxa5 8 b6.
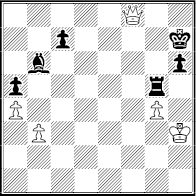
Black thought he could recover with 3 … h4!.
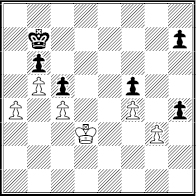
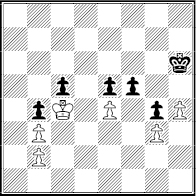
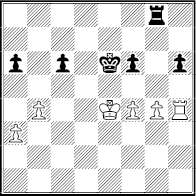
White to play
Then 4 gxh4 h5! would seal the kingside. But White won with 4 e3!.
He needed an entry, not extra pawns, e.g. 4 … hxg3 5 f3 c7 6 xg3 d6 7 h4 e6 8 g5 and White wins.
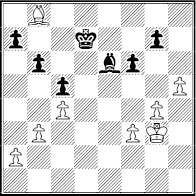
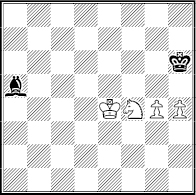
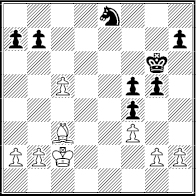
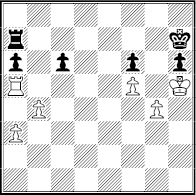
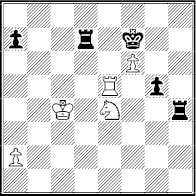
Entry is needed in all sorts of endings, with rooks, knights, you name it. In the next example, with bishops, White is worse because all of his pawns are on light squares. He would lose if Black’s king or bishop penetrates the queenside.
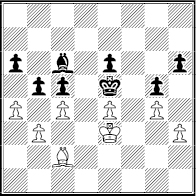
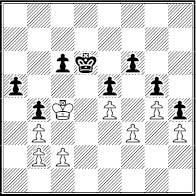
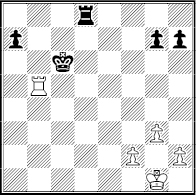
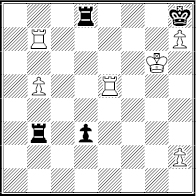
de Firmian – Benjamin
US Championship 1998
White to play
For example, 1 axb5 axb5 and 2 cxb5  xb5 threatens a winning … f1. White is also lost after 2 f3 d4!.
White could pass with 2 d3. But then 2 … bxc4 3 bxc4 a4! invades and wins – 4 b1 b3 5 d3 a2 6 e2 b1. (White can draw with 3 xc4 xe4 4 xe6! g2 5 c4.)
Nevertheless White drew with the simple 1 a5!. Black’s king can’t penetrate via b6 and his bishop can’t get out via a4. No progress was possible, as 1 … bxc4 2 bxc4 e8 3 d1 c6 4 c2 a8 5 d3 b7 etc. showed.
In the middlegame with lots of material, players readily shift their pieces from one wing to the other as they attack and defend. But in an ending, the battles are often separated. A few pieces may face off on the kingside, a few on the queenside.
This means that a player can win if he can create a 2-to-1 mismatch on one of the wings.
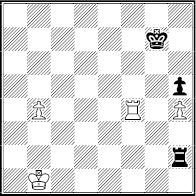
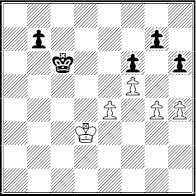
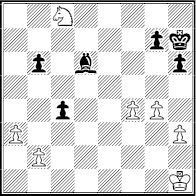
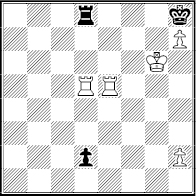
Gurgenidze – Radev
Tbilisi 1971
White to play
Rooks belong behind passed pawns – except when they don’t. Despite White’s rook he can’t make easy progress after 1 b5 axb5 2 axb5 f6 3  b4? g5.
More accurate was 1 f3+! g5 2 c4. Black’s king is useless on the kingside because it cannot attack the rook or h-pawn.
But White has a K+P-vs.-R mismatch on the queenside. He threatens 3 b5 axb5+ 4 axb5 followed by b4-a5 and the winning push of the pawn.
Black tried 2 … c6+ 3 b3 and saw that 3 … b6 would fail to 4 b5! axb5 5 a5 followed by b4. Instead, he chose 3 … c1 and lost after 4 b5 axb5 5 axb5 d5 6 d3! (6 … c5 7 b4).
Mismatches typically involve a king and pawn(s) versus a single piece. They are surprisingly strong against a lone rook and can usually out-muscle a lone bishop.
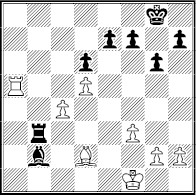
Geller – Kopylov
Soviet Championship 1951
White to play
Bishops of opposite color can make winning an ending difficult, time-consuming – or impossible. But in this case White won with 1 xa7!.
Black can trap the bishop with 1 … c7. But after he wins it, 2 f4 b7 3 xb6 xb6 4 g5, White has a K+Ps-vs.-B mismatch on the kingside.
Black would lose after 4 … fxg5 5 fxg5 f5 6 f4 h7 7 e5 and e6-f7, for example, because his king can’t help the bishop (5 … c6 6 f4 d6 7 h6 gxh6 8 gxh6 g8 9 f5 and g6).
Instead, he tried 4 … f5 5 g6 c6 5 h4 e6 (or 5 … d6 6 h6!). But he resigned after 6 h6! gxh6 7 h5 d6 8 xh6 e7 9 g7 when he realized he cannot defend both wings (9 … g8 10 g6 e6 11 a4).
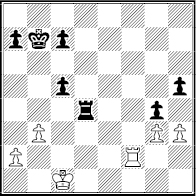
Sometimes a simple trade of pieces will create a mismatch.

Tal – Ragozin
Soviet Championship 1956
Black to play
Black has good drawing chances if his knight and king reach the kingside (1 …  d7!). But he played 1 … e7?? and White jumped at the chance to swap rooks, 2 b4! xb4 3 axb4.
Black’s king can win the b-pawn, 3 … d6 4 h4 c6 and … b5. But by then White’s king and kingside pawns will beat the overmatched knight.
Black saved time with 3 … c6 4 b5 d4 5 b6 d7 6 h4 c6. But he was still lost on the kingside after 7 h5 e6 8 h6 f8 9 g3 xb6 10 f4.
A knight versus a king and two connected pawns isn’t even close, as 10 … c7 11 f5 d7 12 f6 e8 13 g7 showed. Black insisted on playing out a lost pawn endgame, after 13 … e7 14 h7 xh7 15 xh7.
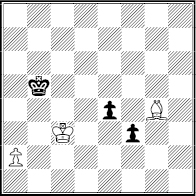
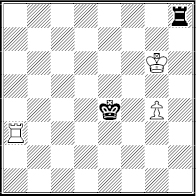
Some techniques can only be used to try to win. Others are useful only when defending. But the opposition can be invaluable in either case.

White to play
White can seize the opposition with 1 b2?. But Black regains it with 1 … d4! and reaches a winning position we’ll examine in Chapter Four (2 c2 a3 3 d2 b2 4 e2 c2 and 5 e1 xd3 6 d1 e3 7 e1 d3 8 d1 d2 9 c2 e2 is Exact Ending 1).
One way to draw is 1 d4!. Black wins the pawn but White gets the opposition after 1 … c4 2 d1 xd4 3 d2!.
He gets to another Exact Ending. But that one is a draw, e.g. 3 … e4 4 e2 d4 5 d2 d3 and 6 d1! e3 7 e1 d2+ 8 d1 d3 stalemate. (By the way, 1 c1 draws in a similar way.)
And here’s how the opposition is used to win.

Adams – Carlsen
London 2012
Black to play
Black must give way after 1 … e6?? 2 xe4 and loses. For example, 2 … f6 3 d5 g5 4 xc5 xg4 5 d5 xh5 6 c5 and White queens first.
No better is 2 … d6 3 f5 e7 4 e5!, when White again has a winning opposition (4 … f7 5 d5).
But the position in the diagram is actually a win for Black after 1 … e3!. He would have the opposition after 2 xe3 e5! (3 f3 d4 or 3 d3 f4).
Instead, White tried the clever 2 f3!, hoping for 2 … e5?? 3 xe3!, when he has stolen the opposition.
But Black replied 2 … e6! and 3 e2 f6. Then 4 xe3 e5! is that winning opposition once more.
White tried one last time, 4 f3. But Black had 4 … g5!.

White to play
White has run out of useful passes (5 g3 e2). He began the queening race with 5 xe3 xg4 6 e4 xh5 7 d5. But Black is way ahead and won after 7 … g5 8 xc5 g4 9 d4 g3 10 e3 g4.
‘Distant opposition’ sounds complex but just means that the kings are more than two squares apart. Then the right move is often easier to visualize than to calculate.
Timman – Yusupov
Amsterdam 1994
White to play
Natural moves like 1 g3? would lose, e.g. 1 … g5 2 h3 f4 3 exf4+ xf4 4 g2 e3 5 f1 d2 and … e3). Also 2 f2 h4! 3 g2 g4 3 f2 h3.
White saw that Black’s king is on a light square. White just had to look for one near his own king. He played 1 g2! and then 1 … g7 2 g1! f7 3 f1 e6 4 e2.
Now on 4 … d5 White cannot play the illegal 5 d3. But he can draw after 5 d2 c4 6 c2, or, as the game went with 5 … d6 6 d1 c5 7 c1! (7 … b5 8 b1 a5 9 c1).
This has been called the ‘hockey’ technique. One king stands in the way of the other king, like a hockey skater throwing a shoulder block.
This is particularly common after one player has been forced to give up his rook for a passed pawn and the result is a position like this:

Liss – Lalic
Isle of Man 1997
White to play
The intuitive move is 1 e7. It succeeds after 1 … e4 2 b7 f4 3 c6 e3 4 d5 f3 5 d4 e2 6 d3. Black had to spend two moves – one by his king, one by his pawn – to safely advance the pawn one square.
Black can’t advance faster. But he can advance smarter, by meeting 1 e7? with 1 … e4! and 2 b7 d4!.
The point is that Black’s king blocks the White king after 3 c6 e4.
White to play
The draw is clear after 4 b5 e3 5 b4 and now 5 … d3 6 b3 e2.
No better is 6 d7+ as long as Black finds 6 … c2! (not 6 … e2??, which blocks the pawn and allows a winning 7 c3).
So let’s go back to the previous diagram and think up a better strategy for White. As slow as it seems, the correct way to start is 1 a7!.
Then 1 … e4 2 b6 e3 3 e7! f4 4 c5 wins because Black never got a chance to throw a shoulder block.
But what if Black meets 1 a7 with 1 … e4, the move that beat 1 e7 ? The answer is 2 b6! d4 3 b5 e4 4 b4!.
Black to play
Now 4 … e3 5 d7+ e4 6 c3 and White’s king gets to d2 in time to prevent promotion and win. Craftier is 4 … d3! (5 d7+? c2). But 5 b3! wins (5 … e3 6 d7+).
Creating a passed pawn on the distant (‘outside’) wing of the board offers two ways to win:
Your opponent may not be close enough to stop it from queening.
Or, if he stops it, he may have to devote so much material to that task that he allows a mismatch on the other wing.
Fischer – Larsen
Candidates match 1971
White to play
White’s a-pawn is very ‘outside.’ But he cannot queen by force (1 b4 d7 2 b5 c7 3 a5 b7 or 1 a5 d7 2 a6 c7).
White won by heading to the kingside while Black is torn between the two wings: 1 d4! d6 2 a5.
Then 2 … f6 – which stops e5-f6 – was met by 3 a6!, threatening 4 a7. Black had to run to the queenside, 3 … c6 4 a7 b7 5 d5.
Black would lose after 5 … xa7 6 e6. He tried to confuse matters with 5 … h4. White just ignored him and the game ended with 6 e6 resigns in view of 6 … f5 7 f6 hxg3 8 hxg3 and xg6/xf5.
Sometimes a potential outside pawn is hard to detect:

Stone – I. Ivanov
Dearborn 1992
Black to play
White has the most advanced pawn and it is passed. But the f-pawn can be stopped by Black’s king.
What decided the game was on the other wing: 1 … d5! 2 cxd5 a5!. Black created a passer that is seven files away from the helpless White king.
The game went 3 g4 b5 4 f5 a4 5 bxa4 bxa4 6 f6 a3 7 d6 and now not 7 … a2?? 8 f7! but simply 7 … xd6 prompted resignation.
Black knew he was winning after he created a passed pawn in the last example because White’s king was ‘outside the square.’
Which square? It’s the one you can visualize with the Black pawn on a4. The square runs from a4 to a1, then to d1, to d4 and back to a4.
Even if White had played 3 g3 b5 4 f3 a4 5 bxa4 bxa4 he would be outside the square. Black would queen in three moves (5 e2 a3).
This bit of elementary geometry is crucial when you can trade down to a pawn endgame:
Volokitin – Efimenko
Kharkov 2004
Black to play
White has executed a cutoff (f4!), a potent technique we’ll consider shortly. Black’s king cannot cross the f-file to stop the b-pawn.
Black’s only hope was 1 … g2! so that 2 b5? g4!. That would work since White is outside the square (3 xg4 hxg4 4 c2 g3 5 d2?? g2).
He would have a choice of a drawn queen endgame (3 xg4 hxg4 4 b6 g3 5 b7 g2) or an equally drawn rook endgame (3 f5 xh4 and … b4+).
But White met 1 … g2! with a simple precaution, 2 c1!. Then he was inside the square (2 … g4 3 xg4 hxg4 4 d2 g3 5 e2 g2 6 f2).
Black had no other tricks and played 2 … a2 3 b5 a5. White relinquished the cutoff, 4 b4!, because Black’s king is too far from the pawn.
The game went 4 … f7 5 b6 a8 6 b7 b8 7 d2 resigns, because White’s king will either reach c7 or win the h-pawn.
If these examples of the square seem too easy, consider this case:
Kamsky – Karpov
Dortmund 1993
White to play
White can try 1 xd7 since 1 … xd7 2 h1 (‘Rook behind the pawn’) makes his h-pawn a threat and wins. But this loses to 1 … xd7 2 h1 h7.
Instead, White played 1 g6?? and lost after 1 … h2 2 h7 e7.
Yet White should be playing for a win with 1 c1!. Then 1 … h2 loses to 2 d1!. Or 1 … f2 2 xd7 and 3 h1!.
Best is 1 … d4 but then comes 2 xd7.
Black to play
Now both 2 … xd7 and 2 … xd7 lose to 3 d1!. After the rook trade, Black is outside the square. The best Black has is 2 … xc4+ 3 b1 h4 4 d1, when White holds all the winning chances.
Zugzwang sounds sophisticated. But anyone who has played rummy, contract bridge or one of several other card games knows what it’s like: It’s your turn to play a card but anything you do hurts your chances.
In chess, zugzwang can result from a move that seems to do nothing.

Sokolov – Sasikiran
Zafra 2007
White to play
White played 1 a1!. It doesn’t threaten a thing. But Black resigned. A king move allows 2 xf5. And a rook move (1 … a5) allows 2 xf6+.
You often must rely on zugzwang when you have an edge in pieces – like having an extra Exchange – rather than in pawns.
The next position looks like it should be easy.
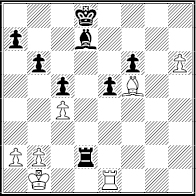
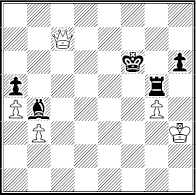
Anand – Topalov
Linares 2005
White to play
But after 1 d2 and 1 … b4 2 e3 a3 how can White make progress?
He only has two pieces to perform three tasks. He needs to (a) capture the pawns, (b) stop … f2-f1( ) and (c) protect the a-pawn.
For example, after 3 e6 b4, 4 xe4 f2 5 h3 a3 and 6 … xa2 draws.
But White can win after 3 … b4 with 4 d5! a3 5 f2! – zugzwang. The win becomes obvious after 5 … b4 6 xe4 or 5 … b2 6 a4.
So, in the game Black played 1 … f2. He set a trap:
After 2 e2? e3! he draws (3 e6 b4 4 b3 a3 5 f1 b4).
But White won with 2 e2+! b4 3 c2! a3 4 b1 e3 5 a1.
Black to play
Black is again in zugzwang. He must allow the a-pawn to begin its march to a8, 5 … a4 6 b2 b4 7 a3+ a4 8 a2! and White duly won.
Triangulation is a crooked path to zugzwang. It occurs when your opponent would be in zugzwang if it were his move. But it isn’t his turn.
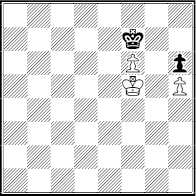
White to play
If this were Black’s move, he loses, 1 … e8 2 g6 f8 3 f7 or 3 xh6.
But since it’s White’s turn, he has to lose a move. The way to do this is 1 e5 f8 2 e4!.
Then 2 … f7 3 f5! recreates the position in the diagram but with Black to move. White accomplished this by moving his king in a triangle (e5-f4-f5) while Black’s king moved back and forth (f7-f8).
But suppose Black knows about opposition and plays 2 … e8!.
White would win with 3 f4 f8! 4 e5. Black gives up the opposition and lands in the losing 4 … f7 5 f5! position or 4 … e8 5 e6 f8 6 f7.
Knowing how to triangulate allows you to force all sorts of simpler winning positions.

Dumitrake – Kiselev
Enakievo 1997
White to play
White played 1 h5! and 1 … xh5 2 gxh5. Black’s king is close enough to stop g6xh6 with a shoulder block, 2 … e6!.
But White forced his way to the previous diagram with 3 e4! f6 4 f4! e6 5 f5+ and 5 … d6 6 d4 e7 7 e5! f7 8 f6.
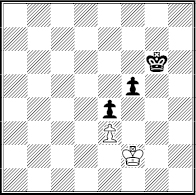
It’s this simple: The most common way to win an ending is to queen a pawn. Therefore, the most effective way to stop a pawn is to blockade it.
White to play
White has two extra, passed pawns near their queening squares. His winning chances? Zero.
Why? Because Black can hold his blockade at d7 and e6 forever.
This technique is so simple and powerful that every player with the advantage has to be careful about blundering into a blockade.
Vajda – Alekhine
Kecskemet 1927
Black to play
Black played 1 … d8!, a good try in a lost position. White saw that 2 g5+?? allows 2 … xg5, eliminating the last White pawns.
But he thought the position was an easy win after 2 h5??. He was shocked to find that Black can draw after 2 … g5 or 2 … g5.
To win White had to take his time and avoid blockades. The right way is 2 g2!. Then 2 … xh4? 3 xh4 g5 fails to 4 f3 xh4 5 f4 and wins.
Black’s only try is 2 … g6. But then 3 f3 h6 4 g3 c7+ 5 f4 threatens 6 g5+/g4 and leads to 5 … d8 6 e6 e7 7 g5+ g6 8 g4.

Black to play
Only then does the win become easier, 8 … h7 9 f5! g8 10 g6 h8 11 f7. Or 9 … h8! 10 g6 g8 and then 11 h5 xg5 12 xg5 h8 13 f7+ and h5-h6-h7.
In most cases, creating a passed pawn is routine. But in some, a dramatic technique – sacrificing a pawn or pawns – is necessary.
Averbakh – Bebchuk
Moscow 1964
White to play
Black has the outside passed pawn. Shouldn’t he be winning after 1 c4 d6 2 d4 b5 3 c3 e5 ?
No. He loses: 1 e5! fxe5 2 g5! and 2 … hxg5 3 f6! gxf6 4 h5 and queens.
There is no salvation in 2 … d6 because of 3 f6! e6 4 fxg7 f7 5 gxh6 b5 6 e4 b4 7 d3! and 8 c4/9 xb4 wins.
Breakthroughs occur most often in pawn endings. But they can have an equally surprising impact when other pieces are on the board.

Ivanchuk – Adams
Frankfurt 2000
White to play
White, a pawn down, can draw easily if he makes a cutoff, 1 f6!. Black’s king cannot easily advance and 1 … d6 2 f5! would cost a pawn.
But White tried to draw more quickly by using tactics. After 1 h3? he expected 1 … gxh3 2 h4 and 3 xh3 would eliminate all kingside pawns.
That’s good logic but bad calculation. He overlooked 1 … d4!. Then White would be outside the square after 2 hxg4 xf4 3 gxf4 h4!.
White played 2 f2, so that 2 … gxh3 3 h2 keeps his hopes alive.
Black to play
But this time he overlooked a breakthrough, 2 … h4!. That guarantees Black a strong passed pawn. For example, 3 gxh4 gxh3 followed by 4 … xh4 5 h2 c6 and the decisive entry of the Black king.
White preferred 3 hxg4 but was lost after 3 … hxg3 4 g2 xg4 5 d2 c6 6 e3 b5.
A protected passed pawn is typically decisive in pawn endgames. It can often win piece endgames as well. But there is a way to offset it.
Michel – Euwe
Mar del Plata 1947
White to play
Black has just traded off all four rooks and appears assured of a win.
Why? Because he has an entry route, … d7-e6 and … xe5.
White’s king can defend the e-pawn – 1 f2 d7 2 f3 e6 3 f4. But the protected passed h-pawn pulls him away, 3 … h4 and 4 … h3 5 g3 xe5 6 xh3 e4, for example.
Yet White was able to draw in the diagram and the outcome was clear after one move, 1 e6!. After the forced 1 … fxe6 he can just pass, h2-g2-h2, if he wants.
Black’s king cannot advance beyond the square of White’s protected f-pawn. He cannot create a passed queenside pawn either because … b5 would be answered by b2-b3!.
Creating a counter-passer is often a lot more complicated:
Aronin – Smyslov
Moscow 1951
White to play
White has just traded a rook and piece to reach what looks like an easy win. His king can reach c4 and begin picking off pawns. For example, 1 e2 f7 2 d3 e6 3 c4 a5 4 c5 and wins.
But Black would have counterplay after 1 e2 g6 2 d3 f5! and then 3 exf5+ xf5 4 c4 e4!.
Then White could win all the queenside pawns – and lose to a counter-passer, 5 xb4 e3! 6 fxe4 e4 7 c5 xe3 8 xc6 f2 9 c4 xg2 and 10 … g4!.
So White found 1 g4!. That costs him a tempo, after 1 … f7 2 e2 e6 3 d3 d6 4 c4 a5. But White would win with 5 f3!, creating zugzwang:
Black to play
For example, 5 … d7 6 c5 c7 7 c3 bxc3 8 bxc3 d7 9 b6. Or 8 … b7 9 d6 b6 10 c4 and wins.
All very logical. But after 1 g4 Black saved himself with the shocking 1 … hxg3! 2 fxg3 g4!.
His first idea is to create a kingside entry, 3 hxg4 g6 and … g5xg4, to create a counter-passer. But this was doomed by 3 h4!. Black’s king could not leave the kingside.
But Black had a second point. After 3 … c5 4 e2 h7 5 d3 h6 6 c3 a5 7 cxb4 axb4 it seemed like he was just passing aimlessly. But he was setting an ingenious trap. If White had continued 8 c4 he would lose to 8 … f5!.
White to play
White can’t stop the e-pawn after 9 exf5 e4 and he’s too late in creating is own counter-passer (10 xc5 e3).
Also lost is 9 d3 f4! 10 gxf4 exf4 11 e2 h5 12 e5 g6! and … f5xe5.
So White backed off, didn’t play 8 c4?? and agreed to a draw.
One of the contradictions of endgame play is that it is often easier to win by reducing your material advantage.
Ponomariev – Sasikiran
Biel 2004
White to play
White has a choice of possible winning plans. He could try to advance his king to the vicinity of d7 or e6. Or he could try to isolate Black’s pawns (perhaps with f4-f5 and fxg6) so that they will be easier to attack.
But simpler and better was 1 d5! and then 1 … e6 2 xf6!. This converted to a pawn ending that was a routine win.
Yes, White’s material advantage was less after 2 … xf6 3 g4 hxg4 4 hxg4 f7 5 xf6 xf6 than it had been in the previous diagram.

White to play
But it’s easier to win now. In fact, White has more than one way. He chose 6 d4 e6 7 c5 with the opposition.
Then came 7 … e7 8 d5 d7 9 e5 e7 10 g5! resigns (10 … f7 11 d6 g7 12 e6 g8 13 f6 h7 14 f7).
Jose Capablanca formulated one of the most useful conversion plans: When pawns are equal and you are ahead the Exchange, look for a way to give back the Exchange to win a pawn. Your material edge will decline slightly. But the win is usually much easier to achieve.
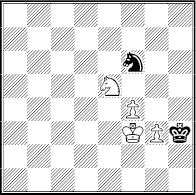
We’ve seen how a king can demonstrate superiority over the rival king by limiting its scope, e.g. by seizing the opposition or throwing a shoulder block. Other pieces can dominate their rivals in a similar way.
Fischer – Addison
Cleveland 1957
White to play
White might win by creating a passed pawn, 1 b4 c7 2 d3 and c4/b4-b5. But easier is 1 e5!.
That virtually stalemates the knight, since 1 … f6 2 xf6! leads to a won pawn endgame (2 … xf6 3 d3 e5 4 c4).
Black’s kingside majority can’t create a passed pawn after 4 … g4 5 b4 h5 6 a4 h4 7 h3!, which stops 7 … h3!.
Instead, Black tried to create a kingside mismatch with 1 … h5 2 d3 g4. White just ignored him: 3 b4 a6 4 a4 gxf3 5 gxf3 h4 6 b5 axb5 7 a5! (breakthrough) h3 8 c6! resigns.
When there are few pieces on the board, it stands to reason that dominating a single enemy piece can be decisive.
Keres – Hort
San Antonio 1972
White to play
It appears that White’s only winning idea is to create a passed e-pawn with a prepared f4-f5. (The immediate 1 f5? allows 1 … gxf5 2 gxf5 xe5!.)
But 1 g5! was better. Black’s bishop joins his king in the penalty box.
Since there is no counterplay to worry about, White can explore various plans to win the f-pawn, such as bringing his king to e8 or his bishop to f6.
The game went 1 … a4 2 d4 a6 3 e4 a4 4 b8 h8 5 f8 g7 6 d8 h7 7 d3 a3+ 8 c4 a4+ 9 b5 a3.
The maneuvering gave White a chance to look at tactics such as 10 e6 xd4 11 e7. But that fails after 11 … e3 12 e8() xe8, a book draw, or 12 exf7 g7.
So play continued 10 f8 g7 11 c8 h7 12 f8 g7.
White to play
Black resigned after 13 xh8! xh8 14 e6+ g8 15 e7 a8 16 f6! because the king and bishop get to dominate the rook.
The main line is 16 … e8 17 c6 a8 – otherwise 18 d7 wins.
Then 18 c7 leaves Black with no good moves. After 18 … h7 19 d4! g8 20 d7 and 21 e8()+ because 20 … a7+ drops the rook.
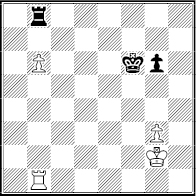
The most interesting battle that regularly occurs in an endgame is R-vs.-K. In some cases a king proves superior, such as when it can advance a passed pawn against a helpless rook.
But there are two cases when the rook wins the battle. The first occurs when a rook cuts a king off from the scene of action.
Balashov – Tiviakov
St. Petersburg 1993
Black to play
If it were White’s move he would draw with 1 d1 or 1 d2.
But it’s Black’s turn and 1 … d5! sealed off the White king from the kingside. That creates a K+P-vs.-R mismatch.
Play went 2 a2 g6 3 f2 f5 and now 3 d2 xd2! 4 xd2 g5! is distant and winning opposition (5 e2 g4! 6 f2 f4).
On other moves, Black would make steady progress, e.g. 3 g2+ h5 4 f2 g4 5 g2+ f3.
The best way to break a cutoff is to attack the rook, either with your king or your rook, offering a trade.
Zhelezny – Kim
Moscow 2008
Black to play
Here 1 … d4 seems to win as in the previous diagram. For example, 2 c3 d8 3 c2 h4 4 c3 f5 5 c2 h3 6 c3 f4 7 c2 h2 8 h1 g3.
Or 3 f1+ g5 4 g1+ f4 7 h1 g4 8 g1+ f3 9 h1 h8! and … h4-h3.
But White can draw with 2 d1! because his king is in the square (2 … xd1 3 xd1 h4 4 e2 h3 5 f2 h2 6 g2).
Black tried 2 … e4, hoping that a cutoff on the e-file would be sufficient. But White repeated the process, 3 d2 h4 4 e1!. Black accepted a draw in view of 4 … xe1 5 xe1 and f2-g2 or 4 … f4 5 e2 h3 6 f1!. (Also 6 h1 h4 7 f2).
When the defending king is cut off by a rank, rather than a file, the situation is usually worse, as we’ll see.
The geography of the board provides us with the other way for a rook to win a battle against a king.
Taimanov – Larsen
Palma de Mallorca 1970
Black to play
Black’s king is not cut off. But the tempting 1 … f4 2 a4+ e5 allows to 3 g5!.
Then Black’s only active play, 3 … g8+ 4 h6 h8+, is foiled by 5 g7!. That wins time for 6 g6. The winning Lucena position is near. (See Exact Ending 5 of Chapter Four.)
Instead of this, Black chose the immediate 1 … g8+! 2 h5 h8+!. This time the pawn is on the fourth rank and that means the king cannot approach the rook (3 g6 g8+ 4 h7 xg4! draw).
So play went 3 g5 g8+! 4 h4.

Black to play
Nothing has changed so 4 … h8+! is best. Then on 5 g3 Black would draw with 5 … e5 6 g5? f5!.
If White tries the cutoff, 6 f3, Black has the anti-cutoff method mentioned above, 6 … e6 7 g5 e7 8 g4 f8! and draws.
Yet Black, a world-class player, didn’t check in the last diagram. He chose 4 … e5?? and White cut the king off by a rank, 5 a6!.
This wins after 5 … f4 6 f6+ e5 7 g5! since Lucena is coming up. Or 5 … h8+ 6 g5 g8+ 7 g6.
The advantage of knowing these techniques is that they spare you from a lot of calculating. For example, in the last diagram, 4 … f4 does draw. But you have to see then 5 a4+ can be met by the surprising 5 … f3!. Knowing the checking distance is easier.
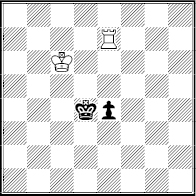
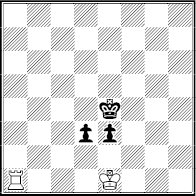
When a rook, not a king, is trying to promote a pawn, it usually belongs behind the pawn. Let’s see why.
White to play
White wins with 1 b7!. Since his rook is behind the pawn he can answer a Black rook move with 2 b8().
King moves will allow White’s king to penetrate, e.g. 1 … e6 2 f3 d6 4 g4 and g5xg6. The greater range of the ‘behind’ rook also wins after 2 … f5 3 b5+!.
But suppose we reverse the position of the rooks. Put the Black one at b1 and the White one at b8.
Then 1 b7? is an error because of 1 … g7. White’s rook is frozen at b8 and his king can be checked away if it tries to reach the b-pawn.
A better White try is to support the b-pawn with the king. But 1 f3 g5 2 e4 g4 3 d5 xg3 4 c6 allows Black to draw with his pawn, 4 … g5.
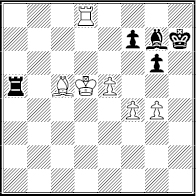
When the player with advantage can steal the ‘behind’ role, the impact can be huge.
Georgiev – Kamsky
Istanbul 2012
White to play
White should draw because his rook is excellently placed. When he is forced give up his rook he can create one or two passed kingside pawns.
For example, 1 g5 fxg5+ 2 xg5 and then 2 … b2 3 f5 a1() 4 xa1 xa1 5 f6 draws.
But White played 1 h5??, perhaps thinking he will have winning chances after 2 g6.
What he overlooked was 1 … d4!. Black threatens to make his rook the one ‘behind,’ with 2 … a4!. Then White can’t stop the a-pawn. Black ends up with an extra queen, not just a rook.
Seeing that, White played 2 xa2 xa2 3 f5. But Black’s king was fast, 3 … b3 4 g5 fxg5 5 xg5 c4 6 f6 d8 7 g6 d5, and White resigned.
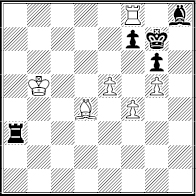
If a rook reaches the seventh rank in a typical early endgame it exerts a powerful force because it attacks vulnerable pawns. This is true even when the defender’s king is not limited to the eighth rank.
Ivanchuk – Short
Amsterdam 1994
White to play
Everything seems defended until 1 d5!.
If Black had tried 1 … c6 2 xe7 xe7 White would win with 3 g6 hxg6 4 hxg6 and f7+.
The pawn ending, 4 … f8 5 xf8 xf8, would also be lost, 6 f3 e7 7 g4 f6 7 h5 (zugzwang) e7 8 g5 e6 9 c4! e7 10 f5 d6 11 b3!.
So, Black tried 1 … xd5 2 exd5+ xd5. But then 3 f7:

Black to play
After 3 … d6 4 f3 Black runs out of useful moves, e.g. 4 … b6 5 axb6 cxb6 6 e4 e6 7 b7 b5 8 b6+! and wins.
Instead, Black chose 3 … b6 4 xc7 bxa5 and was lost after 5 f3 f8+ 6 e3 h6 7 xg7 (or 6 … g8 7 a7).
Seizing the seventh is also an important defensive technique. In some cases it allows you to eliminate enough enemy pawns to draw.
Kasparov – Karpov
World Championship 1984
White to play
White cannot stop … a8 and the advance of the a-pawn. He tried to raid the kingside with 1 h5? h6 2 e5. But after 2 … a8! he was too late, 3 e6+ b5 4 g6 a5 5 xg7 a4 6 b7+ a5 and Black won.
It was a good idea but a bad execution. The right way to raid was 1 e5! a8 2 e6+ c5 3 e7 because White gets both kingside pawns.
Play would go 3 … a5 4 xg7 a4 5 xh7 a3.

White to play
By exploiting the seventh rank, White has three passed pawns. His rook can get back just in time to give itself up for the a-pawn, 6 c7+! b4 7 c1! a2 8 a1. Then his kingside pawns enable him to draw.
If a player has no pawns he usually needs the equivalent of an extra rook to win. That’s a lot. Therefore a wise defender wants to eliminate as many enemy pawns as possible.
And when there are pawns on both wings, the defender wants to get rid of the queenside pawns first. Why? Because his king is typically on the kingside and that makes it harder to stop a queenside passer.
Eliskases – Fischer
Buenos Aires 1960
Black to play
Black may have had hallucinations of winning when he played 1 … c5?. If he can follow up with 2 … b5!, the bishop dominates the stalemated knight, which could be lost after … g8-f8-e8-d8.
But White saw 2 a4! and he gradually won after 2 … g6 3 g2 f6 4 f3 e6 5 e4 f2 6 f5+ d7 7 a7 and d5.
Black should have drawn by swapping pawns – but not with 1 … xf4 2 xb6, when White gets two queenside passers.
Correct is 1 … xa3!. Then 2 bxa3?? c3! and the c-pawn queens. White has to play 2 xb6 but after 2 … xb2 3 xc4 c1 4 f5 h5 his chances are minimal.
When there are pawns on both wings, the player who is trying to win wants a majority – as large as possible – on the distant wing. If pawns are equal on that wing it’s usually very hard to win.
Anand – Genius
London 1994
White to play
But a win is possible if there is a one-pawn edge on the distant wing. And a two-pawn edge is better. That explains 1 d4! xd4 2 exd4.
White had the edge after 2 … f5 3 b4! f6 4 c5! a6 5 a4 e7 6 b5! axb5 7 axb5 g5 8 f2.
But he is not yet winning: If he advances his king to, say, a5, Black can create a counter-passer on the kingside.
However, Black rushed with the immediate 8 … h5?.
White to play
White switched gears with 9 h4!!. That ensures him of a kingside entry. He won after 9 … gxh4 10 f3 e8 11 f4 d7 12 g5 d8 13 xh4 d7 14 xh5. On 10 … f6 White can win with 11 f4 g6 12 c6!, exploiting his big queenside majority.
The bigger-majority principle is particularly important in rook endgames. Suppose you are a pawn ahead. There are two scenarios:
In one of them, you have a 2-to-1 majority on the queenside and the pawns are balanced, three to three, on the kingside. Some positions like that are winnable. Many are not.
But suppose that you have a 3-to-1 edge on the queenside, while you opponent has a one-pawn majority on the kingside. Your chances of winning escalate sharply.
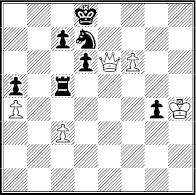
When all else fails, you can draw some hopeless-looking positions by arranging your pieces and pawns on impregnable squares.
Timman – Yusupov
Montpellier 1985
White to play
Usually a player needs a rook, bishop and pawn to balance a queen. Therefore White has a slight material edge. He might win if he captures Black’s a-pawn and pushes his own a-pawn.
And there’s also zugzwang. White found 1 f6! which seems to run Black out of useful moves:
He can’t safely move his king (1 … g8 2 xh6) or move his rook from the g-file (1 … c5 2 f7+ h8 3 g6!). If his rook leaves the rank White can create a passed pawn (1 … g7 2 b4 axb4 3 a5 xa5? 4 f5+/5 xa5) or advance his king.
Yet Black saved the game with 1 … c5! and … b4. There followed 2 f7+ h8 3 e8+ g7 4 d7+ f6 5 xc7 b4!.
White to play
Now it’s White who has no particularly useful moves. His king cannot pass the fourth rank without losing the g-pawn. He can’t create a passed pawn. There are no zugzwangs. He tried 6 h7 g6 7 g3 d6+ 8 f3 b4 9 d7 g5 but eventually agreed to a draw.
In some cases, a fortress is nothing more than a position that denies your opponent an entry point for his king.
Kramnik – Grischuk
Kazan 2011
Black to play
Black’s rook and knight are both en prise. Is he lost?
No, because of 1 … b4!. Then 2 xd6? allows 2 … b6+. So 2 xb4 axb4 is forced and 3 xb4 was followed by 3 … b6!.
The fortress is secure. Black can pass with … d8-e7. If White’s king runs to the kingside, Black slams the door with … g7. Draw.
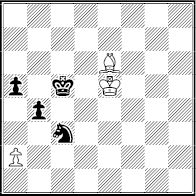
When defending your pawns, the best place for your pieces is usually next to or behind the pawns. But when your opponent’s king got there first, the best defense may be attacking his pawns from behind.

Gipslis – Tal
Latvian Championship 1958
Black to play
Black’s position appears hopeless because of xb7. On 1 … g2 White can win with 2 c5 and c8-d6xb7. (Or, after 2 … d4, with 3 b5! as he did in the game, as we’ll see.)
A second idea is to trade a pair of pawns, 1 … xc4 2 xb7, and defend with the king. But after 2 … d6 3 c8+! e5 (not 3 … d7 4 b6+!) 4 b6 Black is lost.
For example, 4 … d4 5 d6 f1 6 b5 axb5 7 a6. Or 4 … e6 5 a7 d7 8 c6 c8 9 a7 and b8xa6. So, Black tried to attack the pawns with his king, 1 … d4?. But after 2 c5 g2 3 b5! he resigned in view of the breakthrough, 3 … axb5 4 c6! bxc6 5 a6 c5 6 c6+ and the a-pawn queens.
Right was 1 … xc4! 2 xb7 d4!. Then on 3 b6 c3 4 c5:
Black to play
The draw is secured by 4 … b3!. For instance, 5 c6 f1 6 d4+ a4 7 b5 xb5! 8 xb5 xa5!.
Attack from behind arises in many bishop endings, both with bishops of the same color or of opposite color. It is also common in R-vs.-Ps.
White to play
There’s no point in 1 a4+ f3. The rook must attack the pawns from a distance and prompt zugzwang. So let’s start with 1 a8.
Then on 1 … f3 White attacks the d-pawn, 2 d8!, He wins after 2 … d2+ 3 d1 e2+ 4 xd2 f2 5 f8+. The same for 3 … f2 4 f8+/5 e2.
The best try is 2 … e4. But White passes, 3 d7!, to create zugzwang, e.g. 3 … e2 4 d2! or 3 … d2+ 4 e2 f4 5 d4+ e5 6 xe3.
Back at the diagram Black has a trickier defense in 1 … d4!. Again White should attack from behind, 2 e8!. But this time Black can set a trap, 2 … c3 3 xe3?? c2!, threatening 4 … d2+.
White has to play the accurate 3 d1! and 3 … d4 4 e7! to create zugzwang, e.g. 4 … e2+ 5 d2 c4 6 e4+ d5 7 xd3.
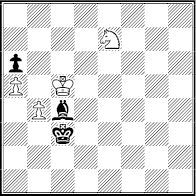
The more valuable the piece, the less likely it is to be sacrificed in an endgame. Queen sacrifices only occur in rare combinations or composed studies. But there are cases when a minor piece can be profitably given up to obtain one or more passed pawns.
Zso. Polgar – Kramnik
Guarapuava 1991
Black to play
White traded off a Black d-pawn with her last moves. She hopes to draw by eliminating the last pawns when Black advances to b3.
Black could try to win by maneuvering the knight to c4. But much easier is 1 … xa2! and 2 xa2 a4.
A pawn must queen after 3 e4 b3 4 b1 a3 5 d3 a2.
A piece sacrifice is most likely to succeed when it leaves your opponent with no piece stronger than a knight. Second best is leaving your opponent with a bishop, as we saw in the discussion of mismatch.
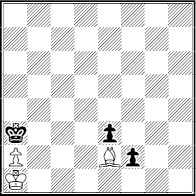
In bishop endgames, what matters most is the color of the squares that your pawns and your opponent’s pawns are on.
White to play
This textbook example illustrates how useless pawns can be on the wrong colored squares. With 1 c5! and 2 b3 White creates an ironclad blockade.
For example 1 … xc5 2 b3 e5 3 e6 c7 4 e4. Black cannot make progress if White passes with bishop moves to g4, f5, e6, etc.
There’s a general rule: In most cases you want your pawns on squares of the opposite color of your bishop. Even with three extra pawns in the last example Black couldn’t win because they were on the wrong color squares.
The pawns lose their offensive power when they share squares with your bishop, as they did in the last example.
The endgame technique that typically takes the longest to execute is creating and exploiting a second weakness in the enemy camp. It’s a concept that also occurs in middlegames. But it yields the clearest result in an endgame.
P. Nikolic – Movsesian
Polanica Zdroj 1996
Black to play
Black’s a-pawn is White’s only target. After 1 … c7 Black was ready to free his rook for duty with 2 … b6.
But White won by opening a new front, 2 h5!. Then 2 … g5 would lose to 3 e4 and 4 f5.
Black had to play 2 … gxh5 3 xh5. Now on the passive 3 … h8 White gets the superior king position, 4 e4 d6 5 f5 e7 after which he can win by activating his rook with 6 h1 and 7 e1+/8 e6 or 7 c1.
Black played 3 … g8 instead. He was hoping that White would trade pawns (4 xh6? xg4) or be forced to use his rook to defend his g-pawn. Play went 4 h4 d7 5 e4 e6.
White to play
But White turned the guard duty over to his king, 6 f3! h8 7 h5 h7 8 g3. When Black tried to activate his rook, 8 … d7, White made it passive again with 9 a5!.
It still might seem that Black was holding after 9 … a7 10 h4 f7 11 h5 g7 12 f5 h7. White had no king entry on the kingside.
White to play
However, the passivity of Black’s rook proved to be fatal after 13 c5 c7 14 a4!. The threat was 15 b5 and there was no relief in 14 … b7 15 xc6 xb4 16 xf6.
The rest was 14 … g7 15 b5 axb5 16 axb5 b7 17 bxc6 c7 18 c1 c8 19 c7 f7 20 c6 g7 21 h4 f7 22 g3 resigns, in view of the threat of f4-e4-d5-d6.
The ultimate defensive trick is to draw by means of stalemate. This may sound like a rare and remote possibility. It isn’t.
Stalemate appears regularly in Exact Endings:
It’s how the defender can often draw in K+P-vs.-K. The same goes for K+Q-vs-K+P when the pawn is on a bishop or rook file. Stalemate is the key to the ‘wrong bishop’ case of K+B+RP-vs.-K and in many versions of K+Q-vs.-K+R. A lone king draws against a king and two knights because of stalemate.
And you’ll find it in many cases of K+R+P-vs.-K+R.
Black to play
Black’s king is cut off. White threatens g4+ followed e8 or f7.
But Black has one way to draw, 1 … a7+! 2 f6 f8!.
The outlook still looks grim after 3 b4!. White threatens 4 b8 mate and he would meet 3 … a8 with 4 h4!, reaching a winning Exact Ending (‘When Philidor Fails’ in Chapter Four).
But the position after 3 b4 is a draw thanks to 3 … f7+! since 4 exf7 is stalemate. Similar tricks occur in K+R+B-vs.-K+R.
There is no secret to mastering stalemate. The main thing is simply to be aware of the possibility.
Kramnik – Leko
Tilburg 1997
Black to play
Black foresaw this position earlier and forced White to bring his king forward to g6. Black’s king appears vulnerable to a different kind of trick – 1 … d2 allows 2 d5! and 2 … xd5 3 b8+ and mates.
Black has a tempting defense, 1 … d6+. But stronger was 1 … xb5!! and then 2 bxb5 d2. He threatened to queen the d-pawn.
On 3 b1 he would avoid 3 … d1() 4 xd1 xd1?? 5 e8 mate – and draw instead with 4 … d6+! because 5 xd6 is stalemate. Or simply 3 … d6+! and 4 … d1().
So the crucial position arose after White met 2 … d2 with 3 bd5.
Black to play
Black drew with the dramatic 3 … d1() 4 xd1 d6+! 5 xd6, stalemate. And with that we leave the learning of endgame techniques and see how many trade secrets you remember – and can use.
Set up each of these positions on a computer screen or board. Then:
(a) Try to figure out which technique – or techniques – can be used. Both players may have techniques available to them. Or one player might use more than one technique.
(b) Try to find the best play, without moving the pieces.
(c) Then try to find the best play, with moving the pieces.
11 Kavalek – Bilek
Sousse 1967
White to play
How can White take advantage of Black’s piece placement?
12 Fischer – Reshevsky
Los Angeles 1961
White to play
With no passed or queenside pawns White’s chances seem slim. He drew after 1 e4?. Did he have better?
13 Bareev – Azmaiparashvilli
Shenyang 2000
Black to play
Black has more than one way to win. Which is the easiest?
14 Timman – Spassky
Hilversum 1983
Black to play
White threatens to win the knight with 1 e7+ c8 2 e8+ or 1 f7. What can Black do?
15 Grischuk – J. Polgar
Biel 2007
Black to play
A knight and two connected pawns usually beats a knight. Why is this position different?

16 Hort – Doncevic
Bundesliga 1983
White to play
Black wants to create a counter-passer with … e5+. What can White do?
17 Ljubojevic – Smeets
Amsterdam 2007
White to play
White is in check and will lose the c5-pawn. What’s the difference between 1 e5 and 1 c7 ?

18 Carlsen – Morozevich
Morelia-Linares 2007
Black to play
Black can win the kingside pawns beginning with 1 … xf4. Should he?
19 Mieses – Gunsberg
Hanover 1902
White to play
White has an extra pawn but no passer. What should he do?