 xc3 Exchange sacrifice in the Sicilian Defense the same way that he knows when to answer … g6 with h2-h4-h5. He recognizes the pattern. That tells him what is likely to be worth calculating.
A master can calculate sacrifices better than you. But before he starts counting out five-move variations, he has to come up with one move – the one that starts the sacrifice. He doesn’t do this by looking at every possible offer of material. He relies on his know-how – the sacrifices that occurred in similar positions in previous games. There are very few new, unique sacks.
Standard sacrifices are a form of priyome. A master knows, for instance, the … xc3 Exchange sacrifice in the Sicilian Defense the same way that he knows when to answer … g6 with h2-h4-h5. He recognizes the pattern. That tells him what is likely to be worth calculating.
In this chapter we’ll examine 25 of the most commonly occurring sacrifices. These are not sham sacrifices, as Rudolf Spielmann called them. Those are really combinations, such as the ancient  xh7+/ …
  xh7/
xh7/  g5+ against a castled king. Sham sacks lead to a quick and definite outcome.
A real sacrifice, on the other hand, may just offer compensation and alter the dynamic of the middlegame. They are harder to learn – and that’s why they are the trade secrets of masters.
When White plays d4-d5 as a sacrifice he wants to open the d- or e-file for his heavy pieces and perhaps plant a knight on d4. This happens after openings as varied as the Caro-Kann and Nimzo-Indian Defenses, and the Queen’s Gambit, both Accepted and Declined.
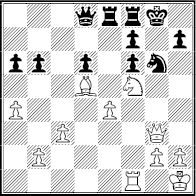
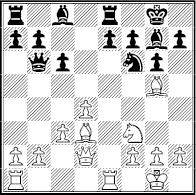
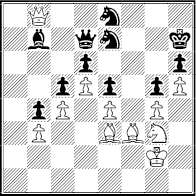
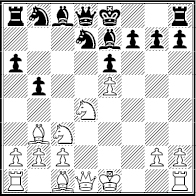
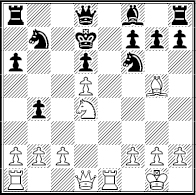
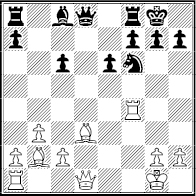
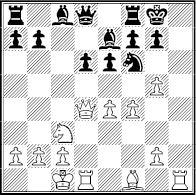
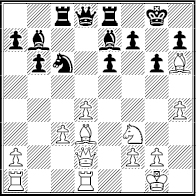
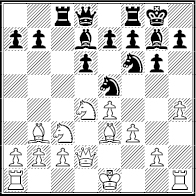
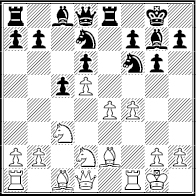
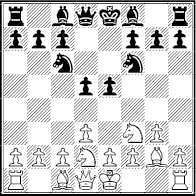
Spassky – Avtonomov
Leningrad 1949
White to play
In this position, from a QGA, Black controls d5 five times compared with two times for White. Yet 1 d5! works. On 1 … fxd5? Black is lost because of 2 a3! (2 … c6 3 xd5 or 2 … xc3 3 xd8 with check).
Moreover, both 1 … xd5 and 1 … bxd5 allow a strong 2 g5!. After Black chose 1 … bxd5 2 g5!, White had two pins and a winning threat of 3 xd5 xd5 4 xd5
Black defended with 2 … e7 3 xf6 gxf6. Then on 4 xd5 he could recapture with the pawn and keep his bishop so that d4-c6 is ruled out.
White would then retain a strong initiative after 4 … exd5 5 d4!  d7 (else f5) 6 e1 f8 7 h5.
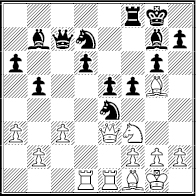
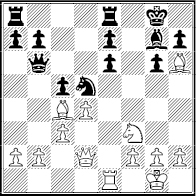
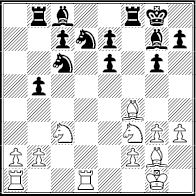
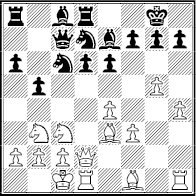
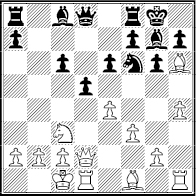
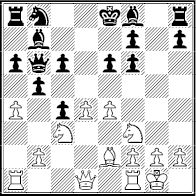
Instead, the game went 4 xd5 xd5 5 xd5 exd5. White does not have a forced win, just a terrific position after 6 d4!.
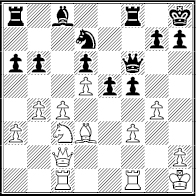
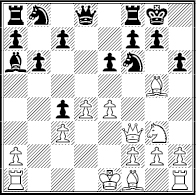
Black to play
White threatens to exploit the e-file pin with heavy pieces and f5 or c6. Black tried 6 … f8 7 f5 h5?, overlooking 8 xd5! xd5 9 xe7+ g8 10 xf6. He resigned in view of 11 g7 mate or 12 e7+.
Better was 6 … d7 7 e1 a7. But White would have a strong initiative, well worth a pawn, after 8 ac1 f8 9 h5.
The moral: Even when d4-d5 looks impossible, it’s worth a second look.
Another form of d4-d5 occurs when White has a pawn at e4 and will meet … exd5 with e4-e5.
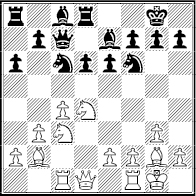
Keres – Fine
Ostende 1937
White to play
The tempting 1 e5? surrenders a wonderful outpost to Black at d5 and opens the diagonal of his bishop at b7. The position calls for 1 d5! instead.
Many of the most common real sacrifices are not forcing. Here, for example, Black can refuse the pawn with 1 … e5.
But the new pawn structure favors White after 2 g5 d7 3 h4 and 4 f5. Or after 2 g5, with threats of 3 d6 and 3 xh7 xh7 4 h3.
So, Black played 1 … exd5. White would get little from 2 exd5? xd5. But 2 e5! drove away the Black knight and made e5-e6!? possible.
For example, 2 … e4 can be met by 3 e6! fxe6 4 xe4 dxe4 5 g5. White would have a dangerous attack with 6 xh7+, 6 xe6+ or 6 xe6.
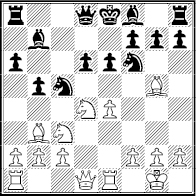
Instead, the game went 2 … d7 3 g5.
Black to play
Now on 3 … h6 White can draw with perpetual check after 4 e6 hxg5 5 exf7+ xf7 6 e7+ g6! 7 xg7+ or look for more.
Black played 3 … f8?, a natural but faulty follow-up to his previous move. He lost after 4 xh7! xh7 5 h3 and 5 … c1 6 xh7+ f8 7 he3.
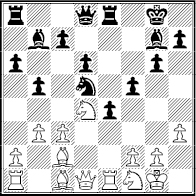
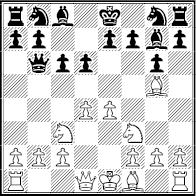
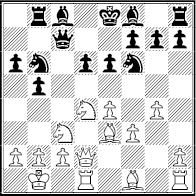
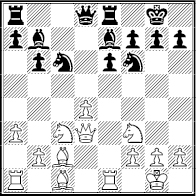
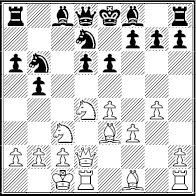
xc3This arises almost exclusively in the Sicilian Defense. But it is so common and so crucial to the outcome of middlegames that it is one of the most important recurring sacrifices.
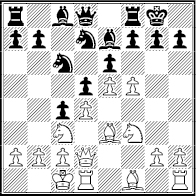
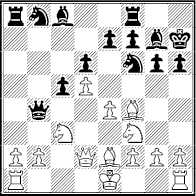
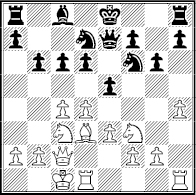
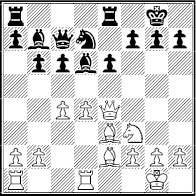
Thorhallsson – Hillarp Persson
Icelandic Team Championship 2003
Black to play
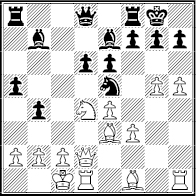
Black appears to be worse because his backward d-pawn is a chronic weakness. But he seized the initiative with 1 … xc3! 2 xc3 xe4.
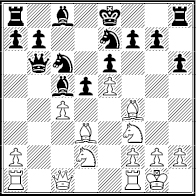
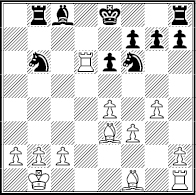
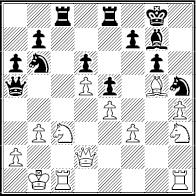
After White met the threats (… xc3/ … xf2+/ … xf2) with 3 e3 the forced moves were over and we can evaluate the sacrifice:
Black has improved the scope of his bishop at b7 and threatens to push his center pawns down White’s throat. His chances are better in a middlegame than in an ending so he played 3 … c7! and 4 c3 f5.
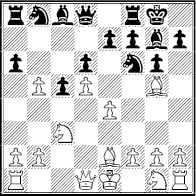
White to play
Theoretically White is about a half a pawn ahead. But the initiative and center control matter more. White played 5 c1 and chances would be roughly equal after 5 … f4. But it was much harder to play the White pieces and Black won.
When Black does not immediately win the e4-pawn, White’s king safety and the weakness of his pawns are keys to Black’s compensation.
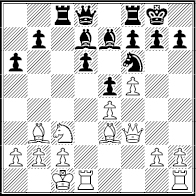
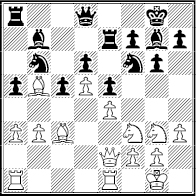
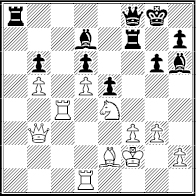
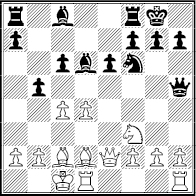
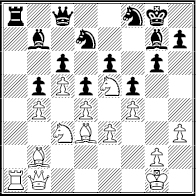
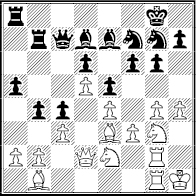
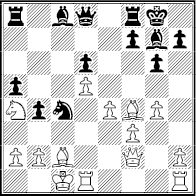
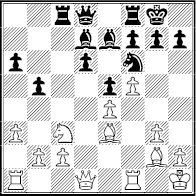
J. Polgar – I. Ivanov
New York 1989
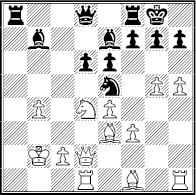
Black to play
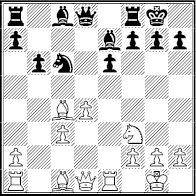
A priyome in this position is g2-g4-g5 by White and … b5-b4 by Black, as we saw in Chapter One. Since it’s Black move, he can start the chain reaction and would likely stand well after 1 … b5 2 g4 b4 and either 3 g5 bxc3 4 gxf6 cxb2+ and 5 … xf6 or 3 d5 xd5 4 xd5 c7.
But more promising is 1 … xc3! 2 bxc3 c6. Black threatens to take on e4 as well as build up on the queenside with … a5/ … c8.
He would stand better after 3 d5 xd5 4 exd5 a5 5 b2 c8, with threats to c3 and prospects of … e4 or … c4-a4.
Instead, play went 3 b2 xe4. Black’s compensation was more than enough because of White’s unsafe king. White bet on a kingside attack and was lost after 4 g4 d5 5 d3 a5 6 h6 f6 and now 7 g3?! xg3 8 xg7 xg7 9 f6 h5! won.
A kind of reversed image of … xc3 is an Exchange sacrifice on f6 or f3. Its main aim is to damage the enemy’s castled position. If the sacker can also pick off a pawn, all the better. This is a common theme in the French Defense:
Rovner – Tal
Riga 1955
Black to play
If White had seen it coming he would have tried something like 1 d2. But he chose 1 h3? and allowed 1 … xf3!.
Declining the sack, 2 hxg4, fails to 2 … xd4! 3 gxf3 xf3+ 4 g2 xg5. Black would have two pawns for the Exchange – more than enough ‘comp.’
White preferred 2 gxf3 h2! 3 g2. But he was worse after 3 … xd4 4 e3 h6! and 5 h4 f4.
For example, 6 b1 f8!, piling up against f3, is better than the complications of 6 … xe3 7 fxe3 hxf3 8 f2!.
Instead, the game went 6 g6?! xe3 7 xe8 and Black won after 7 … hxf3! 8 xd7 xh4+.
The White version of this, xf6, is a familiar guest in the Sicilian Defense. The positional benefits often include securing outposts at d5 or f5.

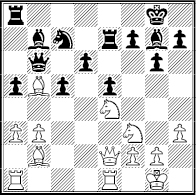
Stein – Parma
Lvov 1962
White to play
The natural 1 f5 is handled by 1 … e7. White secured the f5 square and the win of a pawn for the Exchange with 1 xf6! gxf6 2 f2.
A key point is that 2 … g7 3 f1 e7?? allows 4 f5+. Black tried 2 … g8, leaving White with a choice of 3 xf6 e7 or the more ambitious ideas, 3 e3 and h6/f5 or building up with 3 f1.
He chose the latter and play went 3 f1 de8 4 f5 d8 5 g3.
Black to play
White’s main threat is h2-h4-h5, which, thanks to the knight on f5, would be decisive. (In fact, 5 h4 is stronger than 5 g3.)
Black began to give back material, 5 … h8 6 xd6 (6 h4!) e7 7 xf6. Then he gambled on 7 … xe4? based on 8 xe4 xf6 and 8 xe4 xd5.
But this lost to 8 xf7+! xf7 9 xf7 e5 10 c4. The outcome would have been unclear after 7 … d7 8 e5 e7.
Pawn chains encourage attacks on the flanks of the chain. With White pawns at d4 and e5 facing Black pawns at d5 and e6, a standard idea is f4-f5/ … exf5 – and even the follow-up of e5-e6 – to open the center.
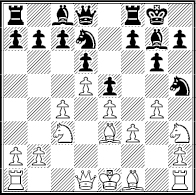
But another recurring theme is blasting open the center by giving up a knight for two chain pawns.
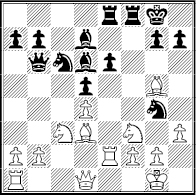
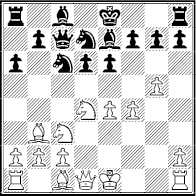
Jansa – Gligoric
Nice 1974
Black to play
That happens most often when White creates a chain with links at e4 and d5, as in the King’s Indian and Benoni Defenses but also in 1 e4 e5 openings. This position arose from a Ruy Lopez.
White prepares to pressure the queenside with a3-a4 and d2. Or with d2-c4 and … xc4/bxc4 and fb1.
Black acted first, 1 … bxd5! 2 exd5 xd5. At meager cost his center pawns – and the bishops behind them – became an offensive force following 3 b2 b6 4 e4 c7!.
Black threatened … xb5 but also prepared … d5 followed by … e4.
White to play
He was better after 5 a4 d5 6 ed2 e4! 7 xg7 xg7 and then 8 h2 e6 9 ac1 f5.
Black’s edge became obvious after 10 f3 c4+! (11 h1 c5 or 11 f2 xf2+ 12 xf2 c5 and … d3+). But even without 10 f3 he would have a strong game with … f4-d3 or … f8 and … f4.
A variation on this theme is a sacrifice on e4 rather than d5. If Black then wins the d5-pawn the effect is the same.
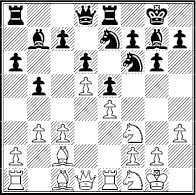
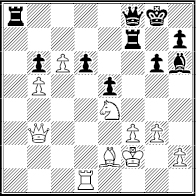
Geller – Eingorn
Riga 1985
Black to play
Having seen the last example, you might start by looking at 1 … exd5. But 1 … xe4! and 2 xe4 f5 is more forcing.
Black gets to mobilize his center pawns immediately thanks to his threats to take on c3. Play went 3 c2 e4 4 d4 xd5.
The game could become wildly unbalanced after 5 d2 c5 6 e2 b4 7 c4!? xa1 8 xa1 or 5 … b4 6 c4! xd4 7 cxd5 xa1 8 xa1 xd5 9 xb4.
White to play
Instead, White replied 5 e2? and then 5 … xc3 6 xc3 xc3 7 b1.
Black didn’t want to give his opponent attacking chances along the a1-h8 diagonal after 7 … xe1 8 xe1 followed by b2.
He felt he could win with his center pawns alone and did so after 7 … c5! 8 b2 xb2! 9 xb2 d5 10 c1 d4 11 d1 d6.
This arises in several different pawn structures with an open file. The sacrificer, White or Black, wants to close the file and secure positional benefits like a protected passed pawn.
Epishin – Dolmatov
Russian Team Championship 1992
White to play
White can occupy c7 with his rook but it can be challenged by … c8.
Better is 1 c6!, threatening the pawns on b6 and d6. After the forced 1 … xc6 2 dxc6 we can evaluate:
(a) White created a protected passed pawn at c6.
(b) He opened a splendid diagonal leading to f7 and threatens c4.
(c) He is virtually certain to win back at least one pawn.
Of course, Black has an extra Exchange. But rooks need files to prove they are superior to minor pieces. Since the c-file is now plugged up, a diagonal, a2-g8, counts much more.
Black to play
This became evident as the game went 2 … h8 3 xd6 and now 3 … c1!? 4 c3 a3 5 e6 g7 6 g2.
White could have won a second pawn (6 xe5 or 6 xe5). Or he could have pushed the c-pawn. But he preferred to exploit the a2-g8 diagonal, with 6 … e7 7 c4 aa7 8 h4 xe6 9 xe6 f8 10 b3!.
He was preparing c4 and g5-f7+. The game ended with 10 … h6 11 c4! g5 12 hxg5 hxg5 13 e6 g4 14 fxg4. Black resigned in view of f6 followed by e8! or h5!.
The file plugger works best when it not only limits enemy rooks but benefits one of your minor pieces, such as White’s light-squared bishop in the last example, and Black’s in the next.
Matanovic – Szabo
Saltsjobaden 1952
Black to play
White threatens to win a second pawn, xd5+. If Black defends with … f7, White can continue with f3-e5 or perhaps a2-a4 and enjoy an edge.
So Black played 1 … e4! and 2 xe4 fxe4. Then White had no targets to attack. His rooks don’t play because the e-file is plugged. Black’s bishop goes from bad to good, e.g. 3 … f3! 4 f2 g5 or 4 f1 h6.
But one of the advantages of having an extra Exchange is that you can give it back. White chose 3 f1. He invited 3 … h3 4 f2 xf1 5 xf1 when he would still be a pawn up and ready for 6 a4.

Black to play
Black appreciated that and preferred 3 … f3 so that he could answer 4 f2 with 4 … g4, threatening … xf4 or … h5-h4.
White kept winning chances with 4 xf3! and 4 … exf3 5 f2 e6 6 e1! (not 6 f1 xf4 7 xf4 e2 or 7 gxf4 g4+ and 8 … g2+).
The upshot is that he can trade rooks and try to win the f3-pawn in the endgame. Black had enough counterplay, 6 … h6 7 d2 f7 8 xe6 xe6 9 h3 g5!, to draw. A good sacrifice had been met by a good counter-sack.
This sacrifice occurs in two forms of the Sicilian Defense. In one, Black plays … d5 in answer to g2-g4. We examined that in Chapter One.
The second version arises when Black’s pawn is at e5, not e6. Then when … d5 is met by exd5, Black may be able to liberate his pent-up power with … e4.
Petrosian – Smyslov
Moscow 1949
Black to play
If White can threaten the d-pawn with fd2, Black’s bishops suffer after … e7 or … c6. White would be at least equal. So Black chose 1 … d5!.
White cannot allow … dxe4, e.g. 2 f3 dxe4 3 xd8+ xd8 4 xe4?? xe4 5 xe4 d1+.
In the game, he chose 2 xd5?. This turned out badly following 2 … xd5 3 exd5 xc2 and then 4 b3 e4!. Black kept his pawn and it grew in power with 5 g4 e3 6 g2 d2! 7 xd2 exd2 8 d1 xd5. He won.
But what if White played 2 exd5 ? The answer is 2 … e4!.

White to play
The only way to avoid 3 … xc3 4 bxc3 xc3, which favors Black, is 3 xe4. But the Black bishops take over after 3 … xb2 and 4 f3 xa3.
If … d5 can be carried off favorably in an endgame like that, it stands to reason that it should be a worthy option in a middlegame:
Bokuchava – Tal
Poti 1970
Black to play
White has taken steps (d2, f3) to make sure … xc3 will be unsound. But 1 … d5! is promising. The main line is 2 exd5 e4!.
White’s bishop is not trapped because 3 fe1 exf3 allows 4 xe8. Therefore, play could go 3 fe1 e5 and then 4 xe4 xe4 5 xe4 xd5.
There would be chances for both sides after 6 f4 and then 6 … xe4 7 xe4 xc2 and 8 g3 f6 or 8 d4 c4.
But back at the diagram White met 1 … d5 with 2 xd5? and Black replied 2 … xd5 3 exd5 e4. On 4 xe4 White just loses a piece.
He tried 4 fe1 e5 5 f4 but lost after 5 … exf3 6 xe5 g4 (or 6 xe5 g4).
This is another sacrifice that can be carried out by White or Black. A rook is almost always given up for a bishop, not a knight. The compensation often comes in the form of domination of light or dark squares, depending on which bishop is captured.
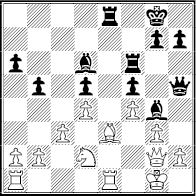
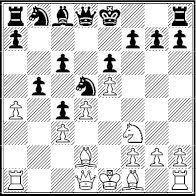
Polugayevsky – Petrosian
Moscow 1983
Black to play
White might feel he is better because of his bishops and pressure (b3, fb1) against b7. But that changed radically after 1 … xe3! 2 fxe3 c5.
The two-bishop edge is gone, b7 is rock solid and Black is preparing to target e3 and dominate the dark squares.
For example, 3 c1 e8 4 f3 h6 and 5 … e7 threatens to win a pawn with … xe3+. If White tries to keep his material edge with f2, Black can repeat the position with … e4+ – but may want more.
White preferred 3 c2 e8. He should have conceded the e-pawn with 4 b1 xe3 5 be1. If White can trade a pair of rooks he would reach rough equality. But he chose 4 f3 h6 5 c3 e7 instead.
White to play
Now 6 f2?? e4+ is out of the question. On other moves Black would enjoy slightly better chances after … xe3+.
White blundered, however, with 6 b6? and resigned after 6 … a4!.
The colors-reversed version, when White plays xe6, often begins a kingside attack directed at squares around f7.
Adorjan – Vadasz
Hungary 1970
Black to play
Since 1 … g4 invites 2 e5!, Black tried 1 … e6. But this innocuous-looking move turned out to be a serious error because of 2 xe6!.
White’s immediate aim is to win a pawn after 2 … fxe6 3 e1.
But he also had attacking chances based on e5 or g5 – as well as on h6/g5 and then either xg6 or c4.
The dangers to Black were evident after 3 … c5 4 c4! d5 and 5 h6.
Black to play
Black’s position would be in free fall after 5 … h8 6 g5 and xe6 or xe6. Also, after 5 … f6 6 g5 xg5 7 xg5 and e5 or xg6.
He played 5 … ad8? 6 xg7 xg7 7 g5 c7 8 f4. In this lost position he walked into 8 … f8 9 xc7! (9 … xc7 10 xe6+ and xc7).
Many of the rules given to beginners are so general (‘Don’t lose time in the opening’) that they’re almost useless. One of the most specific concerns a sacrifice: ‘Do not take the enemy b-pawn with your queen.’ There are good reasons for this.
Tal – Tringov
Amsterdam 1964
White to play
The game is five moves old and Black is already threatening to violate the rule with … xb2. White played 1 d2! xb2 2 b1 and then 2 … a3 3 c4. His compensation is having six pieces in play in a semi-open position while Black is trying to fight with two.
After 3 … a5 4 0-0 Black should have developed, such as with 4 … d7. But he played 4 … e6 and 5 fe1 a6? 6 f4 e5 7 dxe5 dxe5.

White to play
It shouldn’t be shocking that White can begin a sham sacrifice – that is, a combination – with 8 d6!. Then 8 … exf4 9 d5! cxd5 10 exd5+ loses and 9 … d7 10 g5 e5 11 c7+! xc7 12 xf7+ d8 13 e6 is mate.
Black accepted a different sacrifice, 8 … xc3, and resigned after 9 ed1 d7 10 xf7+! xf7 11 g5+ e8 12 e6+ because of 12 … d8 13 f7+ c7 14 d6 mate or 12 … e7 13 f7+ d8 14 e6 mate.
This sacrifice is offered so often because the best way to punish an early move of the enemy QB is to attack the undefended b-pawn. This occurs in openings as varied as the Sicilian’s Poisoned Pawn Variation (1 e4 c5 2 f3 d6 3 d4 cxd4 4 xd4 f6 5 c3 a6 6 g5 e6 7 f4 b6) and the Slav Defense (1 d4 d5 2 c4 c6 3 f3 f6 4 c3 f5 5 cxd5 cxd5 6 b3!).
The compensation is usually just a lead in development. But the sacrificer usually needs to open the center to make that matter. For example, 1 e4 e6 2 d4 d5 3 e5 c5 4 dxc5 c6 5 f3 xc5 6 d3 ge7 7 f4 b6.

Keres – Alexandrescu
Munich 1936
White to play
White played this way for several reasons. First, the conservative 7 0-0 g6! would have posed problems defending the e-pawn, e.g. 8 e1 d7 followed by … b6-c7.
The sacrifice, 8 0-0 xb2, made sense because (a) it costs Black two tempi to grab the pawn and bring his queen to safety, (b) White can open the center with c2-c4!, and (c) Black won’t be able to castle easily because of tactics.
Play went 9 bd2 b6 10 c4!. Note that 10 … 0-0 is no good because of 11 xh7+! xh7 12 g5+ g8 13 h5 or 12 … g6 13 g4.
Therefore Black played 10 … h6, But White replied 11 c1!.
Black to play
He threatens 12 b1 d8 (12 … a5 13 b3) 13 cxd5 xd5 14 e4 and xc5 when the queen retreats. And he’s also looking to play xh6.
Black was forced into unnatural moves, 11 … b4 12 e2 d7 13 a3 a6 14 b1 c6.
He was in trouble after 15 g3 f5 16 cxd5 exd5 17 e6! because of 17 … xe6?? 18 b5.
He lost quickly: 17 … fxe6 18 e5 xg3 19 hxg3 c7 20 xd7 xd7 21 b2 b6 22 xg7+ d6 23 e4+! dxe4 24 fd1+ resigns.
But the b-pawn is not poisoned in other cases, as the success of 1 d4 f6 2 f3 e6 3 g5 c5 4 e3 b6 5 bd2 xb2!? and other openings have shown. Understanding what makes the sacrifice work – such as opening the center – is part of a master’s know how.
When the center is locked thanks to Black pawns at c5, d6 and e5, the action typically turns to the wings. But a sacrifice of a piece on c5 or e5 can make an explosive difference.
Spassky – Penrose
Palma de Mallorca 1969
White to play
White has better pieces but the closed center stifles them. He would have little after 1 f5 xf5 2 exf5 and 2 … g7 and … f6, for example.
White’s solution was 1 xc5! dxc5 2 xe5. His aim is e4-e5, which frees e4 for a piece and can make threats of d5-d6 or e5-e6. On 2 … d6 he should avoid the endgame (3 xd6 xd6 4 e5 f7) and continue 3 a1!.
The game went 2 … g8 and 3 b8.

Black to play
Now 4 e5 can’t be stopped. Then White’s minor pieces take over, e.g. 5 e4+, 5 e4 and 6 xc5 or 5 f5 followed by 6 e6.
Black’s reply, 3 … ef6, prepared to give back the piece, 4 e5 xd5! 5 cxd5 xd5, when chances would be equal.
But White found 4 f5 and then 4 … e7 5 xh6!. This is based on 5 … xh6 6 f8+ followed by 7 f7+, 8 xf6+ and a winning e4-e5.
Black decided on 5 … exd5 6 cxd5 xh6. But after 7 f8+ g7 8 xc5 the center pawns could no longer be restrained.
The game ended with 8 … d7 9 d6+ h7 10 e5! h8 (10 … xe5 11 e4+ g8 12 b8+) 11 h6 h7 12 e6! c2+ 13 g3 resigns.
Because of Black’s tight quarters in the full Benoni pawn structure, it’s often impossible for him to stop the sacrifice. The best defense may be a counter-sacrifice as he tried in the last example and more successfully in the next.

Gufeld – Augustin
Sochi 1979
White to play
This arose from a Ruy Lopez, not a Benoni. After 1 xe5! dxe5 2 xc5 White would pocket the b4-pawn and have a huge pawn roller.
For example, 2 … c8 3 xf8 xf8 4 xb4 followed by c4-c5 and maybe d3, c3 and b3-b4-b5.
But White preferred 1 xc5 dxc5 2 xe5. When Black prevented 3 xf7+ by means of 2 … g8, White continued 3 xd7 xd7 4 e5.

Black to play
This looks ominous because of 5 d6 g6 6 e6 or 5 … c6 6 d3, threatening mate on h7.
But Black found safety in 4 … xd5! 5 cxd5 xe5 and then 6 xe5 xe5.
Material is equal and 7 f4 d7 8 e4 allowed him to flee into a bishops-of-opposite-color ending, 8 … a1+ 9 f2 d4+! 10 xd4 cxd4 11 f5 f6! 12 xf6+ gxf6, that was ultimately drawn.
When White pushes his unsupported g-pawn two squares he dares Black to take it. If Black doesn’t, White saves a tempo for his attack – and an extra tempo often makes an attack decisive.

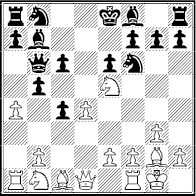
Spassky – Petrosian
World Championship 1969
White to play
A priyome in similar positions is 1 e5. But White chose 1 g4! because it prepares a powerful push to g5 and g6, e.g. 1 … b5 2 g5! hxg5 3 fxg5 d7 5 g6! or 4 … h5 5 g6! fxg6 6 g5.
So Black played 1 … xg4 and then came 2 g2 f6 3 g1. White’s ideas include (a) f4-f5, (b) f3 and e4-e5, and (c) d3-g3 and xg7+.
Black defended with 3 … d7 4 f5 g8, because 4 … e5 5 de2 and 6 g6! would have been too strong. White continued to build up, 5 df1.

Black to play
Now 5 … e5 is bad because of 6 e6! fxe6 7 fxe6 xe6 and 8 xf6!, threatening 9 xf8+! xf8 10 xg7 mate.
Black should have tried 5 … exf5! 6 xf5 xf5. But he allowed 5 … d8? 6 fxe6 fxe6 7 e5!, a sacrifice we’ll examine in a few pages.
After 7 … dxe5 8 e4 White threatened to take on f6. He would meet 8 … xe4 with 9 xf8+! and 10 xg7 mate. The rest: 8 … h5 9 g6 exd4 10 g5! Resigns. (11 … hxg5 12 xh5+ g8 13 f7+ h8 14 f3 and mate).
The g2-g4 push is not exclusive to Sicilian bashers. It crops up in Caro-Kann Defense middlegames and 1 d4 openings like the Semi-Slav (1 d4 d5 2 c4 e6 3 c3 f6 4 f3 c6 5 e3 bd7 6 c2 d6 7 g4 xg4 8 g1) and various Indian defenses, like 1 d4 f6 2 c4 d6 3 c3 e5 4 f3 bd7 5 e4 e7 6 e2 0-0 7 g4!? xg4 8 g1. Here’s a vintage example from a Semi-Slav.
Alekhine – Illa
Buenos Aires 1926
White to play
With 1 g4! White tried to force half of the g-file open. On 1 … xg4 he would gain time with 2 dg1 h5 3 g5 h3. He might win after 4 hg1 g6 5 c5 e7 6 e5 followed by xg6.
But what if Black takes with his knight, 1 … xg4 and 2 c5 c7 ? Once again the file is dangerous after 3 hg1. Black was clinging to life after 3 … f5 4 e5 because 4 … xe5 5 dxe5 threatens 6 f3 (5 … f6 6 xg7+!).
Instead he chose 4 … f6 and White won with 5 f3 xe5 6 xe5 e8 7 g5 f7 8 xf5! (8 … exf5 9 b3).
A colors-reversed form of the g2-g4 sacrifice is … b5 by Black when White has castled queenside. If the pawn is not captured it can become a battering ram.
Abu Sufian – Lalic
Hastings 2007-08
Black to play
Black has a space edge on the queenside but it looks like White has the quicker attack. This appearance changed after 1 … b5!.
Then on 2 xb5 b8 Black would hold the initiative, 3 d6 xd6 4 exd6 and 4 … b4 5 b1 f6 and … e4, for example.
In the game White ignored the offer with 2 fxe6 fxe6 3 h4. But he was soon overwhelmed by 3 … a5 4 g5 b4!.
xe6) for PawnsAnother common feature of Sicilian Defenses is a White sacrifice on e6. Ideally he gets three pawns – and an attack – for a bishop.
Stein – Chistyakov
Soviet Team Championship 1959
White to play
Black has just retreated his attacked knight to d7. But this allowed 1 xe6!. Then 1 … xd4 loses a pawn to 2 xd7+ and 3 xd4.
Play went 1 … fxe6 2 xe6. Black had to move his attacked queen and give up a third pawn, 2 … a5 3 xg7+.
White’s pawns provide cover for attacking pieces, e.g. 3 … f7 4 f5 f8 5 h5+ g8? 6 h6+ mates or 5 … g6 6 xe7 xe7 6 d2 and d5+.
Black tried 3 … f8 4 e6+ g8 but was losing after 5 h5 f8 6 xf8 xf8 7 d2 with a threat of 8 d5 followed by f6+ or xa5.
When White would get three pawns and strong attacking chances from xe6, it may pay to decline the offer. For instance: 1 e4 c5 2 f3 d6 3 d4 cxd4 4 xd4 f6 5 c3 a6 6 c4 e6 7 b3 e7 8 f4 b5 9 e5! dxe5 10 fxe5 fd7.
White to play
When White opts for 11 xe6 Black should avoid 11 … fxe6 12 xe6 b6? 13 d5 or 12 … a5 13 xg7+.
He has better chances of survival after 11 … xe5! even if White has the upper hand following 12 xc8 and 13 d5.
Rudolf Spielmann loved all kinds of sacrifices but he is particularly associated with the advance of an e-pawn to the sixth rank. One of his games began 1 e4 f6 2 c3 d5 3 e5 fd7 4 e6!?. The point is that 4 … fxe6 5 d4 makes a mess of Black’s pawn structure.

Black to play
The safest policy may be to return the pawn, 5 … e5 6 dxe5 e6, but this is not to everyone’s taste. Black played 5 … f6?! 6 f3 c5 7 dxc5 c6 and lost quickly after 8 b5! d7 9 0-0 c7 11 e1 (threat of g5xe6) h6 12 xc6 bxc6 13 e5.
This obstruction idea occurs in many different openings. Another of Spielmann’s games began 1 e4 c6 2 c3 d5 3 f3 f6?! 4 e5 e4 5 e2 xc3 6 dxc3 b6?! 7 d4 c5? and then 8 e6!.
If Black can’t correct his pawn structure, he needs active counterplay, as in this example from a King’s Indian Defense.

Black to play
If Black retreats 1 … e8, he is worse after, say, 2 cxb5 axb5 3 f4 and e4. His choice is between 1 … d7 or an exchange of pawns and queens first. In either case White cannot maintain his pawn on e5.
If Black opts for the middlegame, 1 … d7?! 2 e6! he faces dangers like 2 … fxe6 3 d5!, when 3 … exd5 4 cxb5 axb5? 5 xd5+ costs a piece. Or 3 … a5 4 cxb5 exd5 5 d4 and 3 … a7 4 dxe6.
Experience indicates White has compensation in the endgame, after 1 … dxe5 2 dxe5 xd1 3 xd1 d7, in view of 4 e6! fxe6 5 cxb5 axb5 6 f4.
Black to play
Black is worse after 6 … e5? 7 e3. For example, 7 … f6 8 ac1 d7 and now both 9 e4 followed by c5 and 9 d5 xd5 10 xd5 are good.
As in the Spielmann games, Black’s downfall comes from passive play. In the diagram, 6 … b4 7 a4 b6! is a fine, forcing idea, e.g. 8 xb6 xb6 9 xc7 b7 and 10 … xb2.
d5Planting a knight on d5 is a common sacrifice in English Opening and Sicilian Defense middlegames. It works when the virtually forced … exd5 allows White to build pressure on a newly opened file.
Uhlmann – Brameyer
East German Championship 1972
White to play
White began with 1 d5! because 1 … b8? 2 xc6 and 3 xe7+ or 1 … d7? 2 b6 are verboten.
Black played 1 … exd5 2 cxd5 and 2 … xd5 3 xd5. Thanks to the sham sacrifice White pressures c6. The game ended quickly: 3 … d7 4 d3 b6 and 5 f5 f8? and 6 xc6! bxc6 7 h6+! gxh6 8 c3 and mates.
In the Sicilian, a sacrifice on d5 is more often real, rather than sham, and is typically designed to open the e-file when the enemy king is uncastled. Here’s a case of White offering pieces twice on d5.
Tal – Mukhin
Baku 1972
White to play
After 1 d5! Black rejected 1 … exd5 2 exd5+ because 2 … e7 3 f5 loses back the piece and 2 … d7 3 b4 or 3 c6 gives White excellent compensation. For example, 3 b4 a4 4 xa4 bxa4 5 c4 and xa4+.
So he chose 1 … b4, expecting the knight to retreat from c3. But White fired back 2 xb7 xb7 and 3 d5!.
Black had little choice this time in view of 3 … e7? 4 c6 or 3 … a5? 4 xf6 gxf6 5 c6! c8 6 xf6 mate.
So the game went 3 … exd5 4 exd5+ and 4 … d7 – again avoiding 4 … e7? 5 f5.
White to play
White has one pawn for his knight but Black’s king predicament and the prospect of c6 offers excellent ‘comp.’ White chose 5 c3 because 5 … bxc3 6 a4+ and 7 ac1! would open decisive attacking lines.
So play went 5 … b3 6 xb3 c5 7 c4 with 8 b4 or 8 c6 coming up, e.g. 7 … c8 8 b4 ce4 is met by 9 c6 xg5 10 b8+! xb8 11 c6 mate.
Instead, Black tried 7 … c8 8 c6 and White was threatening 9 e3 followed by ae1 and e3 and e7+!.
The game ended with 8 … h6 9 xf6 gxf6 10 e3 c7 11 b4 g8? and Black resigned.
It’s a familiar scenario: Kings are castled on opposite wings and the player who first opens attacking lines wins. He may have done it with a supported pawn charge. But quicker is an unsupported charge, that is, a sacrifice.
White to play
White’s attack seems to be on schedule with 1 h5 followed by 2 h3 or 2 d3 and 3 dg1/ 4 g6.
But Black can interrupt him with the forcing 1 … b4!. That seizes the initiative, 2 a4 c5! 3 axc5 dxc5, and White’s attack grinds to a halt. Or 2 e2 de5 threatening 3 … xf3 and 3 … c4.
White doesn’t need to support his g-pawn. With the faster 1 g6! he threatens 2 gxf7+ xf7. Then he can choose between 3 h3, with xe6+ in mind, and 3 f4/4 f5.
And what if the pawn is taken? One way is 1 … hxg6 and then 2 h5! gxh5 3 xh5 with deadly play on the open file (3 … f6 4 h3 and h2).
Only slightly better is 1 … fxg6 2 h5! gxh5 3 xh5 and 3 … f6 4 g5.

Black to play
Now the target is g7. For example, 4 … e5 5 g2 f8 and 6 e2 followed by f3-f4 with a terrific attack for White.
While White is looking to his right in this kind of position, Black can look to his right – to open a queenside file with a very similar sacrifice.
Ilincic – Cvetkovic
Kladovo 1990
Black to play
White is on the verge of g5-g6 while Black has a hard time preparing a supported … b3 – since 1 … a4 allows 2 xb4.
But Black doesn’t have to prepare. He stole the initiative with 1 … b3!, even though the pawn can be taken three ways.
The simplest lines are 2 xb3 xf3! and 2 cxb3 c8+ 3 b1 xf3! (4 xf3 xe4+ and … xf3), which favor Black.
The real test was 2 axb3. Black continued 2 … a4!. It’s the mirror image of what happened on the kingside in the previous example, when White played g5-g6 and met … hxg6 with h4-h5!.
After 2 … a4, White tried to keep files closed with 3 b4. But on 3 … a3 4 b3 Black would have opened the position with 4 … d5!.
Instead, after 3 … a3 White went for 4 b1 axb2 5 xb2.
Black to play
At the cost of a pawn Black has the more vulnerable king target. Next came 5 … d5!, getting his e7-bishop into play and readying … a4/… a8. If 6 cxd5 xd5 he would threaten 7 … a2+ and 7 … xf3.
White tried to close the position with 6 c3 dxe4 7 f4. But Black replied 7 … d5 8 b3 d3+ 9 xd3 exd3. He won eventually after 10 hg1 xb3 11 xb3 xb4! since 12 cxb4 d5+ is death.
The sacrifices in this chapter tend to fall into two categories: There are those that wouldn’t occur to amateurs because they just seem so strange, such as the ‘impossible’ d4-d5 push and the Exchange sacks on e6 or f3. A second group of sacrifices are trade secrets because amateurs think the key moves require preparation: They feel that g5-g6 needs h4-h5. Others of this type are the unsupported g2-g4 advance, the Benko-like … b5 – and Emanuel Lasker’s contribution to the science of sacrifice.
Lasker made this sacrifice famous when he cleared a square for his knight at e4 in a famous endgame against Jose Capablanca, at St. Petersburg 1914. The push is much more common in a middlegame.

Ragozin – Noskov
Leningrad 1930
White to play
Black’s last move, … f6, was designed to neutralize the b2-g7 diagonal. He may have counted on being safe after 1 xf6 xf6 and 2 … e5. Then he could meet 2 e5 dxe5 3 fxe5 with 3 … d4+ and 4 … xe5.
But White played the immediate 1 e5! and 1 … dxe5 2 e4!. If Black refuses the pawn, 2 … e7 3 fxe5 c5, White’s attack wins with 4 f6+! gxf6 5 g4+ h8 6 exf6. Or 3 … h8 4 xh7 xd3 5 h5 g8 6 cxd3.
Black tried 2 … exf4 and then 3 xf6+ xf6 4 xf4:
Black to play
Now xf6 or xf6 are on tap, and 4 … d5 would invite a sham sacrifice, 5 xh7+! xh7 6 h5+ g8 7 xg7! xg7 8 g4+ f6 9 g5 mate.
Black can defend much better with 4 … e5! and 5 xe5 d5. Then the two-bishop sacrifice fails. White might try 6 h5 h6 7 f3 instead.
Instead, Black created an escape route for this king with 4 … e8?. But this handed White another winning combination, 5 xf6! gxf6 6 g4+.
Black could resign after 6 … h8 7 h4. He chose 6 … f8 and lost after 7 a3+ e7 8 xh7 b6+ 9 h1 e8 10 d1! and g8 mate.
Another common form arises when the sacrifice of the e-pawn prepares an advance of the f-pawn.
Short – Ni Hua
Beijing 2003
Black to play
White threatens xf5 and would win control of light squares for his minor pieces after 1 … fxg4 2 fxg4 (or 1 … f4? 2 xh7).
Black made the dark squares more important with 1 … e4!. If 2 e2, then 2 … exf3 and 3 … e5 is annoying. (After 3 xf3 Black might prefer 3 … fxg4 4 xg4 xf1+ 5 xf1 xf1+.)
White accepted the offer, 2 fxe4. But 2 … f4! revealed Black’s strategy: At the cost of a pawn he cleared e5 for his knight and obtained a powerful passed f-pawn. White’s bishop and knight, which would have been powerful after 1 … f4 or 1 … fxg4, have become idle spectators.
Play continued 3 e2 f3 4 d2 e5. (Even better was 4 … f2!, threatening … f3 mate, and then 5 e3 e5 followed by 6 … xg4 or 6 … f3+ 7 xf3 xf3.)
White to play
Black’s knight and f-pawn allowed him time to mobilize both rooks and he was winning after 5 g5 g6 6 g1 g4 7 b1 f7 and … af8.
By passive we mean a non-forcing move that leaves a piece en prise. Consider the Sicilian Defense line that runs 1 e4 c5 2 f3 c6 3 d4 cxd4 4 xd4 f6 5 c3 d6 6 g5 e6 7 d2 e7 8 0-0-0 0-0 and then 9 f4 h6:
White to play
There are several reasons why Black wants to see 10 h4. He might prefer the bishop to be unprotected so that 10 … xe4 11 xe4 xh4.
White has an alternative in 10 h4!?. The first point is that after 10 … hxg5 11 hxg5 he can swing his queen to the h-file and threaten mate on h7 or h8, e.g. 11 … d7 12 xc6 bxc6 13 g4 and h2.
And on 10 … xd4 11 xd4 hxg5 12 hxg5:
Black to play
White can meet 12 … g4 with 13 e2 e5 14 g1! exf4 and 15 xg4, with the idea of h2-h8 mate.
Moreover, 10 h4 is not just based on the wishful thinking that Black will open the h-file. After 10 … xd4 11 xd4 a6, for instance, White can aim for e2 and g2-g4-g5. This is stronger thanks to h2-h4. One GM game went 12 e2 a5 13 f3 d8 14 g4! d7 and then 15 xh6 gxh6 16 g5 with a fierce attack that eventually won.
The prime virtue of this sacrifice is that it allows you to ignore … h6 when you really don’t want to retreat or trade the bishop. Here’s how a missed opportunity can ruin a game.
Saidy – Fischer
New York 1965
White to play
The pin on the knight at f6 and the threat of e4-e5 gave White compensation for his pawn. But Black’s last move, … h6, ‘put the question.’
White would be worse in the 1 xf6 xf6 2 xf6 gxf6 endgame.
He stayed in the middlegame with 1 d2 and 1 … bd7 2 e5 d5. But he was worse and after 3 f5? exf5! 4 xd5 e8 5 xc4? he overlooked 5 … xe5! 6 xd8 xc4+! 7 xe8+ xe8+. Black went on to win the ending after 8 d1 xd2 9 xd2 e2+ 10 c1 xf2.
White missed a chance to upset one of history’s greatest players because he didn’t know the passive sack, 1 h4!. If 1 … hxg5 2 hxg5 Black can’t move his knight because he faces death on the h-file. Moreover, White could build up his attack since he is no rush to take on f6. For example, 2 … bd7 permits a strong 3 e5!.
Well before the Benko Gambit (1 d4 f6 2 c4 c5 3 d5 b5!? 4 cxb5 a6), players on the Black side of a King’s Indian Defense or Benoni conjured counterplay by offering a pawn on b5:

Uhlmann – Geller
Palma de Mallorca 1970
Black to play
Black often plays … e6 and … exd5 in similar positions. But that would lose a pawn here (1 … e6 2 dxe6 and 3 xd6).
Black found 1 … b5! and then 2 cxb5 axb5 3 xb5 b6. He can use the two half-open files to pressure pawns at a2 and b2.
He also threatens 4 … xe4 5 xe4 xb5. In fact, after 4 a4 he still has 4 … xe4 5 xe4 xb5! because 6 axb5 xa1+ and … xh1 favors him.
White chose 4 e2 and Black attacked the e-pawn with 4 … b4!.
White to play
The tactical problems are shown by 5 c2? xe4 6 xe4?? xc3+.
White liquidated pawns and pieces, 5 e5 h5 6 g3 and then 6 … a6! 7 xa6 xa6 8 exd6 exd6. Black prepared to pile on pressure with … d7-b6, … b8 or fa8 and then either … a4 or … c4.
The game saw 9 0-0 d7 10 ae1 xg3 11 hxg3 b6. Black’s threats include 12 … c4 and 12 … xc3 13 bxc3 c4.
Something had to fall. And when it did, 12 e2 c4 13 d3 fa8 14 b3 xc3 15 xc3 xc3 16 bxc4 xa2 17 xa2 xa2, Black had a better rook, better minor piece and, after his king reached f5, a better king. He won.
The … b5 sacrifice typically occurs in the opening or early middlegame when Black can exploit a lead in development. If White can coordinate his pieces smoothly, the sacrifice may backfire. For example, 1 d4 f6 2 c4 g6 3 c3 g7 4 e4 d6 5 e2 0-0 6 g5 c5 7 d5 b5 8 cxb5 a6.
White to play
This occurred in a 1967 game from the first issue of the Chess Informant – and 7 … b5 was given a question mark without comment.
White replied 9 a4 and had little trouble making his extra pawn count after 9 … a5 10 d2 axb5 11 xb5 a6 12 ge2 bd7 13 0-0 and then 13 … xb5 14 xb5 b6 15 c2 fc8 16 c3.
But 7 … b5 wasn’t bad. Like many sacrifices, it required a vigorous follow-up, such as 10 … b4 11 f3 fd7 12 c1 c4 with … c5-b3 in mind.
There are two basic forms of this sacrifice and in both cases the aim is to acquire two or three passed queenside pawns in return for a piece.
One form arises in the Sicilian Defense when Black plays … a6 and … b5 and has a pawn at d6 that is not protected by an e-pawn.
Adams – Pelaez
Innsbruck 1987
White to play
Typical moves in this kind of position are 1 g5, 1 d3 and 1 a3. But here White has an extra option, a capture on b5. After he retakes xb5 he attacks the queen and earns a third passed pawn as compensation.
White can sacrifice a bishop or knight on b5. He chose 1 dxb5! and play went 1 … axb5 2 xb5 c6 3 xd6+ xd6 4 xd6 xd6 5 xd6.
Now we can see that 1 xb5+ would have been the wrong way to start because without a bishop on the board White would allow 5 … c4!.
Black to play
White’s passed pawns aren’t as important as his edge in development. That was enhanced by the trade of queens and grew after 5 … bd7 6 g5! e7 7 d2 e8 8 e2 c7 9 hd1.
Black can hardly move a piece (9 … b6? 10 c5+ and mates; 9 … b7 10 xd7+; 9 … b5 10 d3 and 11 b3 or 11 c4).
Play went 9 … d8 10 a7 b7 11 c5+ e8 12 a4 and then 12 … f6 13 gxf6 gxf6 14 f4! f7 15 h5+ g7 16 e7 resigns (16 … g8 17 xd7).
The less common, but typically more dangerous, form of this sacrifice arises when queenside pawns are fixed: White pawns at b4, c5 and d4 facing Black ones at b5, c6 and d5.
Bronstein – Botvinnik
World Championship 1951
White to play
White knew the pattern and had been thinking about a sacrifice for five moves. “Two passed pawns, advancing on enemy pieces, have brought me more than a dozen points in tournaments of various ranks,” he wrote of 1 xb5!.
The pawns’ advance will be aided by the knight when it reaches d6. Black inserted 1 … xe5 2 fxe5 h6 3 c1, then 3 … cxb5 4 xb5.
White pawns do a good job of taking squares away from Black pieces, so he stayed in the middlegame with: 4 … d7 5 d6 xa1 6 xa1 a8 7 c3.
There was no way to stop b4-b5 and the game went 7 … f8 8 b5.

Black to play
Black’s best defense in such positions lies in blockading the pawns or giving up a piece for two of them, 8 … b8 9 c6?! xc6.
Something similar could have arisen when the game went 8 … xd6 9 exd6 a4. Then 10 c6 xb5 11 cxb7 xb7 12 c7 and 12 … xc7 13 dxc7 b6 would have held. In the end the game was drawn.
One of the most unlikely of sacrifices arises in positions like this:
White to play
Black’s pieces don’t easily defend the kingside so 1 d3 followed by 2 c2 used to be common. After Black defended with … g6, White shifted his queen, d2-h6, and looked for a way to play g5 and/or h2-h4.
But GM Yuri Razuvaev proposed an immediate 1 h4! to save time and support g5. His main line ran 1 … xh4 2 xh4 xh4 and now 3 f3.
By attacking the knight at c6 White wins time for e4. Analysis has found that 3 … b7 4 e4 d8 5 h5 is best.
Then 5 … a5 6 h4 xh4! 7 xh4 xc4 is a sound queen sacrifice and 6 g4! xc4 7 h6 g6 8 h4 xh4 is nearly as good. That’s one of several versions of the h2-h4 gambit that arise in this pawn structure. In practice the gambit is declined more often than it’s accepted.
Sanguineti – Averbakh
Portoroz 1958
Black to play
White has just played 1 h4. Accepting the pawn, 1 … xh4 2 xh4 xh4, is dangerous after 3 g5!.
This is shown by 3 … g4 4 f3 h5 5 f2! followed by h1. Or 4 … g3 5 f6, threatening h6 and mate on g7.
Black just ignored the h-pawn and met 1 h4 with 1 … d6!. This stops White from transferring his queen to f4 and g4, followed by g5/h4-h5.
White could still try to make kingside threats with 2 h5 and then 2 … a5 3 hxg6 hxg6 4 e5 followed by f4.
But he stumbled with 2 g5 a5 3 f3?. Black replied 3 … g3! 4 h5 d6 and won after 5 hxg6 h2+ 6 f1 hxg6 7 e4 xe4 8 fxe4 g3! 9 e3 c4.
f5 HopWe examined the knight shift to f5 as a priyome. When the shift is discouraged by … g6, White can insist on it.
Byvshev – Geller
Kiev 1954
White to play
White had been preparing 1 f5!? gxf5 2 gxf5 in the previous dozen moves. He analyzed 2 … f8 3 h5, when the threat of 4 h6 would prompt 3 … h6 4 xh6 xh6 5 xh6 and 5 … e8.
Then 6 xf6 would allow Black to defend with 6 … xh5 (7 h6 xf3). But White has other options, including 6 g6 or 6 h2.
But Black didn’t try to refute 1 f5. He just replied 1 … f8 and turned his attention to the queenside. White needed a new idea and he passed up the best one, 2 eg3 followed by 3 h5!.
Instead, he played 2 h6+? xh6 3 xh6 and his attack was stalled, since h4-h5 will be met by … g5!, sealing the kingside.
This enabled Black to open the other wing after 3 … ab8 4 c1 a4. He had the edge after 5 cxb4 xb4 6 c3 and won well after 6 … b7 7 c2 xb2 8 xa4 xg2 9 xg2 e7 10 xd7 xd7 11 b2 xb2 12 xb2 f5!.
The idea of trying to open the g-file with f5 also appears in Sicilian Defenses and positions with a fianchettoed Black bishop, as in this from a King’s Indian Defense.

Spassky – Fischer
Sveti Stefan 1992
White to play
White has managed to open some kingside lines. But it won’t matter unless he gets his queen into play there. He would be worse after 1 xb4 axb4, for example, since the e4-pawn is falling.
In desperation, White tossed a piece, 1 f5? gxf5 2 gxf5. He dreamed of mates after g1 and d4. But Black safely took another pawn, 2 … xb2. His king is safe on h8 or h7 (3 g1+ h7 4 d4? xd4 5 xd4 c2+).
White tried 3 f1 and resigned soon after 3 … d7 4 b1 xa1 5 g1+ h8 6 xa1+ f6.
In 1 d4 d5 games, the Catalan and similar openings, Black often grabs a pawn with … dxc4 and then protects it with … b5. It may look like White is gambiting his entire queenside.
White typically challenges b5 with a2-a4 and Black defends with … c6 and/or … a6. Then it’s a strong pawn mass or weak pawn mess, depending on what happens next.
In the simplest form, 1 d4 d5 2 c4 dxc4 3 e3 b5?! then 4 a4! is strong, e.g. 4 … a6 5 axb5 axb5?? 6 xa8 or 4 … c6 5 axb5 cxb5??
6 f3!. In more complex forms, tactics are more difficult to come by:
Alekhine – Bogolyubov
World Championship 1929
White to play
Black traded off his better bishop to make his d5-knight a tower of strength. His c-pawn denies White’s bishop its best diagonal: No d3.
If White is going to justify his sacrifice, he must act quickly, with 1 g5!. He prepares 2 h5 and, if 2 … g6, then 3 h6 e7 4 xh7! and g7.
Note that 1 … 0-0? fails to another thematic idea in such positions, 2 b1!. White threatens mate on h7 as well as 3 axb5. If Black gives back the pawn he has nothing to offset his weak squares and bad bishop.
The game went 1 … f6 2 exf6 xf6? and White had a clear edge after 3 e2 a6 4 f3! (4 … d5 5 c2 g6 6 xh7! or 4 … h6 5 h5+).
To play this kind of position, Black must take risks. Here that means 2 … gxf6! 3 h5+ d7 followed by … e8, when White’s edge is minimal.
When the pawn structure is fluid, White usually wants to change it:
Khalifman – Sveshnikov
Elista 1996
White to play
To safeguard his pawns, Black delayed development in favor of the bishop and queen moves. A natural plan for White is to prepare d4-d5, such as with 1 e4 a6 2 c3.
But he can play more forcefully with 1 b3!? and 1 … cxb3 2 xb3. For example, 2 … a6 3 d1 e7 4 a3! xa3 5 xa3 with good play after ab1 and ac4. Or 2 … xd4 3 b2 and 3 … b4 4 xb4 xb4 5 axb5.
Black chose to develop, 2 … bd7. But 3 e3! created a threat of 4 d5!. Black’s queenside would be collapsing after 3 … d5 4 xd7 xd7 5 c3.
Instead, Black opted for 3 … c5 and then 4 xd7 xd7.

White to play
He offered to give back the pawn (5 xb7 xb7 6 xb5).
But White steered a more ambitious course with 5 d5 and his initiative eventually prevailed after 5 … bxa4 6 xa4 exd5 7 c3! d4 8 d5.
Black would also be in trouble after 5 … exd5 6 xd5 xd5 7 xd5 d8 8 axb5 or 5 … b4 6 dxe6 fxe6 7 a5 a6 8 xb7 and xe6+.
We saw in Chapter One how h2-h4-h5 is a priyome to challenge … g6. If Black guards h5 with … f6, the pawn push is a super-sharp sacrifice.
White to play
When this Sicilian Dragon position first appeared White tried standard attacking ideas such as g2-g4 to support h4-h5, and h6. But 1 g4 is slow. And 1 h6? xh6 2 xh6 allows 2 … xc3! 3 bxc3 a5, an excellent version of the … xc3 sacrifice.
Then 1 h5! was found to be sound in view of 1 … xh5 2 0-0-0. White has a juicy target at h7 after 2 … c4 3 xc4 xc4 4 g4, for example, and a winning plan of h6xg7 followed by h6+ and g4-g5.
His attack is so quick after 4 … f6 5 h6 that Black might consider the 5 … h8!? 6 xf8 sacrifice that we will look at in a few pages.
There are several versions of the h4-h5 sacrifice. It can lead to heavier sacrifices, as in 1 d5 f5 2 g3 g6 3 h4 f6 4 h5!? xh5 5 xh5! gxh5 when 6 e4 threatens xh5 mate and gives White a strong attack.
Another version is:
Shishkin – Borisenko
Rostov 1958
White to play
Black avoided … 0-0 because of h4-h5!, when … xh5 might lead to a sound xh5 sacrifice. Instead, he intends … b7 and … 0-0-0.
But 1 h5! xh5 2 g4 turned out to be good, since Black’s knight is exiled offside following 2 … hf6 3 g5 h5.
That mattered after 4 e4! and 4 … b7 5 a4 put c6 under fire. Black didn’t like 5 … c8 6 xa7 a8 or 5 … b8 6 d5 d7 7 dxc6 xc6 8 b5!.
In the end he complicated with 5 … b5 6 cxb6 b6 and lost after 7 b3 (7 a3! is better) c8 8 bxc6 xc6 9 xc6+.
f4The King’s Indian Defense is a curious animal. Black plays … g7 but often follows this by blocking the bishop with a pawn at e5.
One method of freeing the bishop is to maneuver a knight to f4, even when White has two pieces attacking that square. At the cost of a pawn, Black gets to play … exf4!.

Kamsky – Kasparov
Manila 1992
Black to play
White met Black’s last move, … h5, with g2-g4. He underestimated 1 … f4!. After 2 xf4? exf4 3 xf4 b5 Black would be strong on the dark squares, with … b6 and … d7-e5 coming up.
White acknowledged his error with 2 c2. Black left the gambit on the table with 2 … b5 3 f2 d7 4 ge2 b4 5 a4 a5!.
Allowing White to win the pawn and keep his dark-squared bishop this way is better than 5 … xe2? 6 xe2, when Black’s initiative slows.
The game went 6 xf4 exf4 7 xf4 e5 and then 8 0-0-0 c4!.
White to play
We can appreciate how … exf4 improved Black’s chances. His threats include 9 … f6! and 9 … d7/… xa4.
White tried to get his bishop to d4 but 9 e3 xe3 10 xe3 b8 gave Black an initiative that kept growing. He won after 11 b3 d7 12 b1 e8! 13 b6 b5 14 d2 a4 and … b3.
There are variations on the sacrifice in which Black plants a rook, not a knight, on f4. These offers may be accepted, refused or accepted at a later point, as the last example showed. The sack, whether of a pawn or the Exchange, works best when Black can then plant a knight on e5.
Atalik – Avrukh
St. Petersburg 1994
Black to play
After 1 … f4 2 xf4 exf4 3 xf4 Black obtained good play with 3 … f5 and then 4 gxf5 gxf5 5 d2 fxe4.
He would have gotten his pawn back after 6 fxe4 xc3 7 xc3 h4+ 8 g3 xg3+ and 9 … e8.
White preferred 6 xe4. But after 6 … e5! 7 e2 f5 and 8 0-0-0 xe4! 9 fxe4 h4 Black had ample compensation (10 g3 xe4 or, as the game went, 10 hf1 xf4! 11 xf4 xh2 and … h6).
When an under-supported c-pawn advances to the fifth rank, it’s a sacrifice to blow open part of the center and vacate a key square.
Black to play
In this Modern Benoni position, White may have a solid edge if he can continue f3, c4, a2-a4 and e3. That’s why 1 … c4! is popular. Black clears c5 for his knight, which would doom the pawn on e4. He stands well after 2 xc4 c5 or 2 f3 b5! (3 xb5? b6+).
In fact, the usual way to test 1 … c4 is with 2 h1 c5 3 e5!, with chances for both sides after 3 … dxe5 4 xc4 or 3 dxe5 xe5 4 xc4.
There are various forms of this sacrifice, many of them surprising:

Dorfman – Hauchard
Meribel 1998
White to play
White appreciated the value of c4 and played another impossible-looking move, 1 c5!. Then 1 … dxc5? 2 b5! b7 3 c4 c7? 4 f4! would regain his pawn favorably.
3 … d7 4 d1 0-0 is also good for White in view of 5 xd7! xd7 6 xb6.
Black opted for 1 … bxc5 since 2 b5 b7 3 c4 c7 is more playable here (4 f4 e5). However, his a-pawn could not be held after 4 d2! and he eventually lost.
One of the most common rook-for-bishop sacrifices is a passive offer. It’s a frequent feature of Sicilian Dragons with the odd-looking … h8!?.
Lobron – Kudrin
New York 1983
Black to play
White’s attack is coming together quickly, with a mixture of xg7 and h4-h5xh6, and perhaps e4-e5 thrown in.
Black managed to defend and attack with 1 … h8!. After 2 xf8 xf8 his king position is safe and he has the upper hand on the queenside dark squares, with … b8/ … b4 in mind.
White played 2 h5 xh5 before taking the Exchange, 3 xf8 xf8. But he misjudged the consequences of 4 g4 g3 5 h3.
Instead of the expected 5 … xf1 6 xf1 and 7 1h1!, he faced 5 … b8!. The Dragon bishop was unleashed, e.g. 6 xg3 b4. Then 7 b3 xc3 or 7 e3 d4 or 7 f4 xb2+ are bad and 7 d3 would be met by 7 … e5! followed by … xg3 or … f4+.
Instead of this White played 6 a3 to stop … b4. But he was lost soon after 6 … e5! 7 f2 f4+ 8 b1 xf1 9 xf1 xa3 10 d1 e5! 11 c3 a6.
A better response by White occurred in a later game, 3 d3 b8 4 xh5! so that 4 … gxh5 5 exd5 cxd5 6 f4 threatens xb8 and g3+.
Time once again to apply your know-how, this time the sacrificial kind. In each position you should be able to recognize the pattern of one of the sacrifices we’ve examined. First, identify the sacrifice and then try to work out variations at least three moves into the future.
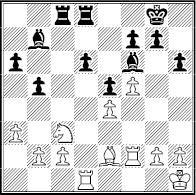
20 Dreev – Cifuentes
Wijk aan Zee 1995
White to play
On 1 g5 Black defends with 1 … f6. What else can White do?
21 Vydeslaver – Psakhis
Ramat Aviv 1998
Black to play
Natural moves include 1 … c6 and 1 … a5/2 … b4. What else?
22 Nimzovich – Marshall
Carlsbad 1907
Black to play
Is it too early for 1 … e4?
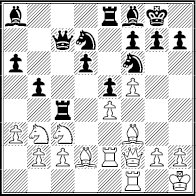
23 Lerner – Kaidanov
Moscow 1985
White to play
Black seems to have a rock-solid extra pawn. What can White do?
24 Stoica – Flis
Polanica Zdroj 1983
White to play
There’s only one sacrificial idea here. How does it work?
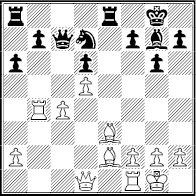
25 Tal – Gligoric
Portoroz 1958
Black to play
Do any sacrifices come to mind? How should White respond?
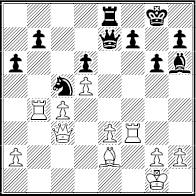
26 Grischuk – Dvoirys
Moscow 2002
White to play
It isn’t hard to figure out on which square White will sacrifice. But which piece is best to give up there?

27 Muratov – Spassky
Tallinn 1959
Black to play
What sacrifice occurs to you? What might happen in the next three moves if it’s accepted?