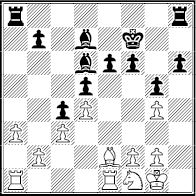
 g4+! 2 f3 h5 and … g6.
1 Black’s queen bishop lacks a good square. He equalized with the bishop tour, 1 … g4+! 2 f3 h5 and … g6.
Play went 3 h4 0-0 4 g4 g6. Then on 5 xg6, the irregular recapture, 5 … fxg6! followed by …  ae8 is best. This favors Black because of his play along the e- and f-files.
2 White has greater winning chances with a knight shift, 1 g4! g6 2  h4!. After 2 … c6 he was careful to avoid 3 xg6? because this is another case when 3 … fxg6! helps Black.
White’s superiority was clear after 3 hf5!  d8 4 f3 e8 5 h4! xf5 6 exf5! c8 7 g5 and he eventually won.
3 The priyome is 1 … b4 so that a White knight move allows 2 … d5!.
But here it turns out disastrously, 1 … b4?? 2 exf6 bxc3 3 g2!, since 3 … xf6 4 xf6 is hopeless.
The game ended with 3 … b7 4 xg7+  h8 5 g8+! resigns (5 … xg8 6 g1+ h8 7 fxe7+ or 5 … xg8 6 fxe7+ g7 7 g1).
4 If you relied on calculation, you might start with 1 … h7. That threatens … xh4 and might lead to 2 g5 hxg5 3 hxg5 e5.
But White can make a promising sacrifice with the endangered g-pawn. 4 g6! fxg6 5 g4 and d5.
It’s better to rely on an anti-g4 priyome and look at 1 … d5!. Then 2 exd5 xa3! 3 bxa3 allows Black to retake 3 … xd5!.
White’s kingside would be vulnerable after 4 xd5 exd5 5 cxd5 xh4 or 4 cxd5 xc3 5 dxe6 xf3 6 xf3 fxe6.
Instead, the game ended in a draw after 4 cxd5 xc3 5 d4! xa3 6 g5 hxg5 7 hxg5 e5! 8 fxe5 xg5+.
5 The c-file is closed half-way but 1 … a5! prepares the Philidor Ring.
After 2 hf1 b5 White faced the prospect of 3 … b4. Then 4 cxb4 xb4 would make his d-pawn a target. But allowing … bxc3 is even worse.
White stopped the b-pawn’s advance with 3 a3. The drawback is 3 … c4!. That forced an exchange of pieces because both 4 … xb2 and 4 … xd2 were threatened. After 4 xc4 bxc4:
White to play
Because of 3 a3 White cannot play b2-b3 or b2-b4 without losing at least one pawn. This meant Black was free to pile up against b2 with his rooks, 5 e3 a6! 6 g3 b6 7 a2 a8 8 f3 a5! 9 g2 ab5. He eventually won.
6 It looks like 1 a4 b4 2 a2 is well-timed in view of 2 … a5 3 c7! followed by c2 and fc1 (or c1-d3) with a clear advantage.
But 1 a4? was met by 1 … g5! and after 2 d2 b4 3 a2 a5 there was no c7. Black had greater space and superior chances after 4 f3 b6 5 b3 f5 6 h5 f6 7 fd1 e7 8 e3 fc8.
Better was 1 fd1 because 1 … b6 allows 2 xb5! and 3 c7. And on 1 … f6, the priyome works, 2 a4! with an edge.
7 A case can be made for 1 … h5 (and 2 g5 g4). Or for … b8-a8 in preparation for the … xc3 sacrifice.
But better is fighting for e5 with 1 … g5!. Black would have the edge if the offer is declined (2 ad1 gxf4 3 xf4 e5).
The real test is 2 fxg5 hxg5 3 xg5. Then 3 … e5 prepares … c4, … xf3+ or a capture on g4.
White played 4 f4 and Black had a good option in 4 … fd7! 5 xe7 xe7 and … cg8.
Black preferred 4 … h7 to get the knight to f8. He was rewarded by 5 h6? g8 6 ad1 g6 7 h3? f6! and wins.
Better was 5 xe7 xe7 6 g2 f8 with mixed chances.
8 After 1 a4! and 1 … bxa4 2 bxa4 Black would be worse following 3 d2. If Black contests c4 with … b6 the knight is driven back by a4-a5!.
Also bad is 1 … b4? 2 b1! b6 3 bd2 e7 4 a5! a8 5 c4!.
His best try is a sacrifice, 1 … c4!. White should not allow 2 … b4 and 3 … c3. So we can examine 2 axb5 axb5 3 bxc4 and then 3 … b4! with a passed pawn (4 a2? b3!).
Black would have good compensation after 4 b1 c5 5 bd2 d7 followed by … a4 or … a4. Also 4 a4 c5 5 xc5 xc5 followed by … b6 or … g4.
9 This is a good time for 1 … h5!. White would be over-extended after 2 g5 h7 3 h4 g6 and … f6.
The best try is 2 gxh5! xh3 3 1h2 but Black is better after 3 … h7.
Instead, White chose 2 3h2, to maintain the pawn on g4. This surrendered control of the kingside dark squares – 2 … hxg4 3 hxg4 c8! 4 f3 h7! 5 g3 g5 6 f5 d8.
Black’s initiative won after 7 … g6 followed by … g7/ … h8.
10 Yes, because of play along the f-file in connection with d5.
After 2 … d6 he played 3 d5! so that 3 … xd5 4 xd5+ h8 5 g5! and then 5 … e8 6 xf8+ xf8 7 h5.
Instead, Black tried 3 … h6 to stop g5. But this permitted 4 d3!, with a winning threat of 5 xh6 gxh6 6 g6+. For example, 4 … h8 5 xh6! gxh6 6 g6 g4 7 e4 xf1+ 8 xf1 g8 9 f8!.
11 White can force a trade of rooks with 1 b5! and create an outside passed pawn after 1 … xb5 2 cxb5.
Black can try to blockade with 2 … d4 and 3 … b6. But White breaks it with 3 a5 and 4 b6 or 3 e2 and 4 e3.
Black lost after 2 … f8 3 b6 d4 4 a5 e8 5 b7 a7 6 c7 and queens.
12 He could have won with 1 c7+! and 1 … f7 2 xf7+ xf7 3 b5! and the knight is dominated. If 3 … e7 4 g4 d7, White converts to a won pawn endgame (5 xd7 xd7 6 h5).
13 The conversion 1 … xe4+! 2 xe4 xf6. White’s king is cut off.
He tried 3 a4 with the idea of a4-a5 and c4-c5-c6. But Black replied 3 … a5 4 c5 (4 b5 d5+! and … f5 wins) and now 4 … e7!.
White is inside the square after 5 xe7 xe7 but would lose his a-pawn. The game ended with 5 d4 e5+ 6 d6 f5 7 e4 g6 (8 e6 f4).
14 Black created a fortress with 1 … xf6! and 2 xf6+ d7.
The g-pawn isn’t needed to draw. White won it after 3 f7+ c6 4 b3 e5 4 xg4 d7.
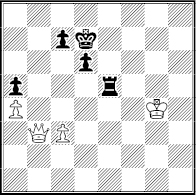
White to play
There is no zugzwang because Black can shift his rook back and forth between c5 and e5. White’s king cannot cross the fifth rank. His queen cannot create a passed pawn or give itself up favorably for the rook.
15 It’s different because of a blockade, 1 … g4!, and stalemate (2 xg4). White gave up one pawn but Black stopped the other, e.g. 2 c4 h2+ 3 e4 f1! 4 e3 xg3+ 5 e5 and now 5 … h5 is one way to draw.
16 The breakthrough, 1 f5!, wins (1 … gxf5 2 g6 e5+ 3 e3 e6 4 b5).
Black tried 1 … e5+, hoping to draw after 2 fxe6 xe6 3 gxf6 g5 or 2 e4 gxf5+ 3 xf5 fxg5 4 xg5 e6 5 xh5 f5 (shoulder) and … e4.
But White has the simple 2 e3! gxf5 3 g6 and 3 … f4+ 4 d3 e6 5 b5!.
17 White can achieve the checking distance with 1 c7! xc5 2 b1!.
It doesn’t help Black to cut off the king by a rank with 2 … h7+ 3 c8 since the Black king can’t advance the pawn alone, 3 … d5 4 d1+! e4 5 c1 draws (5 … h6 6 c7). No better is 2 … d4 3 d1+ e3 4 c1!.
In the game White lost after 1 e5?? xc5 2 e4 c4 3 e3 c3 4 c7! e6+! 5 f4 c4 6 f5 h6 7 e4 c5 and so on.
18 No. That allows White to enlarge his more advanced majority on the other wing. Black lost after 1 … xf4?? 2 xa5 g3 3 b5 xh4 4 a4 xg5 5 a5 f6 6 a6 e3 7 c6 g5 8 b4 because b4-b5-b6 will queen.
Black could draw with 1 … b4! 2 a4 e1, e.g. 3 f5 gxf5 4 xf5 d2.
19 He sacrificed to create a passed pawn, 1 g8!. Then on 1 … e4 White could win with 2 e6 and c8xb7.
Instead, Black took the piece, 1 … xg8, and after 2 xb7 he tried 2 … c4 3 c6 d5. He was hoping for 4 xa6 xc6.
But White won with 4 b6 d8 and 5 f6! gxf6 6 h6, a breakthrough. Black’s bishop was overworked after 6 … e4 (to stop 7 h7) and the game ended with 7 b7 – zugzwang – 7 … e7 8 xa6 f7 9 b6 resigns.
20 The sacrifice 1 c5! bxc5 2 dxc5 xc5 (not 2 … xc5 3 xd7 and 4 xc5) is strong after 3 c2.
Black’s knight is threatened and cannot get back to defend the kingside because 3 … d7 4 d2 costs a piece.
After 3 … a6 4 g5! g6 and 5 a4! White either gets a decisive attack (5 … b8 6 h4) or wins material (5 … b4 6 xd6! xd6 7 e4).
21 It’s an excellent time for 1 … xc3! 2 bxc3 c6 since the e4-pawn is doomed (3 d3 a8 4 g5 xe4! 5 xe4? xe4 and Black wins in view of discovered check, 6 xe7 f2+ 7 g1 h3 mate).
The game went 3 g5 xe4 4 xe7 xe7 and 5 f6 b7! 6 fxg7 c8 7 g4 d2 8 f2 xg2+ 9 xg2 xc3 with more than enough compensation.
22 No, because after 2 dxe4 dxe4 3 g5 Black gets a fine initiative with the Spielmann idea, 3 … e3!. Then comes 4 fxe3 h6 5 ge4 g4!.
White to play
Black would be winning after 6 f3? xd1+ 7 xd1 f5! (8 c3 f2+).
The game turned in his favor after 6 b3! xd1+ 7 xd1 f5 (7 … f5 8 h3) 8 e1 b4 9 d4 0-0-0!.
23 White can push 1 d5. Or he can sacrifice a pawn with b2-b3, either immediately or after 1 axb5 cxb5.
In case of 1 b3 and 1 … b4 White would get reasonable compensation with 2 a5! c7 3 a4 followed by b6 and d4-d5.
In the game, Black played 1 … cxb3 2 xb3 d7 and White emerged with the better game after 3 d5 cxd5? (3 … c5 4 b1 e7 is better) 4 exd5 c5 5 b4 d7 6 h4.
24 After 1 d5! Black loses with 1 … xd5?? 2 xh7+ and 3 h8 mate. So 1 … exd5 and 2 g5 were played.
The threat of 3 xf6 and xh7+ is powerful, e.g. 2 … g6? 3 xe7! xe7 4 xf6 or 2 … e4 3 xe4 dxe4 4 xe4 g6 5 h4.
25 Black got play with 1 … f4!. White can’t accept the pawn because 2 xf4 exf4 threatens … xc3 (and 3 b2? a4+! 4 bxa4? b4+ is death).
He replied 2 h5!. Then 2 … gxh5 would allow 3 xf4! exf4 4 hg1! and xg7+ with an attack.
Black played 2 … xh5 instead and White seized the initiative with 3 f2 f4 4 g4, threatening f6+. A fighting draw followed 4 … d7 5 h2 h5 6 e2 xc1+ 7 xc1 b5 and … b3+.
26 Best was 1 dxb5! axb5 2 xb5!. He wants a knight on b5 so he can capture on d6 or threaten a check at c7, e.g. 2 … d5 3 c3!.
The second point came after 2 … xa2 3 b1 a8 4 xd6+ xd6 5 xd6.

Black to play
White has two pawns for the knight but he also has b5! coming up. Black’s best may be 5 … a5 6 b4 a8 (not 6 … a4? 7 xb6!) and 7 b5 b8.
Instead, he played 5 … a4? 6 b5 e7. But 7 d4! forced a win of material. Black resigned soon after 7 … e5 8 d5 c3+ 9 bxc3.
27 The passive sack, 1 … a5!, makes sense. If White ignores the knight Black will continue his attack with … exf3 and … f5 or … b5!?.
The game went 2 axb4 axb4. Black would have been winning after 3 xe4 xe4 4 fxe4? g4! because of … xa1+.
Instead, 3 b1 a1 4 d2 was played and Black had ample compensation following 4 … exf3 5 gxf3 xd5 and 6 e4 xe3 7 xe3 e6.
28 No, because 3 c3! xd5 4 d3! leads to the drawn Exact Ending 2.
29 Black’s bishop has one good defensive diagonal and that’s not enough. White begins with the shouldering 1 c6! and follows with a5-a6. Black played 1 … d3 2 g5 c4 3 e7 e3 to stop c5.
But he couldn’t stop b6 and he resigned after 4 a6 a7 5 d8! b8 6 c7 a7 7 b7.
30 White already has his king in place for a Philidor position and 1 a5! would get him closer to it.
After 1 … f3 2 a3+ g4 White can draw with a rook pass such as, 3 b3. King moves and even 3 h5 also work. The h-pawn is irrelevant.
But White played 1 h8? f3 and missed an opportunity to reach the short side with 2 g1! d1+ 3 h2. Once again the position is a draw, even without the h-pawn, because White has time for checks such as a8-a2+.
31 Yes. Checking distance doesn’t matter here: 1 … e4! draws in view of 2 e6 d4+! or 2 e6 f8! 3 a8+ g7 4 d6 f7! as in Exact Ending 8.
32 All three draw. But 1 g8+? d7 just helps Black and 1 xc6? e6+! is an instant Philidor.
The best try is 1 g6!. Then 1 … b4+ 2 xc6 b8! gets Black’s king to the short side and allows him to draw.
Black blundered with 1 … e7? and White could have won with 2 g8+ d7 3 b7, intending c8. Black’s king is on the long side and he loses after 3 … e1 3 g7+ d8 4 xc6 c1 5 g8+ e7 6 c8.
But White also erred, with 2 xc6+? and Black created a Philidor after 2 … b8! 3 h6 b7+ 4 c6 c7+ 5 d6 b7! and 6 … c6+.
33 It’s a draw if Black gets to the short side, with 1 … e7! 2 h7+ f8 and 3 f6 g8!. Then on 4 a7 Black can draw in a variety of ways, including 4 … b1 followed by rank checks.
In the game Black played 1 … e8?? and lost to 2 f6 d7 3 h7+ e8 4 h8+ d7 5 f8 and g7.