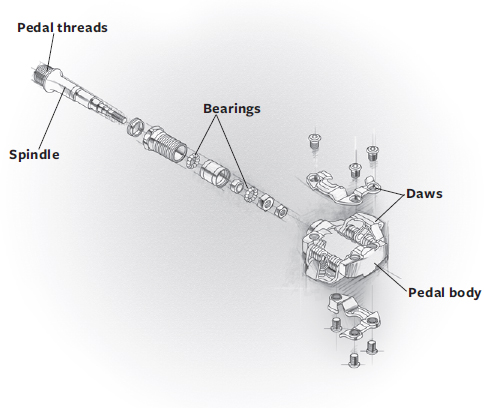
Today’s pedals come in many shapes and sizes, but they all serve the same purpose—to give your feet something to push against to turn the crankarms and propel you forward. Here’s the basic info you need to service the most common pedal types.
• PEDAL BASICS
• CLIPLESS PEDAL MAINTENANCE
• CARTRIDGE-TYPE SPINDLE SERVICE
• TROUBLESHOOTING PEDALS
The left pedal is reverse-threaded, so you must turn it clockwise to loosen it. Turn the right pedal counterclockwise to loosen. It can take a lot of force to remove pedals; protect your hands from things like the chainrings in case the wrench slips.
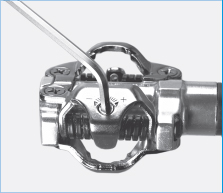
If clipping in or out of your clipless pedal is difficult, see if your pedal has a spring tension adjustment. Look for a single bolt on the front and back of the pedal (or just a rear one on single-sided pedals). Each screw will have an arrow showing which way to turn the screw to increase retention (usually described with a “+”) or to ease entry and release ("-"). If cleat tension isn’t the issue, check that the cleat engages the pedal completely and properly.
1. Know your maintenance points. The pivot points for the movable jaw parts should get a drop of chain lubricant every month or so—more often if they get wet.
2. Lubricating the cleats isn’t always recommended, but pedals with steel cleats can get squeaky if they’re ridden completely dry. A very light coating of chain oil on each of the points where the cleat and jaws make contact should be all you need. Keep it light—too much oil will trap dirt and accelerate the wear of the cleat.
When cleats wear, it becomes difficult to escape the pedals. At the first signs of unreliable release, replace the cleats. Before removing them, use a permanent marker to outline the cleats on the soles so you can quickly position the new ones.
If the cleat bolts won’t budge, use a hammer and punch to drive the screws counterclockwise. Grease the bolts, align, and install the new cleats.
3. To remove the pedals, shift onto the large chainring, place the right pedal in the 3-0’clock position, attach the pedal wrench so it’s nearly in line with the crankarm, and push down to loosen and remove the pedal (see photo). If it won’t turn, ask a strong friend to help, try penetrating oil such as Liquid Wrench, or use a cheater bar on the wrench for added leverage (remember that the left pedal turns clockwise to loosen). When both pedals are off, spin the spindles between your fingers. If they turn with resistance or feel dry, tight, loose, or rough, regrease the bearings. If you feel a smooth hydraulic resistance while turning the spindle, the grease is still fine.

Step 4
4. Many of Shimano’s pedals, as well as those of some other brands, come apart by unscrewing and removing the spindle and bearings as a unit. Use a pedal spindle tool or a wrench of the appropriate size to unscrew the spindle/bearing assembly. Hold the right pedal in a vise with the spindle upright, and turn the tool clockwise to unscrew the spindle. To unscrew the left pedal spindle, turn the tool counterclockwise.
5. Some clipless pedals have a dust cap that you must remove to access the bearings. The cap can be pried out or may require the use of a hex key or flat-blade screwdriver. In most cases, it’s relatively obvious how the cap is removed. With the number of different designs in current use, it’s best to consult the owner’s manual before delving too deeply.
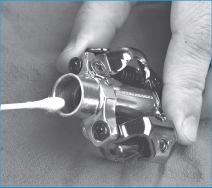
6. If you add grease every few months, the pedals may never need new parts. For pedals with cartridge spindle/bearings, put about ½ ounce of grease inside the pedal body and reinstall the spindle assembly, which will regrease all the bearings (see photo). Lube Speedplay pedals by removing the tiny bolts in the ends and pumping grease in with a needle-nose grease gun. For Shimano pedals with a plastic dust cap, remove the cap and push grease onto the exposed bearings. Pull back the rubber seal on the spindle and push fresh grease onto the inside bearings.

Step 6
FIND A STEP-BY-STEP VIDEO ON ADJUSTING CLEAT TENSION AT
1. Remove your pedals from the crankarm, then turn the pedal spindles slowly in your fingers, and push them sideways to feel for play. If the spindles turn with a hydraulic smoothness and there is no play when you push and pull, the pedals don’t need service. If the spindles turn roughly or you feel play, take the following steps to refurbish them.
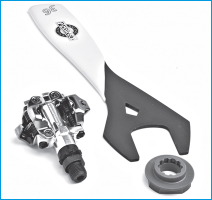
You’ll need a spindle removal tool for many pedals of this type (including Look, Mavic, and some Shimano models), as well as a bench vise to hold the tool as you turn the pedal body. If you have a strong grip, you can sometimes get away with holding the pedal in your hand and using a large adjustable wrench or 32-millimeter cone wrench to turn the tool.
Most Shimano pedals have 17-millimeter flats that most adjustable wrenches will fit. Be warned: These flats are soft aluminum, and an adjustable wrench is likely to mar them. If that doesn’t bother you, go ahead. Otherwise, use Shimano’s TL-PD77 tool or a good quality 17-millimeter cone wrench.
Step 1
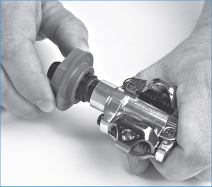
2. For pedals that require a spline-fit tool, such as this Shimano model, clamp the tool in the bench vise with the spline socket facing upward, and fit the splines of the pedal into it. Turn the pedal to unscrew and remove the spindle (see photo). If you look closely at the face of the tool, you’ll see that it’s marked to show which way to turn the tool for both the right and left pedals. Turn the pedal clockwise to loosen the right spindle and counterclockwise to remove the left.
Step 2
3. Don’t force the tool. If it doesn’t turn with a little pressure, you may be turning it the wrong way. If it doesn’t turn, apply pressure in the other direction. After a few turns, you should be able to pull the spindle out of the pedal.

Step 3
4. Clean off any dirt that’s on the end of the spindle, which is where one of the bearing cartridges resides. Clean off any contaminated grease or dirt that you find on the rest of the spindle. Use a swab to wipe any dirt, contaminated grease, or water from inside the pedal body.
Step 4
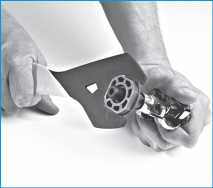
5. Place a dollop of grease on the end of the spindle assembly (see photo). Place a dollop about the size of a marble inside the pedal body. Turning it by hand only, screw the spindle into the pedal a few turns. Extract it and repeat. This will push the fresh grease into the spindle body and work it through the bearings.

Step 5
6. To finish the job, install the tool on the spindle and thread the spindle back into the pedal body fully by hand (see photo).
Step 6
Sometimes the new grease will cause a hydraulic resistance that can damage plastic parts inside the pedal if you force the spindle. If the spindle resists at any point, extract it and start again. When you have hand-turned the spindle all the way into the pedal, use the wrench to hold the tool and tighten the spindle. Don’t overtighten—it needs little effort to remain tight. The pedal spindle should now turn smoothly, without play. Rotate the spindle with your fingers to work the grease around inside, and wipe away any excess grease that forced its way out of the seal. Apply a light coating of grease to the spindle threads, wipe the threads in the crankarm clean, and reinstall the pedal.

13 COMMON PROBLEMS, SOLVED!
PROBLEM: A clipless pedal makes squeaking sounds when you’re pedaling.
SOLUTION: Spray the cleats with Armor All or lube (just don’t walk in the house in your now-oily shoes).
PROBLEM: The cleats won’t engage when mountain biking in wet or cold weather.
SOLUTION: Spray canola cooking spray onto the cleats and pedals before a ride so mud and ice won’t stick.
PROBLEM: You’re having trouble getting out of your SPD-style clipless pedals.
SOLUTION: The cleats are probably worn so much that they can no longer spread the pedal jaws to release. Install new cleats.
PROBLEM: With each pedal stroke, you hear a click coming from one side.
SOLUTION: The pedal may have loosened. Tighten it.
PROBLEM: You’re having trouble getting into clipless pedals.
SOLUTION: Make sure that the cleat is installed correctly on the shoe. Reread the directions or ask a shop for help. If they’re Look-type plastic road cleats and you have small feet, you may have curved the cleat too much when tightening it to your shoes. The cleats must be fairly flat to engage correctly. Shim the edges with plastic to flatten the cleat.
PROBLEM: Even though you’re using a good pedal wrench, you just can’t get the pedal off.
SOLUTION: Make sure you’re turning the pedal the right way. The right pedal is turned counterclockwise to loosen it, but the left pedal is turned clockwise. It’s still not coming off? Add a cheater bar to the pedal wrench. Still stuck? Try a penetrating oil such as Liquid Wrench, or use a longer cheater bar on your wrench for enhanced leverage.
PROBLEM: It’s hard to get in and out of your clipless pedals.
SOLUTION: The parts that make up the jaws on top of the pedals may have come loose. Tighten the screws. No problem with the pedals? Check the cleats on the bottoms of your shoes. If they are worn or broken, replace them.
PROBLEM: You need to replace your clipless pedal cleats, but the bolt heads are full of crud or damaged.
SOLUTION: Clean them out with an awl, then force a hex key in by tapping on it with a hammer. If you can get the hex key to re-form the hole in the bolt, you should be able to loosen the screws.
PROBLEM: You installed the pedals on the wrong sides before you realized it. Now the left pedal is in the right crankarm and the right is in the left.
SOLUTION: Next time, look at the pedals right at the threaded portion of the spindle. Usually pedals are marked with an R or an L designating right or left. (The R pedal is for the right crankarm, and the L is for the left.) All you can do to fix pedals threaded into the wrong sides is to remove the pedals and hope for the best. Threading them into the wrong sides will usually destroy the threads in the crankarms. If that’s the case, you’ll need to replace the crankarms. Or, you can have a shop try to re-tap the crankarms with something called a helicoil kit, though this doesn’t always work. The good news is that the pedals should be reusable, as crankarm threads are soft and shouldn’t damage the pedal threads.
PROBLEM: Your clipless pedal cleats will not come off because the bolts are damaged or frozen.
SOLUTION: Apply a penetrating lubricant, then use a punch and hammer to loosen the screws. Use a pointed punch and strike the bolt to make a small divot. Put the point of the punch into the divot and strike the punch so that the force pushes the screw counterclockwise and loosens it.
PROBLEM: You stripped the threaded plate inside your shoe.
SOLUTION: In some shoes, it’s possible to lift up the liner inside the shoe and replace the threaded insert. If not, it’s usually possible to cut a hole in the shoe that’s just large enough to allow you to perform surgery and replace the threaded insert. Then you can glue or tape the liner back in place or replace it with an after-market footbed.
PROBLEM: You need to remove the pedal but can’t find a place to fit your pedal wrench.
SOLUTION: Look at the back of the crankarm to see if there is a hex-shaped hole in the pedal spindle. If so, get the appropriate 6- or 8-millimeter hex key and use it to loosen and remove the pedals.
PROBLEM: You crashed, and now it feels like the pedal wobbles when you’re riding.
SOLUTION: You probably bent the pedal spindle when you crashed, which will cause a wobbly feeling when you’re pedaling. This can also lead to ankle problems if you ride on it a lot. You might be able to get a replacement spindle, or you can replace that pedal or the set.