
The saddle is more than a place to park your behind; it lets you maneuver the bike with shifts in weight and should put you into the perfect pedaling position. Here’s how to make sure yours is doing what it should.
• SADDLE AND SEATPOST BASICS
• HOW TO POSITION YOUR SADDLE
* Types of Saddle Clamps: Fine Adjustments Start Here
* Set Saddle Tilt
* Set Your Saddle Height
* Set Your Saddle’s Fore-and-Aft Position
• TROUBLESHOOTING SADDLES AND SEATPOSTS
1. The tilt and fore-and-aft position of the saddle are controlled by the clamp that holds the saddle on the seatpost. Old-fashioned saddle clamps have a nut on each side that must be loosened before the saddle can be removed or have its angle or fore-and-aft position changed (see photo). The serrations on this type are coarse and do not allow for fine adjustments.

Step 1
2. A second clamp type is the one-bolt clamping system, which allows for very fine adjustments. When this single bolt is loosened, the saddle can slide forward or backward, and the tilt of the clamp can be changed. The bolt is then retightened to hold the saddle in the new position.

Step 2
3. A third type is a micro-adjusting clamp, where there are two bolts working in opposition (see photo). Changing the tilt of the saddle involves loosening one bolt and tightening the other. This system allows minute changes to be made in saddle tilt and also holds the adjustment securely.

Step 3
Loosen the seatpost clamp enough that the nose of the saddle can be easily moved up or down. Place a level or straightedge along the top of the saddle and adjust the saddle tilt until the seat is level (make sure the bike is on level ground to get an accurate measurement). Then retighten the clamp bolt.

The correct saddle position depends on how your knees relate to the pedals at a particular point in the revolution of the crankset. The first step in finding this position is setting your saddle to the right height.
1. To determine the correct saddle height, sit on the bike while wearing riding clothes. Have a friend hold you and the bike upright, or place your bike in a doorway, near a wall, or in a stationary trainer that holds the bike level with the ground.
Rotate the crankarms to the 12-0’clock/6-0’clock position. Set your heel on the lower pedal. You should be able to place your heel comfortably on the pedal, and your leg should be fully extended-meaning it should be straight (see photo).
If there’s a noticeable bend in your knee, your saddle is too low. If you have to rock your hips to reach the pedals when pedaling backward, the saddle is too high. In either case, adjust and retest the height.
2. To raise or lower the saddle, loosen the binder bolt at the top of the seat tube. Move the seatpost up or down as needed. Check to make sure that the saddle is aligned with the top tube and not turned to the right or left, then retighten the binder bolt.
3. Some city bikes and certain mountain bike models are equipped with quick-release binder bolts for rapid and frequent changes of saddle height. For most types of riding, however, once you’ve determined the ideal height for your saddle, it should be set there and left alone.
4. When raising your saddle, look for the seat-post manufacturer’s line indicating the maximum recommended height (see photo). It’s dangerous to ride with the seatpost raised beyond that point—there may not be enough post within the seat tube to support your weight. If you can’t set your saddle to the proper height without moving beyond that line, then you need to purchase a longer seatpost (or, possibly, a larger frame).
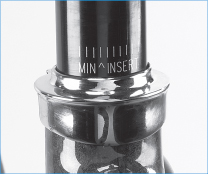
Step 4
5. Any time you pull a metal seatpost (steel, aluminum, or titanium) out of a metal frame, clean it off and apply a fresh coat of grease (anti-seize compound or Ti-Prep is a better choice when titanium is involved) before sliding it back in (see photo). This protects the post from corrosion and makes it easier to raise and lower the saddle. Use assembly compound (a gritty paste) on carbon frames and seatposts (it can also be used if the frame or seatpost is made of steel, aluminum, or titanium). The grit in assembly compound helps resist slipping without marring the components. Never use grease on a carbon frame or seatpost.
1. Sit on the bike (on level ground) with the crankarms at the 3-0’clock/9-0’clock position. Hold a plumb line (or a string with a weight tied on the end) next to the knee of your forward leg. Place the top of the string in the groove beside your kneecap and observe where the weight falls. It should touch your foot at a point in line with the pedal axle.
If the weight falls in front of the pedal axle, the saddle needs to be moved back a bit. If it falls behind the axle, the saddle needs to go forward. Loosen the seatpost clamp, and move the saddle in the direction needed.

Step 1
2. Once you’ve set the saddle height, tilt, and horizontal position, check the position of the handlebar. For general riding purposes, the top of the bar should be about 1 inch below the level of the top of the saddle.
Asa rough guideline, check the distance between the bar and saddle by placing your elbow against the nose of the saddle and extending your forearm toward the handlebar. The tips of your fingers should fall about 1 inch short of the bar (see photo).

Step 2
Racers may want the handlebar a little lower and farther away from the saddle; casual riders may want them a little higher and closer. If the distance doesn’t fall within a suitable range for your type of riding, replace the stem to dial in your position.
WATCH THIS FIX:
FIND A STEP-BY-STEP VIDEO OF PROPER BIKE FIT AT

7 COMMON PROBLEMS, SOLVED!
PROBLEM: Your seatpost won’t budge no matter how much you yank, twist, and tug.
SOLUTION: Completely loosen the seatpost binder bolt in the frame. Apply penetrating oil to the top of the seat tube and tap the post with a plastic mallet to make it vibrate, which will help the oil penetrate into the frame. Do this every day for a week or so, and keep trying—the seatpost will come free if you wait long enough. If you’re in a hurry, try this: Remove the saddle, flip the bike upside down, and clamp the top of the seatpost in a sturdy vise. Then grab the bike and rock it from side to side to break the post free. It’s quite possible that some lightweight seatposts won’t survive the process, so be sure you’re willing to make that sacrifice for the sake of expediency.
PROBLEM: The saddle won’t hold its position. It tilts up or down every time you hit a bump.
SOLUTION: The clamp is worn. Replace it. If it’s a one-piece post, replace the parts that hold the saddle. Clamps usually wear out because the saddle loosens and you keep riding. Keep it tight and it should last.
PROBLEM: The seatpost is the right size, and the bolt in the frame works, but as you ride, the seatpost slides down in the frame.
SOLUTION: Remove the seatpost and lightly sand it to roughen the surface. You need to sand only the section of the post that will be inside the frame. Usually this will increase the frame’s purchase on the post and keep it from slipping. Another option (and the only one if you have a carbon post): Coat the post with assembly paste.
PROBLEM: When you’re lowering the seatpost, the post goes partway down, then stops.
SOLUTION: You may have bent the post. Remove it and lay it on a flat surface to check it. Replace it if it’s bent. Not bent? Something inside the frame is preventing the seatpost from going lower, like the screw holding your water bottle cage. If the saddle must be lowered permanently, you can create the space to lower it by cutting a section off the end of the seatpost.
PROBLEM: The saddle creaks when you’re riding.
SOLUTION: Drip a tiny amount of oil around the saddle rails where they enter the saddle and into the saddle clamp where it grips the rails. Leather saddles sometimes creak the same way that fine leather shoes can. There’s not much you can do about this.
PROBLEM: When you tighten the seatpost binder bolt, the seatpost doesn’t tighten in the frame.
SOLUTION: If you have a two-piece bolt that passes through the frame ears, it’s likely that the bolt is bottomed against itself and can’t tighten the seatpost. Fix this by adding a washer under one end of the bolt, which will allow you to tighten it a little bit more. This should then clamp the post in the frame.
PROBLEM: You’ve tried padded shorts and every saddle angle, but you still suffer numbness from riding.
SOLUTION: Try different saddles. Don’t rule out unconventional ones, such as those that have strange shapes or cutouts. In the most difficult cases, you might consider a different type of bike, such as a recumbent.
