
In this section, we cover how to select and care for the cassette—the collection of cogs on the rear hub. What we don’t cover: freewheels, the old-fashioned setup that uses thread-on cogs. Most bikes built since about 1980 use cassettes. They’re easier to remove and install, and they allow for stiffer, stronger hub construction. Win!
• CASSETTE BASICS
• CASSETTE MAINTENANCE
• COMPATIBILITY
• CASSETTE REMOVAL AND DISASSEMBLY
• TROUBLESHOOTING CASSETTES
1. This is all about cleaning and lubrication. We recommend that this be done at least monthly. If you ride in a heavy rainstorm, clean and lubricate both your chain and cassette.
Want to do a thorough cleaning job? Remove the wheel, then lay it down on a workbench or other flat surface to free both your hands for cleaning.
2. Make sure to also clean the troughs between teeth. If you have difficulty getting the cogs clean with a rag alone, use a stiff brush (like a toothbrush) to loosen the grime, and use the rag to wipe it away.
Clean the teeth of the cogs as well as you can. When the chain pulls against those teeth, any leftover grit.

Step 2
Use a rag to wipe the grime off the surface of the cogs. Moisten the rag with solvent if necessary. After cleaning the outer surface of the first cog, hold the rag with both hands. Pull it taut and slide it between successive cogs, cleaning both sides of each with a shoeshine motion.
3. Once the cogs are clean, attend to the inner parts. Spin the cassette a few times. If you hear only the familiar sound of the ratcheting mechanism, proceed with lubrication. If you hear grinding sounds, as though there are little particles of sand partying inside, you should try to clean out the grit. It’s usually possible to flush out foreign matter by dripping oil or some type of solvent through the mechanism. (Don’t try to disassemble a cassette body. They aren’t meant to be serviced.)
Look for a crack between the outer and inner cassette bodies by spinning the cassette and watching for where they are separated. Usually, you can find this without removing the cassette from the hub.
Drip bicycle oil or medium-weight motor oil into the mechanism, spinning the cassette to help the oil work its way around. Put a rag underneath to catch any excess that drains through. There’s a handy tool available called the Morningstar Tools Freehub Buddy that allows you to flush and lubricate cassette bodies.
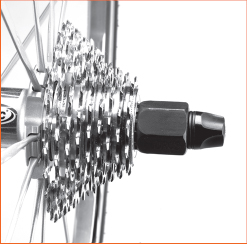
4. If your cassette still feels gritty, try a penetrating oil-and-solvent mixture such as WD-40. Rotate the cassette while you spray the solvent mixture into it (see photo). Wipe away any excess, and lubricate the cassette once again with oil.
Some people use a more potent solvent, such as kerosene. If you do, you may have to oil your cassette several times before the lubricant is adequately replaced. A penetrating oil should be able to do the job.

Step 4

Generally speaking, SRAM, Shimano, and other aftermarket 8-, 9-, and 10-speed cassettes can fit on the same freehub body. Campagnolo 9-, 10-, and 11-speed cassettes use their own freehub design. Shimano 11-speed cassettes also require wider freehub bodies. And SRAM’s XX1—a mountain bike drive train with an 11-speed cassette and a single chainring—requires a specific freehub, as well. Bottom line? If you’re changing drive trains, talk to your local bike shop to make sure everything is compatible.serves as an abrasive, causing both the chain and the cogs to wear more quickly. Clean chains and cogs shift better, too.
1. To replace a broken spoke, change gear ratios, or replace worn cogs, it’s necessary to remove the cassette from the hub. This is easy to do with the correct tools. For Shimano, SRAM, and Campagnolo cassettes, it requires one chainwhip, the appropriate cassette lockring remover, and a large adjustable wrench. For old cassettes (ones without lockrings), two chainwhips will do the trick.
Start disassembly by removing the rear wheel from the bike. If it’s a modern cassette, you’ll see a spline pattern at the center of the small cog; this accepts a special lockring remover.
2. Unscrew the quick-release mechanism, and insert the cassette lockring remover into the spline. For extra stability, reinstall the quick-release (remove the springs first) to hold the remover in place. This will prevent the tool from rocking and getting damaged when you apply force.
Step 2
3. Stand the wheel up (hold it or lean it against something), and wrap the chain section of a chainwhip around the largest cog, placing the handle forward (in the drive direction). Then place a large adjustable wrench on the flats of the lockring remover with the handle facing the other direction (see photo). Hold the chainwhip handle and push down on the adjustable wrench to loosen the lockring.
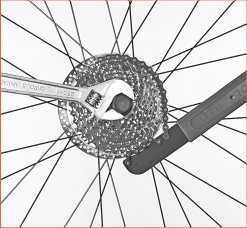
Step 3
4. Once it’s loose, remove the quick-release and, still holding the chainwhip, unscrew the lockring completely, turning the remover by hand. Once the lockring is removed, the cogs will slide off the hub.

Step 4
5. Some cassette gear clusters are assembled with bolts or screws (see photo) or are attached to a carrier, which you’ll see when you remove the gear cluster. In order to separate the cogs on these, it’s necessary to remove the hardware. Just be sure to keep everything in order as you remove it so you can reassemble the cassette correctly.
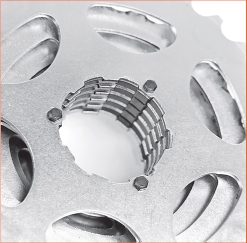
Step 5
WATCH THIS FIX:
FIND A STEP-BY-STEP VIDEO OF HOW TO REPLACE A CASSETTE AT
10 COMMON PROBLEMS, SOLVED!
PROBLEM: The cassette won’t fit on the cassette hub.
SOLUTION: Cassettes fit on hubs only one way. Match the cassette’s spline to the hub’s spline; then it’ll slide on.
PROBLEM: The cassette is getting rusty.
SOLUTION: A little rust won’t damage the cogs quickly, so it’s not a major concern. Usually, using a little more lube will prevent rust. Rust is also a sign that you should ride more!
PROBLEM: A tooth (or teeth) on a cog is bent or broken.
SOLUTION: It’s nearly impossible to adequately straighten a bent tooth. There are individual cogs or partial clusters available for some models, so it may be possible to replace one cog or a few, rather than the whole cassette. In other cases, though, you’ll need to replace the full set.
PROBLEM: Shifting is not as accurate as it once was. And the drivetrain is noisy, as if the chain isn’t quite in gear.
SOLUTION: Check that the cassette lockring is tight. It may have loosened, allowing the cassette cogs to move slightly and rattle around on the hub.
PROBLEM: When pedaling in certain gears, there’s a disconcerting skipping feeling and sound.
SOLUTION: Skipping happens for one of two reasons. Most commonly, it’s from debris between the cogs or worn cogs. If you can see mud, grass, or any sort of foreign debris trapped between your cogs, dig it out. If there’s no debris, a cog is probably worn out. Most often this is a sign that the chain and cogset will need to be replaced.
PROBLEM: Once in a blue moon, you feel and hear a loud metallic pop coming from the cassette hub or freewheel body.
SOLUTION: That’s the sound of the pawls inside the mechanism slamming into place after getting hung up. If it happens only on rare occasions, don’t worry about it too much, though you should clean and relubricate the freehub internals. If it becomes chronic, there may be irreparable damage inside the mechanism. In this case, replace the freehub body.
PROBLEM: You hear a creaking sound coming from a rear wheel.
SOLUTION: Remove the cassette cogs, grease the splines that the cogs sit on, reinstall the cogs, and tighten the lockring.
PROBLEM: Pedaling feels crunchy and rough.
SOLUTION: Either the chain has gotten dirty or dirt has gotten inside the cassette or freewheel bearings. Flush it out with a light lube such as WD-40, and then apply a medium-weight oil like Phil Wood Tenacious Oil. Repeat until it runs smoothly.
PROBLEM: The shifting isn’t as precise as it was before you disassembled and cleaned your cassette.
SOLUTION: Check to see that the spacers were installed correctly and that all the spacers were reinstalled. There should be same-size gaps between each pair of cogs. If not, the shifting won’t work correctly.
PROBLEM: When installing a cassette, it fits too tightly on the hub.
SOLUTION: Sometimes manufacturers slightly enlarge the cassette body on the hub, because they want the most amount of purchase for the cogs, which can dig into the body during pedaling. (This is often the case when the hub has an aluminum cassette body.) To install the cassette, lubricate the body and gently press the cassette onto the body. It’ll go on if you rock it and work it on gently.