Managing Software Packages
This chapter describes the following major topics:
RHCSA Objectives:
41. Install and update software packages from Red Hat Network, a remote repository, or from the local file system
The Red Hat software management system was originally called Redhat Package Manager but is now known as RPM Package Manager (RPM). RPM also refers to one or more files that are packaged together in a special format and stored in files with the .rpm extension. These rpm files (also called rpms, rpm packages, or packages) are manipulated by the RPM package management system. Each package included in and available for RHEL and its derivatives is in this file format. Packages have meaningful names and contain necessary files, as well as metadata structures such as ownership, permissions, and directory location for each included file. Packages may be downloaded and saved locally or on a network share for quick access, and they may have dependencies over files or other packages. In other words, a package may require the presence of additional files, another package, or a group of packages in order to be installed successfully and operate properly. Once a package has been installed and its metadata information stored in a package database, each attempt to update the package updates its metadata information as well.
The Red Hat Subscription Management service is a web-based secure environment for Red Hat customers, with a valid subscription for system and subscription management and content updates. It requires customer registration for access and use. This service can also be accessed directly from a RHEL system to manage the subscription and content for that system only.
RHEL provides powerful tools for the installation and administration of RPM packages on the system. The rpm command is flexible and it offers a number of options though yum is superior to rpm in the sense that it resolves package dependencies automatically. PackageKit provides access to graphical tools for adding, updating, and removing packages.
RHEL is essentially a set of RPM packages grouped together to form an operating system. It is built around the Linux kernel and includes thousands of packages that are digitally signed, tested, and certified. There are several concepts associated with package management that are touched upon in the following sub-sections.
A software package is a group of files organized in a directory structure and metadata that makes up a software application. Files contained in a package include installable scripts, configuration files, library files, commands, and related documentation. The documentation includes detailed instructions on how to install and uninstall the package, man pages for the configuration files and commands, and other necessary information pertaining to the installation and usage of the package.
All metadata related to packages is stored at a central location and includes information such as package versioning, the location it is installed at, checksum values, and a list of included files with their attributes. This allows package management tools to efficiently handle package administration tasks by referencing this metadata.
Red Hat software packages follow a standard naming convention. Typically, there are five parts to naming a package: the first part contains the package name, followed by the package version, the package release (revision or build), the Enterprise Linux the package is created for, and the processor architecture the package is built for. An installable package name always has the .rpm extension; however, this extension is removed from the installed package name.
For example, if the name of an installable package is openssl-1.0.1e-34.el7.x86_64.rpm, its installed name as reported by the rpm and yum commands would be openssl-1.0.1e-34.el7.x86_64. Here is a description of each part of the package:
An installable package may require the presence of certain packages in order to be installed successfully. Likewise, many software packages require other packages to be present in order to operate smoothly. This is referred to as package dependency, where one package depends on one or more other packages for installation or execution.
Metadata information for the installed package files is stored in the /var/lib/rpm directory. This directory location is referred to as the package database, and is referenced by package management tools to obtain information about ownerships, permissions, timestamps, and file sizes. The package database also contains information on package dependencies. All this information aids package management commands in verifying dependencies and file attributes, upgrading and uninstalling existing packages, and adding new packages.
Red Hat Subscription Management Service
The Red Hat Subscription Management (RHSM) service is provided by Red Hat for comprehensive subscription management and is the replacement for the older Red Hat Network Classic. Red Hat delivers software updates, technical support, and access to supported software versions in both binary and source forms by issuing subscriptions to its products. You purchase subscriptions based on your IT requirements and the Red Hat software you plan to use in the environment. You first register your systems with RHSM and then attach subscriptions to them based on the operating system and software they run.
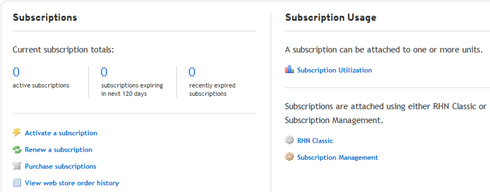
RHSM offers Red Hat customers access to the web-based tool via the Customer Portal to add, organize, inventory, check status, track usage, and report on available subscriptions and any number of registered systems along with software products used by those systems. Software content for all supported software versions in both binary and source forms is delivered via geographically distributed Content Delivery Network (CDN). Figure 5-1 shows the overview section of Subscriptions Management after you have logged on to Customer Portal with your valid credentials. Using this dashboard, you can manage your subscriptions and registered systems.
Figure 5-1 Red Hat Customer Portal Dashboard
Local system administration and its subscriptions may be managed using the Subscription Asset Manager (SAM). SAM allows you to import entitlements via a manifest exported from the Customer Portal and gives you centralized control of the subscription assets. SAM can define groups and grant systems and users access to them. SAM controls the entitlements locally, but gets the contents from the Customer Delivery Network. In order to use SAM, you need to enable access to a Red Hat repository to install it. Configuring access to that repository and installing SAM is beyond the scope of this book.
Subscriptions for a single system can also be managed using the Subscription Manager client application called subscription-manager that is installed locally on the system. This application has both graphical and command line interfaces, and it lets you manage the local system and its allocated subscriptions. Subscription Manager connects the local system with the Customer Portal or Subscription Asset Manager, and it gets contents from the Customer Delivery Network.
The subscription-manager command has several subcommands to perform various operations for local system subscriptions. Some of the subcommands are described in Table 5-1.
|
Subcommand |
Description |
|
attach |
Attaches a subscription to a registered system. |
|
auto-attach |
Automatically attaches the closest-matched subscriptions. |
|
clean |
Removes all local system and subscription data. |
|
list |
Lists subscription and product information. |
|
register / unregister |
Registers (unregisters) a system to the Customer Portal. |
|
remove |
Removes subscription information. |
|
repos |
Lists available repositories. |
|
status |
Shows subscription and product status. |
Table 5-1 subscription-manager Subcommands
Registering a System and Attaching Subscription
If you have an active subscription available, you can register your system with RHSM and attach it with the subscription that matches the system. You can do this from the command line by running the subscription-manager command, but you will need to supply valid user credentials in order to accomplish the tasks.
|
# subscription-manager register --auto-attach |
|
|
Username: |
|
|
Password: |
|
|
The system has been registered with ID: 2c9bc658-4cf8-4241-a388-ce50b8dce251 |
|
|
Installed Product Current Status: |
|
|
Product Name: |
Red Hat Enterprise Linux Server |
|
Status: |
Subscribed |
After the system has been registered and a subscription has been attached to it, you can view the information by running the Subscription-Manager in the console by selecting Applications | System Tools | Red Hat Subscription Manager. A dashboard with three tabs will appear, as shown in Figure 5-2.
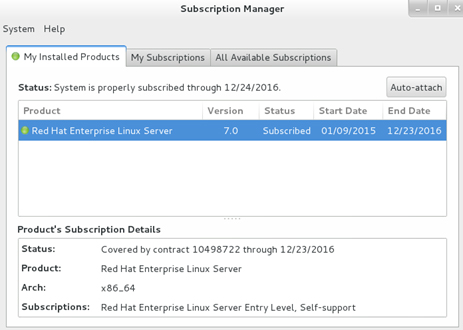
Figure 5-2 Red Hat Subscription-Manager Dashboard 1/2
The My Installed Products tab shows the product name and its version, subscription status, validity dates, and product subscription details.
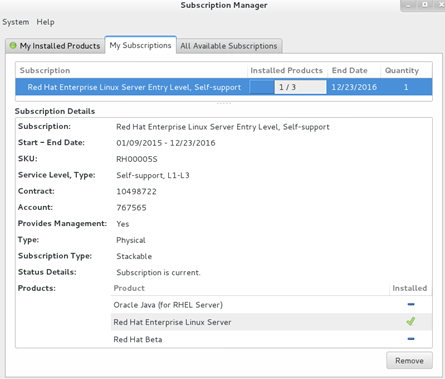
The My Subscription tab, as depicted in Figure 5-3, shows the subscription and system information in more detail.
Figure 5-3 Red Hat Subscription-Manager Dashboard 2/2
The last tab, not shown here, lists information about all available subscriptions.
Detaching Subscription and Unregistering the System
You can remove the subscription assigned to the system and then unregister it using the subscription-manager command. Finally, run this command again with the clean option to remove any data stored locally for this system.
# subscription-manager remove --all
1 subscription removed at the server.
1 local certificate has been deleted.
# subscription-manager unregister
System has been unregistered.
# subscription-manager clean
All local data removed
The above can be achieved by using the graphical equivalent of the Subscription-Manager.
This section discusses the package management tasks including installing, upgrading, freshening, overwriting, querying, removing, extracting, validating, and verifying packages using the rpm command. One caveat with this command is that it does not automatically satisfy package dependencies, which can become a big headache in the software installation and upgrade process.
Before getting into the details, let’s take a look at Table 5-2 to see some common options that are used with the rpm command.
|
Query Options |
Description |
|
–q |
Queries and displays packages. |
|
–qa |
Queries all installed packages. |
|
–qc |
Displays configuration files. |
|
–qd |
Displays documentation files. |
|
–qf |
Displays file information. |
|
–qi |
Shows package information. |
|
–ql |
Lists files in a package. |
|
-q --whatprovides |
Lists packages that provides the specified package or file. |
|
-q --whatrequires |
Lists packages that requires the specified package or file. |
|
–qR |
Lists dependencies. |
|
Install Options |
Description |
|
–F |
Upgrades an existing package. |
|
–i |
Installs a package. |
|
–U |
Upgrades an existing package or installs it if not already installed. |
|
–h |
Shows installation progress. |
|
--force |
Installs a package even if the same version already exists. |
|
--replacepkgs |
Overwrites existing packages. |
|
Other Options |
Description |
|
–e |
Removes a package. |
|
--import |
Imports a public key. |
|
–K |
Validates the signature and the package integrity. |
|
–v or –vv |
Displays detailed information. |
|
–V |
Verifies the integrity of package files. |
Before we look at various package management tasks, use the mount command to mount the RHEL7 DVD on the /mnt mount point. Insert the DVD medium in the drive and run the following:
# mount /dev/cdrom /mnt
If you have the RHEL7 ISO image copied to a directory on this system, you can mount it instead of the actual DVD. The following assumes that the ISO image is located in the /var/rhel7iso directory and it is called rhel-server-7.0-x86_64-dvd.iso:
# mount –o loop /var/rhel7iso/rhel-server-7.0-x86_64-dvd.iso /mnt
Here, the loop option tells the mount command that what is being mounted is not a block mountable device file but a mountable image file. This way the system treats the ISO image as if it is a real file system accessible via the /mnt mount point. You can use the df command to determine the loop device file (/dev/loop0 in this case) that was used by the above command:

Querying one, more than one, or all packages searches for the required information and displays it on the screen. The following are some examples.
To query all installed packages:
# rpm –qa
libXxf86misc-1.0.3-7.1.el7.x86_64
perl-HTTP-Tiny-0.033-3.el7.noarch
baobab-3.8.2-4.el7.x86_64
…… . .
To query whether the specified package is installed:
# rpm –q perl
perl-5.16.3-283.el7.x86_64
To list all files in a package:
# rpm –ql iproute
/etc/iproute2
/etc/iproute2/ematch_map
/etc/iproute2/group
…… . .
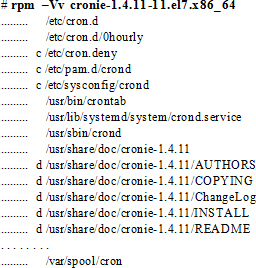
To list only the documentation files in a package:
# rpm –qd audit
/usr/share/doc/audit-2.3.3/COPYING
/usr/share/doc/audit-2.3.3/ChangeLog
/usr/share/doc/audit-2.3.3/README
…… . .
To list only the configuration files in a package:
# rpm –qc coreutils
/etc/DIR_COLORS
/etc/DIR_COLORS.256color
/etc/DIR_COLORS.lightbgcolor
/etc/profile.d/colorls.csh
/etc/profile.d/colorls.sh
To identify which package the file is associated with:
# rpm –qf /etc/passwd
setup-2.8.71-4.el7.noarch
To display information about a package:
|
# rpm –qi setup |
|
|
Name |
:setup |
|
Version |
:2.8.71 |
|
Release |
:4.el7 |
|
Architecture |
:noarch |
|
Install Date |
:Tue 08 Jul 2014 12:46:50 PM EDT |
|
Group |
:System Environment/Base |
|
Size |
:696310 |
|
License |
:Public Domain |
|
Signature |
:RSA/SHA256, Wed 02 Apr 2014 04:14:29 PM EDT, Key ID 199e2f91fd431d51 |
|
Source RPM |
:setup-2.8.71-4.el7.src.rpm |
|
Build Date |
:Wed 12 Mar 2014 12:08:24 PM EDT |
|
Build Host |
: x86-024.build.eng.bos.redhat.com |
|
Relocations |
:(not relocatable) |
|
Packager |
:Red Hat, Inc. <http://bugzilla.redhat.com/bugzilla> |
|
Vendor |
:Red Hat, Inc. |
|
URL |
:https://fedorahosted.org/setup/ |
|
Summary |
:A set of system configuration and setup files |
|
Description |
: The setup package contains a set of important system configuration and setup files, such as passwd, group, and profile. |
To list all dependencies for the specified package:
# rpm –qR sox
/sbin/ldconfig
/sbin/ldconfig
libFLAC.so.8()(64bit)
…… . .
To query what the installable package is for:
|
# rpm –qip /mnt/Packages/zsh* |
|
|
Name : |
zsh |
|
Version |
: 5.0.2 |
|
Release |
: 7.el7 |
|
Architecture |
: x86_64 |
|
Install Date |
: (not installed) |
|
Group |
: System Environment/Shells |
|
Size |
: 5834433 |
|
License |
: MIT |
|
Signature |
: RSA/SHA256, Wed 02 Apr 2014 06:53:21 PM EDT, Key ID 199e2f91fd431d51 |
|
Source RPM |
: zsh-5.0.2-7.el7.src.rpm |
|
Build Date |
: Tue 28 Jan 2014 02:11:17 PM EST |
|
Build Host |
: x86-024.build.eng.bos.redhat.com |
|
Relocations |
: (not relocatable) |
|
Packager |
: Red Hat, Inc. <http://bugzilla.redhat.com/bugzilla> |
|
Vendor |
: Red Hat, Inc. |
|
: http://zsh.sourceforge.net/ |
|
|
Summary |
: Powerful interactive shell |
|
Description |
: The zsh shell is a command interpreter usable as an interactive login shell and as a shell script command processor. Zsh resembles the ksh shell (the Korn shell), but includes many enhancements. Zsh supports command line editing, built-in spelling correction, programmable command completion, shell functions (with autoloading), a history mechanism, and more. |
To determine what packages require the specified package in order for them to operate properly:
# rpm –q --whatrequires iproute
initscripts-9.49.17-1.el7.x86_64
dhclient-4.2.5-27.el7.x86_64
dracut-network-033-161.el7.x86_64
libreswan-3.8-5.el7.x86_64
libvirt-daemon-1.1.1-29.el7.x86_64
NetworkManager-0.9.9.1-13.git20140326.4dba720.el7.x86_64
fcoe-utils-1.0.29-6.el7.x86_64
Installing a package creates the necessary directory structure for the package and installs the required files. The following command installs a package called zsh-5.0.2-7.el7.x86_64.rpm on the system:
|
# rpm –ivh /mnt/Packages/zsh-5.0.2-7.el7.x86_64.rpm |
|
|
Preparing… |
################################# [100%] |
|
Updating / installing… |
|
|
1:zsh-5.0.2-7.el7 |
################################# [100%] |
If this package requires the presence of any missing packages, you will see an error message related to failed dependencies. You must first install the missing packages in order for this package to be loaded successfully.
Alternatively, you may specify the --force option to install the package in the absence of the dependent packages. Using this option is not recommended as it forcibly installs a package and overwrites the existing files if the same version of the package is already present.
If the zsh package is located on a remote ftp host host1.example.com in the repository at /pub/outgoing, you need to specify the ftp server name and the package location with the rpm command:
# rpm –ivh ftp://host1.example.com/pub/outgoing/zsh-5.0.2-7.el7.x86_64.rpm
The same syntax applies for the package residing on an http server; just change the protocol name and the location.
Upgrading a package upgrades the specified package, provided an older version of the package is already there. In the absence of an older version, the upgrade simply installs the package.
To upgrade the package sushi-3.8.1-3.el7.x86_64.rpm, use the –U option:
# rpm –Uvh /mnt/Packages/sushi-3.8.1-3.el7.x86_64.rpm
The command makes a backup of all the affected configuration files during the upgrade process and adds the extension .rpmsave to them. In the above example, the sushi package was installed as it was not already on the system.
Freshening a package requires that an older version of the package already exists.
To freshen the package sushi-3.8.1-3.el7.x86_64.rpm, use the –F option:
# rpm –Fvh /mnt/Packages/sushi-3.8.1-3.el7.x86_64.rpm
To freshen all installed packages from the packages on the DVD, execute the following:
# rpm –Fvh /mnt/Packages/*.rpm
Overwriting a package replaces the existing files associated with the package with the same version.
To overwrite the package zsh-5.0.2-7.el7.x86_64.rpm, use the --replacepkgs option:
# rpm –ivh --replacepkgs /mnt/Packages/zsh-5.0.2-7.el7.x86_64.rpm
Removing a package uninstalls the package and all the associated files and the directory structure.
To remove the package zsh, use the –e option and also specify –v for verbosity:
# rpm –ev zsh
Preparing packages…
zsh-5.0.2-7.el7.x86_64
This command performs a dependency check to see if there are any packages that require the existence of the package being removed, and fails if it determines that some other package has a dependency on it.
Extracting Files from an Installable Package
Files in an installable RPM package can be extracted using the rpm2cpio command. Each package contains several files placed in a directory structure, and may be retrieved to replace a corrupted or lost command or a critical configuration file. For example, to extract a lost /etc/ntp.conf file, use the command below to determine what package contains it:
# rpm –qf /etc/ntp.conf
ntp-4.2.6p5-18.el7.x86_64
Assuming that the package is located in the /mnt/Packages/ directory, use the rpm2cpio command to extract (–i) all files from the ntp package and create (–d) directory structure as required:
# cd /tmp
# rpm2cpio /mnt/Packages/ntp-4.2.6p5-18.el7.x86_64.rpm | cpio –id
2795 blocks
Run the ll command to view the directory structure that is extracted:
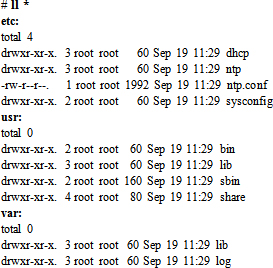
The above output shows etc, usr, and var directories extracted that contain all NTP files. The ntp.conf file is under etc/. We can copy it to the /etc directory now, and we’re back in business.
Validating Package Integrity and Credibility
A package may be checked for integrity (completeness and error-free state) and credibility after it has been copied to another location, downloaded from the web, or obtained elsewhere, and before it is installed. We can use the MD5 checksum for verifying its integrity and the GNU Privacy Guard (GnuPG or GPG) public key signature for ensuring the credibility of its developer or publisher. This will ensure that we are using an uncorrupted and authentic piece of software.
To check the integrity of a package such as zsh-5.0.2-7.el7.x86_64.rpm located in /mnt/Packages/, run the rpm command as follows:
# rpm –K --nosignature /mnt/Packages/zsh-5.0.2-7.el7.x86_64.rpm
/mnt/Packages/zsh-5.0.2-7.el7.x86_64.rpm: sha1 md5 OK
The OK in the output confirms that the package is free of corruption.
Red Hat sign their products and updates with a GPG key, and include necessary public keys in the products for verification. For RHEL, the keys are located in files on the installation media, and are copied to the /etc/pki/rpm-gpg/ directory during the OS installation. Table 5-3 lists the files in that directory along with a short description of the kind of key they store.
|
Description |
|
|
RPM-GPG-KEY-redhat-release |
Used for packages shipped after November 2009, and their updates. |
|
RPM-GPG-KEY-redhat-beta |
Used for beta test products shipped after November 2009. |
|
RPM-GPG-KEY-redhat-legacy-release |
Used for packages shipped after November 2006, and their updates. |
|
RPM-GPG-KEY-redhat-legacy-former |
Used for packages shipped prior to November 2006, and their updates. |
|
RPM-GPG-KEY-redhat-legacy-rhx |
Used for packages distributed by Red Hat Exchange. |
Table 5-3 Red Hat GPG Key Files
To check the credibility of a package, we first need to import the relevant GPG key and then verify the package. From the above table, we know that the GPG file for the packages released recently is RPM-GPG-KEY-redhat-release. In the following example, we are going to run the rpm command to import the GPG key stored in this file and then verify the signature for the zsh-5.0.2-7.el7.x86_64.rpm package using the –K option with the command:
# rpm --import /etc/pki/rpm-gpg/RPM-GPG-KEY-redhat-release
# rpm –K /mnt/Packages/zsh-5.0.2-7.el7.x86_64.rpm
/mnt/Packages/zsh-5.0.2-7.el7.x86_64.rpm: rsa sha1 (md5) pgp md5 OK
The “pgp md5 OK” validates the package signature, and certifies the authenticity and integrity of the package.
The key imported in the previous sub-section can be viewed with the rpm command. We can list the key and display its details as well. Run the command as follows to list the imported key:
# rpm –q gpg-pubkey
gpg-pubkey-fd431d51-4ae0493b
The output indicates that there is one GPG public key currently imported on the system. We can view the details as follows:
|
# rpm –qi gpg-pubkey-fd431d51-4ae0493b |
|
|
Name |
: gpg-pubkey |
|
Version |
: fd431d51 |
|
Release |
: 4ae0493b |
|
Architecture |
: (none) |
|
Install Date |
: Thu 18 Sep 2014 06:58:59 PM EDT |
|
Group |
: Public Keys |
|
Size |
: 0 |
|
License |
: pubkey |
|
Signature |
: (none) |
|
Source RPM |
: (none) |
|
Build Date |
: Thu 22 Oct 2009 07:59:55 AM EDT |
|
Build Host |
: localhost |
|
Relocations |
(not relocatable) |
|
: Red Hat, Inc. (release key 2) <security@redhat.com> |
|
|
Summary |
: gpg(Red Hat, Inc. (release key 2) <security@redhat.com>) |
|
Description : |
|
-----BEGIN PGP PUBLIC KEY BLOCK----- |
|
Version: rpm-4.11.1 (NSS-3) |
|
mQINBErgSTsBEACh2A4b0O9t+vzC9VrVtL1AKvUWi9OPCjkvR7Xd8DtJxeeMZ5eF |
|
0HtzIG58qDRybwUe89FZprB1ffuUKzdE+HcL3FbNWSSOXVjZIersdXyH3NvnLLLF |
|
0DNRB2ix3bXG9Rh/RXpFsNxDp2CEMdUvbYCzE79K1EnUTVh1L0Of023FtPSZXX0c |
|
u7Pb5DI5lX5YeoXO6RoodrIGYJsVBQWnrWw4xNTconUfNPk0EGZtEnzvH2zyPoJh |
|
XGF+Ncu9XwbalnYde10OCvSWAZ5zTCpoLMTvQjWpbCdWXJzCm6G+/hx9upke546H |
|
5IjtYm4dTIVTnc3wvDiODgBKRzOl9rEOCIgOuGtDxRxcQkjrC+xvg5Vkqn7vBUyW |
|
9pHedOU+PoF3DGOM+dqv+eNKBvh9YF9ugFAQBkcG7viZgvGEMGGUpzNgN7XnS1gj |
|
/DPo9mZESOYnKceve2tIC87p2hqjrxOHuI7fkZYeNIcAoa83rBltFXaBDYhWAKS1 |
|
PcXS1/7JzP0ky7d0L6Xbu/If5kqWQpKwUInXtySRkuraVfuK3Bpa+X1XecWi24JY |
|
HVtlNX025xx1ewVzGNCTlWn1skQN2OOoQTV4C8/qFpTW6DTWYurd4+fE0OJFJZQF |
|
…… . . |
|
-----END PGP PUBLIC KEY BLOCK----- |
Verifying an installed package compares the attributes of files in the package with the original file attributes saved and stored in the package database at the time the package was installed. The verification process uses the rpm command with the –V option to compare the owner, group, permission mode, size, modification time, digest, and type among other attributes. The command returns to the prompt without displaying anything if no changes in the attributes are detected. We may use the –v or –vv option with the command for verbosity.
One of the files in the at package is /etc/sysconfig/atd. Let’s check the attributes for this file:
# rpm –Vf /etc/sysconfig/atd
The command returned nothing, which implies that the file attributes are intact. Now let’s change the owner, group, and permissions for this file to bin, bin, and 744, respectively, and then re-run the verification:
# ll /etc/sysconfig/atd
-rw-r--r--. 1 root root 403 Jan 29 2014 /etc/sysconfig/atd
# chown bin:bin /etc/sysconfig/atd ; chmod 744 /etc/sysconfig/atd
# ll /etc/sysconfig/atd
-rwxr--r--. 1 bin bin 403 Jan 29 2014 atd
# rpm –Vf /etc/sysconfig/atd
.M…UG.. c /etc/sysconfig/atd
The output now shows three columns: the first column contains nine fields, the second column shows the file type, and the third column indicates the name of the file. The command performs a total of nine checks, as illustrated by the codes in the first column of the output, and displays what, if any, changes have occurred since the package the file belongs to has been installed. Each of these codes has a meaning. Table 5-4 lists the codes as they appear from left to right, and describes them. The period appears for an attribute that is not in an altered state.
|
Description |
|
|
S |
Appears if the file size is different. |
|
M |
Appears if the (mode) permission or file type is altered. |
|
5 |
Appears if MD5 checksum does not match. |
|
D |
Appears if the file is a device file and its major or minor number has changed. |
|
L |
Appears if the file is a symlink and its path has altered. |
|
U |
Appears if the ownership has modified. |
|
G |
Appears if the group membership has modified. |
|
T |
Appears if timestamp has changed. |
|
P |
Appears if capabilities have altered. |
|
. |
Appears if no modifications have been detected. |
Table 5-4 Package Verification Codes
The second column in the output above indicates a code that represents the type of file. Table 5-5 lists them.
|
File Type |
Description |
|
c |
Configuration file. |
|
d |
Documentation file. |
|
g |
Ghost file. |
|
l |
License file. |
|
r |
Readme file. |
Based on the information in the tables, the /etc/sysconfig/atd is a configuration file with modified permission mode, user (owner), and group. Reset the file attributes to their original values and run the check again to ensure the file is back to its original state.
To verify the attributes for all the files included in a package with details:
Exercise 5-1: Perform Package Management Tasks Using rpm
This exercise should be done on host1.
In this exercise, we will verify the integrity and authenticity of a package called dcraw located in the /mnt/Packages directory on the RHEL installation DVD and then install it. We will display basic information about the package, show files it contains, list documentation files it has, verify the package attributes, and remove the package.
1. Make sure the RHEL7 installation media is in the DVD drive and is mounted on /mnt. If not, run the following to mount it:
# mount /dev/cdrom /mnt
mount: /dev/sr0 is write-protected, mounting read-only
2. Run the ll command on the /mnt/Packages directory to confirm that the dcraw package is available:
# ll /mnt/Packages/dcraw*
-r--r--r--. 61 root root 232524 Apr 1 10:37 /mnt/Packages/dcraw-9.19-6.el7.x86_64.rpm
3. Run the rpm command and verify the integrity and credibility of the package:
# rpm –K /mnt/Packages/dcraw-9.19-6.el7.x86_64.rpm
/mnt/Packages/dcraw-9.19-6.el7.x86_64.rpm: rsa sha1 (md5) pgp md5 OK
4. Install the package:
|
# rpm –ivh /mnt/Packages/dcraw-9.19-6.el7.x86_64.rpm |
|
|
Preparing… |
################################# [100%] |
|
Updating / installing… |
|
|
1:dcraw-9.19-6.el7 |
################################# [100%] |
5. Show basic information about the package:
|
# rpm –qi dcraw |
|
|
Name |
: dcraw |
|
Version |
: 9.19 |
|
Release |
: 6.el7 |
|
Architecture |
: x86_64 |
|
Install Date |
: Fri 19 Sep 2014 09:33:36 AM EDT |
|
Group |
: Applications/Multimedia |
|
…… . . |
|
6. Show all the files the package contains:
# rpm –ql dcraw
/usr/bin/dcraw
/usr/share/locale/ca/LC_MESSAGES/dcraw.mo
…… . .
7. List the documentation files the package has:
# rpm –qd dcraw
/usr/share/man/ca/man1/dcraw.1.gz
…… . .
8. Verify the attributes of the files in the package:
# rpm –V dcraw
9. Remove the package:
# rpm –e dcraw
The yum command (yellowdog updater, modified) is the front-end to the rpm command and is the preferred tool for package management. This utility requires that your system has access to a software repository, which may or may not require a valid user account to log in. The Red Hat Subscription Management service offers access to software repositories, but it is restricted to the subscribers only. There are several other web-based repositories that host packages that you may need on your system. CentOS repositories are one such example that do not require a subscription; they are accessible to everyone. Alternatively, you can set up a local repository on your system and add packages to it. You then create a definition file for this repository in the /etc/yum.repos.d/ directory. The primary benefit of using the yum command is that it automatically resolves dependencies by downloading and installing any additional required packages in order to successfully install the specified package. With multiple repositories set up, yum extracts the specified package from wherever it finds it. The default repositories for subscribers are the ones that are available through RHSM. The yum command is very versatile and provides multiple ways for doing certain tasks. Check the manual pages on how you can use this command with that flexibility.
The key configuration file for yum is /etc/yum.conf. The main section in the file sets directives that have a global effect on yum operations. You can define separate sections for each custom repository that you plan to set up on the system. However, a better approach is to store the repos in the /etc/yum.repos.d/ directory, which is the default location created for this purpose. The default contents of the yum.conf file are listed below:
# cat /etc/yum.conf
[main]
cachedir=/var/cache/yum/$basearch/$releasever
keepcache=0
debuglevel=2
logfile=/var/log/yum.log
exactarch=1
obsoletes=1
gpgcheck=1
plugins=1
installonly_limit=3
Table 5-6 explains the above directives.
|
Directive |
Description |
|
cachedir |
Specifies the location to store yum downloads. Default is /var/cache/yum/$basearch/$releasever. |
|
keepcache |
Specifies whether to store the package and header cache following a successful installation. Default is 0 (disabled). |
|
debuglevel |
Specifies the level between 1 (minimum) and 10 (maximum) at which the debug is to be recorded in the logfile. Default is 2. A value of 0 disables this feature. |
|
logfile |
Specifies the name and location of the log file for yum activities. Default is /var/log/yum.log. |
|
exactarch |
Specifies to update only those packages that match the CPU architecture of the installed packages. Default is 1 (enabled). |
|
obsoletes |
Checks and replaces any obsolete packages during updates. Default is 1 (enabled). |
|
gpgcheck |
Specifies whether to check the GPG signature for package authenticity. Default is 1 (enabled). |
|
plugins |
Specifies to include plug-ins with the packages to be downloaded. Default is 1 (enabled). Please check its description. |
|
installonly_limit |
Specifies the maximum number of versions of a single package, as defined by the installonlypkgs directive, to be kept installed simultaneously. Default is 3. Checks its desctiption. |
Table 5-6 Directives in /etc/yum.conf
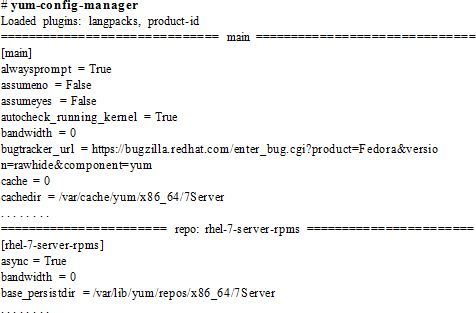
There are additional directives available that we may want to set in the main section or in custom repo sections of the file. These directives may be viewed with the yum-config-manager command:
A yum repository (or simply a repo) is a digital library for storing software packages. A repository is accessed for package retrieval, query, update, and installation, and it may either be for a subscription fee or free of charge. There are a number of repositories available on the Internet that are maintained by software publishers, such as Red Hat and CentOS. Additionally, you can have your own for internal IT use by configuring separate repositories for stocking different types of software and multiple versions of the same software. This is a good practice for an organization with a large number of RHEL systems as it takes care of dependencies automatically and aids in maintaining software consistency across the board. If you have developed a new package or built one, you can store it in one of those repositories as well. It is prudent to obtain packages from authentic and reliable sources such as the Red Hat Subscription Management service and CentOS to prevent potential damage to your system and to avoid possible software corruption.
A sample repository file is shown below with some key directives:
[rhel7.0_repo]
name= rhel7.0 repo
baseurl=file:///mnt
enabled=1
gpgcheck=0
EXAM TIP: Knowing how to configure a yum repository using a URL is very criticial for passing the exam. Use two forward slash characters to specify the FTP, HTTP, or NFS source.
The above example shows five lines in the sample repo file. It defines a unique ID within the square brackets, a brief description of the repo with the name directive, the location of the repodata directory with the baseurl directive, whether or not this repository is active, and if packages are to be GPG-checked for authenticity. Each repository file must have a name and a baseurl directive defined at a minimum, along with a repo ID; other directives are optional. The baseurl directive for a local directory path is defined as file:///local_path (three forward slash characters) and that for an FTP path as ftp://hostname/network_path, an HTTP path as http://hostname/network_path, or for an NFS path as file://hostname/network_path (two forward slash characters). The network path should include a resolvable hostname or an IP address.
Before getting into any further details, let’s take a look at Table 5-7 and understand some common subcommands used with yum.
|
Subcommand |
Description |
|
check-update |
Checks if updates are available for installed packages. |
|
clean |
Removes cached data. |
|
group install |
Installs or updates a package group. |
|
group info |
Displays package group details. |
|
group list |
Lists available package groups. |
|
group remove |
Removes a package group. |
|
info |
Displays package details. |
|
install |
Installs or updates a package. |
|
list |
Lists installed and available packages. |
|
localinstall |
Installs or updates a local package. |
|
provides (or whatprovides) |
Searches for packages that contain the specified file. |
|
remove / erase |
Removes a package. |
|
repolist |
Lists enabled repositories. |
|
repository-packages |
Treats a repository as a collection of packages, allowing them to be installed or removed as a single entity. |
|
search |
Searches for packages that contain a string. |
|
update |
Updates installed package(s). |
|
history |
Allows to review previous yum activities as stored in the /var/lib/yum/history directory. |
You can use the yum command with the repolist subcommand to list all enabled repositories accessible to your system. You can use the –v option for detailed information.

Exercise 5-2: Create a Local Yum Repository
This exercise should be done on host1.
In this exercise, you will create a local yum repository for your system. You will create a directory to store packages and then copy a single package from the mounted installation DVD in to that directory. You will install a package from the DVD that will allow you to set up the repository. Finally, you will create a definition file for the repository.
1. Create a directory /var/local and cd into it:
# mkdir –p /var/local && cd /var/local
2. Copy the package dcraw-9.19-6.el7.x86_64.rpm from /mnt/Packages into this directory:
# cp /mnt/Packages/dcraw* .
3. Install a package called createrepo on the system:
# yum –y install createrepo
…… . .
Installed:
createrepo.noarch 0:0.9.9-23.el7
Complete!
4. Execute the createrepo command on the /var/local directory to create the necessary file structure for the repo. A sub-directory called repodata is created containing the files.
# createrepo –v /var/local
Spawning worker 0 with 1 pkgs
Worker 0: reading dcraw-9.19-6.el7.x86_64.rpm
Workers Finished
Saving Primary metadata
Saving file lists metadata
Saving other metadata
Generating sqlite DBs
Starting other db creation: Sat Sep 20 19:16:23 2014
Ending other db creation: Sat Sep 20 19:16:23 2014
Starting filelists db creation: Sat Sep 20 19:16:23 2014
Ending filelists db creation: Sat Sep 20 19:16:23 2014
Starting primary db creation: Sat Sep 20 19:16:23 2014
Ending primary db creation: Sat Sep 20 19:16:23 2014
Sqlite DBs complete
# ll /var/local/repodata
-rw-r--r--. 1 root root 405 Sep 20 20:12 14a0de541849305bd40a7018b37fd84fdd0e01f3cdec84567fa120cd6a27300e-filelists.xml.gz
-rw-r--r--. 1 root root 1266 Sep 20 20:12 2dd56fc065d5cbaa0bc40d37fd8beda5201fee6ab841c03837dc46471f2b6e52-other.sqlite.bz2
-rw-r--r--. 1 root root 1519 Sep 20 20:12 4a9e531db6f1afd7fbd0a183b233fa7a67837b64be2081f3be9443b247a71da7-filelists.sqlite.bz2
-rw-r--r--. 1 root root 857 Sep 20 20:12 bd2e6608330c3a2fa47b617f5f6bbe13fcf6d3b9b0986a792182d4fb1ece433c-primary.xml.gz
-rw-r--r--. 1 root root 2090 Sep 20 20:12 d6eb83ee59b9e17930105f4f4e365e41dcd1e813eb7bd23e447b66068d33087f-primary.sqlite.bz2
-rw-r--r--. 1 root root 646 Sep 20 20:12
…… . .
5. Create a definition file /etc/yum.repos.d/local.repo for the repository. Enter the information as shown:
# vi /etc/yum.repos.d/local.repo
[local]
name=local repo
baseurl=file:///var/local/
enabled=1
gpgcheck=0
6. Execute the following command to clean up the yum cache:
# yum clean all
Loaded plugins: langpacks, product-id, subscription-manager
Cleaning repos: local rhel-7-server-rpms
Cleaning up everything
7. Run the following to confirm that the repository has been created and is available for use:
|
# yum –v repolist |
|
|
…… . . |
|
|
Repo-id |
: local |
|
Repo-name |
: local repo |
|
Repo-revision |
: 1411258356 |
|
Repo-updated |
: Sat Sep 20 20:12:37 2014 |
|
Repo-pkgs |
: 1 |
|
Repo-size |
: 227 k |
|
Repo-baseurl |
: file:///var/local |
|
Repo-expire |
: 21,600 second(s) (last: Sat Sep 20 20:17:19 2014) |
|
Repo-filename |
: ///etc/yum.repos.d/local.repo |
Exercise 5-3: Create a DVD Yum Repository
This exercise should be done on host1.
In this exercise, you will create a DVD yum repository. You already have the RHEL7 installation DVD mounted on /mnt so you will create a definition file for this repository.
1. Mount the RHEL7 installation DVD on /mnt:
# mount –o ro /dev/cdrom /mnt
2. Create a definition file /etc/yum.repos.d/dvd.repo for the repository. Enter the information as shown:
# vi /etc/yum.repos.d/dvd.repo
[dvd]
name=dvd repo
baseurl=file:///mnt
enabled=1
gpgcheck=0
3. Confirm that the repository has been created and is available for use:
|
# yum –v repolist |
|
|
…… . . |
|
|
Repo-id |
: dvd |
|
Repo-name |
: dvd repo |
|
Repo-revision |
: 1399448732 |
|
Repo-updated |
: Wed May 7 03:45:34 2014 |
|
Repo-pkgs |
: 4,305 |
|
Repo-size |
: 3.1 G |
|
Repo-baseurl |
: file:///mnt |
|
Repo-expire |
: 21,600 second(s) (last: Sat Sep 20 20:25:28 2014) |
|
Repo-filename |
: ///etc/yum.repos.d/dvd.repo |
Listing Packages and Package Groups
Listing packages allows us to search for installed and available packages in a number of ways and display them on the screen.
To list all installed packages on the system:
|
# yum list installed |
||
|
Installed Packages |
||
|
GConf2.x86_64 |
3.2.6-8.el7 |
@anaconda/7.0 |
|
ModemManager.x86_64 |
1.1.0-6.git20130913.el7 |
@anaconda/7.0 |
|
…… . . |
||
To list packages available for installation from all configured yum repositories:
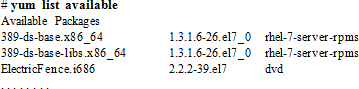
To list all packages available for installation from all enabled repositories as well as those that are already installed. This command basically shows what the previous two commands have displayed separately.
# yum list
To list all packages available from all enabled repositories that we should be able to update:
# yum list updates
To list whether a package (bc for instance) is installed or available for installation from any enabled repository:
|
# yum list bc |
||
|
Installed Packages |
||
|
bc.x86_64 |
1.06.95-13.el7 |
@anaconda/7.0 |
To list all installed packages that begin with the string gnome:
|
# yum list installed gnome* |
||
|
Installed Packages |
||
|
gnome-abrt.x86_64 |
0.3.4-6.el7 |
@anaconda/7.0 |
|
gnome-backgrounds.noarch |
3.8.1-3.el7 |
@anaconda/7.0 |
|
…… . . |
||
To list recently added packages:
# yum list recent
To list a summary of installed and available groups:
# yum groups summary
To list all environment and other groups that are available for installation:
# yum group list
Available environment groups:
Minimal Install
Infrastructure Server
File and Print Server
Basic Web Server
Virtualization Host
Server with GUI
Available Groups:
Compatibility Libraries
Console Internet Tools
Development Tools
Graphical Administration Tools
Legacy UNIX Compatibility
Scientific Support
Security Tools
Smart Card Support
System Administration Tools
System Management
Done
To list all packages a specific group or environment group contains:
# yum group info Base
…… . .
Group: Base
Group-Id: base
Description: The basic installation of Red Hat Enterprise Linux.
Mandatory Packages:
acl
at
attr
authconfig
…… . .
Installing and Updating Packages and Package Groups
Installing a package creates the necessary directory tree for the package and installs the required files. It also installs the files that are part of any dependent packages. If the package being loaded is already present, the command updates it to the latest available version. By default, yum prompts for a yes or no confirmation unless we specify the –y option at the command line. It also allows us to download the package in the /var/cache/yum/$basearch/$releasever/packages directory if we select d. The above is applicable on group installs and updates also.
The following attempts to install a package called ypbind, but proceeds with an update to the newest available version if the command detects the presence of an older version of the package. Use the –y option to proceed without confirmation:
# yum –y install system-config-keyboard
…… . .
Installed:
zsh.x86_64 0:5.0.2-7.el7
Complete!
To install or update the dcraw package located locally in the /var/local directory, use the localinstall subcommand with yum:
# yum –y localinstall /var/local/dcraw-9.19-6.el7.x86_64.rpm
To update an installed package to the latest available version, issue the following command. Note that yum will fail if the specified package is not already there.
# yum –y update autofs
To update all installed packages to the latest version:
# yum –y update
To install or update a group of packages such as Smart Card Support:
# yum –y group install “Smart Card Support”
To update the Smart Card Support group to the latest version:
# yum –y group update “Smart Card Support”
Displaying Package and Package Group Header Information
Packages and package groups have basic information that identify their names, version, release, size, description, architecture they are built for, license, and so on. This information is referred to as their header information. This information can be viewed with the yum command for individual packages as well as package groups.
To view header information for the autofs package:
|
# yum info autofs |
|
|
…… . . |
|
|
Name |
: autofs |
|
Arch |
: x86_64 |
|
Epoch |
: 1 |
|
Version |
: 5.0.7 |
|
Release |
: 40.el7 |
|
Size |
: 3.6 M |
|
Repo |
: installed |
|
: dvd |
|
|
Summary |
: A tool for automatically mounting and unmounting filesystems |
|
License |
: GPLv2+ |
|
Description |
: autofs is a daemon which automatically mounts filesystems when you use them, and unmounts them later when you are not using them. This can include network filesystems, CD-ROMs, floppies, and so forth. |
|
…… . . |
|
To display header information associated with the System Administration Tools group:
# yum group info “System Administration Tools”
…… . .
Group: System Administration Tools
Group-Id: system-admin-tools
Description: Utilities useful in system administration.
Optional Packages:
conman
crypto-utils
dump
expect
hardlink
lsscsi
mc
mgetty
…… . .
To search for packages that contain a specific file such as /bin/bash, use the provides subcommand with yum:

The output indicates that the /bin/bash file is part of the bash package, which is available from the DVD and rhel-7-server-rpms repositories. The output also shows that the bash package was installed during RHEL installation.
With the provides subcommand, we can also use the wildcard character to match all filenames:
# yum provides /usr/bin/system-config-*
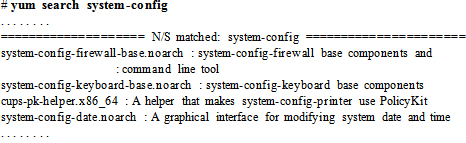
To search for all packages that match the specified string in their name, description, or summary:
Removing Packages and Package Groups
Removing packages and package groups automatically deletes dependent packages as part of the removal process. It prompts for confirmation to proceed unless we specify the –y option with the yum command.
To remove the dcraw package and any packages that depend on it:

|
# yum –y group remove “Scientific Support” |
|
|
…… . . |
|
|
Removed: |
|
|
atlas.x86_64 0:3.10.1-7.el7 |
lapack.x86_64 0:3.4.2-4.el7 |
|
numpy.x86_64 1:1.7.1-10.el7 |
|
|
Dependency Removed: |
|
|
nfsometer.noarch 0:1.7-0.el7 |
python-matplotlib.x86_64 0:1.2.0-15.el7 |
|
Complete! |
|
Sometimes we need to update one or more packages on the system to a newer or the newest version. This may be required to address a bug in the software or to leverage new features introduced in the new version. The yum command allows us to check whether updates are available for the installed packages and from which of the enabled repositories. Use the check-update subcommand with yum as follows:
|
# yum check-update |
|
|
…… . . |
|
|
dhclient.x86_64 |
12:4.2.5-27.el7_0.1 rhel-7-server-rpms |
|
dhcp-common.x86_64 |
12:4.2.5-27.el7_0.1 rhel-7-server-rpms |
|
dhcp-libs.x86_64 |
12:4.2.5-27.el7_0.1 rhel-7-server-rpms |
|
…… . . |
|
The above output indicates all newer versions available from all accessible repositories. Before you proceed with an update, ensure that you choose the version you need to update to.
Though yum install and yum update also allow you to download packages, you can use another tool called yumdownloader to download individual packages from an accessible repository.
To download a single package, specify the name of the package with yumdownloader, and ensure that you change into the directory, /var/local for instance, where you want the package downloaded before issuing the command:
# cd /var/local
# yumdownloader –v dhclient
…… . .
dhclient-4.2.5-27.el7_0.1.x86_64.rpm | 276 kB 00:00
Exercise 5-4: Perform Package Management Tasks Using yum
This exercise should be done on host1.
In this exercise, you will remove an installed package called ntp. After removing it, you will download it in the /var/local directory, reinstall it, and display its header information. You will also install a package group called Smart Card Support. After the installation, you will display the package group’s header information and then remove it.
1. Remove the ntp package:
|
# yum –y erase ntp |
|
|
…… . . |
|
|
Running transaction |
|
|
Erasing : ntp-4.2.6p5-18.el7.x86_64 |
1/1 |
|
Verifying : ntp-4.2.6p5-18.el7.x86_64 |
1/1 |
|
Removed: |
|
|
ntp.x86_64 0:4.2.6p5-18.el7 |
|
|
Complete! |
|
2. Change into the /var/local directory and download the ntp package:
|
# cd /var/local ; yumdownloader ntp |
|
|
ntp-4.2.6p5-18.el7.x86_64.rpm |
| 539 kB 00:00 |
3. Run the ll command on the ntp file to ensure the package has been downloaded:
# ll ntp*
-rw-r--r--. 1 root root 552196 Apr 2 12:39 ntp-4.2.6p5-18.el7.x86_64.rpm
4. Install the package:
|
# yum –y localinstall /var/local/ntp-4.2.6p5-18.el7.x86_64.rpm |
|
|
…… . . |
|
|
Running transaction |
|
|
Installing : ntp-4.2.6p5-18.el7.x86_64 |
1/1 |
|
Verifying : ntp-4.2.6p5-18.el7.x86_64 |
1/1 |
|
Installed: |
|
|
ntp.x86_64 0:4.2.6p5-18.el7 |
|
|
Complete! |
|
5. Display the package header information:
|
# yum info ntp |
|
|
…… . . |
|
|
Installed Packages |
|
|
Name |
: ntp |
|
Arch |
: x86_64 |
|
Version |
: 4.2.6p5 |
|
Release |
: 18.el7 |
|
Size |
: 1.4 M |
|
Repo |
: installed |
|
From repo |
: /ntp-4.2.6p5-18.el7.x86_64 |
|
: The NTP daemon and utilities |
|
|
URL |
: http://www.ntp.org |
|
License |
: (MIT and BSD and BSD with advertising) and GPLv2 |
|
…… . . |
|
6. Install the Smart Card Support package group:
|
# yum –y group install “Smart Card Support” |
|
|
…… . . |
|
|
Installed: |
|
|
coolkey.x86_64 0:1.1.0-27.el7 |
esc.x86_64 0:1.1.0-27.el7 |
|
pam_pkcs11.x86_64 0:0.6.2-17.el7 |
pcsc-lite-ccid.x86_64 0:1.4.10-5.el7 |
|
Dependency Installed: |
|
|
pcsc-lite.x86_64 0:1.8.8-4.el7 |
xulrunner.x86_64 0:24.8.0-1.el7_0 |
|
Complete! |
|
7. Display the Smart Card Support package group information:
|
# yum group info “Smart Card Support” |
|
|
…… . . |
|
|
Group: Smart Card Support |
|
|
Group-Id: smart-card |
|
|
Description: Support for using smart card authentication. |
|
|
Default Packages: |
|
|
=coolkey |
|
|
=esc |
|
|
=pam_pkcs11 |
|
|
=pcsc-lite-ccid |
|
|
Optional Packages: |
|
|
opencryptoki |
|
8. Remove the Smart Card Support package group:
|
# yum –y group remove “Smart Card Support” |
|
|
…… . . |
|
|
Removed: |
|
|
coolkey.x86_64 0:1.1.0-27.el7 |
esc.x86_64 0:1.1.0-27.el7 |
|
pam_pkcs11.x86_64 0:0.6.2-17.el7 |
pcsc-lite-ccid.x86_64 0:1.4.10-5.el7 |
|
Dependency Removed: |
|
|
pcsc-lite.x86_64 0:1.8.8-4.el7 |
|
|
Complete! |
|
Viewing yum Transaction History
The yum history command can be used to view the history of yum transactions performed on packages and package groups. By default, yum stores this information in a database in the /var/lib/yum/history directory. The history database contains a numeric ID assigned to each transaction, the user account that is used to run the transaction, date and time of the transaction, action taken, packages affected, completion status, and so on. In addition to viewing this information in a variety of different ways, we can also repeat or undo a transaction, or rollback to a certain point in the history. The following shows a few examples of pulling information from the history database.
To list the last 20 transactions:
# yum history list
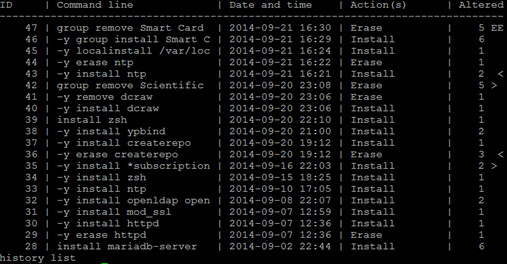
To list all previous transactions:
# yum history list all
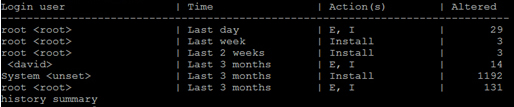
To view a summary of all previous transactions:
# yum history summary
To view transactions from 1 to 3 only:
# yum history list 1..3

Managing Packages with Graphical Toolset
RHEL provides a graphical package management toolset called PackageKit as a single rpm called gnome-packagekit for those who prefer to use the graphical interface. This package is for the GNOME desktop and is installed automatically during the RHEL7 installation when you choose the Server with GUI base environment in the Software Selection. If this rpm is missing from the system, run the following to install it:
# yum –y install gnome-packagekit
PackageKit applications run the yum command in the background; however, these applications are not a replacement for yum nor a superset of it. PackageKit brings several graphical applications that make it easier to view, add, remove, and update packages. These applications are located in the /usr/bin directory and are listed below for your reference:
# rpm –ql gnome-packagekit | grep ‘/usr/bin’
/usr/bin/gpk-application
/usr/bin/gpk-dbus-service
/usr/bin/gpk-distro-upgrade
/usr/bin/gpk-install-catalog
/usr/bin/gpk-install-local-file
/usr/bin/gpk-install-mime-type
/usr/bin/gpk-install-package-name
/usr/bin/gpk-install-provide-file
/usr/bin/gpk-log
/usr/bin/gpk-prefs
/usr/bin/gpk-service-pack
/usr/bin/gpk-update-viewer
The following sub-sections discuss two of these tools: gpk-application, to add and remove packages, and gpk-update-viewer, to view and select updates to install.
The Package Application tool allows us to add or remove one or more packages or package groups. It also allows us to view files included in each package, and the requirements and dependencies for each package.
To use this tool, execute gpk-application at the command prompt, or choose Applications | System Tools | Software to start it. An application interface similar to the one shown in Figure 5-8 will appear, which lists various Package Collections and available Software Sources (repositories) in the left pane. At the top left, we can enter a search string that may include the name, part of the name, description, or file name of a package. The tool searches in the installed package database and in enabled repositories, and produces a list of matching package names on the screen. The installed packages are highlighted and checkmarked while those available are grayed out and without a checkmark. You can choose one or more highlighted packages for removal. If you wish to install an uninstalled package, simply select it by clicking on the checkbox beside it and then click Apply Changes at the top right-hand corner to proceed with the installation. The installation progress shows at the bottom of the screen along with the name of the repository the package is being installed from. For both installed and available packages, you can view files included and list of required and dependent packages. A short description of what the package is about appears on the screen as well, along with its size and license information.
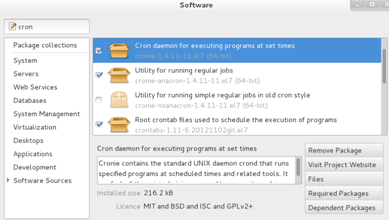
Figure 5-4 Add and Remove Packages
The Package Update Viewer tool allows us to view available updates for the installed packages and select them for installation.
To use this tool, execute gpk-update-viewer at the command prompt, or choose Applications | System Tools | Software Update to start it. An application interface similar to the one shown in Figure 5-5 will appear. This tool automatically runs the yum command in the backend with appropriate subcommands to search for all available updates and list them on the screen. By default, all available updates are checkmarked for installation. However, you only need to select the ones that you need unless your intention is to apply all of them.
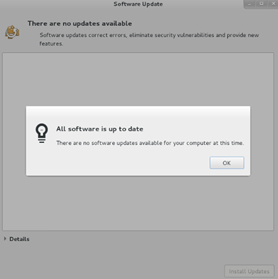
Figure 5-5 The Package Update Viewer
Figure 5-5 shows that all software on the system is already up to date. However, if there were any updates available, they would be listed. In that case, you could highlight a specific update to view its details (by clicking Details at the bottom) or select one or more updates to install (by clicking Install Updates).
This chapter discussed software package management. We learned concepts around packages, packaging, naming convention, dependency, and patch database. We looked at the benefits of RHN and how to register a system to administer software. We studied and performed a number of package management tasks using the rpm command, looked at the concepts and benefits of having a yum repository, and then performed scores of package management tasks using the yum command.
Finally, we reviewed three graphical package administration tools that are part of the PackageKit package.
Answers to Chapter Review Questions
The following labs are useful to strengthen most of the concepts and topics learned in this chapter. It is expected that you perform these labs without any additional help. A step-by-step guide is not provided, as the implementation of these labs requires the knowledge that has been presented in this chapter. Use defaults or your own thinking for missing information.
Lab 5-1: Set up a Third Party Yum Repository
Set up a third party yum repository to access packages located at atrpms.net for RHEL7. Install a package called aalib from this repository. Consider using the --disablerepo option when installing the package to ensure that the yum install command does not search for this program in other enabled repositories.
Lab 5-2: Configure a Local Yum Repository
Configure a local yum repository to access packages located locally in a directory. Create a directory called /var/yum/repos.d/local and copy all the contents of the RHEL7 installation DVD to it. Create a repo file for this repository and install packages policycoreutils* from this repository to validate it.
Lab 5-3: Install Package Groups
Install package groups Backup Server, Remote Desktop Clients, and Security Tools from the local yum repository configured in Lab 6-2. Review the yum.log file for confirmation after the installation is complete. Display the information for the three package groups.