 Within vi, press the ESC key and then type :set nu to view line numbers associated with each line entry.
Writing Shell Scripts
This chapter describes the following major topics:
RHCE Objectives:
63. Use shell scripting to automate system maintenance tasks
Shell scripts are text files that contain Linux commands, control structures, and comments, and they are written to automate long and repetitive tasks. Scripts can accept any simple to complex command and can be executed directly at the command prompt. Shell scripts do not need to be compiled, because they are interpreted by the shell line by line. This chapter presents many example scripts that are examined in detail to solidify understanding. These scripts begin with simple programs and advance to more complicated ones. As with any other programming language, the scripting skill develops over time as more and more scripts are read, written, and analyzed. This chapter also discusses a debug technique that can be used to troubleshoot issues in the code.
Shell scripts (a.k.a. shell programs or simply scripts) are text files that contain Linux commands and control structures for the automation of lengthy, complex, or repetitive tasks such as managing packages and users, administering LVM and file systems, monitoring file system utilization, trimming log files, archiving and compressing files, removing unnecessary files, starting and stopping database services and applications, and producing reports. Commands in the script are interpreted and run by the shell one at a time in the order in which they are listed in the script. Each line is executed as if it is typed and run at the command prompt. Control structures are utilized for creating and managing logical and looping constructs. Comments are also usually included to add general information about the script such as the author name, creation date, previous modification dates, purpose of the script, and its usage. If the script encounters an error during execution, the error message is displayed on the screen.
Scripts presented in this chapter are written in the bash shell and may be used in other shells with some modifications.
You can use any available text editor to write scripts; however, it is suggested to use the vi editor so you can practice. To quickly identify where things are in your scripts, use the nl command to enumerate their lines in the output. We will store our shell scripts in the /usr/local/bin directory and add it to the PATH variable.
Let’s create the first script called sys_info.sh on server1 and examine it line by line. Change the directory into /usr/local/bin and use the vi editor to write the script. Type what you see below excluding the line numbering:
# nl sys_info.sh
1 #!/bin/bash
2 # This script is called sys_info.sh and it was written by Asghar Ghori on December 11, 2014.
3 # This script should be located in the /usr/local/bin directory.
4 # The script was written to show basic RHEL and system information.
5 echo “Display Basic System Information”
6 echo “=========================”
7 echo
8 echo “The hostname, hardware, and operating system information for this system is:”
9 /usr/bin/hostnamectl
10 echo
11 echo “The following users are currently logged on to this system:”
Within vi, press the ESC key and then type :set nu to view line numbers associated with each line entry.
In this script, comments and commands are used as follows:
The first line indicates the shell in which the script will run. This line must start with the “#!” character combination followed by the full pathname to the shell file.
The next three lines contain comments: the script name, author name, creation time, default location for storage, and its purpose. The # sign implies that anything written to the right of it is for informational purposes only and will be ignored during script execution. Note that the first line also uses the number character (#), but it is followed by the exclamation mark (!); this combination has a special meaning to the shell, which is used to specify the location of the shell file. Do not get confused between the two usages of the # sign.
The fifth line has the first command of the script. The echo command prints on the screen whatever follows it. In our case, we will see “Display Basic System Information” printed.
The sixth line will underline the text “Display Basic System Information”.
The seventh line has the echo command followed by nothing. This will insert an empty line in the output.
The eighth line will print “The hostname, hardware, and operating system information for this system is:”.
The ninth line will execute the hostnamectl command to display basic information about the system.
The tenth line will insert an empty line.
The eleventh line will print “The following users are currently logged on to this system:” on the screen.
The twelfth line will execute the who command to list logged-in users.
Here is the sys_info.sh file created in the /usr/local/bin directory:
-rw-r--r--. 1 root root 512 Dec 11 08:39 /usr/local/bin/sys_info.sh
The script created above does not have the execute permission since the default umask value for the root user is set to 0022, which allows read/write permissions to the owner, and read-only permission to the rest. You will need to run the chmod command on the file and add the execute bit for everyone:
# chmod +x /usr/local/bin/sys_info.sh
Any user on the system can now run this script using either its relative path or the fully qualified pathname:
# sys_info.sh
# /usr/local/bin/sys_info.sh
By default, the /usr/local/bin directory is included in the PATH of all users. However, if it is not the case, you will need to define it in the /etc/profile file so that whoever logs on to the system gets this path set. Alternatively, individual users may add the path to their ∼/.bash_profile file. The following shows how to add the new path to the existing PATH setting at the command prompt:
# export PATH=$PATH:/usr/local/bin
Let’s now run sys_info.sh and see what the output will look like:

Before you have a perfectly working script in place, you may have to run and modify it repeatedly. You can use a debugging technique that will help identify where the script might have failed or did not function as expected. You can either add the –x option to the “#!/bin/bash” at the beginning of the script to look like “#!/bin/bash –x”, or you can execute the script as follows:

The above output now also includes the actual lines from the script prefixed by the + sign and followed by the command execution result. It also shows the line number of the problem line in the output. This way you can identify any issues pertaining to the path, command name, use of special characters, etc., and address it quickly. Try changing any of the echo commands in the script to “iecho” and re-run the script in the debug mode to confirm what has just been said.
We have dealt with variables previously and have seen their usage. To recap, there are two types of variables: local (or private) and environment. Both can be defined and used in scripts and at the command line.
Script use_var.sh will define a local variable and print its value on the screen. We will re-check the value of this local variable after the script execution has been completed. The comments have been excluded for brevity.
# nl use_var.sh
1 #!/bin/bash
2 echo “Setting a Local Variable”.
3 echo “==================“
4 SYSNAME=server1.example.com
5 echo “The hostname of this system is $SYSNAME”.
Add the execute bit to this script. The following output will be generated when you run this script:
# use_var.sh
Setting a Local Variable.
==================
The hostname of this system is server1.example.com.
If you run the echo command to see what is stored in the SYSNAME variable, you will get nothing:
# echo $SYSNAME
Using Pre-Defined Environment Variables
The following script called pre_env.sh will display the values of two pre-defined environment variables SHELL and LOGNAME:
# nl pre_env.sh
1 #!/bin/bash
2 echo “The location of my shell command is:”
3 echo $SHELL
4 echo “We are logged in as $LOGNAME”.
Add the execute bit to this script, and run to view the result:
# pre_env.sh
The location of my shell command is:
/bin/bash
We are logged in as root.
During the execution of a script, you can use the command substitution feature of the bash shell and store the output generated by the command into a variable. For example, the following script called cmd_out.sh will run the hostname and uname commands and store their output in variables. This script shows two different ways to use command substitution.
# nl cmd_out.sh
1 #!/bin/bash
2 SYSNAME=$(hostname)
3 KERNVER=`uname –r`
4 echo “The hostname of this system is $SYSNAME”.
5 echo “This system is running kernel version: $KERNVER”.
Add the execute bit and run the script:
# cmd_out.sh
The hostname of this system is server1.example.com.
This system is running kernel version: 3.10.0-123.el7.x86_64..
Understanding and Using Command Line Arguments
Command line arguments (also called positional parameters) are the arguments supplied to a command or script to produce desired results in the output. The location of the arguments, as well as the location of the command or script itself, is stored in corresponding variables. These variables are special shell variables. Figure 14-1 gives a pictorial view of the location of each command line argument.
Figure 14-1 Command Line Arguments
The variables representing various positions and meanings are explained in Table 14-1.
| Variable | Description |
| $0 | Represents the command or script. |
| $1 to $9 | Represents arguments 1 through 9. |
| ${10} and above | Represents arguments 10 and beyond. |
| $# | Represents the count of all arguments. |
| $* | Represents all arguments. |
| $$ | Represents the PID of the command or script. |
Table 14-1 Command Line Arguments
The script com_line_arg.sh below will show furnished command line arguments, their total count, the value of the first argument, and the process ID of the script:
# nl com_line_arg.sh
1 #!/bin/bash
2 echo “There are $# arguments specified at the command line”.
3 echo “The arguments supplied are: $*”
4 echo “The first argument is: $1”
5 echo “The Process ID of the script is: $$”
The result will be as follows when this script is executed with four arguments. Do not forget to add the execute bit.
# com_line_arg.sh baku timbuktu xingyang quito
There are 4 arguments specified at the command line.
The arguments supplied are: baku timbuktu xingyang quito
The first argument is: baku
The Process ID of the script is: 17149
Shifting Command Line Arguments
The shift command is used to move command line arguments one position to the left. During this move, the value of the first argument is lost. The comlineargshift.sh script below is an extension to the com_line_arg.sh script. It uses the shift command to demonstrate what happens when arguments are moved.
# nl com_line_arg_shift.sh
1 #!/bin/bash
2 echo “There are $# arguments specified at the command line”.
3 echo “The arguments supplied are: $*”
4 echo “The first argument is: $1”
5 echo “The Process ID of the script is: $$”
6 shift
7 echo “The new first argument after the first shift is: $1”
8 shift
9 echo “The new first argument after the second shift is: $1”
Let’s execute the script with four arguments. Notice that a new value is assigned to $1 after each shift.
# com_line_arg_shift.sh baku timbuktu xingyang quito
There are 4 arguments specified at the command line.
The arguments supplied are: baku timbuktu xingyang quito
The first argument is: baku
The Process ID of the script is: 17151
The new first argument after the first shift is: timbuktu
The new first argument after the second shift is: xingyang
Multiple shifts in a single attempt may be performed by furnishing the number of shifts desired to the shift command as an argument. For example, “shift 2” will carry out two shifts, “shift 3” will make three shifts, and so on.
Interactive scripts prompt for an input and continue their execution based on the input received. The entered input is stored in a variable. The read command is used for receiving the input and storing it in a variable (FILE in the following example). This command is normally preceded by a message telling the user what is expected as an input.
The inter_read.sh script below will list files and prompt to enter the file name to be removed. Notice the \c in the fifth line. This is an example of escape sequence. It will tell the echo command to wait for user input right after printing the message, “Enter the name of file you want to remove:”. Try running this script with and without the \c and observe the difference. In addition, the PWD environment variable is used in the script to display our location in the directory tree.
# nl inter_read.sh
1 #! /bin/bash
2 echo “Here is a list of all files in the $PWD directory:”
3 /bin/ls –l
4 echo –e “Enter the name of file to be removed: \c”.
5 read FILE
6 echo “Type ‘y’ to remove, ‘n’ if you do not want to:”
7 /bin/rm –i $FILE
Assuming you are logged in as user1 and in the home directory, here is what the inter_read.sh script will do:

There are several files in user1’s home directory. We entered “file1” when prompted and then ‘y’ for confirmation to delete it. You can run the ll command afterwards to verify the removal.
We used the \c escape sequence in this script. The bash shell provides additional escape sequences for use in scripts to improve readability. These additional sequences include the \t for tab, \n for new line, \a for beep, \f for form feed, \r for carriage return, and \b for backspace. Try using them in the inter_read.sh script and observe the change in output.
Additional escape sequences such as \h, \u, and \w may be used to display the hostname, username, and current working directory. For instance, the following will change the primary command prompt to display the username, hostname, and current working directory location:
# PS1=“\u@\h:\w :> $ ”
root@server1:/usr/local/bin :> $
So far, we have talked about simple scripts that run the code line by line and produce the results. The shell lets us employ logical constructs to control the flow of scripts. It does this by allowing us to use test conditions, which decides what to do next based on the true or false status of the condition.
The shell offers two logical constructs: the if-then-fi construct and the case construct. The if-then-fi construct has a few variations, which will also be covered in this chapter.
Before starting to look at the example scripts and see how logical constructs are used, let’s discuss exit codes and various test conditions. We will use them later in our example scripts.
Exit codes refer to the value returned by a program or script when it finishes execution. This value is based on the outcome of the program. If the program runs successfully, we get a zero exit code, otherwise, a non-zero value is returned. This code or value is also referred to as a return code, and is stored in a special shell variable called ?. Let’s look at the following two examples to understand their usage:
# ls
anaconda-ks.cfg initial-setup-ks.cfg
# echo $?
0
# man
What manual page do you want?
# echo $?
1
In the first example, the ls command ran successfully and it produced the desired result, hence a zero exit code was returned and stored in the variable ?. In the second example, the man command did not run successfully because of a missing argument, therefore a non-zero exit code was returned and stored in the variable ?. In either case, we echoed the ? variable value.
We can define exit codes within a script at different locations in order to help debug the script by knowing exactly where the script quit.
Test conditions can be set on numeric values, string values, or files using the test command. You can enclose a test condition within square brackets [] without using the test command explicitly. This is exhibited in later examples.
Table 14-2 shows various test condition operations that can be performed.
Having described the exit codes and various test conditions, let’s look at a few example scripts and observe some of their applications.
The if-then-fi statement evaluates the condition for true or false. It executes the specified action if the condition is true; otherwise, it will take you out of this construct. The if-then-fi statement begins with an if and ends in a fi, as depicted in the syntax below:
if condition
then
action
fi
It was demonstrated earlier how to check the number of arguments supplied at the command line. The following example script called if_then_fi.sh determines the number of arguments and prints an error message if there are none provided:

This script will display the following messages on the screen if it is executed without specifying exactly two arguments at the command line:
Error: Invalid number of arguments supplied.
Usage: if_then_fi.sh source_file destination_file
A value of 2 will appear upon checking the return code. This value reflects the exit code that we defined in the script on line number 6.
# echo $?
2
Conversely, if we supply exactly two arguments, the return code will be 0 and the message will be:
Script terminated.
# echo $?
0
The if-then-fi statement has a limitation and it can execute an action only if the specified condition is true. It quits the statement if the condition is not true. The if-then-else-fi statement, on the other hand, is more advanced in the sense that it can execute an action if the condition is true and another action if the condition is false. The general syntax of this structure is:
if condition
then
action1
else
action2
fi
action1 or action2 is performed for a true or false evaluation of the condition, respectively. The following script called if_then_else_fi.sh will accept an integer value as an argument and tell if the value is positive or negative. If no argument is provided, it will display the usage of the script.
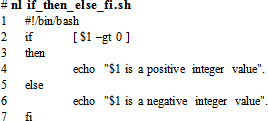
Run this script one time with a positive integer value and the next time with a negative value:
# if_then_else_fi.sh 10
10 is a positive integer value.
# if_then_else_fi.sh –10
-10 is a negative integer value.
This is a more advanced construct than the other two if-then statements. We can define multiple conditions and associate an action with each one of them. During the evaluation of this construct, the action corresponding to the true condition will be performed. The general syntax of this structure is:
if condition1
then
action1
elif condition2 then
action2
…………
…………
else
action(n)
fi
The following script called if_then_elif_fi.sh is an enhanced version of the if_then_else_fi.sh script. It will accept an integer value as an argument and tell if it is positive, negative, or zero. If a non-integer value or no command line argument is supplied, the script will print a complaint.

Run this script four times: the first time with a positive integer, the second time with 0, the third time with a negative integer, and the fourth time with a non-integer value. Check the exit code after each execution to determine where the script exited.
# if_then_elif_fi.sh 10
10 is a positive integer value.
# echo $?
1
# if_then_elif_fi.sh 0
0 is a zero integer value.
# echo $?
2
# if_then_elif_fi.sh –10
-10 is a negative integer value.
# echo $?
3
# if_then_elif_fi.sh abcd
abcd is not an integer value. Please supply an integer.
# echo $?
4
Another example for the if-then-elif-fi statement is provided below. This script is called ex200_ex300.sh, and it will display the name of the Red Hat exam RHCSA or RHCE for the entered exam code ex200 or ex300. If a random or no argument is provided, it will print “Usage: Acceptable values are ex200 and ex300”.

Run this script three times: the first time with argument ex200, the second time with argument ex300, and the third time with something random as an argument:
# ex200_ex300.sh ex200
RHCSA
# ex200_ex300.sh ex300
RHCE
Usage: Acceptable values are ex200 and ex300.
EXAM TIP: A good understanding of the usage of logical statements is important.
While working as a RHEL administrator, you will often need to perform a task on a number of given elements or repeatedly until the specified condition becomes true or false. For instance, if several disks need to be initialized for use in LVM, you can either run the pvcreate command on each disk one at a time or employ a loop to do it for you. Likewise, based on a condition, you may want a program to continue to run until the condition becomes either true or false.
There are three statements you can use to implement looping. They are called for-do-done, while-do-done, and until-do-done.
The for-do-done construct performs an operation on a list of given values until the list is exhausted. The while-do-done statement performs an operation repeatedly until the specified condition becomes false. The until-do-done structure does the opposite of what while-do-done does. It performs an operation repeatedly until the specified condition becomes true.
The let command is used in looping constructs to evaluate the condition at each iteration. It compares the value stored in a variable against a pre-defined value. Each time the loop does an iteration, the variable value is altered. You can enclose the test condition for arithmetic evaluation within double parentheses (()) or double quotes instead of using the let command explicitly.
Table 14-3 lists operators that can be used with the let command.
| Operator | Description |
| – | Unary minus. |
| ! | Unary negation. |
| + | Addition. |
| – | Subtraction. |
| * | Multiplication. |
| / | Division. |
| % | Remainder. |
| < | Less than. |
| <= | Less than or equal to. |
| > | Greater than. |
| >= | Greater than or equal to. |
| = | Assignment. |
| == | Comparison for equality. |
| != | Comparison for non-equality. |
Having described various test condition operators, let’s look at a few example scripts and see how some of these can be utilized.
The for-do-done loop is executed on an array of elements until all the elements in the list are used up. Each element is assigned to a variable one after the other for being processed within the loop. The syntax of the for-do-done loop is:
for VAR in list
do
command block
done
The for_do_done.sh script below initializes the variable COUNT to 0. The for-do-done loop will read each letter sequentially from the range placed within curly brackets (no spaces before the letter A and after the letter Z), assign it to the variable LETTER, and display the value on the screen. The expr command is an arithmetic processor and it is used to increment the COUNT by 1 at each loop iteration.

The output of the script will be:
# for_do_done.sh
Letter 1 is [A]
Letter 2 is [B]
Letter 3 is [C]
…… . .
Letter 24 is [X]
Letter 25 is [Y]
Letter 26 is [Z]
Another example is provided below. This script called create_user.sh can be used to create several user accounts. As each account is created, the value of variable ? is checked. If the value is 0, a message saying the account is created successfully will be displayed, otherwise the script will terminate. In case of a successful account creation, the passwd command will be invoked to assign the user the same password as their username.

The result of the script execution below confirms the addition of four new user accounts:
# create_user.sh
Creating account for user user10.
Changing password for user user10.
passwd: all authentication tokens updated successfully.
user10 is created successfully.
Creating account for user user11.
Changing password for user user11.
passwd: all authentication tokens updated successfully.
user11 is created successfully.
Creating account for user user12.
Changing password for user user12.
passwd: all authentication tokens updated successfully.
user12 is created successfully.
Creating account for user user13.
Changing password for user user13.
passwd: all authentication tokens updated successfully.
user13 is created successfully.
Creating account for user user14.
Changing password for user user14.
passwd: all authentication tokens updated successfully.
user14 is created successfully.
If this script is re-executed without modifying the list of elements, the following will appear:
# create_user.sh
Creating account for user user10.
useradd: user 'user10' already exists
Failed to create account user10.
Creating account for user user11.
useradd: user 'user11' already exists
Failed to create account user11.
Creating account for user user12.
useradd: user 'user12' already exists
Failed to create account user12.
Creating account for user user13.
useradd: user 'user13' already exists
Failed to create account user13.
Creating account for user user14.
useradd: user 'user14' already exists
Failed to create account user14.
EXAM TIP: A good understanding of the looping constructs is important.
The while-do-done loop checks for a condition and goes on executing a block of commands until the specified condition becomes false. The general syntax of this looping construct is:

The condition specified is usually an arithmetic expression containing the test or the let command in either an implicit or an explicit mode, but they are normally used implicitly.
Let’s look at the following while_do_done.sh menu-driven program. The entire case statement (logical construct) is defined as a block of commands within the while-do-done loop. When you choose one of the listed options, the command associated with that option will run. Once the command execution is finished, you will be prompted to press Enter to go back to the menu. The loop will continue until you choose to exit the program by selecting option 5.

When you execute this script, the menu will appear as follows and it will wait for your input:

Now, for instance, if we enter option 4, the program will display all mounted file systems:

Pressing the Enter key will take you back to the menu. To terminate program execution, input option number 5.
Another example of a while-do-done construct is presented below. This script called cuser.sh is a variant of create_user.sh. It reads usernames from a file called userlist.txt and creates the accounts as listed in the file. The script assigns a matching password upon successful creation of a user. Most of the code here is from the create_user.sh script.

And here is what is in the /root/userlist.txt file:
# cat /root/userlist.txt
user4000
user5000
user6000
You can change the usernames in the .txt file and re-run the script for creating additional accounts.
In this chapter, we learned the basics of bash shell scripting. This chapter started with an overview of scripting, then jumped directly into writing and analyzing example scripts. We wrote and inspected simple code and gradually advanced to more complicated scripts. We learned a technique to pinpoint problem lines in our scripts. After understanding and practicing the scripts presented in this chapter, you should be able to write your own scripts, debug them, and examine scripts written by others.
Answers to Chapter Review Questions
The following labs are useful to strengthen most of the concepts and topics learned in this chapter. It is expected that you perform these labs without any additional help. A step-by-step guide is not provided, as the implementation of these labs requires the knowledge that has been presented in this chapter. Use defaults or your own thinking for missing information.
Lab 14-1: Write a Script to Create Logical Volumes
For this lab, present 2x1GB virtual disks to your system. Write a single bash shell script to create 2x800MB partitions on each disk using parted and then bring both partitions into LVM control with the pvcreate command. Create a volume group called vgscript and add both PVs to it. Create three logical volumes each of size 500MB and name them lvscript1, lvscript2, and lvscript3.
Lab 14-2: Write a Script to Create File Systems
This lab is a continuation of Lab 14-1. Write another bash shell script to create xfs, ext4, and vfat file system structures in each logical volume. Create mount points /mnt/xfs, /mnt/ext4, and /mnt/vfat, and mount the file systems. Include the df command with –h to list the mounted file systems.
