Chapter 2
Customizing Windows
Windows comes with a number of features that enable you to personalize your computer. Not only can you change the appearance of Windows to suit your taste, but you can also change the way Windows works to make it easier to use and more efficient.

Change the Lock Screen Background
Synchronize Settings Between PCs
Configure Windows to Work with Multiple Monitors
Pin an App to the Start Menu
You can customize the Start menu for quick access to the apps you use most often. If you have an app that does not appear as a tile on the Start menu, you usually open the app by first navigating the Start menu’s apps list to locate the app, possibly negotiating one or more submenus along the way. For apps you use often, you can avoid this extra work by pinning their icons permanently to the right side of the Start menu. After you have pinned an app, you launch it by displaying the Start menu and clicking the app.
Pin an App to the Start Menu

 Click Start (
 ).
).

 Locate the app that you want to pin to the Start menu.
 Right-click the app.
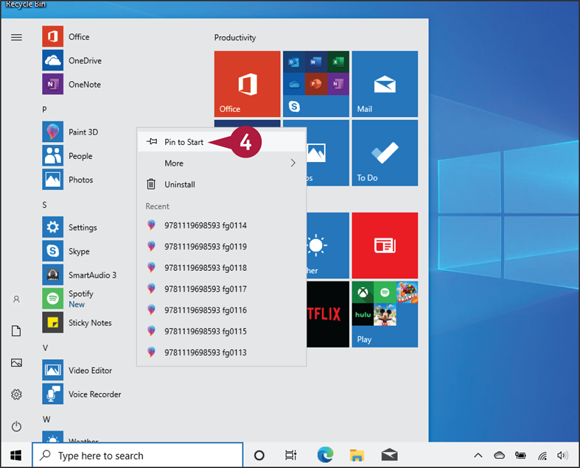
The app shortcut menu appears.
 Click Pin to Start.

 A tile for the pinned app appears on the right side of the Start menu.
Note: To remove an app tile from the Start menu, click Start (), right-click the tile, and then click Unpin from Start.
Note: If you have a large screen, you can show more tiles on the Start menu. Click Start (), click Settings ( ), click Personalization, click Start, and then click the Show more tiles on Start switch to On.
Note: You can also widen the Start menu by clicking and dragging the right edge of the menu.
Open the Settings App
You can configure and customize many aspects of your Windows system using the Settings app. Settings is the Windows app that you use for customizing and tweaking your PC. Many of the sections that follow in this chapter, including changing the Lock screen background and adding an app to the Lock screen, are performed using the Settings app. Settings also offers a wealth of other options that you can use to customize your PC.
Open the Settings App

Open the Settings App
Click Start ().
Click Settings ().

The Settings app appears.
Note: You can also open the Settings app by pressing  +
+  .
.

Navigate the Settings App
Click a category.

The Settings app displays the category.
Click a tab.
Use the controls on the right side of the app window to modify the tab’s settings.
Windows puts the new settings into effect.
You can click Back ( ) if you need to return to the previous screen.
Change the Lock Screen Background
You can make your Lock screen more interesting by changing the image that appears as its background. Locking your computer is a useful safety feature because it prevents unauthorized users from accessing your files and your network. If you find yourself looking at the Lock screen frequently, you might prefer to see something other than the default image. Windows comes with several system pictures that you can use, or you can use one of your own pictures.
Change the Lock Screen Background

Open the Settings app.
Note: See the previous section, “Open the Settings App.”
Click Personalization.
The Personalization settings appear.
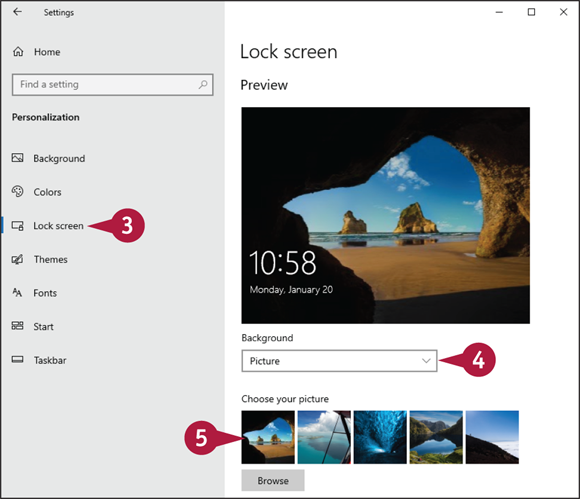
Click Lock screen.
Click the Background  and then click Picture.
Note: If you want to use a series of Microsoft Bing photos as the Lock screen background, click Windows Spotlight instead.
 To use a default image, click the thumbnail of the picture that you want to use.

 To use one of your own pictures, click Browse.
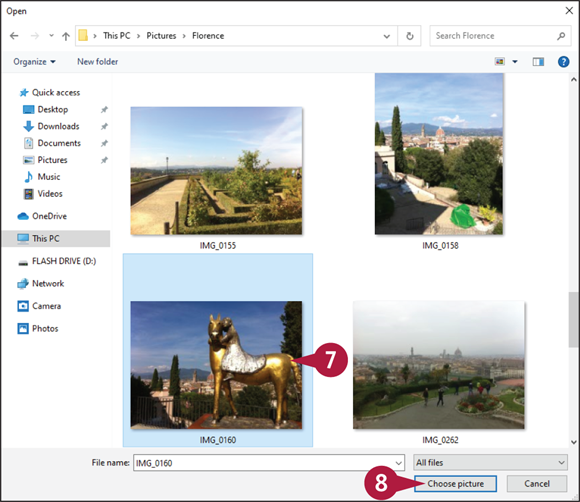
 Click the picture that you want to use.
 Click Choose picture.
The image appears the next time that you lock your computer.
Add an App to the Lock Screen
When you lock your PC, Windows displays status icons for some apps. For example, the status icon for the Mail app shows the number of unread messages. The Lock screen also shows any new notifications that appear for the Calendar app, such as an upcoming appointment. If you lock your computer frequently, you can make the Lock screen even more useful by adding icons for other apps, including ones that support notifications.
Add an App to the Lock Screen

Open the Settings app.
Note: See the section “Open the Settings App” earlier in this chapter.
Click Personalization.
The Personalization settings appear.
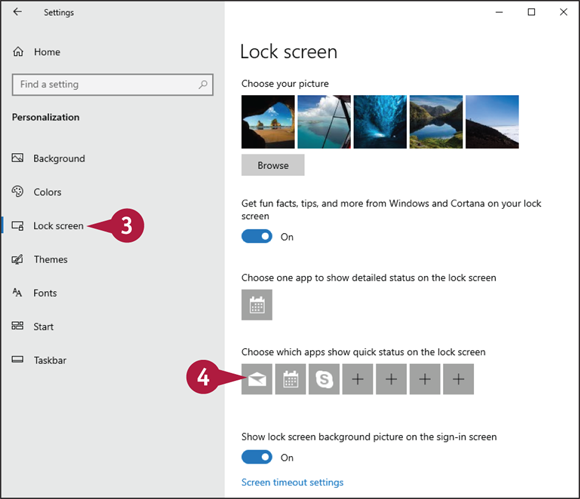
Click Lock screen.
To set a quick status icon for an app, click a button.

The Choose an App window appears.
Click the app for which you want to add a quick status icon to the Lock screen.
Repeat steps 4 and 5 to set the other quick status icons.
If you do not want an app associated with the icon, you can click None.

To choose which app displays its detailed status, click here and then click the app from the menu that appears.
Note: If you do not want a detailed status, click None.
Windows puts the new settings into effect, and the apps appear on the Lock screen the next time that you use it.
Synchronize Settings Between PCs
If, besides your Windows desktop computer, you also have a Windows notebook and a Windows tablet, using the same Microsoft account on each platform means that you can synchronize data among them. You can sync customizations, such as backgrounds and themes; system settings, such as languages and regional settings; Microsoft Edge data, such as favorites and history; and app settings and more. This gives you a consistent interface across your devices and consistent data so that you can be more productive.
Synchronize Settings Between PCs

Open the Settings app.
Note: See the section “Open the Settings App” earlier in this chapter.
Click Accounts.

The Accounts settings appear.
Click Sync your settings.

The Sync settings appear.
Click the Sync settings switch to On.

Under Individual Sync Settings, click the switch to Off beside each type of setting that you do not want to include in the sync.
The next time Windows syncs, it does not include the settings that you turned off.
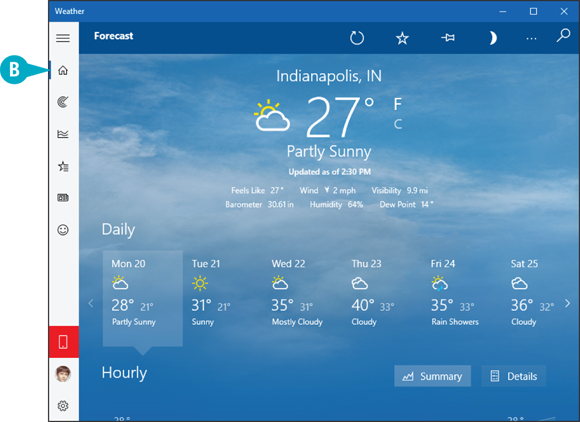
Access an App’s Features
Depending on the app, you might see a few tabs across the top of the window, as well as a Search box in the upper-right corner of the window. However, almost all the apps that come with Windows include a strip running down the left side of the window. This is the app menu, and it gives you access to a number of features, including commands, settings, and views. This menu shows only icons at first, but you can open the menu to display the names of each feature. You can then click the feature that you want to use.
Access an App’s Features

Display the Menu
Open the app that you want to work with.
Click Menu ( ).
).

The app menu expands to show the feature names.

Hide the Menu
Note: If you click a menu feature, the app automatically hides the menu. You need to manually hide the menu if you decide not to select a feature.
Click Menu ().
 The app hides the menu.
Pin an App to the Taskbar
Pinning an app to the Start menu, as described earlier in this chapter, is helpful because it puts the app just two clicks away. If you have an app that you use frequently, you might prefer to have that app just a single click away. You can achieve this by pinning the app to the taskbar. You can pin an app to the taskbar either from the Start menu or from the taskbar itself.
Pin an App to the Taskbar

Using the Start Menu
Click Start ().
If you do not see the app you want to pin, scroll down through the apps list.
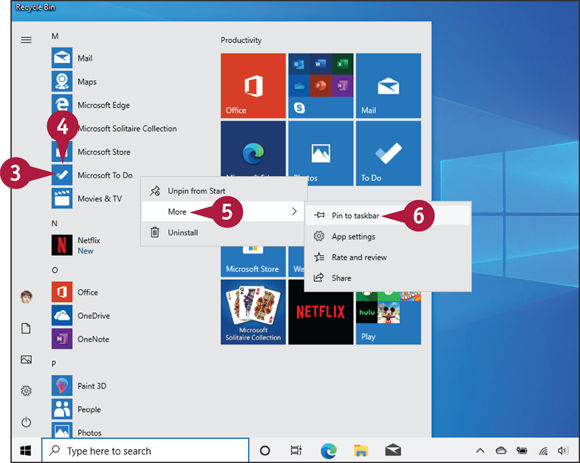
Use either the Start menu tiles or the apps list to locate the app that you want to pin to the taskbar.
Right-click the app.
Click More.
Click Pin to taskbar.

An icon for the app now appears in the taskbar.
Using the Taskbar
Launch the app that you want to pin to the taskbar.
Right-click the running app’s taskbar icon.
Click Pin to taskbar.
Click Close ( ).
).

An icon for the app remains on the taskbar.
Adjust the Volume
While an audio or video file is playing, you can adjust the volume up or down to get its audio just right. If you are listening to media by yourself, you can adjust the volume to suit the music and your mood. However, if there are other people nearby, you will probably want to use the volume control to keep the playback volume low to avoid disturbing them. If you need to silence the media temporarily, you can mute the playback.
Adjust the Volume

In the taskbar, click Volume ( ).
).

The Volume window appears.
Click and drag the slider to set the volume level that you want.
You can also click Toggle mute () to mute the volume ( changes to  ).
).
Windows sets the system volume to the new level.
Set the Time Zone
To ensure that your system clock is accurate, you should set the time zone to correspond to your location. When Windows configures your computer, it performs a number of chores, including setting the current system time and time zone. However, for the time zone, Windows defaults to Pacific Time in North America. If this is not the time zone used where you live, you must select the correct one to ensure that you have the accurate system time.
Set the Time Zone

Open the Settings app.
Note: See the section “Open the Settings App” earlier in this chapter.
Click Time & Language.

Click the Time zone and then click your time zone.
Windows adjusts the time to the new time zone.
Configure Windows to Work with Multiple Monitors
You can improve your productivity and efficiency by using a second monitor. To work with an extra monitor, your PC must have a second video output port that is compatible with the video input port on the monitor, as well as a cable to connect the ports. Modern PCs and monitors use HDMI ports connected with an HDMI cable.
After you have connected your PC and the external monitor, you then need to configure Windows to extend the Start screen to both the main screen and the second monitor.
Configure Windows to Work with Multiple Monitors

Connect the second monitor to your PC.
Open the Settings app.
Note: See the section “Open the Settings App” earlier in this chapter.
Click System.
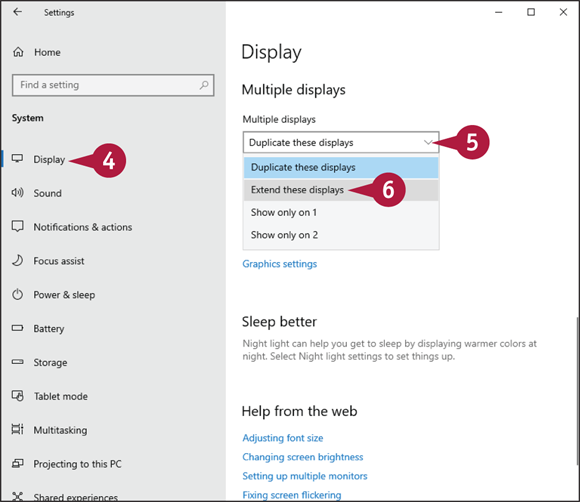
The System settings appear.
Click Display.
Click the Multiple displays .
Click Extend these displays.

Windows asks you to confirm the display changes.
Click Keep changes.

Click the monitor that you want to set as the main display.
 Click Make this my main display (
 changes to
  ).
).
Windows connects to the second monitor and uses the selected monitor as your main display.
Customize the Taskbar’s Notification Area
You can customize how Windows displays the taskbar’s notification area icons to ensure a particular icon is always visible or to turn off an icon’s notifications.
The notification area shows only a few icons by default: Microsoft OneDrive, Network, Volume, and Notifications, and notebook PCs also show the Power icon. You might want to customize the default arrangement. For example, many notification icons offer quick access to their programs’ features when you right-click them. If there is an icon that you right-click frequently, you might want to configure the notification area to show the icon on the taskbar.
Customize the Taskbar’s Notification Area

In the taskbar’s Search box, type notifications.
Click Taskbar notification area.

The Settings app displays the Notifications & Actions window.
Click Select which icons appear on the taskbar.

The Select Which Icons Appear on the Taskbar window appears.
Click the switch to On for each icon you want to display in the notification area.
Click Back () to return to the Notifications & Actions window.

Click Turn system icons on or off (not shown).
Click the switch to Off for each system icon you want to prevent from appearing in the notification area.
Windows puts the new settings into effect.
You can click Show hidden icons ( ) to see your hidden icons.
Set Up Multiple Desktops
You can make your PC screen easier to manage and less cluttered by organizing your running programs into two or more desktops. Each desktop includes only the windows of the programs that you have assigned to that desktop. For example, you might have a work desktop that includes only a word processor, a spreadsheet, and Microsoft Edge for research; a social desktop that includes only Mail, People, and Calendar; and a media desktop that includes only Music, Photos, and Videos. You can quickly switch from one desktop to another.
Set Up Multiple Desktops
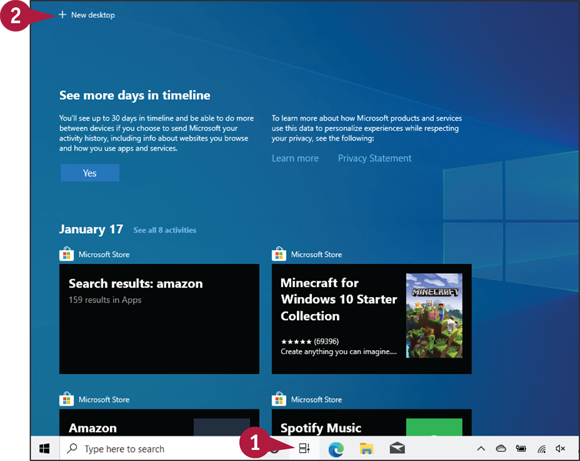
Add a New Desktop
In the taskbar, click Task view ( ).
).
Click New desktop.

Windows creates a new desktop.
Your original desktop is shown as Desktop 1.

Switch to Another Desktop
In the taskbar, click Task view () (not shown).
 You can position the mouse pointer (
 ) over the other desktop to see the programs running within that desktop.
Click the desktop you want to use.
Windows switches to that desktop and displays its running programs.
Note: Any new programs you launch will now appear only in the selected desktop.

Move a Program to a Different Desktop
In the taskbar, click Task view () (not shown).
Right-click the program you want to move.
Click Move to.
Click the desktop to which you want the program moved.
 You can also click New desktop to move the program to a new desktop.
Windows moves the program to the selected desktop.