Chapter 8
Working with Multimedia
If you are into movies, TV shows, or music, you will appreciate the Windows apps that help you play, organize, edit, and generally get the most out of your multimedia. This chapter gives you the details on all the Windows media apps.

Import Videos from a Digital Camera
You can import videos from a digital camera and save them on your computer. If your camera stores the videos on a memory card, you can also use a memory card reader attached to your PC to upload the digital videos from the removable drive that Windows sets up when you insert the card.
To perform the import directly from your digital camera, you need a cable to connect your camera to your PC. Most digital cameras come with a USB cable. After you have the digital videos on your system, you can view them.
Import Videos from a Digital Camera

 Plug in your camera or memory storage card reader.
Note: If you see a notification, click the notification and then skip to step 5.
 Click File Explorer (
 ).
).
 Click This PC.
File Explorer displays a list of the devices attached to your PC.
 Right-click your digital camera.
 Click Import pictures and videos.

The Import Pictures and Videos dialog box appears.
 Click Review, organize, and group items to import (
 changes to
  ).
).
 To make sure your videos are imported into the Videos folder, you can click More options and follow the instructions in the first tip.
 Click Next.

Windows displays the photos and videos that are on your camera.
 If a group contains both photos and videos, click the group’s View all X items link (where X is the number of photos and videos in the group).

 Videos are indicated with a filmstrip graphic.
 Click each video that you want to import (
 changes to
  ).
).
 Type a name for each video import.
 Click Import.
Windows imports the videos. When the import is complete, File Explorer displays your imported videos.
Navigate the Videos Folder
Before you can work with your videos, you need to locate them on your PC. You do that by using the Movies & TV app to open the Videos folder, which is a special folder designed specifically for storing digital videos, movies, and TV shows.
To get more out of the Videos folder, you need to know the basic techniques for opening any videos that you have stored in it. If you are looking for commercial movies or TV shows, you can also use the Movies & TV app to buy or rent a movie or to buy a TV show episode.
Navigate the Videos Folder

Click Start ( ).
).
Click Movies & TV.

Windows opens the Movies & TV app.
Click Personal.
Movies & TV displays your videos.
Click Videos.
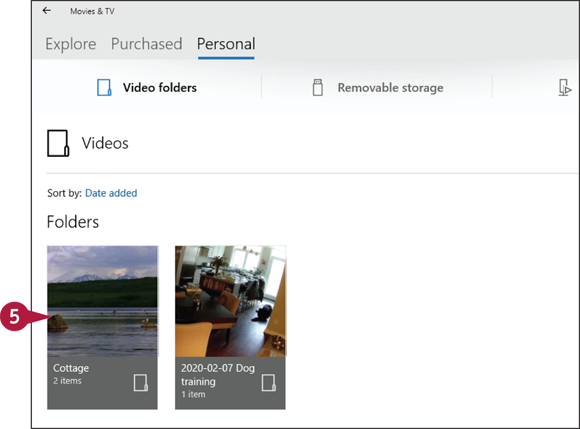
Videos that are not in subfolders appear in the All Videos section.
The Movies & TV app displays the contents of your Videos folder.
If the Videos folder contains one or more folders, click a folder.

The Movies & TV app displays the digital videos in the selected folder.
 You can click Back (
 ) to return to the previous section of the Movies & TV app.
Watch a Video
After you know how to use the Movies & TV app to navigate your Videos folder, as shown in the previous section, “Navigate the Videos Folder,” you can use the app to select and play a video that you have on your PC. The Movies & TV app plays the video full screen on your PC, so you get the best viewing experience. When you have the video playing, you can pause and restart the playback, and you can use a special tool called the scrubber to quickly fast-forward or rewind the video to the spot that you want.
Watch a Video

Start a Video
In the Movies & TV app, locate the video you want to play.
Click the video.

The Movies & TV app begins playing the video.

Control the Video Playback
Click the screen.

The Movies & TV app displays the playback controls.
You can click Pause ( ) to stop and restart the playback.
You can click and drag the scrubber to rewind or fast-forward the video.
You can click the timeline to jump to that position in the video.
Edit a Video
You can use the editing features of the Photos app to edit and enhance a video. It is a rare video that comes out perfectly on the first take. For example, most videos have unneeded footage at the beginning and the end that needs to be removed — or trimmed — from the file. You might also want to enhance part of a video by drawing text on the video or adding a similar artistic touch. If there is a frame of the video that you want to preserve, you can save that frame as a JPEG photo.
Edit a Video

Open a Video for Editing in Photos
Click Start ().
Click Photos.

Windows opens the Photos app.
In the Search box, type video.
Under the Type category, click video.
Photos displays your videos.
Click the video you want to edit.
Photos opens the video for editing.
Note: Alternatively, open File Explorer (), right-click the video you want to edit, click Open with, and then click Photos.

Trim a Video
Click Edit & Create ( ).
).
Click Trim.

Photos opens the video trimming window.
Click and drag the left trim marker to set the new starting point for the video.
Click and drag the right trim marker to set the new ending point for the video.
To help determine the trim points, you can click and drag the scrubber ( ) to set the video playback position.
Click Save a copy.
Photos trims the video and saves the trimmed version as a copy of the file with the text “_Trim” added to the filename.
The Photos app offers a number of video-editing and video-enhancement tools. For example, if you want to feature part of a video, you can show that part in slow-motion. To really make your video stand out, you can add sophisticated 3D effects such as falling leaves, fireworks, and rain. You can also add motion effects, animated text, and more.
If you want to combine multiple video clips into a single movie, you can use the Photos app’s Video Editor tool. For the details, see the next section, “Make a Movie.”

Add Slow Motion
Click Edit & Create ().
Click Add slo-mo.

Photos opens the video in the Slo-Mo window.
Click and drag the Select speed slider to set the playback speed.
Click and drag the left slo-mo marker () to set the new starting point for the slow-motion effect.
Click and drag the right slo-mo marker () to set the new ending point for the slow-motion effect.
Click Save a copy.
Photos adds the slo-mo effect and saves a copy of the file with the text “_Slomo” added to the filename.

Add 3D Effects
Click Edit & Create ().
Click Add 3D effects.

Click the effect you want to apply.
Click and drag the Start of effect marker ( ) to set where you want the effect to begin.
Click and drag the End of effect marker () to set where you want the effect to stop.
Click Save a copy.
Photos prompts you to export the video to a new file.
Follow steps 2 to 6 in the subsection “Finish the Movie” of the next section, “Make a Movie.”
Make a Movie
The Windows 10 Photos app comes with a new feature called Video Editor that enables you to combine two or more video clips — that is, two or more existing video files on your PC — into a movie. You can trim the clips, add captions and visual effects, create an opening title, apply background music, and much more. The result is a single movie file that you can play on your PC or share with friends and family.
Make a Movie

Start a Video Project
Click Start ().
Click Video Editor.

Windows opens the Photos app and displays the Video Projects tab.
Click New video project.

Video Editor prompts you to name your video project.
Type a name for your video.
Click OK.

Video Editor creates your new project.
Add Video Clips
Click Add.
Click From this PC.
The Open dialog box appears.
Open the folder that contains the video you want to add.
Click the video.
Click Open.
Video Editor adds the clip to your project folder.
Repeat steps 1 to 5 as needed to add other video clips to the project folder.
You build and edit your movie by adding one or more existing video files to Video Editor’s storyboard area. A storyboard is a timeline of your movie that shows thumbnails of each video clip in the order they will appear in the final file. For each video clip you add to the project, you can trim the clip, add a caption and other effects, and change the playback speed. You can also enhance your movie with an opening title and background music.

Populate the Storyboard
From the project folder, click and drag a clip and drop it inside the storyboard.
Alternatively, you can click the clip and then click Place in storyboard.
Repeat step 1 as needed to add your other clips to the storyboard.

Drag the clips left and right within the storyboard to get them in the order you prefer.
Click a clip and then use these commands to edit the clip.
Note: To learn how to edit a video clip, see the previous section, “Edit a Video.”
To view the results, you can click Play ( ) to preview the clip.
To remove a clip, you can click it and then click Remove ( ).
).

Finish the Movie
Click Finish video.
The Finish Your Video dialog box appears.
Click the Video quality  and then click the quality you prefer.
Click Export.

The Save As dialog box appears.
Select the location to which you want to export the movie file.
Edit the filename as needed.
Click Export.
Video Editor exports the movie file.
Play a Music CD
You can play music CDs in Windows Media Player. When you first insert an audio disc in your PC’s optical drive (that is, a drive capable of reading CDs and DVDs), Windows asks what action you want to perform with audio CDs, and you can tell it to play them using Windows Media Player.
The CD appears in the Now Playing window, and if you have an Internet connection, you see the name of each track as well as other track data. You can control some playback options using the Now Playing window, but you can also switch to the Media Player folder for more options.
Play a Music CD

Play a CD
Insert a music CD into your computer’s optical drive.
Windows displays an audio CD notification.
Click the notification.

Windows displays a list of actions you can take when you insert an audio CD.
Click Play audio CD.
Note: If you see the Welcome to Windows Media Player dialog box, click Recommended settings ( changes to ) and then click Finish.
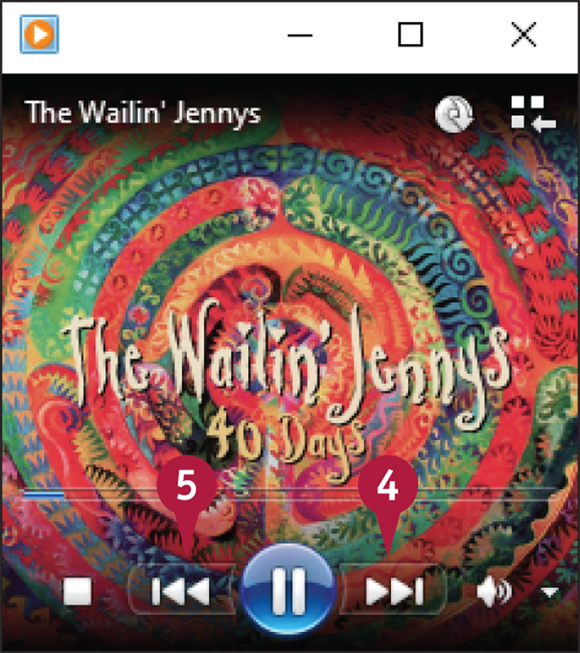
The Windows Media Player Now Playing window appears and begins playing the audio CD.
Skip a Track
Click Next ( ) to skip to the next track.
Click Previous ( ) to skip to the previous track.

Pause and Resume Play
Click Pause ( ).
).
Windows Media Player pauses playback.
Click Play ( ) (not shown).
Windows Media Player resumes playback where you left off.
You can use the playback buttons at the bottom of the Windows Media Player folder to control how a CD plays. For example, you can easily switch from one song to another on the CD. You can also use the Repeat feature to tell Windows Media Player to start the CD over from the beginning after it has finished playing the CD. Windows Media Player also offers the Shuffle feature, which plays the CD’s tracks in random order. If you want to learn how to import music from the CD to Windows Media Player, see the next section, “Copy Tracks from a Music CD.”

Stop Play
Click Stop ( ).
).
Windows Media Player stops playback.
If you click Play () after clicking Stop (), the current song starts over again.
Click Switch to Library ( ).
).

The full Windows Media Player window opens.
Play Another Song
In the details pane, double-click the song you want to play.
Windows Media Player begins playing the song.
This area displays the current song title, the album title, and the song composer (if one is listed).
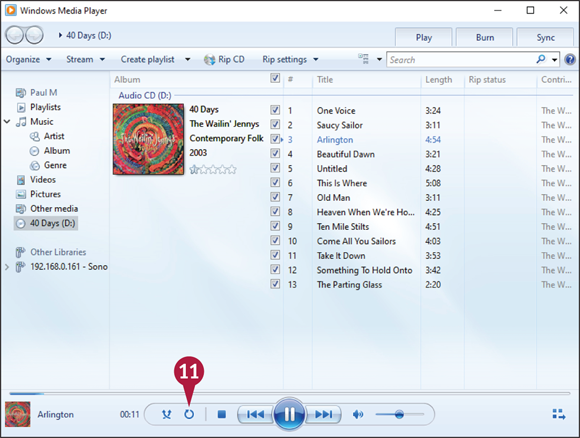
Repeat the CD
Click Turn Repeat On ( ).
).
Windows Media Player restarts the CD after the last track finishes playing.
Note: To turn on Repeat from the Now Playing window, press  +
+  .
.

Play Songs Randomly
 Click Turn Shuffle On (
 ).
).
Windows Media Player shuffles the order of play.
Note: To turn on Shuffle from the Now Playing window, press +  .
.
Copy Tracks from a Music CD
You can add tracks from a music CD to the folder in Windows Media Player. This enables you to listen to an album without having to put the CD into your optical drive each time. The process of adding tracks from a CD is called copying, or ripping, in Windows.
You can either rip an entire CD directly from the Now Playing window, or rip selected tracks using the folder. You can also use the tracks to create your own playlists and to create your own custom CDs.
Copy Tracks from a Music CD

Rip an Entire CD Using the Now Playing Window
Insert a CD into your computer’s optical drive.
The Now Playing window appears.
Click Rip CD ( ).
).
Windows Media Player begins ripping the entire CD.

Rip Selected Tracks Using the Folder
Insert a CD into your computer’s optical drive.
If the Now Playing window appears, click Switch to Library ().
Windows Media Player displays a list of the CD’s tracks.
Click the CD tracks that you do not want to copy ( changes to ).
Click Rip CD.
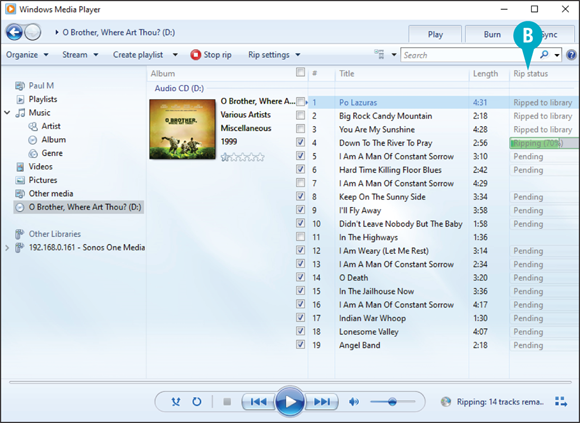
Windows Media Player begins copying the track or tracks.
The Rip Status column displays the copy progress.

After each file is copied, the Rip Status column displays a Ripped to Library message.
 The copy is complete when all the tracks you selected display the Ripped to Library status.
Navigate the Music Folder
Before you can work with your songs and albums, you need to locate them on your PC. You do that by using the Groove Music app to open the Windows Music folder, which is a special folder designed specifically for storing digital music.
To get more out of the Music folder, you need to know the basic techniques for opening any albums that you have stored in it.
Navigate the Music Folder

Click Start ().
Click Groove Music.

Windows opens the Groove Music app with the My Music tab selected.
Note: The first time you start Groove Music, the app adds any music you have in your Music folder, which can take a few minutes to complete.
Click a music category.

The music in that category appears.
Click a category item.

If the category item contains multiple subitems, Groove Music displays those subitems.
You can click Back () to return to the previous section of the Groove Music app.
Play Music
If you want to listen to music while using your PC, and your PC has either built-in or connected speakers, you can use the Groove Music app to play tunes from your Music folder. You can listen to all the songs on an album, all the songs from a particular artist, or individual songs.
The Groove Music app offers several features for controlling the music playback. You can also play albums, artists, and songs in random order and play albums and artists repeatedly.
Play Music

Start Playing Music
Use the Groove Music app to display your music.
Note: See the previous section, “Navigate the Music Folder,” for details.
If you want to play every song in the item, you can click Play () and then skip the rest of the steps in this subsection.
Click the item that contains the music you want to play.

The Groove Music app opens the item and displays a list of songs.
Click Play all ().
You can also move the mouse pointer ( ) over a song and then click Play ().

Control the Music Playback
When you play music, the Groove Music app displays the playback controls.
You can click Pause ( ) to stop and restart the playback.
 You can click and drag the scrubber to rewind or fast-forward the current song.
 To control the volume, you can click and drag the slider.
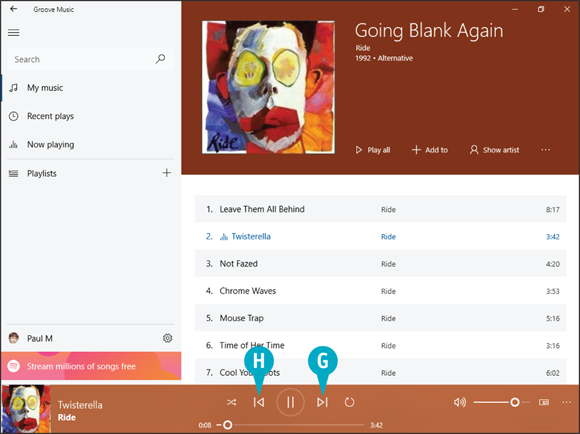
 You can click Next (
 ) to jump to the next song.
 You can click Previous (
 ) to return to the beginning of the current song; click Previous () again to jump to the previous song.
Create a Playlist
A playlist is a collection of songs that represents a subset of your total music collection. A playlist can include audio tracks you ripped from a music CD, songs downloaded from the Internet, or music you have purchased.
You can use the Groove Music app to create customized playlists that include only the songs you want to hear. For example, you might want to create a playlist of upbeat or festive songs to play during a party or celebration. Similarly, you might want to create a playlist of your current favorite songs to play during a workout.
Create a Playlist

Create and Populate a Playlist
Click Create new playlist ( ).
).

Groove Music prompts you to name the new playlist.
Type a name for the new playlist.
Click Create playlist.

Groove Music adds the playlist to the Playlists section of the menu.
Locate a song that you want to add to the playlist.
Move the mouse pointer () over the song and then click Add to ().
Click the name of your playlist.
Note: You can also click and drag the song and drop it on the playlist.
Groove Music adds the song to the playlist.
Repeat steps 4 to 6 until you have added all the songs you want in your playlist.

Play a Playlist
Click the playlist.
Groove Music displays a list of the songs you added.
Click Play all () to listen to the playlist.
Switch Between Audio Devices
If you connect headphones to your PC, you can use those headphones to listen to music or other audio. For those times when you want to listen through your PC’s built-in speakers instead, you can leave your headphones connected and switch between sound output devices.
Similarly, if you connect a microphone to your PC, you can use that microphone to record audio and narration, control your PC via voice, and more. For those times when you want to use your PC’s built-in microphone instead, you can also switch between sound input devices.
Switch Between Audio Devices

Switch Between Audio Output Devices
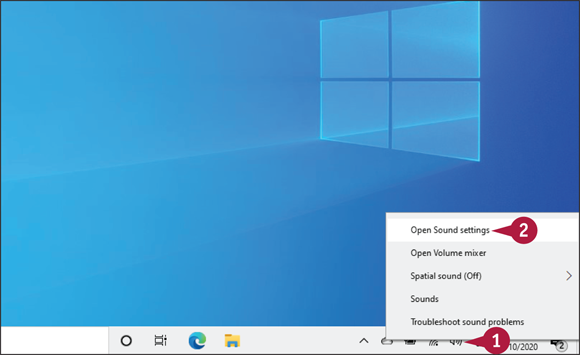
In the taskbar’s notification area, right-click the Volume icon ( ).
).
Click Open Sound settings.

The Settings app opens and displays the Sound tab.
Click the Choose your output device and then click the device you want to use for the sound playback.
Windows now uses the device you selected for sound playback.
Switch Between Audio Input Devices
In the taskbar’s notification area, right-click the Volume icon ().
Click Open Sound settings.

The Settings app opens and displays the Sound tab.
Click the Choose your input device and then click the device you want to use for the sound input.
Windows now uses the device you selected for sound input.