Chapter 9
Editing Documents
To be productive with Windows, you need to know how to work with documents. In this chapter, you learn how to create, save, open, and work with documents and OneNote notebooks.

Add Pages and Sections to a Notebook
Create and Save a Document
When you are ready to create something using Windows, in most cases you begin by launching a program and then using that program to create a new document to hold your work. Many Windows programs (such as WordPad and Paint 3D) create a new document for you automatically when you begin the program. However, you can also use these programs to create another new document after you have started the program.
After you create a document and make any changes to it, you must save the document to preserve your work.
Create and Save a Document
Create a New Document
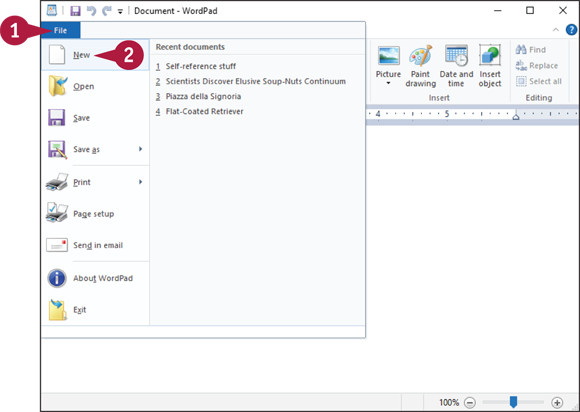
 Click File.
 Click New.
The program creates the new document.
Note: In most programs, you can also press  +
+  to create a new document.

Save a Document
Click File.
Click Save.
Note: In most programs, you can also press +  or click Save (
 ).
).
Note: If you saved the document previously, your changes are now preserved. You do not need to follow the rest of the steps in this section.

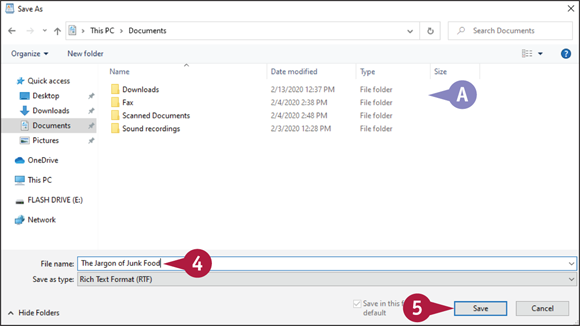
If this is a new document that you have never saved before, the Save As dialog box appears.
 Click Documents.
Note: In most programs, the Documents folder is selected automatically when you save a document.
 Windows opens the Documents folder.
 Click in the File Name text box and type the name you want to use for the document.
Note: The name you type can be up to 255 characters long, but it cannot include the following characters: < > , ? : " \ *.
 Click Save.
The app saves your document in the folder you specified.
Open a Document
To work with a document that you have saved in the past, you typically need to open the document in the program that you used to create it. When you save a document, you save its contents to your PC’s hard drive, and those contents are stored in a separate file. When you open the document using the same application that you used to save it, Windows loads the file’s contents into memory and displays the document in the application. You can then view or edit the document as needed.
Open a Document

Start the program you want to work with.
Click File.
If you see the document you want in a list of the most recently used documents on the File menu, you can click the name to open it. You can then skip the rest of the steps in this section.
Click Open.
Note: In most programs, you can also press +  or click Open (
 ).
).

The Open dialog box appears.
Click Documents.
Note: In most programs, the Documents folder is selected automatically when you open a document.
 If you want to open the document from some other folder, you can click here, click your username, and then double-click the folder.

 Windows opens the Documents folder.
Click the document name.
 Click Open.

 The document appears in the program window.
Change the Text Font
You can add visual appeal to a document by changing the font formatting. The font formatting includes attributes such as the typeface, style, size, or special effects.
A typeface — also called a font — is a distinctive character design that you can apply to the selected text in a document. The type style refers to formatting applied to text, such as bold or italics. The type size refers to the height of each character, which is measured in points; 72 points equal one inch. Special effects are styles that change the appearance of the text, such as underline and strikethrough.
Change the Text Font
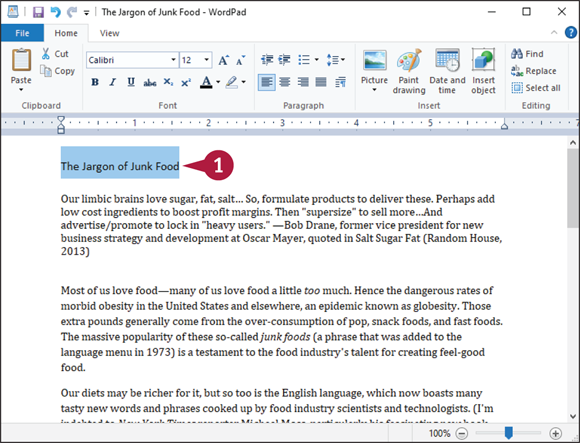
Select the text you want to format.

Display the font options.
In WordPad, you display the font options by clicking the Home tab.
Note: In many other programs, you display the font options by clicking Format in the menu bar and then clicking the Font command.

In the Font list, click  and then click the typeface you want.
In the Size list, click and then click the type size you want.

For bold text, click Bold ( ).
).
For italics, click Italic ( ).
).
 For underlining, click Underline (
 ).
).
 For color, click the Font color and then click a color.
The program applies the font formatting to the selected text.
Note: Here are some shortcuts that work in most programs: For bold, press +  ; for italics, press +
  ; for underline, press +
  .
.
Find Text
In large documents, when you need to find specific text, you can save a lot of time by using the program's Find feature. In short documents that contain only a few dozen or even a few hundred words, finding a specific word or phrase is usually not difficult. However, many documents contain hundreds or even thousands of words, so finding a word or phrase becomes much more difficult and time consuming.
You can work around this problem by using the Find feature, which searches the entire document in the blink of an eye. Most programs that work with text — including the Windows WordPad and Notepad programs — have the Find feature.
Find Text

Click Find.
In WordPad, you display the Editing options by clicking the Home tab.
Note: In many programs, you run the Find command by clicking Edit in the menu bar and then clicking the Find command, or by pressing +  .
.

The Find dialog box appears.
Click in the Find What text box and type the text you want to find.
Click Find Next.

The program selects the next instance of the search text.
Note: If the search text does not exist in the document, the program displays a dialog box to let you know.
If the selected instance is not the one you want, click Find Next until the program finds the correct instance.
Click Close ( ) to close the Find dialog box.

The program leaves the found text selected.
Replace Text
You can make it easier to replace multiple instances of one word with another by taking advantage of the program’s Replace feature. Do you need to replace a word or part of a word with some other text? If you have several instances to replace, you can save time and do a more accurate job if you let the program’s Replace feature replace the word for you. Most programs that work with text — including the Windows WordPad and Notepad programs — have the Replace feature.
Replace Text

Click Replace.
In WordPad, you display the Editing options by clicking the Home tab.
Note: In many programs, you run the Replace command by clicking Edit in the menu bar and then clicking the Replace command, or by pressing +  .
.

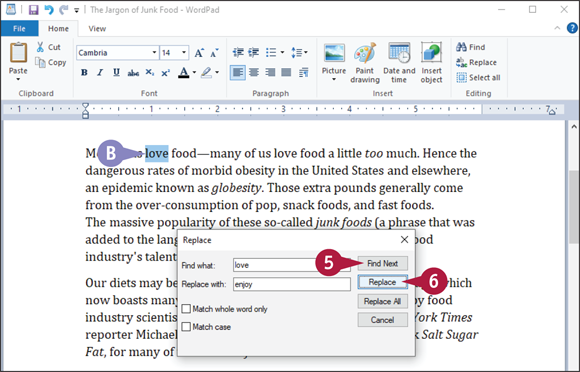
The Replace dialog box appears.
Click in the Find What text box, and type the text you want to find.
Click in the Replace With text box, and type the text you want to use as the replacement.
Click Find Next.
The program selects the next instance of the search text.
Note: If the search text does not exist in the document, the program displays a dialog box to let you know.
If the selected instance is not the one you want, click Find Next until the program finds the correct instance.
Click Replace.
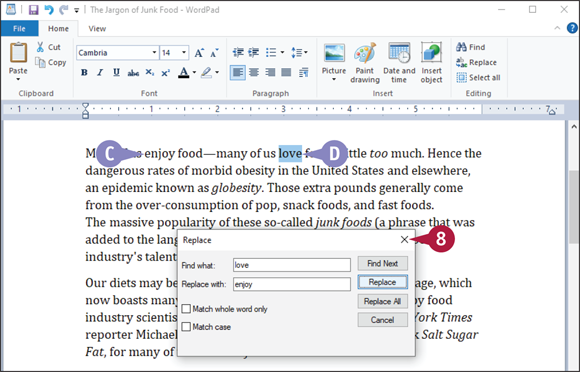
The program replaces the selected text with the replacement text.
The program selects the next instance of the search text.
Repeat steps 5 and 6 until you have replaced all the instances you want to replace.
Click Close () to close the Replace dialog box.
Insert Special Symbols
You can make your documents more readable and more useful by inserting special symbols that are not available via your keyboard. The keyboard is home to a large number of letters, numbers, and symbols. However, the keyboard is missing some useful characters. For example, it is missing the foreign characters in words such as café and Köln. Similarly, your writing might require mathematical symbols such as ÷ and ½, financial symbols such as ¢ and ¥, or commercial symbols such as © and ®. These and many more symbols are available in Windows via the Character Map program.
Insert Special Symbols
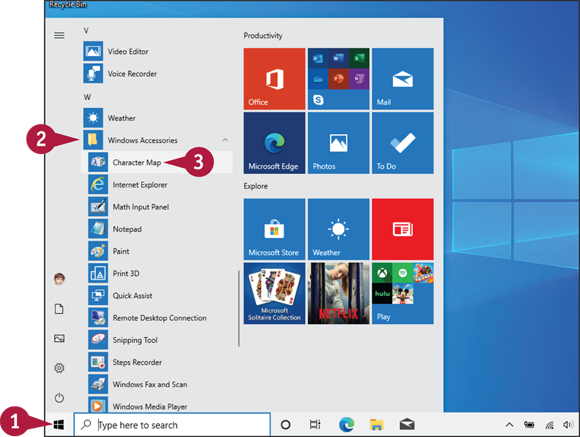
Click Start ( ).
).
Click Windows Accessories.
Click Character Map.

The Character Map window appears.
Click the symbol you want.
Click Select.
Character Map adds the symbol to the Characters to Copy text box.
Click Copy.
Click Close () to shut down Character Map after you choose all the characters you want.

In your document, position the cursor where you want to insert the symbol.
In WordPad, you display the Clipboard options by clicking the Home tab.
 Click Paste.
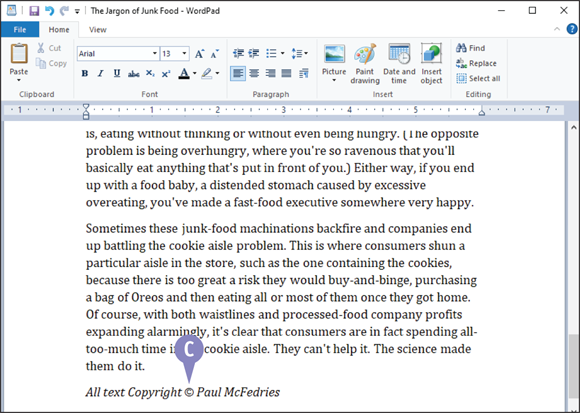
The program inserts the symbol.
Make a Copy of a Document
When you need to create a document that is nearly identical to an existing document, instead of creating the new document from scratch, you can save time by making a copy of the existing document and then modifying the copy as needed. For example, you might have a résumé cover letter that you want to modify for a different job application. Similarly, this year’s conference agenda is likely to be similar to last year’s. Instead of creating these new documents from scratch, it is much faster to copy the original document and then edit the copy as needed.
Make a Copy of a Document

Start the program you want to work with and open the original document.
Click File.
Click Save as.
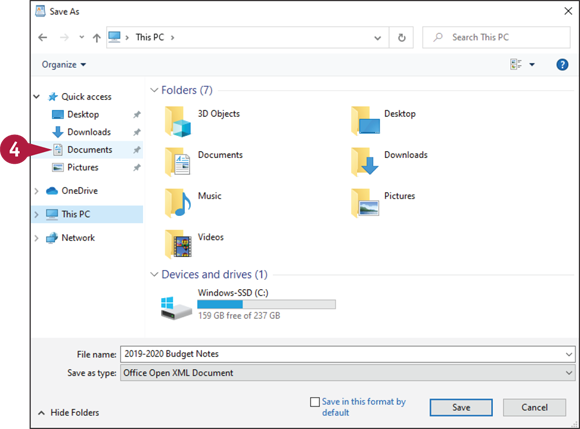
The Save As dialog box appears.
Click Documents.
Note: In most programs, the Documents folder is selected automatically when you run the Save As command.

Windows opens the Documents folder.
Click in the File Name text box and type the name you want to use for the copy.
Note: The name you type can be up to 255 characters long, but it cannot include the following characters: < > , ? : " \ *.
Click Save.

The program closes the original document and opens the copy you just created.
The filename you typed appears in the program’s title bar.
Create a OneNote Notebook
You can use the OneNote app to record and save miscellaneous bits of information, including text, lists, drawings, images, web pages, and tables of data. All of this is stored in a special file called a notebook. Within each notebook you can organize your data within sections, where each section is devoted to a particular subject. Each section is then divided into one or more pages, and you use these pages to enter your data.
Note that your Windows user account must be connected to a Microsoft account to use OneNote.
Create a OneNote Notebook

Click Start ().
Click OneNote.
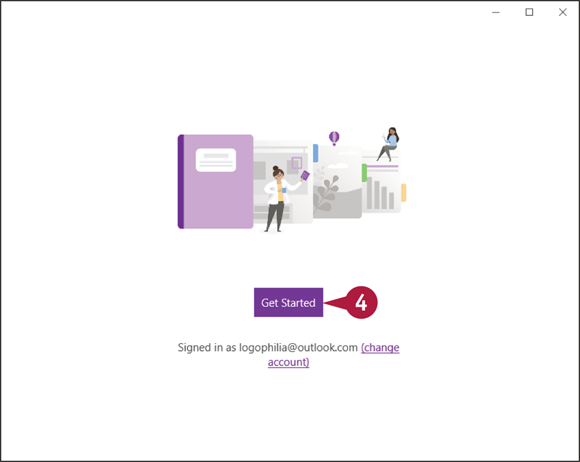
The first time you start OneNote, the app takes you through a few introductory screens (not shown). On each screen, click Next ( ) to continue.
Click Get Started.

The OneNote app appears.
Click the right side of the screen.
Type a name for the notebook.
Click Create Notebook.

OneNote creates a new notebook and populates it with a single section and page.
You can click Hide Navigation ( ) to hide the OneNote navigation pane.
To name the section, right-click it, click Rename Section, and then type the name.
You can click here to add a title for the page.
Add Pages and Sections to a Notebook
You can keep your notes organized and easy to find by taking advantage of OneNote’s pages and sections. Each OneNote notebook consists of one or more sections, which you use to break down the notebook’s overall topic or theme into smaller, more manageable subjects.
You can further break down each section into one or more pages, which are the OneNote items within which you add text, images, lists, and other data. You can add as many sections and pages as you need to keep your notes organized.
Add Pages and Sections to a Notebook
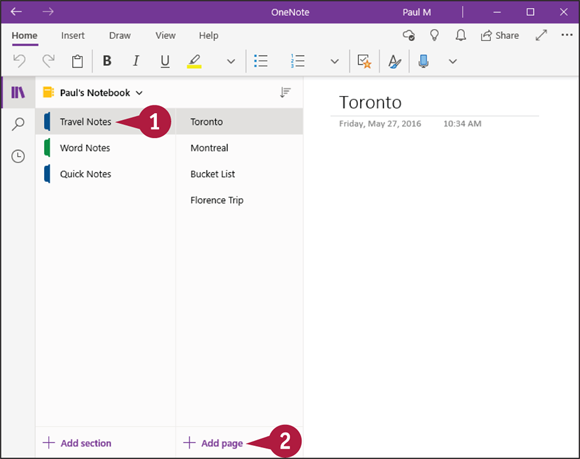
Add a Page
Click the section in which you want to add the page.
Click Add page.
OneNote adds a page to the section.
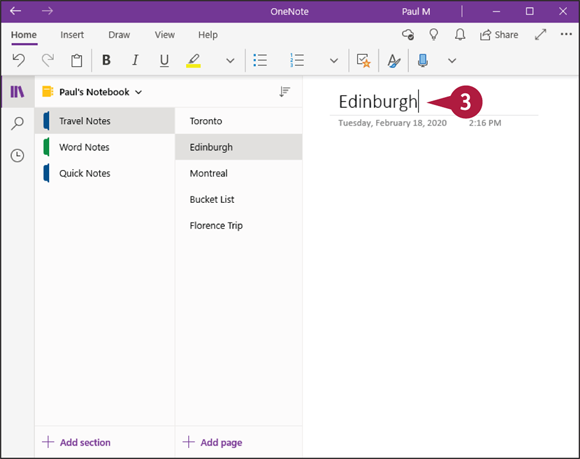
Type a title for the page and press  .
.
OneNote sets the page title.

Add a Section
Click Add section.

OneNote adds a section to the notebook.
Type the section name and press .
OneNote sets the section title.
OneNote adds a blank, untitled page to the new section.
Add Text Notes
Once you have your sections and pages, your next step is to fill your pages with content. OneNote makes it easy to insert everything from simple text notes to pictures to entire files. All OneNote content appears inside a container, which is essentially a box that surrounds the content. After you have some content inside a container, you can move the container around on the page, edit or format the container content, and more.
Most page content consists of text notes, and OneNote makes it very simple to add text to a page.
Add Text Notes

Add a Text Note
Click the section you want to use.
Click the page you want to use.
Click inside the page at the position where you want the text to appear.
OneNote adds an insertion point cursor.
Type your text.
OneNote adds a container around your text.
When your text note is complete, click outside the container.
OneNote adds the text note to the page.

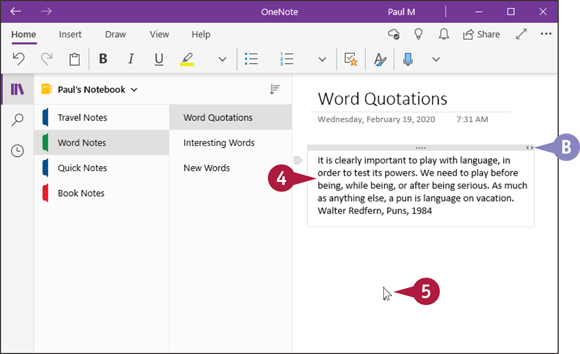
Size a Text Note Container
Position the mouse pointer ( ) over the right edge of the container ( changes to
  ).
).
Click and drag the mouse pointer () right for a larger container, or left for a smaller container, and then release the mouse.
OneNote resizes the container and adjusts the text to fit the new size.

Move a Text Note Container
Position the mouse pointer () over the middle of the top edge of the container ( changes to  ).
).
Click and drag the mouse pointer () to the position you want and then release the mouse.
OneNote moves the container to the new position.
Add an Image to a Notebook Page
Although you will populate your OneNote notebooks mostly with text notes, you can also insert other types of content, including images. You can either insert an image file from your PC’s hard drive or, if your computer has a camera attached, take a photo and insert it directly into the page. As with text notes, OneNote adds an image to the page within a container that you can move and size as needed.
Add an Image to a Notebook Page

Click the section you want to use.
Click the page you want to use.
Click inside the page at the position where you want the image to appear.
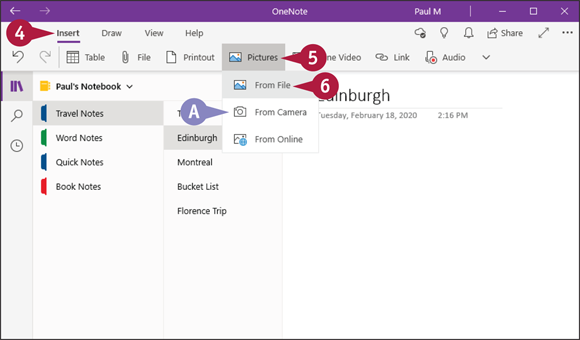
Click the Insert tab.
Click Pictures.
Click From File.
If you want to add a photo using your PC’s camera, you can click From Camera, instead.
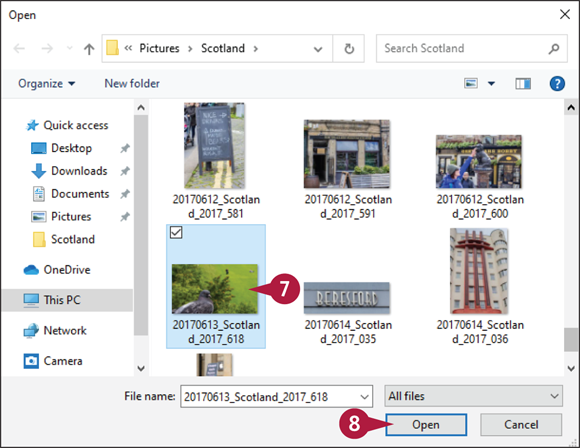
The Open dialog box appears.
Click the image.
Click Open.

OneNote inserts the image into the page.
OneNote adds a container around your image.
Work with Notebook Lists
Many OneNote notes consist of lists of items. If you have a list that does not require a particular sequence, you can add the items to a page as a bulleted list. If you have a list that does require a sequence, then you can add the items to the page as a numbered list instead.
One of the most common OneNote list types is the to-do list, which is a collection of tasks, each with a leading check box. When you complete a task, you activate its check box.
Work with Notebook Lists

Create a Bulleted or Numbered List
Click the section you want to use.
Click the page you want to use.
Click inside the page at the position where you want the list to appear.
Click the Home tab.

Click the type of list you want to add:
You can click Bulleted List ( ) to create a list with bullets.
You can click Numbering ( ) to create a list with numbers.
OneNote adds the list to a container.
Click inside the container and type your list items, pressing after each item.
When you are done, click outside the container.
OneNote adds the list to the page.

Create a To-Do List
Click the section you want to use.
Click the page you want to use.
Add the to-do list.
Select all the items in the list.
Click To Do ( ).
).

OneNote adds a check box to the left of each item.
Print a Document
When you need a hard copy of your document, either for your files or to distribute to someone else, you can get a hard copy by sending the document to your printer. Most applications that deal with documents also come with a Print command. When you run this command, the Print dialog box appears. The Print dialog box enables you to choose the printer you want to use as well as to specify how many copies you want to print. Many Print dialog boxes also display a preview of your document before you print it.
Print a Document

Turn on your printer.
Open the document you want to print.

Click File.
Click Print.
Note: In many programs, you can select the Print command by pressing +  or by clicking Print (
 ).
).

The Print dialog box appears.
Note: The layout of the Print dialog box varies from program to program. The WordPad version shown here is a typical example.
If you have more than one printer, click the printer you want to use.
Click the Number of copies  to specify the number of copies to print.
Click Print.

Windows prints the document. The printer icon ( ) appears in the taskbar’s notification area while the document prints.