But history, which is never tidy, must always end with questions. Conclusions are much too convenient. – Antony Beevor
Just before midnight on 7 February 1863, Mr F. D. Jerningham, a 19-year-old midshipman from HMS Orpheus, began his ride on a borrowed horse along the rough coach road that linked the village of Onehunga with the township of Auckland. He carried with him two hastily written letters from Commander Sullivan of HMS Harrier, a sloop then at anchor near the port of Onehunga. These letters contained dreadful news. They told how earlier that day the steam corvette, HMS Orpheus, flagship of the Australia squadron of the Royal Navy, had been wrecked on a sandbank near the mouth of the Manukau Harbour with, it was feared, a great loss of life.
On reaching Auckland in the early hours of the morning, Mr Jerningham woke and personally delivered each of the letters to the two service chiefs temporarily stationed there. He first approached General D. A. Cameron, commander of the army in the colony, temporarily resident in Karangahape Road at the house known to Aucklanders as St Keven’s. He then went on, possibly by rowboat, to pass the second message to Captain Robert Jenkins of HMS Miranda, then anchored in the Waitemata Harbour. These officers ensured that this alarming intelligence also got to the governor, Sir George Grey. In no time the melancholy news spread through the small capital. The New-Zealander reported that ‘the inhabitants of Auckland were horrified by the appalling intelligence’.
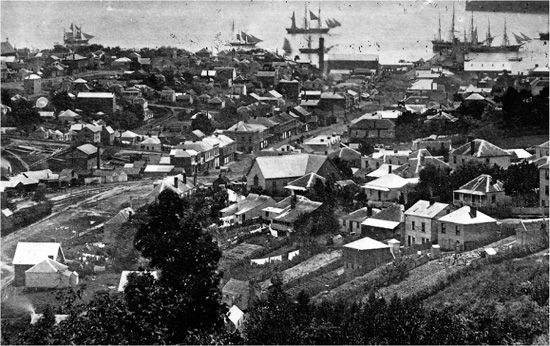
An 1860s photograph of central Auckland and the Waitemata Harbour looking west of north from Albert Barracks. AUCKLAND CITY LIBRARIES, NEG. 1412.
Investigations carried out over the next day or so confirmed that the shipwreck had been a disaster of the first magnitude. Within eight hours of striking the sandbank, the Orpheus had been reduced to a total wreck. And far fewer lives were saved than might have been expected of a ship that had taken the ground within 2 miles of land and in full view of the pilot station. How few became evident when some days later the navy rescue team, which had been aided by settler and Maori volunteers, completed its search for survivors and bodies. The team reported that of the ship’s complement of 259, only 70 had survived. And many of those who drowned were young: cadets and midshipmen training to be fully accredited career officers, and ‘boys’ (their official title) aged twelve to eighteen ‘learning the ropes’ to become full Jack Tars. The average age of the crew, which had a complement of marines, was only 25.

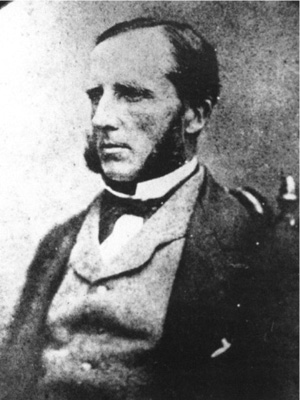
Captain W. F. Burnett, CB. PHOTOGRAPH BY COURTESY OF THE FAIRBURN FAMILY.
The sinking of the Orpheus was, and remains, New Zealand’s greatest maritime disaster. And not only because of the terrible toll in lives. What made the loss particularly tragic was that it seemed both unnecessary and inexplicable. Granted, the approaches to the Manukau are probably the most treacherous of any major harbour in New Zealand. But the ship ran aground on a brilliantly fine summer’s day which, at the time that she struck, provided excellent visibility and no more than a moderate though strengthening southwest wind. For a modern warship to founder under such favourable conditions seemed to suggest a catastrophic blunder on someone’s part. But whose blunder? What was then a vexed question has never been satisfactorily answered.
The roots of the tragedy stretched back to 1861, the year that the Lords Commissioners of the Admiralty in England appointed an experienced and fast-rising officer, Captain W. F. Burnett, CB, to replace Commodore F. B. P. Seymour as commander of the Australia station of the Royal Navy at Port Jackson, Sydney. The Admiralty arranged for the brand new corvette Orpheus (1706 tonnes), a fine ship whose full square-rigged spread of sail was supplemented by steam (screw) power, to take Burnett to his new post.
But when the Orpheus, with the commodore’s broad pennant streaming from her masthead, left Plymouth Sound in December 1861 she was under orders not to sail directly to Sydney. The month before, shortly after the outbreak of the American Civil War, a Federal (Northern) warship, in contravention of international maritime law, had stopped the neutral British packet Trent on the high seas, and removed two envoys who were travelling on her to Europe to canvass support for the Confederate (Southern) cause. The British bluntly demanded their return. Relations between Britain and the United States government became strained almost to breaking point. There was even talk of war. But moderate counsels on both sides of the Atlantic finally won out and the envoys were handed back to the British. But that a substantial residue of bitterness remained in the States was shown in a stanza written by a popular American versifier.
We sent the critters back John,
’Cause Abra’m thought
’twas right.
’Twas not your bullying clack John,
Provoking us to fight!
‘Abra’m’ was of course President Abraham Lincoln, and ‘John’, the British Prime Minster, was John (Viscount) Palmerston. These sore feelings explain why the Orpheus was sent initially on convoy duty off the maritime states of Canada, a diversion that delayed her voyage to the Antipodes by seven weeks. Burnett’s ship did not reach Sydney until 18 July 1862.
Then, over the next five months or so, while the Orpheus was undergoing a thorough refit at Sydney, the new commodore visited various harbours and depot sites in eastern Australia and Tasmania. Finally, on 31 January 1863, he set out on an urgent mission to New Zealand.
It is tempting to assume, as have some writers, that the Orpheus was hurriedly despatched across the Tasman to strengthen the armed forces of a colony teetering on the brink of a resumed racial war. Certainly units of the Royal Navy had already taken part in the first Taranaki war (1861–2). And it is on record that during 1862, eight Royal Navy vessels of varying size and firepower – sloops, frigates and corvettes – spent time in New Zealand waters. By the end of 1862, Governor Grey, convinced that war was imminent in the Waikato, was bent on persuading the British government that ‘as strong a naval force as possible should be in New Zealand and that the Commodore himself should be there’. He confided to one naval captain at Auckland that there was ‘the danger of a sudden outbreak in which thousands of men, women and children may be murdered’. Grey’s superiors in London – rightly, I believe – thought that the governor exaggerated and that, not for the first time, he was being needlessly alarmist in order to get his own way. Indeed, it would appear that Burnett’s purpose in coming to New Zealand on the Orpheus was not to bolster the British naval presence there. Rather it was to arrange for the withdrawal of some of his ships to Sydney, where they could be held in readiness, should war break out between Britain and the United States, to counter possible attacks by American raiders and warships on British merchant shipping in the Pacific. As a preliminary step Burnett had arranged to rendezvous in Auckland with the captains of two of Her Majesty’s ships stationed there: the Harrier, a sloop of 747 tonnes in the Manukau Harbour, and the Miranda, a corvette of 1039 tonnes, at the time at anchor midstream in the Waitemata.
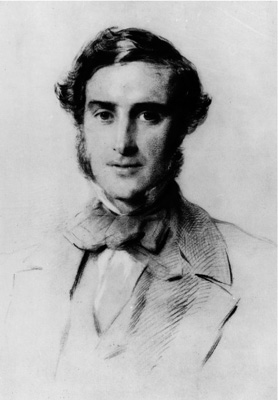
Sir George Edward Grey, 1812–98. Drawing in conté and coloured chalk by George Richmond. AUCKLAND CITY LIBRARIES, NEG. A3952.
After slogging into a foul wind during his first four days out from Sydney, Burnett made a fateful change of course for the Orpheus. He decided to make good the time he had lost by going, not as first planned by way of North Cape and then sailing down the east coast of Northland to the Waitemata Harbour, but by heading directly for the Manukau. Once there he proposed to anchor in the deep channel off Puponga Point by Cornwallis where he would send despatches to naval captains in the region arranging for an early rendezvous. By following this more direct route across the Tasman Sea, the Orpheus succeeded in reaching the Manukau by 7 February 1863, the date Burnett had originally planned on being in Auckland.
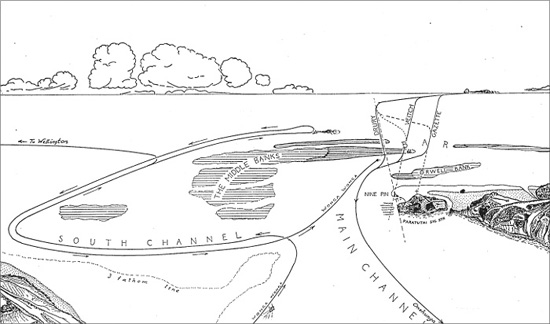
‘Chart showing the Drury, Veitch and Gazette courses for entering the Manukau Harbour.’ The Orpheus mistakenly used the Veitch chart. This chart, which was originally drawn by Thayer Fairburn, is reproduced here by courtesy of the Fairburn family.
At 8 a.m. the lookout man on the Orpheus sighted land. The local signalman on duty at North Manukau Head was Edward Wing, the 21-year-old son of Captain Thomas Wing, pilot and harbourmaster of the port of Manukau. After observing the approach of this unscheduled vessel, Edward Wing hoisted the signal ‘Take the bar’. According to an officer on the Orpheus, the ship then continued to take a steady southeasterly course ‘under steam and all plain sail’.
About 1 p.m., having observed that the ship had already passed south of the main bar entrance, which was the safest of the three channels, Wing decided to add a further signal to his mast directing the ship to turn north. The Orpheus turned about and took a northerly line. But not far enough. To Wing’s alarm, the helmsman on the Orpheus turned his ship prematurely east to negotiate, as he mistakenly thought, the channel through the bar. As Wing later recalled, ‘In desperation, I quickly hauled down my earlier signals and hoisted [a fresh signal] “Keep the vessel off shore. Danger”.’ But those on the Orpheus seemingly either did not receive the message or have time enough to react. At 1.30 p.m., following a slight earlier bump, the ship ran aground on the northern edge of a huge shoal of iron-sand known as the Middle Bank.
The commodore immediately gave the order to the engine-room, ‘full speed astern’. But to no avail. The ship, travelling at 8 knots or more, had driven hard into the bank. And there she was stuck fast.
The death throes of the Orpheus were to be exhaustively reported in contemporary newspapers, and in various official reports. So how she became a total wreck in a few hours is consequently a matter of uncontested record.
When the 16-foot screw failed to budge the ship, the captain sent the crew aloft to furl the sails. This they could do only in part because, almost immediately, the ship broached to, turning broadside onto and lurching towards the open sea – the worst nightmare of every sea-captain – thus exposing her port side to heavy Tasman rollers now driven by strengthening southwesterly winds. The result was chaos. Surging waves quickly smashed the windward bulwarks and gun ports, swept overboard deck fittings and gear and burst open hatch covers, causing water to cascade down into the lower decks. To lighten the ship, whose bottom began bumping violently on the sea floor with every surge of the waves, the commodore ordered the crew to loosen and cast overboard the 3-ton port-side guns. In the face of quickly deteriorating conditions, the sailors were able to dispose of only three of the guns. The ship settled further.
By 2.30 p.m., the commodore seemed to have accepted that his ship was beyond saving. He ordered the crew to lower at intervals, from the lee (starboard) side of the main deck, two ship’s boats – a cutter under Midshipman Fielding and a pinnace under Lieutenant Hill – by this stage a hazardous operation. These boats were manned by a chosen few whose mission was to carry the ship’s records to safety and, more importantly, to get help from shore. A later attempt was made to set afloat the ship’s launch with about 40 men aboard, ‘to lay out anchors,’ said the New-Zealander, ‘in the hope of making grapplings fast so that an attempt could be made to haul [the Orpheus over the bar] into smooth water’. This attempt miscarried, however, when the strong ebb tide swept the launch under the bow of the Orpheus. Once trapped, she stove, and nearly all aboard were drowned.
The cutter, which carried the ship’s senior administrative officer, the paymaster Edward Amphlett, and the pinnace succeeded in reaching dry land just below the north head signal station at Paratutai. But when Amphlett found that no real help was available in this remote area, he and some of the cutter’s men borrowed a local whaleboat, which they rowed to HMS Harrier at Onehunga. There, at 10.30 p.m., Amphlett raised the alarm. But by then it was too late for a rescue party to return to the wreck with any prospect of saving lives.
The whaleboat that carried Amphlett to the Harrier belonged to the Manukau pilot Captain Thomas Wing, who came ashore at the north head in the late afternoon after having guided a 67-ton coastal steamer, the Wellington-bound Wonga Wonga, through the southern channel of the bar. After confirming that no serviceable lifeboat was available, Wing successfully persuaded the sailors who had come from the Orpheus that their best course of action was to return in the cutter and pinnace to the vicinity of the shipwreck and carry out their own rescue attempts. He also volunteered to accompany them with four Maori oarsmen who were on his staff. The arrival in the main channel of the Wonga Wonga, whose captain, Captain Renner, had turned back from his journey south in order to help, made the rescue attempts of Wing’s group more effective. Renner towed the two boats to a spot on the downwind side of the Middle Bank, where they could manoeuvre themselves into an even shallower spot than the steamer could manage – within 100 yards of the Orpheus. Renner then anchored in the channel as close as he dared to the stranded ship.
Meanwhile, back on the doomed Orpheus, the plight of the crew had become desperate. About 5.30, according to one eyewitness account, with the rollers becoming heavier and longer, the heavy guns broke adrift, tearing up the upper deck and driving the crew aloft to cling to the tops or the rigging. As the Wonga Wonga came into view, Commodore Burnett initiated a sauve qui peut. Hailing the men from his vantage point on the mizzenmast platform where he and a number of others had taken refuge; he exhorted his crew to say their prayers. Then, in the words of Lieutenant Charles Hunt, a survivor, he told those who could swim that ‘they had better try to save their lives’. Many who acted on this advice did so by shinning down the jib stay to the jib boom from which they dropped into the smoother water on the lee of the bow. The lucky few who did survive in the turbulent waters either swam, or were borne on wreckage or pieces of furniture, towards the cutter and pinnace, to be hauled aboard, and periodically deposited, cold and exhausted, on the Wonga Wonga. According to the New-Zealander: ‘Many of the survivors [were] badly wounded, having legs and arms broken, and bodies bruised and maimed by the guns and falling spars’. Curiously, this shipwreck foreshadowed the fate of the Wonga Wonga herself, for three years later she foundered on the West Coast off Greymouth.
The majority of the crew, officers and men, who had chosen to stay on the Orpheus, hoping against hope for the rescue which never came had, like the commodore, been forced off the deck which, awash with surging waves, began to break up. They sought refuge in the rigging and the tops – large platforms built on the junction of the upper and lower sections of each of the three masts, which by this time had keeled over to an angle of 30 degrees. The end came about nine o’clock when, one by one, the masts and the rigging fell into the sea, taking the men, including Commodore Burnett, with them. An officer who was a survivor recalled that ‘when the mainmast went, the men on it gave three heart-rending farewell cheers, which was answered by the men on the other masts, and all was then over’. One contemporary account said that ‘the cheers of the men clustered on the rigging … must have echoed through “the land of the hereafter” for the next moment the brave fellows were no more’.
Very few were rescued once the ship had entered its death throes. Towards midnight, having plucked 54 from the sea, the Wonga Wonga abandoned the search. Most contemporary accounts testified to the fact that the young crew of the Orpheus remained disciplined and courageous to the end. But this stirring view must be modified by harrowing recollections of a few onlookers who spoke frankly of the cries of terror and despair of those clinging to or falling from the rigging, about to meet their death in the sea.
In Auckland the following day stories of the disaster were on everyone’s lips. A relief fund was quickly set up to help not only those who had survived the shipwreck, but also the families in the Old Country of those who had not. February the eleventh was declared a day of mourning in Auckland. The New-Zealander spoke of the mood of ‘deep solemnity’ and recorded that ‘several places of worship’ opened their doors for ‘suitable services’.
Meanwhile the survivors, 8 officers and 62 men, had been taken to the Miranda, where they were split into three details. One group, made up of the officers and ten of the men, was hurriedly sent to Sydney on 10 February to catch the first mail ship to England in order to appear before a court martial in Portsmouth. (Although these men were referred to as ‘the accused’, the court martial was in reality a device to institute a formal inquiry into the causes of the disaster, rather than to punish alleged wrongdoers.) Of the ratings left in Auckland, 25 were sent to serve on the Harrier; and the rest were retained on the Miranda.
The crew of the Harrier, aided by civilian searchers and Maori helpers, had the distressing task of recovering bodies that had been washed ashore on the west coast, some as far away as the north head of Kaipara Harbour. Those found were given a decent burial, usually close to the beach where their bodies had been swept ashore. The bodies of two-thirds of those drowned, however, were never recovered.
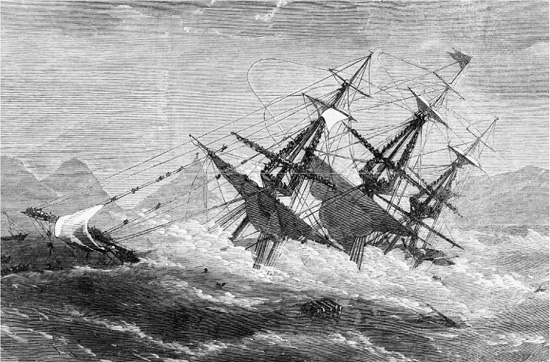
‘The Shipwreck of the Orpheus ’, Illustrated London News, 18 April 1863. The distinctive feature of this illustration is the depiction of members of the crew clinging to all available rigging. AUCKLAND CITY LIBRARIES, NEG. A1206.
Only two bodies were returned to Auckland to be interred in the early settlers’ cemetery situated by today’s Grafton Bridge. One was that of John Pascoe, chief boatswain’s mate. The town’s coroner, Dr T. M. Philson, a surgeon with a services background, thought it necessary to widen his inquest into Pascoe’s death into a detailed investigation of the sinking held before a jury. The second body to be buried in the capital was that of Commodore Burnett which, according to newspaper accounts, local Maori discovered washed ashore, 20 miles north of the Manukau, at a beach called Waitakere, almost certainly Muriwai. When Burnett’s remains, identified by labels on his clothing, were brought to Auckland, the authorities decided to make the funeral one of public remembrance.
On 22 February Burnett’s body was borne to a marquee erected in Albert Barracks Square where it lay in state under a guard of honour of 20 soldiers. The following day was declared one of public mourning. Flags at the barracks, and on ships in the harbour and public buildings in town, all flew at half-mast. At half past two in the afternoon, the funeral procession moved off with the commodore’s body lying on a gun carriage taken from HMS Harrier, drawn by a rope hauled by sixteen survivors from the Orpheus. Following the ratings were senior military and naval officers, 100 seamen and marines from the Harrier and civic dignitaries. As these official mourners passed by, citizens fell in behind. Crowds estimated to be numbered in thousands – for many settlers and soldiers came in from outlying districts – took part in the procession or lined Symonds Street on the way to the cemetery. Once there, Burnett’s body was finally committed to the earth, in accordance with the rites of the Church of England, close to the plot where Pascoe had been buried some few days before.
The scale and solemnity of Burnett’s funeral, so much more impressive than that of Governor Hobson 21 years before, were a measure of the unusual upsurge of grief and compassion among Aucklanders for sailors they did not know.
But even at this early stage people were beginning to ask how far the commodore himself had been responsible for disaster. An ex-navy man turned colonist, who had served on a ship of the line of that same era, HMS Durham, recalled the mood of the time when seventeen years later he wrote to the editor of the [Auckland] Weekly News. ‘I think the universal feeling in the colony endorsed the words spoken to myself by the late Mr [F. W.] Merriman [the Crown Solicitor], who walked beside me in the long funeral procession which followed the corpse … of Commodore Burnett. I had remarked casually on the numbers present, he replied, “Aye, but the numbers we do not see – the widows and orphans the man has made!”’
The loss of the Orpheus and inquiries into what had brought it about were more exhaustively reported than any other disaster in nineteenth-century Auckland. During the following four months, there were a ministerial inquiry, the inquest carried out by Philson, the court martial held in Portsmouth aboard HMS Victory (Admiral Nelson’s old flagship), a report published by the Admiralty Hydrographer, not to mention sundry local investigations carried out in Auckland as well. Consequently, for the historian, there is no shortage of documented evidence, much of it given on oath.
The hydrographer in Portsmouth, a naval officer of considerable authority, albeit one who, as chief marine chartmaker, had an axe to grind, was in no doubt where responsibility for the shipwreck ultimately lay. ‘The loss of the Orpheus,’ he categorically stated in his report, ‘has arisen mainly from … unfortunate directions from the Pilot Station at Manukau Head.’ A simple explanation. But as Oscar Wilde once memorably said, ‘The truth is rarely pure and never simple.’
In this case evidence presented was sometimes conflicting: witnesses were uncertain about times, and the detail of crucial events; some changed their tune at various stages under cross-examination. This was particularly marked among naval witnesses at the court martial who, in the words of one colonial observer in Auckland, ‘must have been unconsciously biassed by a wish to vindicate the memory of the dead’. It should also be noted that the Admiralty, the Auckland provincial government and the Wings (father and son) are all to be regarded as suspect, in their various ways, of trying to shuffle the blame onto the shoulders of others. Certainly there was a search for scapegoats or, in Captain Wing’s phrase, for ‘a chopping block’. The prime suspect, signalman Edward Wing, who later became a master mariner, and lived on until 1930, felt obliged to defend himself publicly until the end of his long life.
Historians are traditionally guided by the dictum of their profession that ‘impartiality is obligatory but neutrality impossible’. They are conscious that they have a professional obligation to provide, where they can, a value judgment. Here, at the risk of oversimplification, I provide mine.
Any ship entering the Manukau Harbour by the main channel in 1863 faced an underlying problem. Over the previous ten years or so, the large Middle Bank which lay at that approach to the harbour mouth, driven by the prevailing southwesterly winds, had steadily extended in a northward direction. This was reflected in progressive changes to the charts and attached directions that were prepared over the period. The first official chart, drawn up by Commodore Drury in 1853 after the survey carried out by the crew of his ship HMS Pandora, was out of date almost by the time it appeared. In 1861 Mr Veitch, sailing master of HMS Niger, found it necessary to revise Drury’s chart drastically. And then later in the very same year, yet another amended version, drawn up by Captain Wing and published in the New Zealand Gazette, superseded Veitch’s chart. All this amended material is reported to have been passed on to the naval authorities in England and Australia before the Orpheus came to New Zealand. Which brings us to the first serious error of judgment. Commodore Burnett, an imperious if not obstinate captain, is alleged to have disregarded the advice of his sailing master, Mr W. D. Strong, and junior officers standing beside him on the bridge of the Orpheus, and insisted on using the outdated Veitch chart in his approach to the bar. It seems certain that he was a major player in the tragedy.
Even so, danger could probably have been averted had signals hoisted at the signal station been less ambiguous, and hoisted more promptly. The signal provided by Edward Wing, ‘Take the bar’, for instance, did not actually indicate that the vessel was on the right course and could proceed safely over the bar. The local interpretation of that particular signal was that the bar was considered ‘workable’ and could be approached if the steersman used the correct channel. Even so, it could be argued that the signalman did not warn the Orpheus early enough that she was sailing too close to the perilous Middle Bank. But Wing’s delay in giving his warning signals may be at least partly attributed to the signal system at the time being cumbersome and the station itself ill equipped. In spite of the harbourmaster’s repeated requests over previous years, the provincial government had been niggardly in both supplying equipment and updating signals, and in placing buoys to mark the channel. All these improvements were made shortly after the shipwreck – a classic case of locking the stable door after the horse had bolted. Above all, if the government had only had the foresight to provide a lifeboat and crew for the north head, it is certain that many more lives would have saved from the Orpheus.
In sum, a combination of neglect, wilfulness and inexperience, all in varying measure, could be said to have contributed to the Orpheus disaster. Responsibility for this tragedy therefore must be regarded as stretching far and wide and back in time. Historians would regard this as normal. Experience teaches them that important historical occurrences rarely have single, immediate, simple causes.