An easy way to thread rubber legs through a cork, balsa, or foam bug body is to file a notch in the eye of a large (darning style) needle, then hook the rubber legs into this open notch, and run the needle with the legs through the body as desired. Once you have the needle and the legs through the body, you can pull on one side of the legs through the hole. If using a double length of leg material for a full leg look, remove the legs from the needle-notched eye and cut the legs at this point with scissors.
If you are making large nymphs, such as some Western stonefly nymphs, use fine-diameter Vernille or Ultra Chenille for the legs. These materials are excellent-grade chenilles that you can taper at the ends by heating in a flame and rolling between your fingers. If you want the legs a little stiffer, add some clear flexible sealer to them. Softex is good for this, along with some of the soft epoxies like Soft Head Cement made by Loon Outdoors.
To run legs through a cork, balsa, or foam body, first make a pilot hole through the side of the bug body with a needle or bodkin. If using a plain needle, first grip the needle in a vise and then run the cork up and down on the needle. Follow this by running a notched-eye needle holding the rubber legs through the cork, foam, or balsa body.
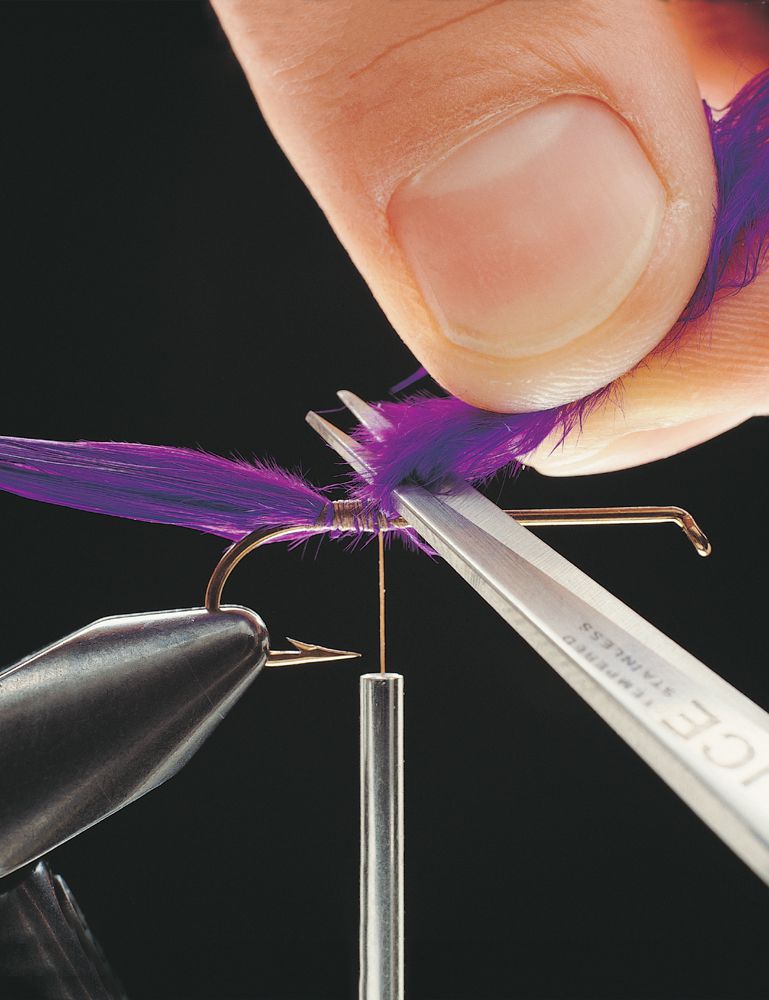
Use a small latch-hook tool (they are sold for fly tying in small sizes by fly shops exclusively) to make overhand knots in small bundles of feathers and fibers to make legs for hoppers and other insects. For best results, do this with the fibers still on the central vane. Make up a bunch of these and you can later clip off what you need when you need it.
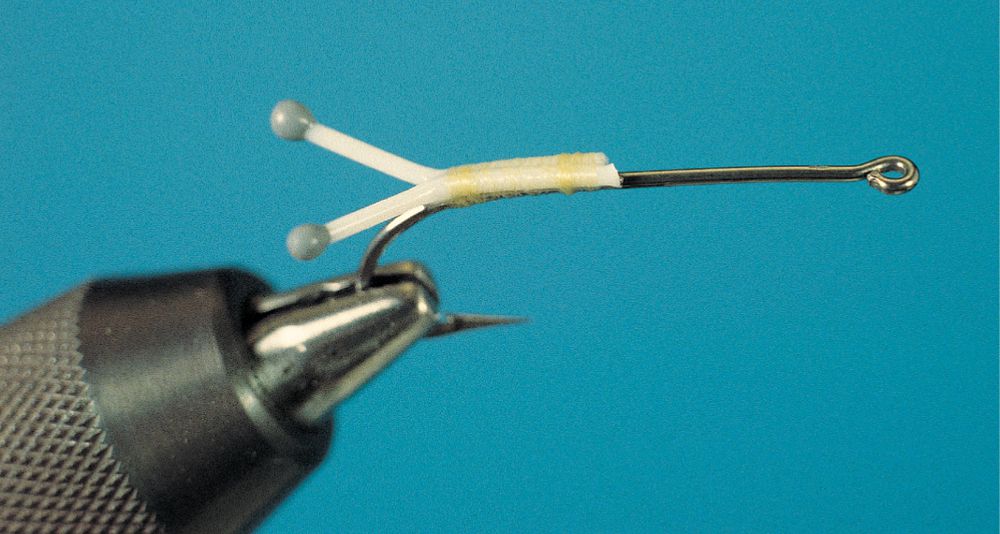
You can make easy eyes for foam, cork, and balsa bugs from plastic-head dressmaker’s pins. These come in several sizes and in assorted basic colors including white, black, blue, red, yellow, and green. They are also easy to dress up with an additional dot of paint to make a pupil on each bulging eye.
Cut the stem to a short length with wire cutters (wear safety glasses), and use pliers to insert the eye into the bug body. To keep them in place, add a small dot of glue to the metal stem to glue the stem and the base of the eye in place on the bug.
One way to make a tandem fly is to tie a few tail materials onto a separate hook and then secure it by means of a mono or wire connector to the main hook. By tying tail materials to the separate tail hook, you essentially extend the length of the fly and also the hooking ability of the fly with this second hook. You can position this hook point up or point down, as preferred.
To do this, add the mono or wire extension to the hook, place it in a vise, and tie on the materials desired. Complete with a whip finish and seal with head cement or epoxy. Place the second hook (forward) in the vise. Then tie the extended wire or mono to the forward hook before adding the materials to complete the fly.
To make simple eyes for saltwater flies such as shrimp and crabs, use plastic bristles from a hairbrush. These are usually in black, but you can also find other colors. The advantage of these is that they protrude like the eyes of a real shrimp or crab, making the fly more lifelike.
Use wire cutters to cut off two bristles, tie them to the hook shank, and bend or flare out the shanks to make the eyes protrude as desired. Bend the plastic bristle at a slight angle or a sharp and right angle, depending upon the position you want for the eyes.
To make bent legs from mono for tying some nymphs and realistic imitations, use a flame, soldering iron, or heated cauterizing tool. Hold the mono next to the side of a flame such as you get from a grill starter. (Lighters get too hot to hold.) Do not let the mono touch the flame, since that will melt it. Within a few seconds, the mono will bend from the heat softening the mono at that point.
You can also do this with a hot rod such as a cauterizing tool or electric soldering iron. These tools make a sharper bend in the mono. Make sure that you hold the mono horizontal so that the melted spot causes the extended part of the mono to drop from gravity and make the desired bend.
Use the same small latch-hook tool noted previously to make overhand knots for joints in the rubber legs used for some fly patterns and many bass and panfish bugs. For best results, do this after you have inserted the legs through the bug body. Otherwise, the knot makes pulling the leg through the body difficult. Do this carefully so that the overhand knot makes a neat bent leg right where you want it in the fly.
For a quick, easy, and professional way to run rubber legs through a bug body, get a sewing machine needle and cut a notch in the side of the eye with a file or Dremel tool. Then, place the needle in a small bench vise with the point up.
To run rubber legs through a foam, cork, or balsa bug, hold the bug sideways over the needle and push down (be careful to keep your fingers out of the way) until the point and notched eye are exposed. Then place the rubber legs in the notch and pull the bug straight up. Do this slowly so that you do not tear or break the rubber legs. Once free of the needle, slip the rubber legs out of the needle notch, and adjust for length. Trim if necessary.
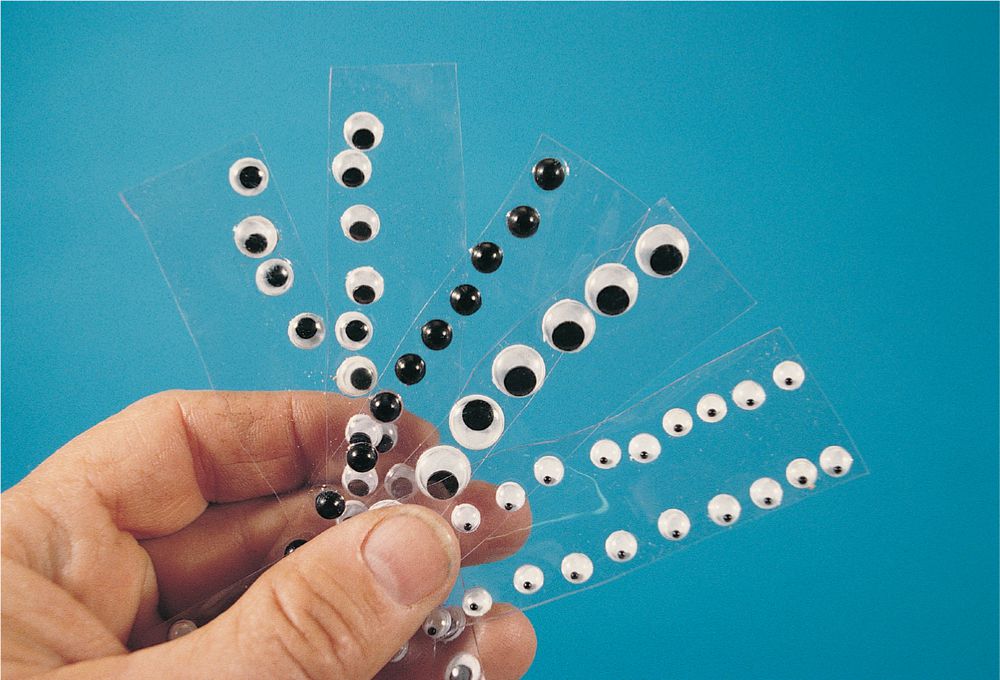
Since self-stick eyes seldom stick permanently to the head of any fly, add the self-stick eyes and then protect them with several coatings of fly-head cement or a single coating of epoxy. You most frequently add eyes to large flies, so the epoxy coating is often the best.
Make bright plastic or glass bead eyes for flies by placing them on mono. This makes a plastic or glass lightweight equivalent of lead dumbbell eyes or bead chain eyes. You can use any color and size bead for this.
You can get beads in transparent or opaque colors, in red, pink, yellow, green, orange, purple, and other colors. Popular sizes available from tackle supply shops and catalogs include 0.12 inch (3.00 mm), 0.16 inch (4.00 mm), 0.20 inch (5.00 mm), 0.24 inch (6.00 mm), and 0.31 inch (8.00 mm). Beads in other sizes and colors are also available from craft stores.
To do this, first string bright plastic beads onto heavy mono. Use an iron or low-heat soldering iron to melt the end of the mono. Slide two beads against this ball on the end of the mono, grip the mono with needle-nose pliers or tweezers, and cut the mono about 1/16 inch (2 mm) from the pliers. Heat and melt the end of the mono. It is a little more risky, but you can also use an open flame, such as a butane grill lighter.
The result is two beads, with a tying space in the center and the beads held in place with the melted ball on each end of the mono. Repeat as above to make more eyes.
These are ideal as eyes on flies for salmon, steelhead, shad, and similar coastal and anadromous species.
Charles Meck, in his book on fly-tying tips, notes an easy way to make split tails on dry flies and nymphs.
To do this, tie in the tail materials and then make a loop of a separate length of tying thread around the bend/shank area of the hook, immediately in back of the tail. Then pull the loop forward, using the joined strands of the loop to split the tail into two or three parts.
To split the tail into two parts, twist the loop strands and bring this between the center of the tail bundle. To make three tails, keep the strands separate and bring them up so that a center part of the tail stays between the loop, and the two split tails angle to the side.
You can adjust the angle of the split tails by the tension on the loop, which pulls forward and is tied down. Then complete the rest of the fly, tying in or wrapping on body materials.
When making bullet heads on flies, such as those in the Thunder Creek series designed by Keith Fulsher (and previously developed as a method of tying by Maine flytier and Gray Ghost originator Carrie Stevens), make sure that you seal the head if you are going to paint eyes on the head. Just as with feather shoulders on flies, you must add some clear sealer to the head so that the painted eye will not bleed when applied to the bunched and folded bucktail head.
Eyes on deer-hair bugs always look best if they are recessed. To do this, use a red-hot nail head to burn a recess to hold an eye in the clipped deer-hair body. Once you have burned the recess into the deer hair, add a small amount of glue (Ultra Flex, Ambroid, Duco, etc.) to the recess, and add the chosen eye to the bug.
To make these recess tools, use common nails with the right-size head for the eyes on the flies that you are tying.
Ideal eyes include plastic eyes, movable doll eyes, and bright beads.
To add self-stick prism eyes to fly heads, use a bodkin to remove the eye from the backing sheet and add it to the head of the fly. Allow the self-stick side of the eye to stick to the bodkin point. Use the bodkin to position the eye on the head of the fly.
Make painted eyes on vinyl for larger flies. These are tied in place rather than glued to the head. These position the eyes a little farther back on the fly, making a more lifelike appearance.
To do this, buy some clear vinyl from a fabric store. Different thicknesses are available to suit your fly tying and fly size. Then cut this into rectangles about the size of a dollar bill.
From a craft store, get some fabric paint but make sure to buy a brand that has a pointed spout. Get colors for both the eye and pupil color. Make a spot of eye color in two rows on the vinyl patch, followed by a smaller centered dot for the pupil. Good combinations for eye/pupil colors are yellow/black, white/black, orange/black, green/white, blue/white, red/white, and red/black.
Once the paints are cured, cut out a pair of eyes by cutting partway around the eye to leave a “tag end” to make a teardrop shape. Tie the eyes by the tag end on each side of the fly so that the eye extends back on the shoulder.
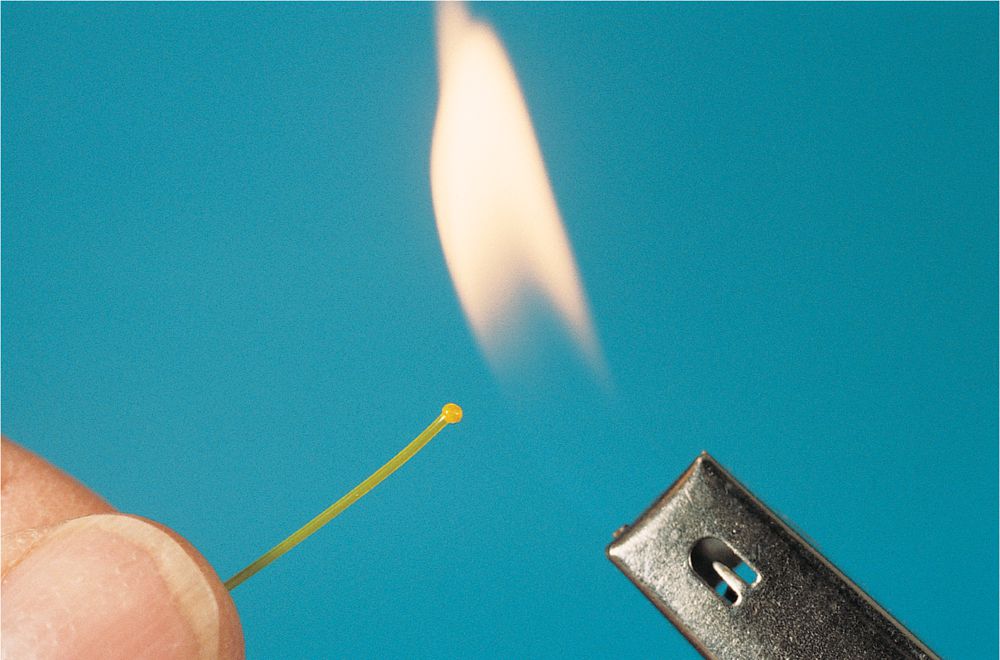
One easy way to make eyes for crab and shrimp flies is to use thick monofilament and burn one end to create a ball or “eye.” You can make up a number of these in advance and have them ready for your fly tying.
Use 20- to 100-pound-test (9.1- to 45.4-kg) mono for this, depending upon the size of the fly and the size of the ball eye desired. Use a cigarette lighter or fireplace/grill lighter to create them. Color the ball eyes with a black, permanent felt-tip marker.
One way to paint a lot of dumb-bell eyes for flies is to place the eyes between the teeth of a comb for easy holding and quick painting. This also makes it easy to paint both sides of each eye at once. Allow the paint to cure before removing from the comb teeth.
Another way to paint dumb-bell or hour-glass eyes is to cut a series of slits in a sheet of cardboard. Corrugated cardboard is best for this since it holds the eyes straight out for easy painting and little possibility that the eyes will fall out. Insert a dumbbell eye into each slit and paint both sides as desired.
To make angled eyes for shrimp and other saltwater patterns, wrap 50- to 100-pound (22.7- to 45.4-kg) mono around a square board or square aluminum stock. Use stock that is about 1 to 2 inches (2.5 to 5 cm) square. Secure one end of the mono, then wrap evenly and soak for a few minutes in a pot of boiling water. Remove the wrapped stock from the boiling water and “set” the mono by dipping it in ice water. Once complete, cut the mono down the middle of each stock to make for a lot of mono pieces bent into sharp bends or “elbows.” Use a flame to form a ball on one end of this bent mono to make a ball eye. Color the ball with black permanent felt-tip marker. Tie these on the hook shank at the mono elbow to make eyes.
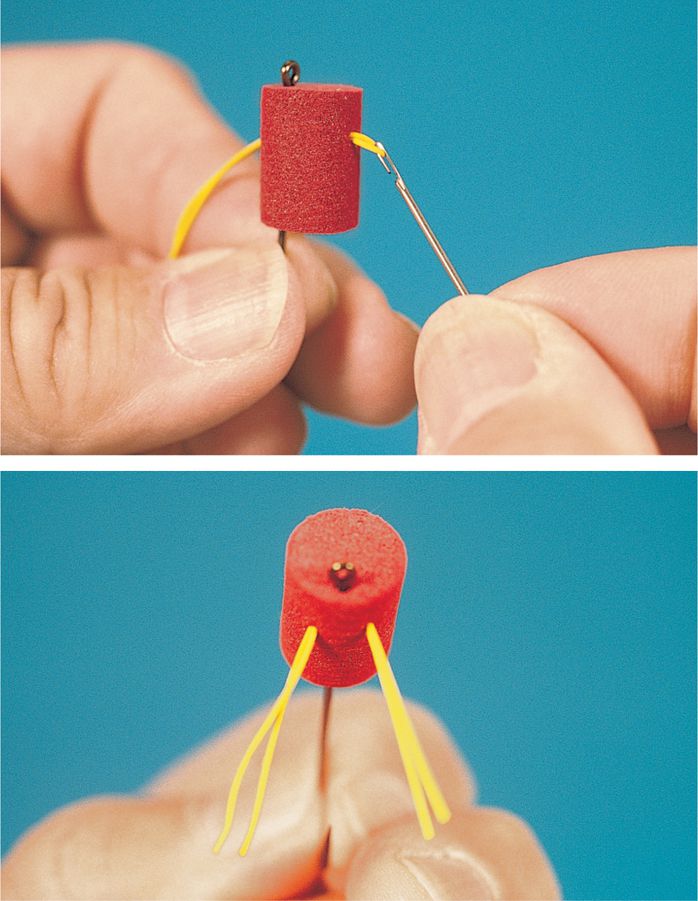
To add rubber legs to a fly or bug (but not through a solid-body bug) center the legs on the hook shank and then crisscross the tying thread over the rubber legs and hook to hold them in place. The problem with this method is that the pressure on the rubber legs often twists the legs to an odd position on the hook.
A better way is to take the length of rubber leg (or legs), fold it over the tying thread, and then pull the tying thread into the hook shank to position the legs on one side of the fly. Then repeat this on the opposite side of the fly. This is quick and allows more exact placement of the rubber legs.
If you want a bunch of legs in one spot, as when tying a Calcasieu Pig Boat bass fly, you can fold a lot of legs over the thread and pull all into place at once.
If using doll eyes that are not self-stick, use a tiny drop of glue to cement the eyes to the head of the fly. Glue both eyes in place, and then lay the fly on a flat area. Do not place the fly on a fly rotator, since this causes the eyes to slightly slide as the glue cures, positioning one eye high on the head and the other eye low.
Once you’ve glued and cured the eyes, coat the whole head with epoxy. Finally, place the fly on a fly rotator to allow the glue to cure without sagging.
Some artist’s and household synthetic paintbrushes contain tapered fibers that make excellent, inexpensive tails on dry flies and nymphs. Check hardware, artists supply, and paint stores for these synthetic paintbrushes and buy those that have springy tapered fibers. Most of these are nylon, so you can dye them using Rit or Tintex dyes.
To add prism eyes to flies, first crease and fold the eyes in half while they are still on the backing sheet. This is easy to do, since you can fold an entire row of eyes at once. This fold in each eye makes it easier for the eye to conform to the round contour of the fly head.
If you want rubber legs on a bug to extend at an angle down into the water instead of out at the sides, run a needle with the legs up through the side of the belly and out the center of the back, then from this point in the back down through the bug to exit on the other side of the bug belly.
The result is rubber legs that hang down into the water instead of sticking out from the sides. The effect is different, and also helps create more action in the bug each time you twitch it.
One way to get extra wiggle in any fly, such as the many large nymph or leech patterns possible, is to tie in a separate tail or body on a separate wire frame, which attaches to the hook with a hinge loop. There are several ways to do this.
One is to tie tail material to a separate ball-eye hook, then cut off (use safety glasses) the hook bend, and attach this tail to a forward fly that you are tying. Do this by first tying down a length of mono, threading the mono through the hook eye of the tail, and then wrapping over the mono loop to make a hinge with the articulated tail.
You can also use any wire for the tail articulated section, using mono loops on both the hook and the tail wire. It is also possible to not remove the hook from the tail so that you have, in essence, a two-hook fly.
Just make sure that any such hook is legal on your waters before using it.