
START GROWING

March in the PNW can be a warm breath of spring and wan sunshine or wintry and mired in mud; often it is both. Plants and gardeners alike revel in this luxurious season of sufficient moisture. Bulbs bloom, seeds sprout, and plants grow at remarkable rates in the lengthening days. However, even in the midst of this dewy, dripping, showery—some might say sodden—season, experienced Northwest gardeners know to anticipate and plan for 8 to 10 weeks of punishingly dry, parched conditions which routinely show up after our (generally damp) Fourth of July festivities conclude. In this chapter I’ll show you how I’ve learned to weather this climatic bait-and-switch throughout many seasons in my own garden.

PLAN
 Assess the growing season: jot down notes in your garden journal about weather conditions, plant performance, and favorite varieties
PREPARE AND MAINTAIN
Dig and prepare soil for planting; work in quick-to-break-down amendments like alfalfa meal, blood meal, fish meal, and kelp
Keep up with early weeding and patrol for pests
Monitor and tend indoor seedlings
START SEEDS INDOORS
Broccoli
Cabbage
Cauliflower
Eggplant
Kohlrabi
Peppers
Tomatoes
SOW AND PLANT
Plant potatoes and soft neck garlic
Plant any remaining bare root plants
SOW OUTSIDE UNDERCOVER
Beets
Carrots
Chard
Kale
Parsley
TRANSPLANT HOMEGROWN OR NURSERY STARTS
Herbs
Lettuce and salad greens
Leeks
Onions
Spinach
DIRECT SOW
Arugula
Asian greens
Chervil
Cilantro
Fava beans
Garlic
Lettuce and salad greens
Onion sets
Peas TIP place pea trellis or other support when planting
Radishes
Rapini
Spinach
HARVESTING NOW …
TIP these crops are all overwintered
Arugula
Beets
Carrots
Chard
Chervil
Chives
Evergreen herbs
Fennel
Kale
Leeks and green onions
Mache
Parsley
Purple sprouting broccoli
Salad greens (undercover)
Sorrel
Spinach
The first step is to get to know your garden and identify shifting seasonal patterns of sun and shade. Exposed, sunny sites dry out quicker than those in shade, whereas low spots in the landscape (where water pools in wet weather) will be last to dry out and are a possible location for extra-thirsty plants.
You’ll also want to determine whether you have sandy soil or sticky clay since these factors make a huge difference in how plants respond to watering. My sloping backyard is composed of well-drained sandy loam, a boon in wet weather, and I rarely lose a plant to root rot. However, come late July you’ll find me constantly at the end of a hose or monitoring the drip system as I race to keep thirsty salad greens, cucumbers, squash, and basil well watered. An annual 3-inch blanket of compost adds valuable organic matter and helps retain soil moisture, but by the end of summer I appreciate the relative drought tolerance of ripening tomatoes, peppers, chard, kale, and Mediterranean herbs. Gardeners with slow-to-warm, sticky clay may bemoan having to delay spring planting but have the benefit of moisture-retentive soil going into the summer dry season.

THREE TIPS FOR WEATHER-SMART PNW GARDENS
1 Take advantage of the cool growing season and seasonal rains. Chard, kale, lettuce, arugula, mustard, pac choi, cabbage, and many other greens thrive in the cool months before the soil warms enough to support summer crops.
2 Limit warm-season crops to just half of your available planting space. Corn, tomatoes, squash and other heat-loving vegetables can be a gamble when we have an especially cool summer.
3 Choose varieties wisely and shop locally. Select seeds and plants that do well in the cool spring, moderate summer, and mild fall conditions of PNW gardens. Purchase locally grown starts or vetted varieties from independent nurseries, farmers markets, and plant sales.
“No bare soil” should be every plant-lover’s creed. Plan your beds so mature plants knit together to fully cover and shade the soil. Apply compost and underplant with a living mulch of groundcovers to further insulate soil from temperature fluctuations and reduce evaporation, helping to maintain soil moisture at the critical root zone. Besides, you get more food that way.
Plant for the immediate as well as the distant future. Dwarf fruit trees, attractive berries, rhubarb, asparagus, artichokes, and other perennials crops take a year or so to get established but produce year after year with relatively modest amounts of additional care once established. Perennial and woody edible plants offer a delicious solution to the excruciatingly slow start of a cold spring. The rhubarb may come in a week or so late in an especially frigid season but it’s way ahead of tiny baby lettuces and pokey peas when it comes to producing garden fresh meals.
Here in the PNW we have a generously long growing season. But even in the coldest weather, weeds seem to wake up first. Weeds—which have been poetically described as plants whose best features are not yet recognized, or any plant in the wrong place—are plants that have developed amazing reproductive capabilities and tough constitutions, allowing them to survive where more civilized plants cannot. As such, these bad boys play a valuable environmental role of blanketing bare ground and preventing devastating soil erosion. A cold comfort as I watch chickweed romp through the newly planted salad bed.
Most weeds are opportunistic. Keeping the ground covered (with mulch, groundcovers, or a spreading canopy of plants) is the best defense against weeds gaining a foothold in the garden. Take a cue from our surrounding native landscape when choosing mulches: pine needles and cones, dried leaves, hazelnut hulls, wood chips, or even a batch of burnt coffee beans are all local and readily available PNW materials that provide a naturalistic and elegant finish to garden beds as they shade out and smother unwanted wildlings.
Nevertheless, when weeds do show up (and they will) eliminate them as quickly as possible before they have a chance to spread, taking particular care to remove all seed heads. Digging the plants is most effective; there’s even a term for it—weeding! Pouring boiling water or a strong vinegar solution is another way to dispatch pesky intruders between stepping stones or in gravel pathways. Steer clear of toxic herbicides that indiscriminately kill all plants and pose a danger to fish, wildlife, and you.
As an organic gardener, I’m always looking for ways to build my soil and replace valuable nutrients removed at harvest time. As a mere mortal, I am also constantly fighting pernicious, deep-rooted perennial weeds that seem to have a will to survive my every effort at control. It was a banner day when I discovered planting comfrey (Symphytum officinale) as a way to combine weeding and feeding, two chores I find less satisfying than planting and picking. Comfrey is a veritable organic fertilizer factory: who doesn’t like free food? The large, succulent leaves are a rich source of nitrogen, higher than most barnyard manures. And the deep roots mine the subsoil, filling the plant’s tissues with other valuable nutrients like potassium, phosphorus, and calcium. With an estimated N-P-K analysis of 8-3-20, comfrey is especially good for flowering and fruiting crops.
However, along with its many benefits, comfrey is also an aggressively spreading, deep-rooted, nearly-impossible-to-eradicate weed. Should you decide to cultivate some homegrown comfrey fertilizer, carefully consider garden placement because this plant will be with you for a good long while. The trick is to manage comfrey as part of a natural cycle: control its spread in the garden by harvesting the foliage, which you can then use as a rich source of nutrition and a fertility boost. The striking purple flowers attract bees and other valuable pollinators, just be sure to cut them down before they set seed. Well-established comfrey plants yield three to five crops each growing season, or about one cutting a month during spring and summer.
Comfrey leaves break down very quickly. You can add them to the compost pile to activate microbes and fire up decomposition; allow plants to first wilt in the sun to prevent roots from forming and spreading throughout the pile. You could also place a feeding mulch of fresh or dried comfrey leaves directly on the soil around tomatoes, peppers, and other fruiting plants. Or prepare a potent liquid fertilizer by stewing comfrey leaves in a bucket of water left in the sun for 2 to 3 weeks. Strain the resulting (highly fragrant) concentrated tea and dilute the mixture 1:1 with water. Apply to roots as a soil drench or pour over plants as a foliar feed. This is an especially good tonic for heat-stressed plants.
Don’t want to introduce comfrey into your garden? Here are another few common but useful PNW weeds:
Horsetail, especially persistent in wet soils, is an effective antifungal agent when brewed into a strong tea with boiling water. Cool the mixture and spray on seedlings to fend off mildew and fungal disease.
Stinging nettles are high in potassium and calcium and extremely nutritious for both garden and gardeners alike. Apply to the soil as a tea or add plants (minus their seed heads) to the compost pile. Wear protective clothing when harvesting to defend against the nasty sting caused by fine hairs along the stems and leaves.
Chickweed is delicious. Serve with a light vinaigrette in early spring before the lettuce is harvestable.
SKILL SET 
STARTING SEEDS, HARDENING OFF, AND TRANSPLANTING
Growing your own garden transplants doesn’t have to be a big production. You’ll need supplemental light, seed-starting mix, access to water, and an indoor space for the young plants where you can carefully monitor their progress for the next couple of months. Don’t be in a rush to produce plants before they can safely go outdoors. Seedlings started too early become lanky and weak, and will quickly outgrow their allotted area and take over every available indoor surface.
In addition to important information regarding planting depth, optimum soil temperature, and estimated days to germination, most seed packets offer guidelines as to when to start seed indoors, generally keyed to last frost date. Valuable hints such as how big transplants should be at planting and their weather resiliency furthers my assertion that a seed packet chockfull of comprehensive growing information is a gardener’s best friend.
LIGHTS, CONTAINERS, ACTION!
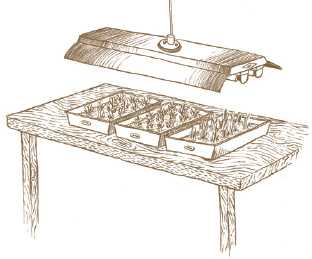
Seedling foliage should be just 4 to 6 inches away from the light tubes; prop seed trays to boost them close enough, or hang light fixtures on chains which can be adjusted with seedling growth.
Even the sunniest window lacks enough light in the early PNW spring to promote strong, stocky growth. While you could spring for costly full-spectrum grow lights, inexpensive fluorescent shop fixtures provide adequate light for good leaf growth and are economical to power. Similarly, growing containers can be anything from specialty seed-starting kits, complete with their own clear plastic humidity dome, to recycled nursery pots or yogurt containers with a few holes poked in the bottom. Sterilize recycled containers before planting by rinsing them in a mild 1:1 solution of bleach and water.
Fill containers with dampened seed-starting mix (a finely milled, sterile growing medium that promotes good root growth) and sow seed according to seed packet instructions, generally at a depth about two to three times the diameter of the seed. Plant judiciously—one to three large seeds (or four to six smaller seeds) in each 4-inch pot—to avoid the future step of thinning seedlings. Cover and water lightly to settle the seeds into the growing medium. Then clearly label each pot with seed variety and sowing date. Wooden or plastic labels are readily available at most nurseries or you can make your own tags from cut-up plastic food containers.
Place planted containers in a non-draining nursery flat or plastic tray, or on an old cookie sheet to catch water. Cover trays with bubble wrap or a sheet of clear plastic to keep soil moist and humidity high. Place trays in a warm location, ideally between 65 to 70°F. Additional light is not necessary for germination, but be sure to keep close watch on the containers and when seedlings emerge, immediately move trays beneath lights. Seedlings should be positioned just 4 to 6 inches from the cool fluorescent bulbs. Boost trays by placing them on a stack of books or hang lighting fixture from chains so you can easily adjust the height as plants grow. Seedlings require 12 hours of light and 12 hours of dark; a simple inexpensive timer lets you control lighting automatically.
Allow the surface of the soil to dry between waterings. Flooding trays with water and allowing pots to wick moisture up from the bottom is a good way to avoid soggy surface conditions which invite disease and pest problems. A small desk top fan helps replicate breezy outdoor conditions and minimizes bothersome but harmless fungus gnats, tiny soil-dwelling pests that live in the soil.
POTTING UP
Warm-season crops like tomatoes, peppers, and eggplants, require a slightly different strategy to produce large, sturdy seedlings at planting time. Plan on starting heat-loving plants indoors about 6 to 8 weeks before last frost and not setting the plants into the garden until 2 weeks after last frost or when nighttime temperatures remain above 50°F. To accommodate this extended indoor growing period you will need to “pot up” young seedlings, carefully transplanting them when they have six to eight true leaves from their sowing container into larger pots that will accommodate their growing roots.
Do not rush setting these semitropical plants out into the garden as even a brief cold spell can stunt them for the entire season—or fatally finish them off. Cold frames, cloches and other sheltering season-extending devices further insulate tomatoes, peppers and the like from our typical up/down temperature swings of spring.
HARDENING OFF AND TRANSPLANTING SEEDLINGS
Plants are ready to move into the garden when they have two or three sets of true leaves and a well-developed root system that fills the pot. But first they must be prepped to withstand outdoor conditions through a process called “hardening off.” Failure to adequately acclimate young seedlings in an optimistic rush to place plants in their permanent spot in the garden is a sure recipe for their demise and a disappointing waste of those weeks of careful indoor tending.
Day 1. Move young seedlings outdoors into an area of filtered shade sheltered from wind for a few hours before returning them to their indoor growing space. Avoid direct sun exposure to prevent damaging what few leaves the plants have.
Days 2 to 6. Gradually increase the time and amount of exposure the young plants receive by a couple of hours each day until by the end of a week plants are fully acclimated to full sun and outdoor life.
Days 7 to 10. Leave plants outside overnight in their pots carefully watching the weather; keep horticultural fleece or a cardboard box handy for immediate protection from sudden shifts in temperature. Also, keep an eye out for pests. Slugs in particular find tender young plants irresistible and can mow down an entire tray of seedlings in one night.
If all goes well, you can now transplant your seedlings permanently into the garden. Prepare garden soil by amending well with compost and fertilizer to promote strong growth. Using a trowel, dig a hole which is slightly larger than the size of the transplant’s pot. If the soil is dry, fill the hole with water and let it saturate the soil before planting.
Remove the seedling from its container by placing your hand over the top of the pot, supporting the stem between splayed fingers. Invert and gently squeeze or tap the pot to release the root ball. Very carefully, tease the root ball to loosen any circling roots and remove extra potting soil before setting the plant into its planting hole. Handle seedlings by their leaves to avoid damaging the main stem; a seedling can always grow new leaves but a pinched stem often spells plant death.
Place seedlings into the ground at the same depth that they were growing in their pots. Backfill soil and gently but firmly tamp to eliminate any air pockets around roots. Form a shallow well by building up soil in a ring surrounding the plant that allows water to pool and soak into the root zone rather than flowing away. Water new plantings well and topdress with compost to conserve soil moisture. Don’t forget to label them clearly!