PUTTING THE GARDEN TO BED

I always feel like I’ve struck garden gold at this time of year. Raspberries and blueberries are ripening the last of their fruit; the apple trees are dropping leaves to reveal their red-and-yellow harvest; and pumpkins, corn stalks, and herb bundles proudly adorn my front porch. A few short months ago all this was nothing more than tiny seeds and fragile sprouts—now I’m hauling bushels and baskets weighed down with food. It’s no wonder our soil needs regular renewal with all that is removed from it over the course of a growing season. Fall is a great time to replenish and feed the soil in anticipation of next year’s harvest: applying organic amendments, planting cover crops, and creating your own compost are easy and economical steps in the right direction.

PLAN
 Assess the growing season; jot down notes in your garden journal about weather conditions, plant performance, and favorite varieties
PREPARE AND MAINTAIN
Continue to collect, dry, and clean seed from this year’s crops and package for next year
Mulch fall and winter crops to protect them from damaging freeze/thaw cycles
Finish garden clean up and compost all disease-free plant debris
Test soil pH and apply lime
Feed soil with bone meal and rock phosphate
Mulch amended beds that won’t be planted with overwintering or cover crops
Rake and collect leaves for mulching beds and adding to compost
SOW AND PLANT
Plant garlic
Plant cool-season cover crops as beds empty
TRANSPLANT OR DIRECT SOW OVERWINTERING CROPS
TIP last chance!
Arugula
Hardy fava beans
Onions
Rapini
Purple sprouting broccoli
Spinach
Arugula
Asian greens
Beets
Broccoli
Cabbage TIP cabbage family crops are sweetened by cooler temperatures
Carrots
Cauliflower
Chard
Evergreen herbs
Fava beans
Herbs
Kale
Kohlrabi
Leeks and green onions
Lettuce and salad greens
Parsnips
Pea tips
Peppers TIP harvest entire pepper plants and hang upside down in a sheltered garage or basement to finish ripening
Potatoes
Pumpkins
Radishes
Rapini
Spinach
Tomatoes TIP pick remaining tomatoes to ripen on the windowsill or prepare green
Winter squash
Working in the yard on a beautiful October day at the beginning of sweater weather is one of my gardening high points. Prepare the garden for winter by removing any dead or diseased plants and layering on organic amendments and buffering mulches. Applying slow-to-break-down amendments in autumn gives the natural processes time to work. It also means that nutrients will be readily available when plants begin growing in spring. Amendments that should be applied now include agricultural lime, bone meal, and rock phosphate; see page 32 for more information.
Hold off on applying fresh compost, manure, and nitrogen-rich amendments that break down quickly (blood meal, cottonseed meal, and alfalfa meal) until spring planting in March and April. The cold temperatures of winter will prevent plants from taking up nutrients, resulting in rain-leached water-soluble nutrients that are a potential source of contamination for groundwater and neighboring waterways—not to mention a waste of your resources.
To insulate the garden over winter and prevent compaction from rain, apply a 4- to 6-inch layer of mulch to any bare soil on which you don’t intend to plant a cover crop. Fluffy mulches like dried leaves, shredded corn stalks, twiggy branches, bracken ferns, and loose straw provide more insulation than dense mulches like compost or woodchips. Hold mulch in place with a plastic tarp anchored by rocks or a board. You can also use layers of black-and-white newspaper or cardboard, topped with a layer of organic mulch for aesthetics purposes if you prefer.
Fallen leaves are a valuable source of no-cost garden riches. Mound raked leaves into piles where they will slowly break down to yield a rich leaf mold or compost in about a year’s time. To speed things along, fill a plastic garbage can with dry leaves and, using a string trimmer like a stick blender, whirl them to a finely chopped texture. You can use these “processed” leaves as fluffy weed-suppressing mulch for beds now, or contain them in a bin where they will break down faster than leaves that have not been chopped.
A cover crop—also known as green manure (meaning plant-based organic material rather than animal waste) or a smother crop—is a temporary infill planting which builds healthy soil, reduces garden chores, and attracts beneficial insects. Cover crop roots prevent erosion and stabilize soil; top growth provides a sheltering groundcover which inhibits compaction from seasonal rain and suppresses weeds by blocking light to the soil. Legume cover crops like peas, vetch, clover, and fava beans go even further and actually feed the garden by setting nitrogen which gets “fixed” in nodules along their roots. As roots break down, nitrogen is released back into the soil leaving it in better condition than it started. It’s complicated and wonderful and yet another way nature looks after the garden.
If you cultivate a year-round PNW garden, a series of planting and harvest means your beds will rarely be empty all at the same time. As plantings change out, sow the appropriate cover crop for that particular season. Warm-season cover crops concentrate on pollinator support and weed suppression, while cool-season cover crops focus on soil building and nitrogen fixing. Cover all your garden bases by sowing a variety of cover crops. Several local seed suppliers have created custom mixes suited to PNW soil conditions. Unless you have a gigantic garden, a pound of cover crop seed should be enough for a year’s planting.
Prepare soil for planting by raking the surface to a fine texture. Then scatter cover crop seed thickly. If you are planting in late summer or fall, carefully lift the leaves of pumpkins, cabbages, and other large plants to sow beneath and around standing plants. Using a rake or a hand tool, scratch seed into the top ½ inch of soil and pat soil to secure seed in contact with the soil. In fall, you can simply await the return of the rains; if planting when conditions are dry, water well.
Fall-planted cover crop seeds germinate slowly, primarily putting on root growth over the winter until longer days and warming temperatures bring on a flush of top growth in spring. Just like all plants, germination and growth is quicker in warm weather. After the cover crop flowers—but before it reseeds—till the leaves, stems, roots, and flowers into the garden where they will provide valuable organic matter as they break down. After 2 to 3 weeks, the bed can be raked smooth and planted.
Because I garden in raised beds, and am not looking to dig any more than necessary, I prefer not to till cover crops into the soil. I simply cut the plants down to about 4 inches and lightly stir the soil with a hand tool to break up the roots, leaving them in place to break down. Top growth gets added to the compost pile if it’s particularly bulky, or left to break down on the surface of the soil or mulch the pathways between the beds.
BEST WARM-SEASON COVER CROPS FOR PNW GARDENS
COVER CROP | DESCRIPTION | WHEN TO SOW |
Buckwheat | Annual. Quickly grows 2 feet tall, flowering just 5 to 6 weeks after germination. Great for smothering weeds. The brittle roots and stems are easy to chop into the soil, producing a generous amount of organic material. Nectar rich flowers attract beneficial insects. | May to August |
Oats | Annual. Fast spring growth and a fibrous root system provide good erosion control and generous amounts of organic material for the soil. Oats are not hardy but winter-killed top growth still protects soil and can be worked into the soil in spring. | April to August |
Phacelia | Annual. Delicate lacy foliage and stout stems quickly grow 3 feet tall and are crowned with beautiful purple-blue fiddlehead flowers that bees love, thus its common name “bee’s friend.” It produces lots of biomass that breaks down quickly when harvested. Fabulous pollinator support. | April to July |
BEST COOL-SEASON COVER CROPS FOR PNW GARDENS
COVER CROP | DESCRIPTION | WHEN TO SOW |
Austrian field peas | Annual/legume. A versatile, cold-hardy pea tolerant of infertile and poorly draining soils. Succeeds where other legumes will not. | September to November |
Cereal rye | Annual. Good winter growth under cool conditions. Tall, sturdy plants support vining cover crops and contribute lots of biomass. | September to November |
Crimson clover | Annual/legume. Easily sown beneath and around standing plants; winter hardy and easy to till under or cut back in spring. Does not do well in poorly drained, acid, or infertile soil. Ruby-red flowers in spring are beautiful and attract beneficial insects. | September to October |
Hairy vetch | Annual/legume. A fast-germinating plant with excellent nitrogen-fixing abilities. More tolerant of acid soil than most legumes with vigorous roots to prevent erosion. Often planted with a cereal grass nurse crop to support its vining growth habit. | September to November |

HAVE YOUR COVER CROP AND EAT IT TOO!
Some of our edible plants provide the same type of valuable soil building and efficient nutrient recycling as cover crops. Detailed growing instructions are found under individual plants in the “Edibles A to Z” section.
Peas and beans are nitrogen fixers, so when removing spent crops always leave roots in place to replenish the soil. Fava beans are particularly cold hardy with some varieties suitable for fall planting. In addition to their delicious harvest, fava beans also produce nectar-rich blossoms and abundant organic matter that makes great compost.
Mustard and arugula are cold-hardy plants that quickly cover the soil and smother overwintering weeds. Mustard in particular is deep rooted, mining the subsoil and bringing valuable micronutrients to topsoil.
Mache is an exceptionally cold hardy, sweetly flavored salad green that can survive anything our PNW winter dishes out. Sow seed thickly in late summer, or allow spring plantings to reseed, for a delicious and protective groundcover.
SKILL SET 
HOMEMADE COMPOST
Compost is an active process as well as a finished product. All organic matter—anything that was once alive—is subject to decay and breaking down. A sustaining element of a healthy forest ecosystem is the layer of decomposing plant litter, or duff, which slowly returns nutrients and organic matter to the soil. The process taking place on the forest floor is the same one happening in our gardens too. “To compost” is to insert yourself into this naturally occurring process by speeding things along, containing the procedure, or tweaking the composition of the finished material.
The rich, dark, crumbly, soil-like substance that remains after decomposition is finished compost—otherwise known as garden gold—a valuable, multitasking, soil-conditioning, garden cure-all. The application of compost is a great way to boost soil health, conserve water, and strengthen plants against pests and disease. As previously discussed, soil is a mixture of mineral particles, organic matter or humus, and air space. Compost, when added to lean sandy soils, improves the soil’s ability to hold moisture and slows leaching, thereby boosting nutrient retention. Fibrous compost worked into clay soil brings it to life by allowing air to penetrate the heavy mass so oxygen can be delivered to roots and soil microbes. Fruits and vegetables grown in healthy soil don’t just taste better—they’re better for you as well. Show a little love for your soil and start a compost pile today.
BASIC BACKYARD COMPOST
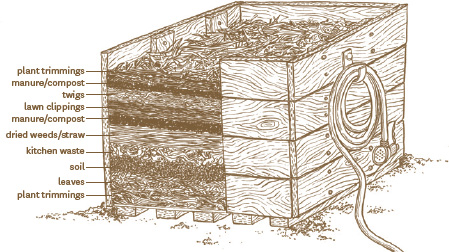
The simple ratio for a compost pile is equal parts green, black, and brown material:
Green: fresh moist organic material like lawn clippings, kitchen scraps, and plant trimmings provide nitrogen and moisture.
Black: garden soil, manure, and/or existing unfinished compost kick start the decomposition process of the other two components by introducing valuable soil organisms.
Brown: dried fibrous material found in dead leaves, small twigs, straw, shredded newspaper, and coffee grounds provide carbon and texture to the blend, increasing air circulation.
Note: do not include pet waste and diseased plant clippings (potential to spread disease), meat (attracts undesirable wildlife and will stink as it decays), and inorganic materials (will not break down).
Many different styles of compost bins are on the market, but homemade ones can be as simple as a 3- by 3-foot bottomless box made out of wood or wire fencing. Layer your ingredients in your compost bin and dampen the pile with a hose to thoroughly moisten. Now you can wait for nature to take over or hasten the process by periodically turning the mixture with a fork to introduce oxygen to the pile and fuel decomposition. Me? I’m a waiter not a turner; I prefer to save my energy for other (less taxing) garden tasks. I continue to add pulled weeds, garden trimmings, and kitchen scraps to my pile throughout the season maintaining the simple ratio of materials and let nature do the heavy lifting.
If you don’t have the space (or desire) for a compost pile, you can purchase commercially produced bagged compost at nurseries, home centers, and hardware stores. For bulk deliveries (and substantial savings) contact your local soils yard or municipal waste management company.
HOW MUCH COMPOST?
The amount of compost needed depends on whether you are starting from scratch with your garden or improving an established garden. For new gardens, work 4 to 6 inches of compost into the root zone, or the top 8 to 10 inches of soil. Existing gardens require only 1 to 2 inches annually; dig compost into the root zone or topdress established plantings by mulching with compost and let subsequent rain, irrigation, and earthworm activity do the digging for you. Compost is relatively low in nitrogen and will not “burn” new plantings so you don’t have to worry about overdoing too much of a good thing.