Chapter 9: Reading and Writing SAS Data Sets
Besides reading raw data from text files, SAS can also read and write data from SAS data sets. Once you have created a SAS data set from raw data or you have been given a SAS data set, you are ready to run SAS procedures to analyze your data or to write a DATA step to create new variables or to further manipulate your data.
A SAS data set actually contains two parts: One is called the data descriptor, and the other is the data itself. The data descriptor contains your variable names, whether a variable is stored as character or numeric (the only two types allowed in a SAS data set), how many bytes of storage are used to store a variable, and other information about how to display the variable in reports or charts. A fancy word used to describe the data descriptor portion of a SAS data set is metadata—data about your data.
The format of a SAS data set is proprietary to SAS and only SAS can read and write SAS data sets directly (there are other programs that can read SAS data sets and convert them to other formats). If you try to open a SAS data set in Word or Notepad, it will look like gibberish.
If you want to examine the data descriptor (metadata) for a SAS data set, you have several options. Because this is the programming portion of the book, the method described here is to run a SAS procedure called PROC CONTENTS. Suppose you want to see the data descriptor for the data set called Demo described in Chapter 7.
The program shown next uses PROC CONTENTS to do this (the program to create the data set Demo is included so that you don’t have to turn back to Chapter 7 to see it.)
Program 9.1: Running PROC CONTENTS to Examine the Data Descriptor for Data Set Demo
data Demo;
   infile “~/MyBookFiles/demographic.txt”;
   input ID $ Gender $ Age Height Weight Party $;
run;

*Program to display the data descriptor of data set Demo;

title “Data Descriptor for Data Set Demo”;
proc contents data=Demo;
run;
You use a DATA= procedure option to specify which data set you want to examine. Here is the output from this procedure:
Figure 9.1: Output from Program 9.1
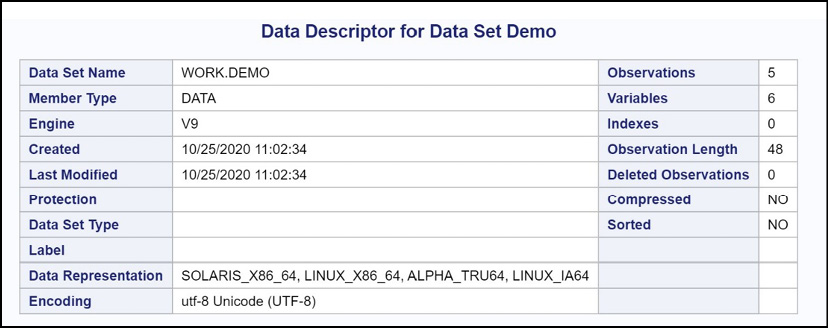
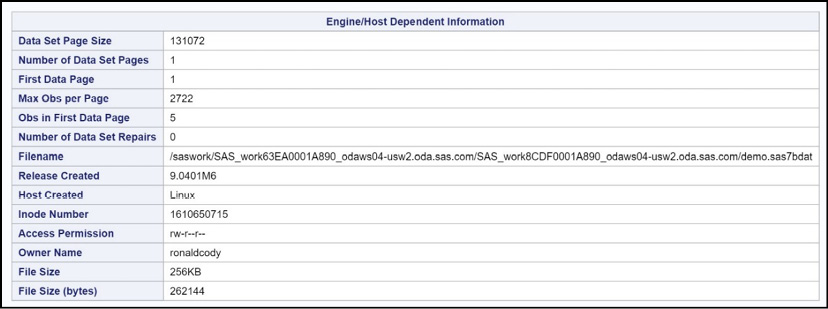
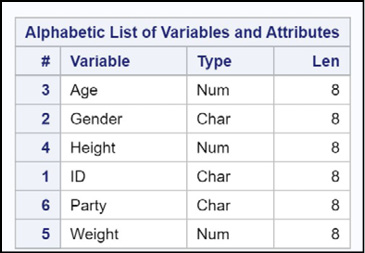
The first section of output shows global information about your data set: the number of observations, the number of variables, etc. You also see the date and time the data set was created or modified.
The next section of your output contains technical information about the size of the data set, the page size, the access permissions, and other details that you might (or might not) be interested in.
This last section of the output lists each of your variable names (in alphabetical order), the file type (Num for numeric, Char for character), and the number of bytes of storage used.
Temporary Versus Permanent SAS Data Sets
All the data sets described in the previous chapter were temporary data sets. That is, once you end your SAS session, these data sets disappear. To create or read a permanent SAS data set, you need to specify a two-part name: the location where the data set is stored (referred to as a library in SAS terminology) and the actual data set name. You can specify a permanent SAS data set name by specifying the library name, a period, and then the data set name. Names of permanent SAS data sets are in the form:
library-reference.data-set-name
where library-reference (referred to as a libref in SAS terminology) is an alias for a folder and data-set-name is the name of the SAS data set. You might wonder about the data sets you created in the last chapter. Those data set names did not contain a period. It turns out that when you use a single name in a DATA statement (such as DATA Test;), SAS assumes that the data set is a temporary data set and stores it in the Work library (a temporary folder/directory located in your user area). The true name of the data set is Work.Test, where Work is the built-in library reference to the Work library.
You can have SAS Studio create the library for you, using the Libraries tab or write a single line of SAS code. You will see both methods in this chapter. First, let’s look at the programming method.
Creating a Library by Submitting a LIBNAME Statement
There are two steps in creating or reading a permanent SAS data set. Step one is to create the libref by using a LIBNAME statement. For example, if you want to create a permanent SAS data set in the MyBookFile folder, you first create a library reference (the name Oscar is used in this example) like this:
libname Oscar “~/MyBookFiles”;
Library references are a maximum of 8 characters and follow SAS naming conventions. If you want to create a permanent SAS data set called Demo in the Oscar library, your DATA statement looks like this:
data Oscar.Demo;
Data set Demo will remain even after you close your SAS session. If you look in the folder, MyBookFiles, you will see a file called Demo.sas7bdat (the extension refers to a SAS data set that is a binary data file compatible with SAS 7).
Here is a program to create the Demo data set in a permanent library called Oscar:
Program 9.2: Using a LIBNAME Statement to Create a Permanent SAS Library
libname Oscar “~/MyBookFiles”;

data Oscar.Demo;
   infile “~/MyBookFiles/demographic.txt”;
   input ID $ Gender $ Age Height Weight Party $;
run;
Although Program 9.2 places the SAS data set Demo in the MyBookFiles folder, you will have to submit the LIBNAME statement each time you start a SAS Studio session. There are two approaches that make this process automatic. One is to add the LIBNAME statement in a SAS program called Autoexec.sas.
The reserved program name Autoexec.sas executes automatically every time you open a SAS session. Therefore, if you add your LIBNAME statement to this file it will re-create the Oscar library automatically.
One way to edit the Autoexec.sas program is to have SAS Studio assist you. Click on the icon circled in Figure 9.2.
Figure 9.2: Editing Autoexec.sas
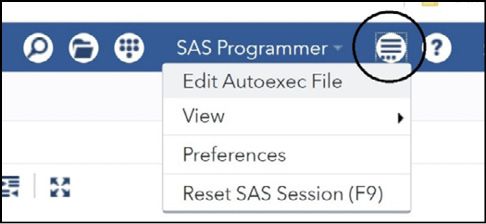
When you select Edit Autoexec File, you see the following.
Figure 9.3: Editing Autoexec.sas
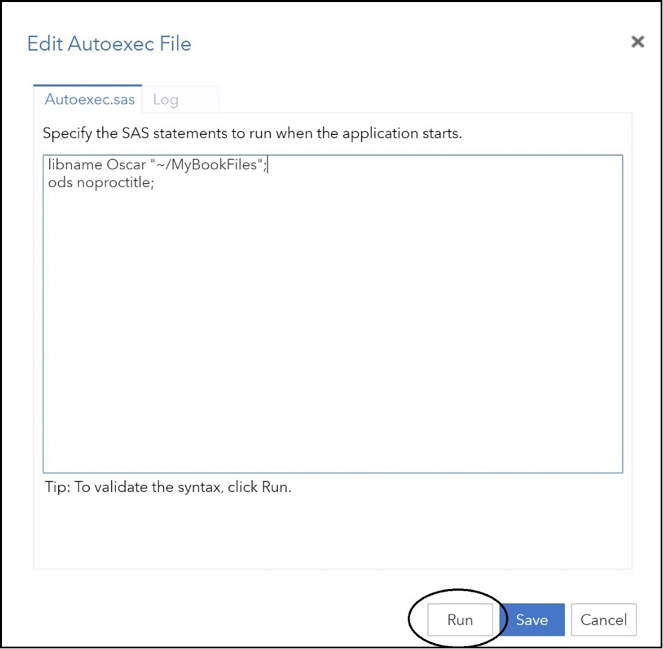
The LIBNAME statement was entered. You will notice that this author previously added the statement:
ods noproctitle;
This statement removes the name of the procedure from all SAS output. It is a good idea to click the box labeled RUN before you save the file.
Using the Library Tab to Create a Permanent Library
You can save yourself all this extra work if you simply let SAS Studio create a library for you. If you use this method, SAS Studio will ask you if you would like your library to be added the Autoexec.sas automatically. To demonstrate how to use SAS Studio to create a library, let’s create another library named Felix.
You start by selecting the Library tab in the Navigation Pane (Figure 9.4).
Figure 9.4: Creating a Library Using the Library Tab
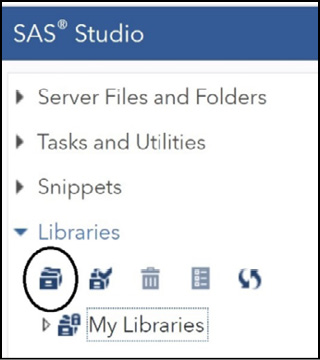
Click the icon circled in this figure to create a new library. Here’s what it looks like.
Figure 9.5: New Library
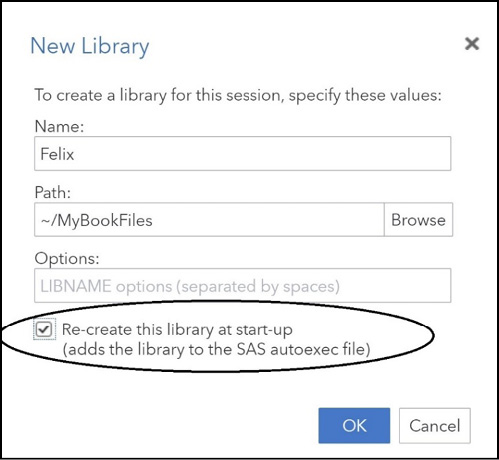
Be sure to check the box circled in Figure 9.5, and then click OK. When you do this, the library called Felix will be created every time you start a SAS Studio session.
Reading from a Permanent SAS Data Set
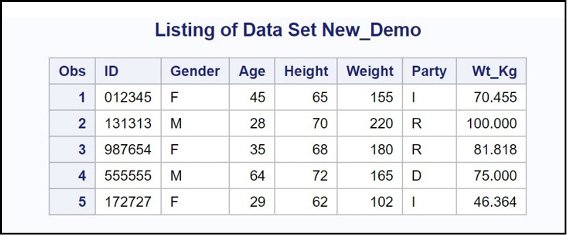
You use an INPUT statement to read data from a raw data file, and you use a SET statement to read data from a SAS data set. The reason you do not need an INPUT statement is that the SAS data set contains all the information (called metadata) about the variables. In the example that follows, you want to use the SAS data set Demo as input to a DATA step that creates a new variable called Wt_Kg, representing the person’s weight in kilograms. In addition, let’s assume that you are writing this program in a new SAS session. Here is the program:
Program 9.3: Using a SAS Data Set as Input to a Program
data New_Demo;
   set Oscar.Demo;
   Wt_Kg = Weight / 2.2;
run;
title “Listing of Data Set New_Demo”;
proc print data=New_Demo;
run;
In this example, you plan to create a new, temporary data set called New_Demo. Because the SAS data set Demo is stored in the Oscar library, you use the two-level name
Oscar.Demo
In the SET statement to read observations from the Oscar.Demo data set. You use an assignment statement (Wt_Kg = Weight / 2.2;) to create the new variable Wt_Kg.
Here is the output.
Figure 9.6: Output from Program 9.2
If you want the new data set New_Demo to be permanent, replace the DATA statement with:
data Oscar.New_Demo;
In this chapter, you saw how to create permanent SAS data sets as well as how to use existing SAS data sets to create either temporary or permanent SAS data sets. The previous version of this chapter, where SAS University Edition was described rather than OnDemand for Academics, was much longer and more complicated than what you see here. In this author’s judgment, ODA is greatly improved over the University Edition.
1. Use PROC CONTENTS to display the data descriptor for the data set Heart in the SASHELP library. Run it again with the VARNUM procedure option (remember, you place procedure options between the procedure name and the semicolon).
2. Create a new, temporary SAS data set called Heart_Vars from the data set Heart in the SASHELP library. Include the variables BP_Status, Chol_Status, Systolic, Diastolic, and Status. Use a KEEP= data set option on the Heart data set to do this. Hint: First, click the My Libraries tab and then expand the list of the data sets in SASHELP.
3. (For all the problems in this book where you need to create a permanent SAS data set, a folder called Problems was create in SAS Studio (the same way the MyBookFiles folder was created) and used in the solutions. You can use this name for your solutions or create a folder with whatever name you want to use). Repeat Problem 2 except make the data set Heart_Vars a permanent data set in your Problems folder (or whatever name you chose) folder.
4. Create a temporary SAS data set called Alive from the data set Heart in the SASHELP library. This data set should contain the variables BP_Status, Chol_Status, Systolic, and Diastolic. Use a WHERE= data set option to select only those observations where Status is equal to ‘Alive’. Use the data set option (OBS=10) with PROC PRINT to list the Alive data set, like this:
proc print data=Alive(obs=10);
Hint: You will need to include the variable Status in the KEEP= data set option because you need this variable to use in your WHERE= data set option. Use a DROP statement to drop Status so that it is not included in the Heart_Vars data set.
5. Write the statements necessary to create a permanent SAS data set called Young_Males in the Problems (or whatever name you chose) folder. Use as input the SASHELP data set Class and select only those observations where Gender is equal to ‘M’ and Age is 11 or 12.
6. What’s wrong with this program?
1. data New;
2. set SASHELP.Fish(keep Species Weight);
3. Wt_Kg = Weight/2.2;
4. *Note: 1 Kg = 2.2 Lbs *;
5. run;