IN EVERY WALK WITH NATURE ONE RECEIVES FAR MORE THAN HE SEEKS.
—John Muir
In all honesty, making your own lines is not really necessary. Furled commercial lines fish nicely right off the spool and level line fluorocarbon can just be cut to length. Both give satisfactory results, and I am slow to recommend any complication.
If you like to have control over every aspect of your fishing, however, or are an unrepentant tinkerer, making your own lines is the least expensive option, and can be fun to boot. Perhaps through your experimenting you may just come up with the next innovation in lines. You can certainly more closely adjust a line for the casting characteristics you prefer if you make your own. Besides, furled and fluorocarbon lines are really quite easy to make.
Furled lines are commonly made out of monofilament or thread. Almost any fiber that is not “furry” can be used, with fluorocarbon and nylon monofilament, and polyester and nylon thread, dominant. Nylon monofilament is close to neutrally buoyant and doesn’t require floatant. Fluorocarbon sinks. Polyester thread lines are limper and allow more delicate presentations, which can be very useful for dry flies, while nylon monofilament is stiffer. Coating thread lightly with non-silicone floatant or floor wax will help it float. I have a slight bias toward nylon since it floats nicely without any treatment. Our ancestors fished furled lines made of horsehair, and there are a few tenkara anglers that still prefer it, though it tends to be heavier and more fragile.
The choice of color of furled lines is unlimited. Since most of the line will be held off the water, a highly visible, even fluorescent material can be chosen. This is the line I use when I teach, as it is much easier for eyes to follow. I really don’t think the fish mind either, since they likely see more the shadow of the line than the color. However, I usually use a quieter color for my own lines, favoring a pale green or amber.
When you make a furled line, you simply join loops of monofilament or thread that are several feet long. The loops are then furled or twisted together to form a multi-strand line. By decreasing the number of loops as you proceed toward the tip of your line, you are able to form a taper that rolls and extends over the water nicely, carrying the fly.
To keep the loops even, you first need to set up a furling board. Any board that’s 10 percent longer than the eventual length of line will do. At one end firmly screw in two large cup hooks or L hooks, then space out alternating pegs made from a dowel or broom handle. I use one-inch dowels and simply cut one-inch holes with a spade- or spur-point drill bit into a piece of scrap two-by-six, fourteen feet long. The dowels, cut to four inches, snug down in the drilled holes. This allows me to remove the dowels when I am ready to wind a leg or store the furling jig. A light sanding of any rough spots prevents unintentional snags; painting or lacquering is definitely optional, though a light, flat paint does make it a little easier to see the thread. The spacing of dowels will determine the gradient of your taper, and some ingenious furling boards have been made that allow the dowels to be adjusted. If you want you can spend a lot of time calculating different tapers and adjusting your line. The previous illustration (page 112) shows how I spaced my pegs for a twelve-foot furled line.
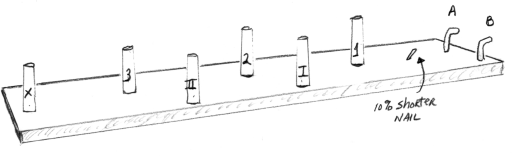
On leg A, dowels are fixed at 42, 81, and 113 inches. On leg B, they are at 64 and 98 inches. The tip dowel, X, is twelve feet from the L hooks.
To reiterate the general idea, you start at hook A and begin wrapping loops: several around peg 1, a few around 2, a couple around 3, and finally less as you go around X. Then on your way back up leg B, do the reverse, building taper rather than decreasing it. After both sides are done, wind each leg individually. Once under the tension of these windings, by putting the two legs together and unwinding, the magic of furling takes place with the two legs forming a beautifully simple, two-strand line.
Tie a simple overhand loop a couple inches long and place it over the anchor hook A. This small knot will not be noticeable, as it is wound within the line. It is actually better to have the loop a little long so the knot does not occur too close to the end, and of course it is easier, too. If you make this loop extra long you are essentially adding to the taper of the butt section, which is not a bad idea.
Make five loops back and forth between the nearest dowel #1 and anchor hook A. Don’t worry if they overlap. Placing them far enough down the dowel that they are secure, but not so far down that they are difficult to slide off the dowel in latter steps, is the ticket.
On the next half loop from the anchor hook go past the dowel #1 to dowel #2. It doesn’t matter whether you pass inside or out. Whichever way you started is fine.
Go around dowel #2 then back to dowel #1, but pass the whole spool in between the first five leg loops as you go around. This is what locks the loops together. Some recommend tugging the loop down a bit, but I don’t think it is necessary, just be consistent. You want your loops of each segment to be about the same size. Now take your spool back down around dowel #2 and back up and through dowel #1 loop again. Do this three times total. Now you have two segments of five and three loops respectively, joined together at dowel #1.
Do the same for dowel #2 to dowel #3, but using only two loops this time.
Now pass from dowel #3 around the tip dowel X up to dowel II on leg B. You are using dowel X simply to turn the corner at this step. This loop must go on the outside of dowel X of course, no matter where you have been turning loops, inside or outside. Go around dowel II either side, and go back past the tip dowel X and back up to dowel #3 on side A, going through the loop again.
Now back around the tip dowel X and up past dowel II to dowel I. This will give you a simple three-strand tip when legs A and B are combined.
After going around dowel I, loop back down to II, going through the loop to bind it. Finally make five loops between dowel I and hook B.
End by tying another overhand loop just long enough to reach the cup hook with tension. The thread or mono will give a little with tension so tie it a bit short rather than a bit long.
Now clamp the strands beneath a clamp on the tip dowel X so the two legs A and B can be wound separately. Any kind of easy-to-apply clamp will work, but don’t injure the thread. (This is an important step. I have seen other furlers try to extend out one leg and attempt to wind the whole thing at once, which is unbelievably unwieldy with a twelve-foot line. Others make the two legs separate, which I think just takes more time.)
Carefully lift all the loops off the dowels on leg A (in my rig I just remove the dowels). With a cup hook mounted firmly in the chuck of a power drill, transfer the loops from leg A and begin winding. Wind until the cord is shortened by the twisting to just past the 10 percent nail (fourteen inches or so). Some folks time the winding, but I think just estimating the 10 percent shortening is fine. The two legs have to be close to the same winding tension, but not exactly. Place a paper clip through the loop on the drill cup hook and hang it on the nail. Transferring the loops from the cup hook to the paper clip is easy, though occasionally you need to back twist with your fingers a tiny bit to open a loop.
Do the same thing with leg B.
Now put both paper clips on the drill cup hook and reverse spin the two legs together, furling them into one line. You want to reverse it until you get back the maximum length.
If you want, you can just tie monofilament to the tippet end of the line and put a Dacron-backing loop through the loops on the butt end, and go fish. But there is a more elegant looking solution, called a Shorb loop. It isn’t very hard and gives a nice, finished look that is secure by itself without any backing or mono added.
A Shorb loop is made by using a knit picker, which is found at any sewing store and used to pull snagged yarns back inside a sweater. Simply take the knit picker and go between the two leg cords of your furled line, a little more than a finger width from the end, and grab the end loops (from off of the paper clips) and pull through.
Now push the loops in the knit picker jaw that you grabbed from the paper clip and push them further down the neck of the knit picker. Lastly grab the lasso loop you just formed with the knit picker jaw and pull it through the loops. You’re done. You have essentially pulled a loop (the lasso) through the strands behind the terminal loops you threaded down the standing line, securing it.
Pull hard on the loop to neaten it up. Do the same at the opposite end and you have a nicely formed loop on each end that can be used in a loop-to-loop connection.
I like putting a piece of backing that is tied in an overhand loop through the Shorb loop, joining them in a loop-to-loop fashion. This readies the line for a girth hitch to the lilian of your tenkara rod.
To the Shorb loop you can add a tippet ring or simply stick with a loop-to-loop connection. To put on the ring, tie it in with a short piece of stiff mono, a uni knot on each end. Stiff mono helps prevent tangles when you are fishing. You can also feed the tippet ring onto the furled line itself. I then feed the whole line through the tip loop, forming a knuckle around the tippet ring.
Of course you can vary the number of loops in a leg to change the taper and adjust casting characteristics. It is even possible to change thread color by tying in loops during the winding. These small knots are hardly noticeable and don’t affect strength much in my view. I have seen both camouflaged and brighter indicator lines made this way.
If you want to give furling lines a try, 6-0 fly-tying thread (denier 135140), or invisible nylon thread works well. These have been my best so far. Monofilament in #2 test works too, though you want to decrease the number of loops to avoid bulk. Very fine furled lines can be made with 8-0 thread, and some use fluorocarbon for a very dense line.
You can get pretty creative with furled lines. In my opinion there is no softer presentation than that produced by a furled line on a tenkara rod. Lately, I have been using shorter furled lines on my old Orvis too. (By simply using fewer pegs, the furling rig adapts to shorter lines.) Some tenkara anglers are even constructing traditional horsehair lines. It’s funny how some of the old ideas, like furled lines, occasionally come back into style.
You can spend a lifetime adjusting single filament lines, and plenty of western fly anglers do just that, designing taper to suit their own casting stroke and various fishing conditions. In keeping to tenkara simplicity, I will share just three “formulas” that illustrate three different approaches to building a tenkara single filament line. Each has its pros and cons.
When considering whether to fish single filament or furled lines, remember that fluorocarbon can be adjusted to length with a nipper, right on the water. Furthermore, they have more density and so can fight wind better than furled lines. Lastly they are easier to make. An angler simply joins sections of fluorocarbon (and nylon) together for a taper, or cuts the required length for a level line.
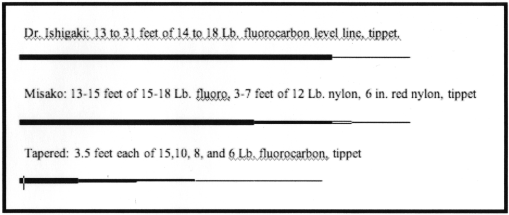
Dr. Ishigaki is perhaps the foremost level-line promoter in the world. He uses a yellow fluorocarbon line in either fourteen- or eighteen-pound test to which he adds tippet. He varies the length of the line, using everything from a line that’s shorter than the length of his rod to one that’s twice its length. The level line can be adjusted while he fishes. Inexpensive and simple, there is only one knot, the tippet knot, extending from rod to tip. If you want simple, this is the rig. I have found that ten-pound fluorocarbon can be effectively fished, providing added delicacy, though it is not as easy, nor as wind resistant. Heavier fluorocarbon is easier to cast. I’ve settled on fifteen-pound test for most of my level lines. On very tight brushy streams, it can be helpful to fish a line smaller than the rod length.
Misako fishes a slightly tapered line. She starts with a fluorocarbon line that varies from fifteen- to eighteen-pound test, depending on the wind and water conditions. This first section is generally the length of her rod, which is adjustable between thirteen and fifteen feet. To this she adds nylon monofilament for its better floatation. She uses a slightly smaller diameter length of monofilament, in lengths typically from one-quarter to one-half the rod length, followed by a small six-inch section of tinted Amnesia indicator. She finally adds a very flexible tippet. As a competitive fly angler, she is used to efficiently fishing long lines. This is a great line for nymphing and wet flies, yet will work with dry flies too. At first you will find it a little unwieldy given that it requires an efficient cast to extend it fully. If you are having trouble, shorten the length of the nylon midsection.
I have been fishing a fully tapered fluorocarbon line lately. It is composed of four sections of fluorocarbon, each three feet, six inches long, in fifteen-, ten-, eight-, and six-pound fluorocarbon with an attached tippet ring. As is the case with western lines, by shortening the size of the butt and lengthening the midsections (from the traditional 60-20-20 Ritz rule of lines), you increase the delicacy of the presentation. Though I enjoy this very light throwing line, it limits my reach somewhat by its delicacy. Still it unrolls beautifully in a bow and arrow cast. My attempts to create longer tapers have been less successful in turning over a fly. Longer tapers must favor a longer and heavier butt section to lay out nicely.
Each of these approaches has its advantages. Heavier fluorocarbon transfers energy quickly, enabling a more accurate placement of the fly, and the use of heavier flies. It does add a bit of a “clunk” feel to the cast on super-light rods. Fluorocarbon is probably a better fit for boisterous and windy western waters. I like it on open water too, especially lakes.
A taper retains a degree of delicacy, allowing a fisherman to cast a smaller fly more softly. Tapers are for smaller water and delicate presentation.
If building a line with an indicator, consider taking the colored section you intend to use and making a French “sighter” or “slinky.” Coil two feet or less of fifteen-pound tinted nylon monofilament around a bolt, securing it with wire or bread ties. Boil it for five minutes in water, then store it overnight in the freezer. The coil makes a very sensitive indicator for nymphing and is easily followed, though it does affect the cast. It is popular with competitive anglers.
As with so many things, there is no right answer and you may find a solution of your own. One thing all three of these approaches have in common is that fluorocarbon is necessary for efficient casting. The lack of stiffness and low density of nylon monofilament makes it a poor choice by itself.
When building a single filament line, I join each section simply with either double uni knots or double surgeon’s knots, though a traditional barrel knot would be fine too. The double surgeon, a simple overhand knot with a second turn, is the best knot if the diameters of the two pieces are quite different. The knot can put a slight elbow at the junction compared to the other two, but I have not found this to be important in practice.