Chapter 6: Learning to Read Written Instructions
By now you’ve probably looked at some knitting patterns and thought, “Is this in English?” Knitting instructions use a lot of unfamiliar terms and abbreviations that can be intimidating at first. This chapter will help you learn to understand what you are reading the next time you look at a knitting pattern.
Make and Measure a Gauge Swatch
How to Read a Knitting Pattern
Getting to Know Gauge
Gauge (referred to as tension in the UK) is the number of stitches and rows per inch—using stockinette stitch, unless the pattern notes otherwise. Different yarns knit to different gauges, the same yarn knits to a different gauge on different sizes of needles, and different knitters knit the same yarn on the same needles at different gauges.
Understanding Gauge
A good knitting pattern will specify the gauge required to create the desired size or fit of the garment. For example, it will read something like “Gauge: 20 stitches and 30 rows to 4 inches over stockinette stitch on size 7 (4.5 mm) needles.” To create a sweater or hat with the same measurements that the pattern specifies—so that it fits properly—you need to be sure that you are knitting to that gauge. Though your yarn label should indicate what size needle to use with the yarn and what the desired gauge is, you should use that recommendation only as a guide, as tension varies from knitter to knitter.
These three swatches were all made using 20 stitches and 30 rows, but with different yarns and different needle sizes. You can see how varied the sizes of the final results are. That’s why making sure you’re getting the same gauge the pattern calls for—with the yarn you have chosen for the project—is so important. Even a slight discrepancy can have a tremendous effect. A 1-stitch-per-inch difference in gauge, over a large number of stitches, can result in a final size that is several inches smaller or larger than desired.

Understanding Gauge Differences with Stitch Patterns
Sometimes a knitting pattern will cite the gauge for a particular stitch pattern, if that’s what is primarily used for the garment. Like needle size and yarn type, stitch pattern can also affect gauge. For example, the same yarn, worked in stockinette stitch on size 7 needles, knits to a different gauge in a ribbed pattern on the same size needles.
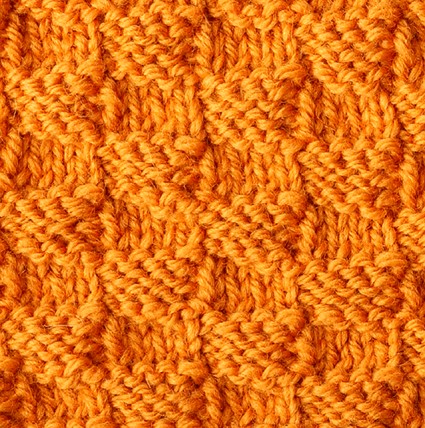
These three swatches are all made from the same yarn and using the same needles, over 20 stitches and 30 rows, but with different stitch patterns. You can see how varied the sizes of the final results are.

Make and Measure a Gauge Swatch
Before starting a project, always make a gauge swatch to ensure that you are knitting to the gauge the pattern calls for. A gauge swatch is a small square of knitting used to measure how many stitches and rows per inch you are getting with a particular yarn on a certain size needle. It takes only a few minutes to make one, and you will definitely not regret it. Many new knitters skip this step and spend hours on a sweater that ends up too big or too small.
How to Make a Gauge Swatch
To make a gauge swatch, use the yarn and needle size that the pattern calls for. It’s not a bad idea to have handy three pairs of needles: the size called for, the next size smaller, and the next size larger. (If you don’t use them for this project, you will need them someday for another project.)
1. Cast on the same number of stitches that the pattern says is equal to 4 inches.
2. Work in stockinette stitch (knit on the right side and purl on the wrong side) until the swatch is 4 inches long (measuring from the cast-on edge to the needle).

3. Bind off your stitches somewhat loosely, cut the working yarn, leaving about a 6-inch tail, and pull the tail through the last stitch.

NOTE: If you think you may be short on yarn for your project, don’t cut the yarn after finishing the swatch. Simply measure your gauge (as instructed on the next page) and then unravel the swatch so you can use the yarn for your project.
How to Measure a Gauge Swatch
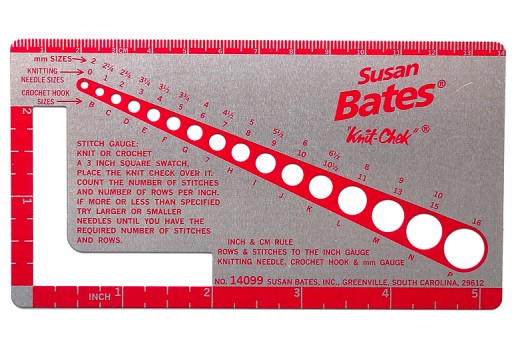
Remember the stitch and needle gauge tool from Chapter 1? Now is the time to use it. If you don’t have one, you can use a ruler or tape measure. Before measuring, block your swatch: Take a warm steam iron to the swatch, pressing only lightly. Let it cool and dry before measuring. Blocking your gauge swatch is particularly important to accurately measure gauge for certain stitch patterns, like cables, which cinch in, and lace, which spreads out.
1. Lay your swatch on a flat surface. Place your stitch and needle gauge (or other measuring device) so that the opening is centered both horizontally and vertically on the swatch.

2. Count the stitches in the horizontal 2-inch space and the rows in the vertical 2-inch space.
3. Divide these numbers by 2. That is the number of stitches and rows you are getting per inch.
4. If your pattern lists gauge as a certain number of stitches and rows over 4 inches, multiply the stitch and row counts you got for the 2-inch square.
Knitting Terms
Learning to read knitting instructions is like learning a new language. Familiar words pair together to form unfamiliar phrases. The following is a list of common knitting terms and phrases and their translations. For a list of knitting abbreviations that you’ll find in most pattern instructions, refer to the inside cover.
A
as established Work in a particular pattern, as previously set.
as foll Work as the instructions direct below.
as if to knit Knitwise; insert the needle into the stitch the same way you would if you were knitting it.
as if to purl Purlwise; insert the needle into the stitch the same way you would if you were purling it.
at the same time Work more than one set of instructions simultaneously.
B
bind off in patt Work stitch pattern while binding off.
bind off loosely Bind off without pulling the working yarn too tight, so that the finished edge is elastic.
block Lay knitted pieces out flat and dampen or steam them to form them to the proper shape and measurements.
C
change needles Use the larger (or smaller) needles specified in the pattern, starting with the next row.
continue in patt Continue to work the stitch pattern as previously established.
E
ending with a RS row Work a right side row as the last row you work.
ending with a WS row Work a wrong side row as the last row you work.
every other row Work as instructed on alternate rows only.
F
from beg From the cast-on edge; usually used to direct where to start measuring a knitted piece.
G
gauge The number of stitches and rows per inch, usually presented in knitting instructions as the number of stitches and rows per 4 inches.
I
increase stitches evenly across row (around) Position the number of increased stitches at regular intervals across the row or round.
J
join round When knitting in the round, work the first stitch of the round so that the last stitch and the first stitch join, forming a circle.
K
knitwise As if to knit; insert the needle into the stitch the same way you would if you were knitting it.
M
marker Something used to mark a point in a stitch pattern or in your knitting, be it a plastic ring stitch marker, safety pin, or tied piece of yarn.
N
next row The row following the current row, usually followed by specific instructions pertaining to that row.
O
on following alternate (alt) rows Every other row, after the current row.
P
pick up and knit A method of picking up stitches, as for a collar or button band, where the knitting needle is inserted into the work, yarn is wrapped around the needle as if to knit, and the new loop is pulled through.
place marker Slip a stitch marker onto the knitting needle to indicate special instructions regarding the stitch following; or place some other sort of marker, such as a safety pin, to indicate where buttons will be.
preparation row A setup row that occurs prior to beginning the stitch pattern repeat.
purlwise As if to purl; insert the needle into the stitch the same way you would if you were purling it.
R
rep from * to * or between *s Rep the set of instructions that appear between the two asterisks the number of times indicated or to the end of the row or round.
rep from * to end (or until a particular number of stitches rem) Rep the set of instructions that begin after the asterisk until the end of the row or round (or until the number of stitches indicated remains before the end of the row or round).
reverse shaping When working something like a cardigan, where the fronts are mirror images of each other, instructions for shaping are given for one front; you need to reverse those instructions for shaping the other front.
right side (RS) The side of the knitting that will show.
S
selvage An extra stitch (or stitches) that will be used for the seam.
slip marker Slip the stitch marker from the left needle to the right needle.
slip stitches to holder Put the stitches onto a stitch holder, usually to be worked later.
T
turn Turn work from right side to wrong side, or vice versa, to begin a new row or to begin working part of a row, as in short row shaping.
turning ridge A row of stitches, usually purled on the right side of stockinette stitch, where a hem will be folded under.
W
weave in ends When finishing a project, sew loose ends in and out of the backs of stitches or into seams to prevent them from unraveling.
with RS facing Work with the right side facing you; usually used when instructions are telling you to pick up stitches for a button band or collar.
with WS facing Work with the wrong side facing you.
work even Work without increasing or decreasing.
work to end Finish the row.
working needle The needle that is being used to knit or purl stitches.
working yarn The yarn that is being used to knit or purl stitches.
wrong side (WS) The side of the knitting that will not show.
How to Read a Knitting Pattern
A knitting pattern contains all the information you need to make a certain design. In addition to the instructions, a pattern should list what sizes the design can be knit for, the tools and materials required, and any particular stitch patterns used. Some patterns also contain diagrams of the finished pieces, called schematics, which show the shape of the pieces and their measurements.
Reading the Pattern First
There are so many knitting patterns and books to choose from these days that you may be overwhelmed. When you find something that you would like to knit, read over the pattern first to see if the instructions are clear and make sense to you. Choose a pattern within your skill level. Many patterns are rated, ranging from very easy to expert. If the pattern isn’t rated, reading it over will let you know if it’s something you can handle. Trying to knit something that is too difficult may turn you off to knitting forever, and you certainly don’t want that. Also, make certain that the instructions are written for a size that you would like to knit.

Reading Instructions for Size
Most knitting patterns are written for more than one size. The smallest size is listed first, with the remaining sizes listed in parentheses—for example, S (M, L). Throughout the pattern, the instructions contain information pertaining to the various sizes, such as stitch counts and numbers of decreases or increases, using a parallel format. For example, a pattern written for S (M, L) may instruct you to cast on 50 (60, 70) stitches. That means if you’re knitting the medium size, you need to cast on 60 stitches. Some knitters avoid confusion by highlighting or underlining the part of the instructions that pertain to the size they are knitting.
Choosing a Size
Knitting patterns list the measurements for the sizes included in the instructions. These measurements usually indicate the finished sizes of the knitted garment. Different designers use unique templates based on their idea of what fits a certain age or size range. So the best way to figure out what size to knit for yourself or for someone else is, if possible, to take body measurements. Then you can decide whether you want the garment to have a loose, comfortable fit, or a more snug, tailored fit. You then check your measurements against the pattern’s finished measurements and make your choice.
Taking Body Measurements
To take body measurements, you need a tape measure. Measure the bust or chest by placing the tape measure around the fullest part of the chest, at the underarm. For the waist, measure around the smallest part of the torso. For the hip, measure around the fullest part of the lower torso. Measure for the sleeve length by placing the tape measure at the edge of the shoulder and extending down (with arm held straight at side) to the wrist. Also measure from the underarm to the wrist to obtain a measurement for where to begin the sleeve cap shaping. The measurements of some parts of a knitted garment should be a few inches larger than the actual body measurements, or the garment will be too tight. If the garment is very tailored, you may want to also measure the circumference of the upper arms, wrists, and neck.

Reading Schematics
Schematics are diagrams of the finished knitted pieces for a project. They indicate the measurements for each piece before everything has been sewn together. Schematics are a handy reference: You can measure your knitting as you go along and compare it to the schematic to make sure your knitting is the right size. Or if your row gauge is slightly off, you can follow the schematic instead of the row counts in the instructions to make certain your pieces will be the correct length. However, it’s important to remember that the measurements listed on schematics do not include embellishments such as collars, button bands, or decorative edgings that are added later.

Gathering Materials and Tools
A knitting pattern lists the materials and tools needed to complete the project. Some knitting patterns specify a number of balls of a particular brand of yarn. If you plan to substitute, be sure to purchase the same number of yards of a yarn that knits to the same gauge—not just the same total weight of yarn. Some patterns simply specify a number of yards of a particular weight yarn. Either way, it’s not a bad idea to buy an extra ball, just in case. A pattern usually also lists needle types and sizes, as well as special tools you need. It’s a good idea to gather these materials before starting. However, you can wait until you have sewn your sweater together before purchasing buttons or other fasteners.

How to Read a Knitting Chart
At some point, you will come across a stitch chart or color chart on a knitting pattern, particularly if the design employs color work, textured stitches, or cables. Don’t be intimidated by all the symbols and hieroglyphics; most patterns provide a key to the symbols used in each chart.
Reading a Chart in the Right Direction
Each square on a knitting chart represents a stitch; a horizontal row of squares represents a row. You read a chart as you work the knitting: from bottom to top and starting at the lower-right corner. The first horizontal row of squares represents a right side row (unless otherwise specified) and is read from right to left. The second horizontal row, a wrong side row, is read from left to right. (For circular knitting, all chart rows are read from right to left.) Most charts represent only a partial section of the knitting that is repeated to create the overall pattern. So, after you work the last stitch in a chart row, you return to the beginning of the same chart row and repeat. Working row-wise is the same: After you work the last row of the chart, you repeat the chart from the bottom.

Reading a Color Chart
When a chart is used to represent a color pattern, each square is filled with a particular color or a symbol that corresponds with the color of yarn in which that stitch and/or row should be worked. You read this type of chart as described above: from bottom to top and back and forth, starting with the lower-right corner.
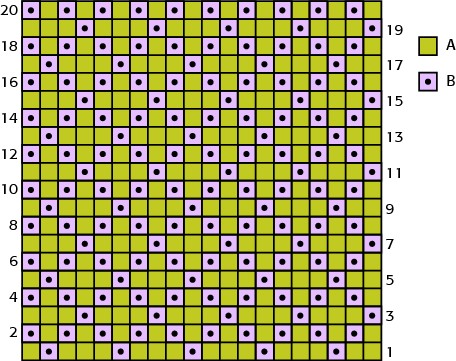

Reading a Stitch Pattern Chart
When a chart is used to represent a textured stitch pattern, each square is either empty or contains a symbol. Symbols vary from pattern to pattern. For simple knit and purl patterns, an empty square means “knit on the right side rows and purl on the wrong side rows.” A square that contains a dot means “purl on the right side rows and knit on the wrong side rows.” More complex stitch patterns, such as cable patterns, for example, contain many symbols representing different techniques.

Common Symbols Used in Knitting Charts
Symbol charts employ a language of symbols to convey instructions relating to a particular stitch or group of stitches. Unfortunately, these symbols vary from one designer to another—particularly symbols for cable stitches—so it’s important to use the key that is provided with a chart. All good patterns include clear written instructions along with the chart, so don’t feel you have to learn symbols by heart. The following table shows a number of knitting chart symbols you might encounter.
