Chapter 8: Bobbles, Cables, and Textured Stitches
This chapter covers stitch treatments you need to know to make a highly textured sweater: bobbles, knots, and cables. Most cable work involves holding a stitch or stitches on a cable needle, working the next stitch or few, and then working the stitches from the cable needle. Simple cables are easy to do and can add a sculptural accent to your knitting. Included here are a variety of bobble stitches, knot stitches, and cables. Experiment with some of the combinations here and then see if you can create your own.
Knit or Purl Through Back of Loop
Combine Cables with Bobbles, Knots, and Textured Stitches
Make Bobbles
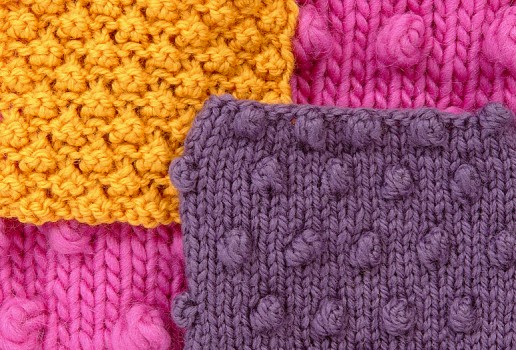
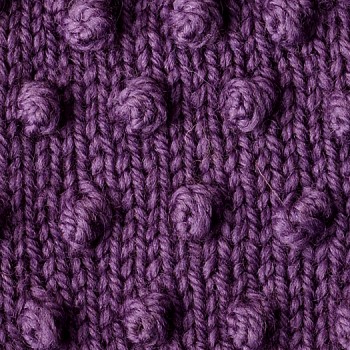
Bobbles add an exciting three-dimensional accent to your knitting. Bobbles can be used for effect in many ways: as a single row along a border, repeated in an allover pattern, or placed inside cables. Different designers make bobbles in different ways; experiment to find the way that suits you best.
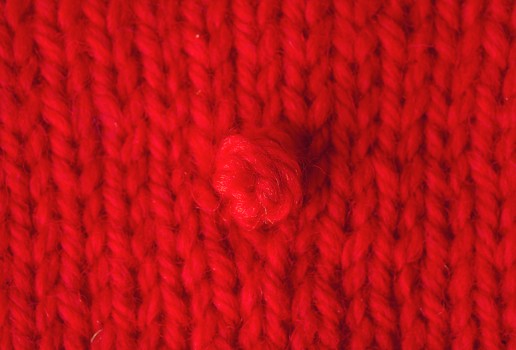
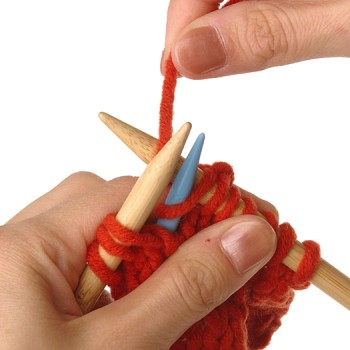
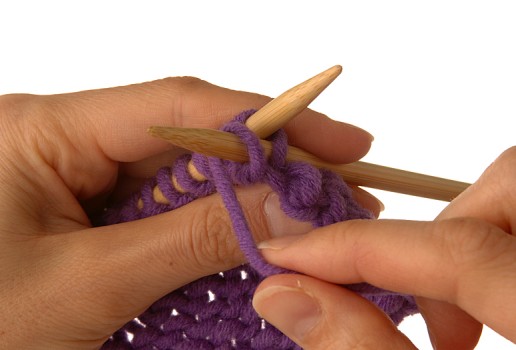
How to Make an Easy Bobble
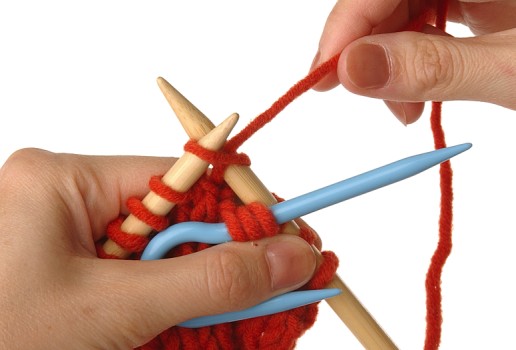
This is the easiest bobble because you don’t have to turn your work to make it. The abbreviation for make a bobble is mb.
1. Work to the point where you want the bobble. Knit into the front, back, front, back, and front (that’s five times) of the next stitch.
2. Without turning your work, use the left needle to pick up the fourth stitch and pass it over the fifth and off the needle; pass the third stitch over the fifth and off the needle; pass the second stitch over the fifth and off the needle; and finally, pass the first stitch over the fifth and off the needle.

Knitting five times into 1 stitch and then passing the 4 extra stitches, one at a time, over the last stitch forms this bobble.
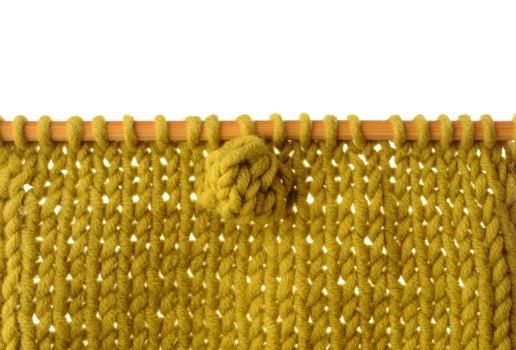
How to Make a Bigger Bobble
This bobble is made by knitting five times into 1 stitch, as for an easy bobble, but then you work a few rows on the 5 stitches before decreasing back to 1 stitch.
1. Work to the point where you want the bobble. Knit into the front, back, front, back, and front (that’s five times) of the next stitch.
2. Turn your work, so that the wrong side is facing, and purl the 5 bobble stitches.
3. Turn again, so that the right side is facing, and knit the 5 bobble stitches.
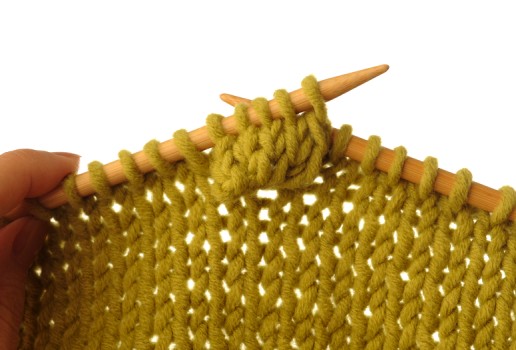
4. Repeat step 2.
5. Repeat step 3.
6. Do not turn work. Still on the right side, use the left needle to pick up the fourth stitch and pass it over the fifth and off the needle; pass the third stitch over the fifth and off the needle; pass the second stitch over the fifth and off the needle; and finally, pass the first stitch over the fifth and off the needle.

Knitting five times into 1 stitch, then working on the 5 stitches alone for a few rows before passing the 4 extra stitches, one at a time, over the last stitch forms this bobble.
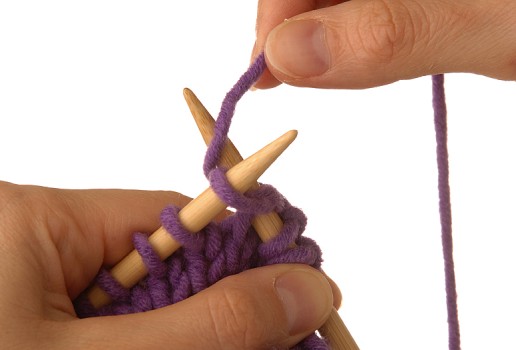
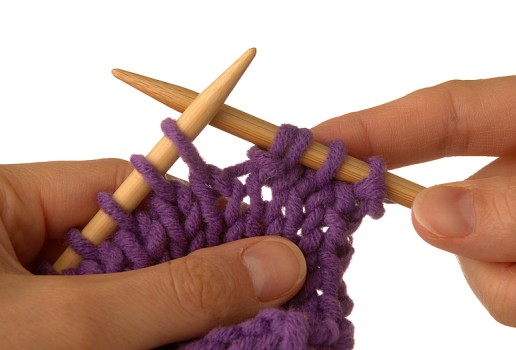
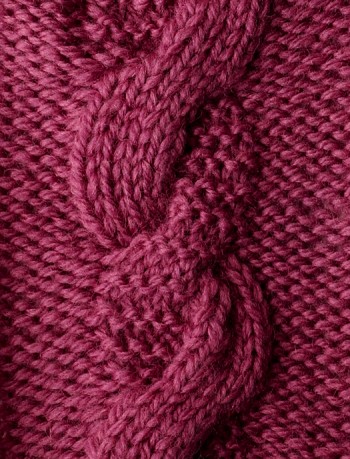
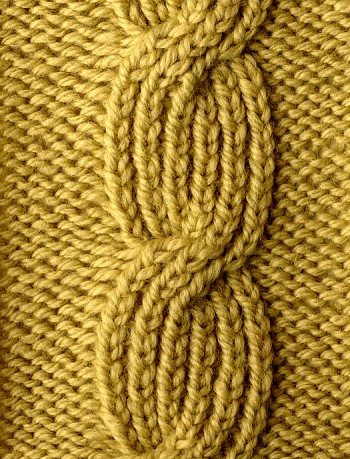
Make Simple Cables
Cables look more complicated than they actually are. If you can knit, purl, put stitches on a holder, and count, you can make a simple cable.

You make simple cables by holding one or more stitches on a cable needle to the front or the back of your work, knitting or purling the next one or more stitches from the left needle, and then knitting or purling the stitches from the cable needle. Whether you hold the stitches to the back or front determines which direction the cable crosses.
Simple Back Cross Cable
To practice making a cable, you need needles, yarn, a row counter, and a cable needle. Cast on 16 stitches and then work rows 1 and 2 shown below to set up for the cables. This cable, which slants to the right, is worked on the 6 stitches at the center, with 5 stitches of reverse stockinette stitch on either side. Remember to click your row counter ahead each time you complete a row.

1. Row 1 (RS): P5, k6, p5.
2. Row 2 (WS): K5, p6, k5.
3. Row 3 (cable row): P5, slip the next 3 sts purlwise to a cable needle (cn) and hold at back of work (a). K the next 3 sts from the left needle. K the 3 sts from the cn, starting with the first st that was slipped (b), p5.

Step 3A
Step 3B
4. Row 4: Rep row 2.
5. Rep rows 1–4 for back cross, or right, cable.
NOTE: You can slip the held stitches to the left needle before knitting them.
Simple Front Cross Cable
Making a front cross cable will be easy now that you have made a back cross cable. The only difference is that for this cable, you hold the stitches on the cable needle to the front of your work, so the cable slants to the left. You need to cast on 16 stitches, as before.
1. Row 1 (RS): P5, k6, p5.
2. Row 2 (WS): K5, p6, k5.
3. Row 3 (cable row): P5, slip the next 3 sts to a cable needle as if to purl and hold at front of work (a). Knit the next 3 sts from the left needle. Now use the right needle to knit the 3 sts from the cable needle, starting with the first st that was slipped onto the needle (b), p5.
Step 3A

Step 3B
4. Row 4: Rep row 2.
5. Rep rows 1–4 for front cross, or left, cable.
FAQ
There are different sizes and types of cable needles. Which one should I chose?
Always use a cable needle that is slightly smaller in diameter than your working knitting needle. If you use one that is too thick, you will stretch out your stitches. The type you choose depends entirely on your preference. Many knitters choose one that looks like a tiny double-pointed needle because it’s easier to knit directly from it. Others prefer a hook-shaped cable needle because the stitches don’t fall off easily, and it hangs down out of the way when you’re knitting the other stitches. Experiment with the various types to find the style that suits you best.

Knit 1 in the Row Below
Many textured stitch patterns include the instruction to “knit 1 in the row below.” It’s an easy stitch maneuver that causes the knitted fabric to pucker slightly, giving it more dimension.
How to Knit 1 in the Row Below
1. Holding the working yarn at the back, insert the right needle from front to back into the stitch directly below the next stitch on the left needle.
NOTE: Be sure to insert the needle all the way through to the back before knitting, so that the stitch above becomes caught up by the new stitch.
2. Wrap the working yarn around the tip of the right needle and knit as usual, sliding the stitch above off the left needle at the same time.
Knit or Purl Through Back of Loop
A common direction in knitting patterns is “k1 tbl” or “knit 1 through back of loop.” Likewise, you often see “p1 tbl” or “purl 1 through back of loop.” Knitting or purling through the back loop twists the stitch, and so it is a frequently-used maneuver in textured, twist-stitch patterns. It is also used in the bar increase, where you knit into the front and back of the same stitch. You also find “tbl” in the decreases k2tog tbl and p2tog tbl.
How to Knit Through Back of Loop
1. Holding the working yarn at the back, insert the right needle knitwise, from front to back, into the back loop of the next knit stitch on the left needle.
2. Wrap the working yarn around the tip of the right needle and knit as usual.

How to Purl Through Back of Loop
1. Holding the working yarn at the front, insert the right needle purlwise, from back to front, into the back loop of the next purl stitch on the left needle.
2. Wrap the working yarn around the tip of the right needle and purl as usual.
Knit with Bobbles and Knots
You learned how to make a single bobble a few pages ago. Now you can create stitch patterns that incorporate many bobbles or knots. Knots are textural stitches similar to bobbles, but they’re smaller and usually formed by simultaneously increasing and decreasing.
Bobble and Knot Stitches
Bobble Stitch
Here’s a pattern where on right side rows you work a bobble (as described in How to Make an Easy Bobble) every 4th stitch on every 6th row. You work this pattern on a multiple of 4 stitches plus 3.
1. Row 1 (RS—bobble row): *K3, make bobble (mb); rep from * to last 3 sts, k3.
2. Rows 2, 4, and 6 (WS): Purl.
3. Rows 3 and 5: Knit.
4. Row 7 (bobble row): K1, mb, *k3, mb; rep from * to last st, k1.
5. Rows 8, 10, and 12: Purl.
6. Rows 9 and 11: Knit.
7. Rep rows 1–12 for bobble stitch.
Trinity Stitch
Trinity stitch, which is also referred to as bramble stitch, works very well alongside cable panels. You work it on a multiple of 4 stitches plus 2.

1. Row 1 (RS): Purl.
2. Row 2 (WS): K1, *[k1, p1, k1] into the next st, p3tog; rep from * to last st, k1.
3. Row 3: Purl.
4. Row 4: K1, *p3tog, [k1, p1, k1] into the next st; rep from * to last st, k1.
5. Rep rows 1–4 for trinity stitch.
Knot Stitch
This is a textured stitch pattern that works well for sweaters, jackets, and bags. You work it over a multiple of 2 stitches plus 1.

1. Rows 1 and 3 (RS): Knit.
2. Row 2 (WS): K1, *p2tog without slipping sts off the needle, bring yarn to back and knit the same 2 sts together and slide them off the needle; rep from * to end of row.
3. Row 4: *P2tog without slipping sts off the needle, bring yarn to back and knit the same 2 sts together and slide them off the needle; rep from * to last sts, k1.
4. Rep rows 1–4 for knot stitch.
Pillared Knot Stitch
This interesting pattern resembles a rib, and it does pull in like a rib but without a lot of elasticity. You work it over a multiple of 4 stitches plus 1.

1. Row 1 (RS): K1, *p3tog without slipping sts from the left needle, bring yarn to back and knit the same 3 sts together without slipping sts from the left needle, bring yarn back to the front and purl the 3 sts together (this time slipping the sts off the left needle to complete the knot), k1; rep from * to end of row.
2. Row 2 (WS): Purl.
3. Rep rows 1 and 2 for pillared knot stitch.
Star Stitch
In this easy stitch, the little knots resemble stars. It is worked on a multiple of 4 stitches plus 1. This pattern uses the following abbreviation:

ms (make star): P3tog, leaving sts on the left needle, then wrap yarn around right needle and purl the same 3 sts together again (this time slipping the sts off the needle to complete the knot).
1. Rows 1 and 3 (RS): Knit.
2. Row 2 (WS): P1, *ms, p1; rep from * to end of row.
3. Row 4: P3, ms, *p1, ms; rep from * to last 3 sts, p3.
4. Rep rows 1–4 for star stitch.
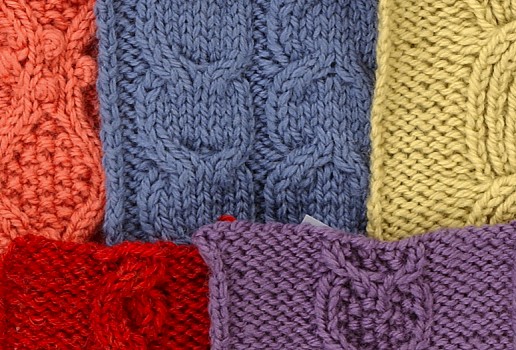
Learn More Cable Patterns
Now that you have seen how you can move stitches and cross them in your knitting, you are ready to try some other cable patterns.
Most instructions for cable knit garments break down the various stitch patterns and cable elements into panels so that they’re easier to follow. The following cable panels include 2 stitches in reverse stockinette stitch on each side of the cable.
More Cable Patterns
Braided Cable (12-Stitch Panel)
This cable is easier to make than it looks.

1. Row 1 (RS—cable row): P2, *slip the next 2 sts to a cable needle and hold at back, knit the next 2 sts from the left needle, knit the 2 sts from the cable needle; rep from * to last 2 sts, p2.
2. Rows 2 and 4 (WS): K2, p8, k2.
3. Row 3 (cable row): P2, k2, slip the next 2 sts to a cable needle and hold at front, knit the next 2 sts from the left needle, k2 sts from the cable needle, k2, p2.
4. Rep rows 1–4 for braided cable.
FAQ
Is it possible to work a cable without a cable needle?
You can work small, simple cables without a cable needle. This is not recommended for cables that require moving more than 3 stitches or those that require moving more than one set of stitches. Here’s how to work a simple 4-stitch cable:
1. Work up to the 4 cable stitches and slip them purlwise from the left needle to the right needle.
2. Insert the left needle tip from left to right into the front of the first 2 stitches slipped.
3. Carefully slide the right needle out of all 4 cable stitches, leaving the first 2 stitches originally slipped on the left needle and leaving the third and fourth stitches loose at the back of your work.
4. Carefully re-insert the right needle into the third and fourth stitches.

Upward cable (left); downward cable (right)
5. Slip the third and fourth stitches onto the left needle tip. The first 2 stitches are now crossed over in front of the third and fourth stitches.
6. Knit across the 4 cable stitches and then across the rest of the row.
Wave Cable (10-Stitch Panel)
This cable is similar to the simple cables you made earlier, except that you perform both the front cross and back cross in the same cable.

1. Row 1 (RS): P2, k6, p2.
2. Row 2 (WS): K2, p6, k2.
3. Row 3 (cable row): P2, slip the next 3 sts to a cable needle and hold at back, knit the next 3 sts from the left needle, knit the 3 sts from the cable needle, p2.
4. Row 4: Rep row 2.
5. Rows 5–8: Rep rows 1 and 2 twice.
6. Row 9 (cable row): P2, slip the next 3 sts to a cable needle and hold at front, knit the next 3 sts from the left needle, knit the 3 sts from the cable needle, p2.
7. Rows 10 and 12: Rep row 2.
8. Row 11: Rep row 1.
9. Rep rows 1–12 for wave cable.
Double Cable (12-Stitch Panel)
You can make this cable so that it looks like it’s pointing upward (shown on the left) or downward (shown on the right). Here’s how to make a downward-pointing cable:

1. Row 1 (RS): P2, k8, p2.
2. Row 2 (WS): K2, p8, k2.
3. Row 3 (cable row): P2, slip the next 2 sts to a cable needle and hold at front, knit the next 2 sts from the left needle, knit the 2 sts from the cable needle; slip the next 2 sts to a cable needle and hold at back, knit the next 2 sts from the left needle, k2 sts from the cable needle; p2.
4. Row 4: Rep row 2.
5. Rows 5–8: Rep rows 1 and 2 twice.
6. Rep rows 1–8 for double cable.
NOTE: To make the cable point upward, work all rows the same way, except on row 3 reverse the order of the front and back crosses.
Honeycomb Cable (20-Stitch Panel)
You can widen this interesting cable by adding multiples of 8 stitches.

1. Row 1 (RS—cable row): P2, *slip the next 2 sts to a cable needle and hold at back, knit the next 2 sts from the left needle, knit the 2 sts from the cable needle; slip the next 2 sts to a cable needle and hold at front, knit the next 2 sts from the left needle, knit the 2 sts from the cable needle; rep from * to last 2 sts, p2.
2. Rows 2, 4, 6, and 8 (WS): K2, p16, k2.
3. Rows 3 and 7: P2, k16, p2.
4. Row 5 (cable row): P2, *slip the next 2 sts to a cable needle and hold at front, knit the next 2 sts from the left needle, knit the 2 sts from the cable needle; slip the next 2 sts to a cable needle and hold at back, knit the next 2 sts from the left needle, knit the 2 sts from the cable needle; rep from * to last 2 sts, p2.
5. Rep rows 1–8 for honeycomb cable.
Garter and Stockinette Stitch Cable (14-Stitch Panel)
Here’s a pretty cable that you don’t see very often.
1. Row 1 (RS): P2, k10, p2.
2. Row 2 (WS): K2, p5, k7.
3. Rows 3–6: Rep rows 1 and 2 twice.
4. Row 7 (cable row): P2, slip the next 5 sts to a cable needle and hold at back, knit the next 5 sts from the left needle, knit sts from the cable needle, p2.
5. Row 8: K7, p5, k2.
6. Row 9: Rep row 1.
7. Rows 10–16: Rep rows 8 and 9 three more times; then rep row 8 once more.
8. Row 17 (cable row): Rep row 7.
9. Rows 18–20: Rep row 2 once; then rep rows 1 and 2 once more.
10. Rep rows 1–20 for garter and stockinette stitch cable.
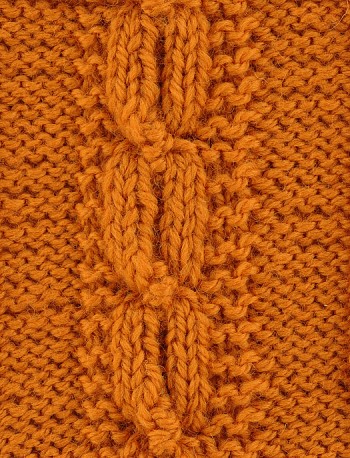
Combine Cables with Bobbles, Knots, and Textured Stitches
Here are a few cables that integrate bobbles, knots, or textured stitches into their structure. Most of these combinations take on an embossed, or sculptural, quality, which is what is so fascinating about knitting with cables.
Fancy Cable Stitches
Knotted Cable (10-Stitch Panel)
This cable involves moving the cable needle from front to back and working the held stitches in stages.
1. Rows 1, 5, 7, and 9 (RS): P2, k2, p2, k2, p2.
2. Rows 2, 4, 6, and 8, and 10 (WS): P4, k2, p4.
3. Row 3 (cable row): P2, slip the next 4 sts to a cable needle and hold at the front, knit the next 2 sts from the left needle; then slip 2 sts from the cable needle back to the left needle. Bring the cable needle (with the remaining 2 sts on it) to the back, purl the 2 sts that were moved back to the left needle; knit the 2 sts from the cable needle, p2.
4. Rep rows 1–10 for knotted cable.
Bobble Cable (13-Stitch Panel)
This cable uses the following techniques:

mb (make bobble): For a refresher on how to make a bobble, see Make Bobbles.
3-st right purl cable: Slip the next st to a cable needle and hold at back, k2 from the left needle, p1 from the cable needle.
3-st left purl cable: Slip the next 2 sts to a cable needle and hold at front, p1 from the left needle, k2 from the cable needle.
1. Row 1 (RS—cable row): P3, 3-st right purl cable, p1, 3-st left purl cable, p3.
2. Rows 2 and 8 (WS): K3, p2, k3, p2, k3.
3. Row 3 (cable row): P2, 3-st right purl cable, p3, 3-st left purl cable, p2.
4. Rows 4 and 6: K2, p2, k5, p2, k2.
5. Row 5 (bobble row): P2, k2, p2, mb, p2, k2, p2.
6. Row 7 (cable row): P2, 3-st left purl cable, p3, 3-st right purl cable, p2.
7. Row 9 (cable row): P3, 3-st left purl cable, p1, 3-st right purl cable, p3.
8. Rows 10 and 12: K4, p5, k4.
9. Row 11 (cable row): P4, slip the next 3 sts to a cable needle and hold at back, knit the next 2 sts from the left needle, then p1, k2 from the cable needle, p4.
10. Rep rows 1–12 for bobble cable.
Ribbed Cable (15-Stitch Panel)
This interesting cable is worked in k1, p1 ribbing.
1. Row 1 (RS): P2, k1, *p1, k1; rep from * four times to last 2 sts, p2.
2. Row 2 (WS): K2, purl into back of next st, *k1, purl into back of next st; rep from * four times to last 2 sts, k2.
3. Row 3 (cable row): P2, slip the next 6 sts to a cable needle and hold at back, k1, [p1, k1] twice from the left needle, then [p1, k1] three times from the cable needle; p2.
4. Row 4: Rep row 2.
5. Rows 5–14: Rep rows 1 and 2 five times.
6. Rep rows 1–14 for ribbed cable.
Wishbone and Seed Stitch Cable (12-Stitch Panel)
This delicate cable looks complicated but is easy to do.

1. Row 1 (RS—cable row): P2, slip the next 3 sts to a cable needle and hold at back, k1, [p1, k1, p1] from the cable needle; slip the next st to a cable needle and hold at front, [k1, p1, k1], k1 from the cable needle; p2.
2. Rows 2, 4, and 6 (WS): K2, *p1, k1; rep from * twice, p2, k2.
3. Rows 3 and 5: P2, *k1, p1; rep from * twice, k2, p2.
4. Row 7: P2, k1, p1, k3, p1, k2, p2.
5. Row 8: K2, p1, k1, p3, k1, p2, k2.
6. Rep rows 1–8 for wishbone and seed stitch cable.
Hollow Oak Cable (15-Stitch Panel)
This beautiful cable uses the following techniques:

mb (make bobble): For a refresher on how to make a bobble, see Make Bobbles.
3-st right purl cable: Slip the next st to a cable needle and hold at back, k2 from the left needle, p1 from the cable needle.
3-st left purl cable: Slip the next 2 sts to a cable needle and hold at front, p1 from the left needle, k2 from the cable needle.
1. Rows 1 and 5 (RS—bobble row): P5, k2, mb, k2, p5.
2. Rows 2, 4, 6, and 20 (WS): K5, p5, k5.
3. Row 3 (bobble row): P5, mb, k3, mb, p5.
4. Row 7 (cable row): P4, 3-st right purl cable, p1, 3-st left purl cable, p4.
5. Row 8: K4, p2, k1, p1, k1, p2, k4.
6. Row 9 (cable row): P3, 3-st right purl cable, k1, p1, k1, 3-st left purl cable, p3.
7. Row 10: K3, p3, k1, p1, k1, p3, k3.
8. Row 11 (cable row): P2, 3-st right purl cable, [p1, k1] twice, p1, 3-st left purl cable, p2.
9. Row 12: K2, p2, [k1, p1] three times, k1, p2, k2.
10. Row 13: P2, k3, [p1, k1] twice, p1, k3, p2.
11. Rows 14, 16, and 18: Rep rows 12, 10, and 8, respectively.
12. Row 15 (cable row): P2, 3-st left purl cable, [p1, k1] twice, p1, 3-st right purl cable, p2.
13. Row 17 (cable row): P3, 3-st left purl cable, k1, p1, k1, 3-st right purl cable, p3.
14. Row 19 (cable row): P4, 3-st left purl cable, p1, 3-st right purl cable, p4.
15. Rep rows 1–20 for hollow oak cable.