PAINTED BIRD DESIGN
A couple of years ago I was inspired by a piece of art and used it to create a cake, and within this design was a bird (it’s pictured in the mood board). I love birds—I love watching them and imagining what it would be like to be one . . . it seems so free to be able to fly places, to see the world from such a high vantage point. It seems so safe. I definitely hope I spend another life as a bird!!
Anyway . . . ever since I painted that bird on the cake I have been itching to create more bird art. I got the opportunity to do a fantail piece in late 2019 at the Hannah Jensen workshop I attended in Christchurch. There was no cake involved and actually not really any painting—or at least not detail painting. Hannah’s art is comprised of multiple layers of paint over a wooden board—I’m talking 50+ layers!! Then she sketches a quick design on the dry paint layers and uses a carving tool to carve into the layers and create this amazing texture and art. (Side note: Hannah is amazing, and if you want to be inspired go and check out her work. She is also the most epic human and I just love listening to her Instagram stories. She starts every day with ‘Good morning beautiful humans’ in the most sing-song, calming way.)
Obviously I’d thought I would do a flower at the workshop, but as we were researching images I remembered the bird on the cake. I picked a beautiful piwakawaka (fantail) image and used this to sketch and then carve onto my board in Hannah’s style (my creation is shown in the mood board, bottom left). It further inspired what is now a deep need to create more bird art, but this time on cakes.
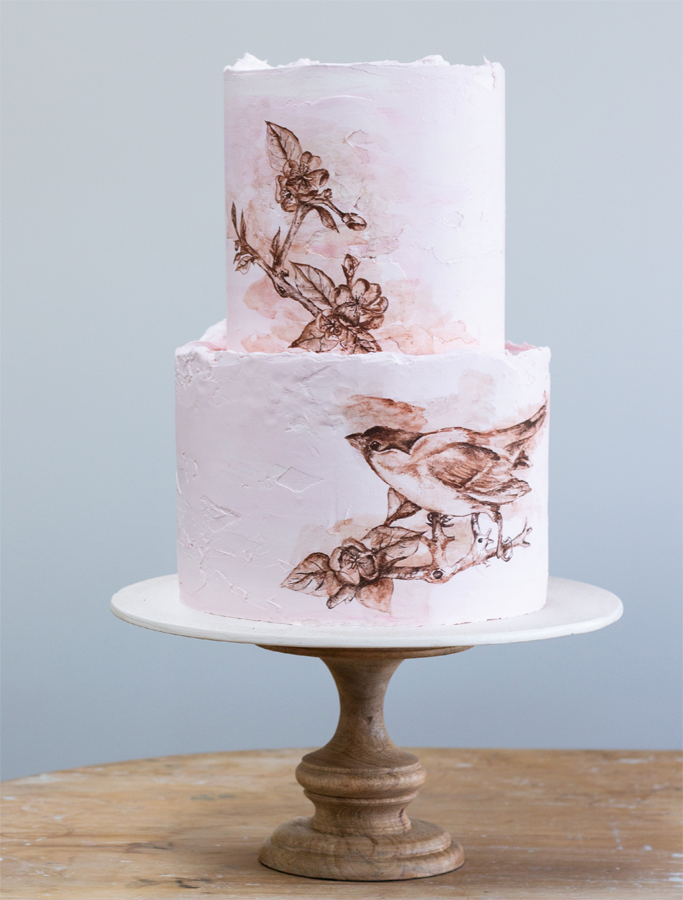
For this design I wanted a smaller two-tier cake, to keep it delicate. I would make it slightly ethereal by using a blush-coloured textured ganache finish over the whole cake. I do love piwakawaka so I decided to sketch some of these into the design. We get these cheeky birds out in our native bush, and they flit around from branch to branch and often follow you for a while along a bush walk.
For the colour scheme I chose to go with browns and yellows. The first step would be to wash out the background with a light watercolour, then sketch the bird in basic lines over the top, with maybe a small amount of shading to give detail. This design would work really well with some flowers added among the birds; actually, my tattoo artist Triton Ly does incredible floral bird work, and his work is another huge inspiration for me.


DESIGN DEBRIEF
Best-laid plans . . . the cheeky piwakawaka was elusive to me, so without a proper inspiration image for reference I started thinking further outside the box. I stumbled across these printed Hobbytex place-setting cloths that depicted a bird sitting on a blossom branch! Epic—this was now the direction I wanted to go in.
I stayed loosely with my original design, which was the textured light blush with the painting of a bird. I dropped the yellow colour and just used a single shade of brown. I switched between watercolour, lines and layering to give the painting life. Originally, as per my sketch, I had wanted two birds. When I’d finished the bird on the bottom tier, however, I’ll be honest—I got bored with the bird and didn’t want to paint another. Instead, I pieced together branches and blossoms from the various images to create the illustration on the second tier.
I love the finished product so much, and I think this is a great representation of letting the design remain loose and letting it lead you. If I had remained rigid about following the original description—or even my sketch—I wouldn’t have come away happy. I am forever grateful to have customers who allow me this kind of creativity.