Chapter 4
Shoulders and Neck
In a sport such as soccer, the attention is on the lower extremities, the legs. Soccer players move and perform the bulk of their skills with the ball using the lower extremities. Often players who decide to add resistance training to their programs focus on the legs alone, but this is shortsighted. Every section of the body above the legs is recruited during play to prevent injuries, maintain balance, increase speed, generate and transfer power, maintain space, perform throw-ins, and much more.
When choosing to supplement your ball training, realize that the entire body, not just the legs, needs to be addressed. Imbalances within and between the various regions of the body can derail performance and may even increase the risk of injury. An overall fitter player will be able to delay fatigue and go deeper into a match, increasing his chances of affecting the outcome of the match. The fitter player also is more resistant to injury, and on teams that have minimal substitutes, keeping players healthy is a prime reason for supplementing training.
Anatomy of the Shoulder Joint
A joint, or articulation, is where bones come together. The three main types of joints are immovable, slightly movable, and freely movable. Examples of immovable joints are the bones of the adult skull and the joints between the three bones that make up each side of the pelvis. Examples of slightly movable joints are where the ribs connect to the sternum. Freely movable joints are what most people think of when envisioning a joint—shoulder, elbow, knee, ankle, and others—and there are different types of freely movable joints. Two of the most common injuries sustained by soccer players damage the joint integrity of the ankle or the knee.
The typical freely movable joint is encased inside a sleeve of connective tissue called the synovial capsule. Thickenings of this capsule at specific locations form the ligaments. Ligaments connect bone to bone, and tendons connect muscle to bone. Most ligaments are extra-articular; that is, they are outside of the joint capsule that surrounds the two bones. The notable exceptions are the anterior and posterior cruciate ligaments, which are intra-articular and are found within the joint capsule of the knee. (Learn more about the knee in chapter 8.)
The upper arm is connected to the central portion of the skeleton, which is called the axial skeleton, through what appears to be a very simple arrangement that has a complex overall function. The humerus, the upper arm bone, articulates with the glenoid, the mostly flat surface of the scapula that is made deeper by a cartilage cup called the glenoid labrum. The scapula rides on some deep muscles of the back and can slide and rotate a bit around the curved surface of the ribs. But its only connection to the axial skeleton is by way of the clavicle, or collarbone, to the sternum, or breastbone. So what we see are three distinct joints: the sternoclavicular joint (clavicle to sternum), the acromioclavicular joint (clavicle to a specific location on the scapula, the point on the top of your shoulder), and the glenohumeral joint (the flat glenoid on the scapula to the rounded head of the humerus). You may hear of a scapulothoracic joint between the scapula and the ribs, although there is no direct bony articulation between the scapula and the ribs.
The ligaments of the sternoclavicular joint are quite strong, and this joint is not injured very frequently in soccer. The acromioclavicular joint has a number of ligaments for both stability and mobility that can be injured during soccer play, mostly from a direct blow to the top of the shoulder (e.g., falling and landing on the tip of the shoulder). The glenohumeral joint is the most mobile joint in the body and is an amazing feat of biomechanical engineering. The joint capsule thickens into a number of distinct glenohumeral ligaments. This joint dislocates most often when the arm is outstretched and forced into another direction, usually backward, leading to the humerus dislocating forward or anteriorly.
A shoulder dislocation occurs at the glenohumeral joint. A shoulder separation occurs at the acromioclavicular joint.
The body is divided into three planes. The frontal plane divides the body into front and back sections, the sagittal plane divides the body into right and left sections, and the transverse plane divides the body into upper and lower sections. All movements of the shoulder are described according to the plane in which the movement occurs. As the most mobile joint in the body, the shoulder moves in all three planes and has a number of distinct movements (see table 4.1).
Mobility is a good thing, but it also increases the potential for injury. In soccer, collisions and falls cause most of the injuries to the upper extremity and shoulder girdle. A player with strong shoulder muscles will be able to react to and withstand impact to protect the shoulder.

Shoulder Muscles
Most shoulder muscles attach to the scapula. As stated in chapter 3, a muscle has two attachments. In general the origin is at the immobile end, while the insertion is at the movable end. In the majority of situations, when a muscle is stimulated and contracts, it pulls the insertion toward the origin. Most muscles cross one joint, so its action is on that one joint, but when a muscle crosses two joints, it can have an effect on both joints. When you can picture a muscle’s origin and insertion, you can reason out its action.
Deltoid
The deltoid muscle group (figure 4.1) forms the cap over the shoulder joint. There are three distinct muscles: the anterior deltoid toward the front, the lateral deltoid in the middle, and the posterior deltoid toward the back. The anterior deltoid originates on the clavicle; the lateral deltoid originates on the acromion process of the scapula (that point on the top of your shoulder); and the posterior deltoid originates on the spine of the scapula, which is on the posterior surface of the scapula. These three muscles attach to a common tendon that inserts laterally (away from the midline) on the humerus.
Together, the deltoid muscle group abducts the arm. Individually, the anterior deltoid helps with shoulder flexion, and the posterior deltoid assists with shoulder extension. Put one hand over the deltoid, and perform each action. When you raise your arm as if you were answering a question (shoulder flexion), you should feel the anterior deltoid, but not the posterior deltoid, contract.
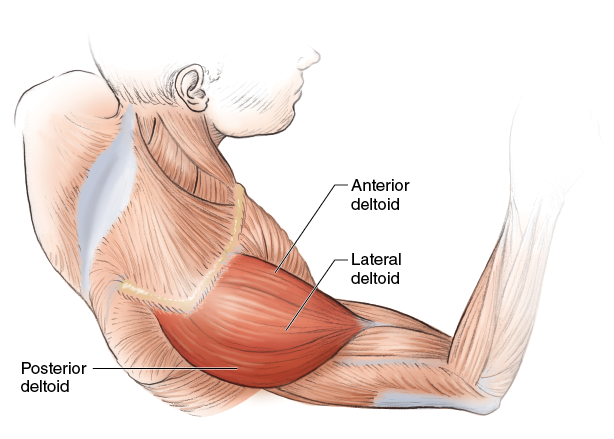
Figure 4.1 Deltoid muscle group.
Rotator Cuff
The rotator cuff muscles are necessary for rotating the humerus in the glenoid, but they also are critical for shoulder stability. Unlike the hip, the shoulder does not have much in the way of structural constraints, so muscles need to provide the support. The rotator cuff (figure 4.2) is made up of four muscles. The subscapularis originates from the underside of the scapula, courses under the arm, and inserts anteriorly on the humerus. This is the main muscle for internal rotation of the humerus in the glenoid and is the muscle usually injured when a baseball pitcher tears his rotator cuff. The other three muscles of the rotator cuff are found mostly on the backside of the scapula: the supraspinatus (supra means it is above the spine of the scapula), infraspinatus (infra means it is below the spine of the scapula), and teres minor (teres means ropelike, and minor means it is the smaller of two ropelike muscles). Together, these three muscles perform external rotation of the humerus in the glenoid and assist in a number of other actions.
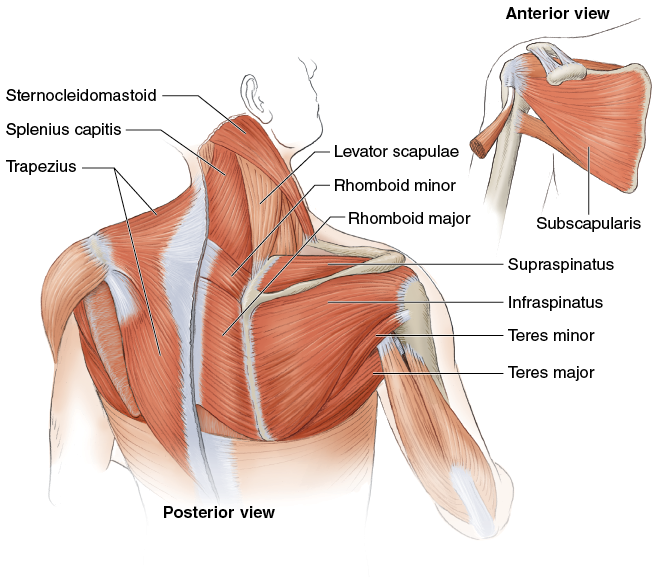
Figure 4.2 Muscles of the rotator cuff and neck.
Other Shoulder Muscles
Many other shoulder muscles help with shoulder mobility and stability:
• Rhomboid major and minor. These muscles originate mostly on the upper thoracic vertebrae (the vertebrae where the ribs attach) and run diagonally down, inserting on the nearby border of the scapula. The rhomboids help adduct the scapula (pull the scapula to the vertebral column), elevate the scapula (shrug the shoulders), and rotate the glenoid inferiorly (down, away from the head) because of the diagonal direction of the muscle’s fibers.
• Levator scapulae. This muscle originates on the upper cervical vertebrae (the neck) and inserts at the upper corner of the scapula. By its name, it elevates the scapula, but it also assists in rotating the glenoid inferiorly as well as in scapular adduction.
• Serratus anterior. This muscle can be difficult to visualize. It originates on the lateral surface (away from the midline) of a number of ribs and follows the ribs back toward the vertical border where the rhomboids insert. When activated, the serratus anterior pulls the scapula around the surface of the ribs, away from the vertebral column. Picture the movement of the scapula when someone performs a boxing jab. This muscle is addressed again in chapter 5.
• Trapezius. This broad, flat muscle of the upper back is just under the skin. It originates all along the cervical and thoracic vertebral column and inserts at the lateral end of the spine of the scapula to adduct the scapula. Functionally, the trapezius is three muscles: upper, middle, and lower. The upper trapezius elevates and rotates the glenoid down, while the lower trapezius rotates the glenoid up and stabilizes the scapula to prevent rotation.
Neck Muscles
The neck is very mobile, but it is also a fragile area of the body. Because of heading, the neck muscles figure prominently in soccer. The motions of the neck include flexion (moving the chin down) and extension (moving the chin up), lateral flexion (tilting the head toward either shoulder), and rotation (turning the head). These actions can be combined for circular motions.
The primary neck flexor is the sternocleidomastoid, which originates on the clavicle and sternum, inserting on the mastoid of the skull (that knot behind your ear). The sternocleidomastoid also turns the head right or left; contracting the muscle on the right side turns the face to the left and vice versa. The main neck extensor is the splenius capitis, which originates on a number of vertebrae and inserts at the base of the skull. The levator scapulae and upper trapezius assist in neck extension. Lateral flexion is accomplished by contracting these muscles on the right or left side to move the head in the appropriate direction.
Seal Crawl

Execution
1. Lie on the ground. Get into the up position of a traditional push-up but on your insteps, not your toes. Keep your insteps on the ground for this exercise.
2. Using only your arms for propulsion, crawl around, dragging your legs. Changing directions and speed involves more muscles, so do not crawl in a straight line. Keep your back and hips straight, and do not allow your trunk to sag toward the ground. Go farther and faster as your strength improves.
Muscles Involved
Primary: Latissimus dorsi, deltoid
Secondary: Rotator cuff (subscapularis, supraspinatus, infraspinatus, teres minor), trapezius, spinal extensors (erector spinae, multifidus) and abdominal core (external oblique, internal oblique, transversus abdominis, rectus abdominis) to maintain a straight back
Soccer Focus
The shoulder joint is very complex. Unlike the hip, the shoulder has little structural bone support. The lack of bony restraint allows for extensive motion around the shoulder. About 15 muscles attach to the scapula, clavicle, and humerus to manage this movement. Exercising each muscle and movement separately would require a lot of time and special equipment. Choose exercises that work multiple muscles in many different movements to make the most of your training time. The seal crawl requires functional motion and support from most of the shoulder, back, and abdominal muscles. This is a good general exercise for every player but especially for young players who tend to have weak shoulders.

Variation
Wheelbarrow
The wheelbarrow exercise requires a partner. While performing the action, you provide the pace of movement, not your partner. You pull; your partner does not push. Keep your back straight. If you have trouble keeping your back straight, have your partner hold your legs farther up toward your thighs.


Safety tip
Even if your back sags a bit when you perform the seal crawl, try to keep it straight when performing the wheelbarrow. It is best to perform these exercises on a safe surface such as grass or the floor. Avoid surfaces littered with debris that might cut or injure the hands.
Arm Wrestling
Execution
1. You will need a partner for this exercise. You and your partner lie facedown on the ground with your heads nearly touching. Get in the up position for a traditional push-up.
2. On your coach’s command, try to touch or gently slap your partner’s hands while trying to avoid being touched or slapped by your partner. Although some movement may occur, try to stay in the same place.
3. The duration of this exercise will vary according to arm and abdominal strength. First perform the exercise for 15 seconds, and increase the time as fitness improves.
Muscles Involved
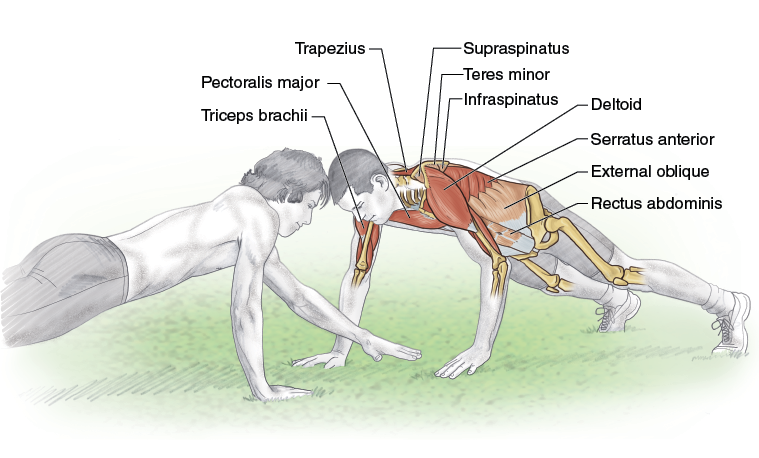
Primary: Triceps brachii, pectoralis major, deltoid, serratus anterior, trapezius
Secondary: Rotator cuff, spinal extensors, abdominal core
Soccer Focus
This is a good exercise for working a wide range of muscles—the abdominals and back muscles for posture, the muscles that attach to the humerus to maintain the desired position and balance when one hand is off the ground, and the muscles that attach to the scapula to control the shoulders as you challenge each other. This exercise improves strength, balance, and local muscle endurance of the shoulders, arms, trunk, and back. Improvements in these aspects of muscle function will help you play deeper into the match and resist fatigue. Training is not just about the legs and the heart. Training for a whole-body activity such as soccer means addressing the whole body. Focusing only on the legs is a common error when training.

Variation
Grasp right hands with your partner while balancing on your left arms (or left hands, if you both are left handed). Your goal is to put your partner off balance while maintaining your own balance. Begin by simply grasping hands and holding this position. Once you both can maintain balance, add the combative element. It may take some practice to advance to using the nondominant arm, but that is a goal. Don’t focus only on the dominant arm.
Head–Ball–Head Isometrics


Safety tip
Trying to best your partner could make the ball pop out and cause you to bump heads. Be careful. This isn’t about winning.
Execution
1. Find a partner of similar height and weight. Stand in a staggered stance facing each other. Pin the ball between your foreheads. You may find it helpful to hold each other’s upper arms.
2. Push with your legs through the trunk, neck, and ball in an attempt to push your partner back as your partner attempts to push you back. Keep the ball pinned between your heads. This is not a competitive exercise. You are not trying to beat your partner. The idea is to squeeze the ball.
3. At first perform a few repetitions of 10 seconds each. As you get stronger, increase the number and duration of repetitions.
Muscles Involved
Primary: Sternocleidomastoid, upper trapezius
Secondary: Gastrocnemius, soleus, quadriceps (vastus medialis, vastus lateralis, vastus intermedius, rectus femoris), gluteus maximus, spinal extensors
Soccer Focus
For very young players, heading the ball is more of a novelty that usually happens from a bounced or thrown ball. Most very young players are unable to consistently get the ball airborne or master the movements necessary to properly head the ball, making heading a pretty rare skill. As players age and grow, heading takes on an integral role in the game, making it necessary to devise ways to increase neck strength. Neck strength is important not only for heading but also to protect the head during collisions. The head is protected when the neck muscles contract to anchor the head to the much heavier torso. When the neck muscles are not strong enough, the head can jerk, causing whiplash or concussion even in the absence of a direct blow to the head.

Partner-Assisted Neck Resistance

Execution
1. Find a partner of similar height and weight. Your partner will provide resistance to you as you perform the exercise. Have your partner stand in front of you with her arm extended and the palm of her hand on your forehead.
2. Flex your neck forward against the resistance provided by your partner. Your partner should provide resistance but still allow you to move through the full range of motion. The strength of this movement comes from the neck, not the trunk.
3. Repeat the exercise for all directions of movement. This can be repeated for neck extension (partner’s hand on the back of your head) as well as to both sides for lateral flexion (partner’s hand on one side of the head and then the other).
Muscles Involved
Primary: Sternocleidomastoid (forward flexion, lateral flexion), splenius (extension), upper trapezius (backward extension, lateral flexion)
Secondary: Neck stabilizers (such as splenius, semispinalis capitis, and scalenes)
Soccer Focus
Heading is a complex skill that does not come naturally. Why would anyone voluntarily put his head in the path of a fast-moving object? Most teams have players who will do anything to get their heads on the ball and players who will go out of their way to avoid heading the ball. Consider the difficulty of heading. When the ball is in the air, the player must decide where on the field he needs to be to head the ball and what speed and direction are necessary to get there. When he heads the ball, will he be standing or running and, if running, in what direction? Will he have to jump? How high? Off one leg or two? Where will he redirect the ball? In the air, to the ground, to a teammate? If to a teammate, should he direct the ball to his teammate’s feet, in the path he is running, or somewhere else? If the header is a shot on goal, the goalkeeper must be avoided, so where is the goalkeeper? Few of these decisions involve an opponent, and all decisions must be made well ahead of impact with the ball or the opponent. It’s a wonder anyone really wants to head a ball. But when done well, heading is an electrifying skill that can thrill player and spectator alike.

Variations
There are a number of variations to this exercise. One involves a towel. Your partner stands in front of you and drapes a towel around the back of your head, holding both ends. You perform neck extension against the resistance of the towel. Your partner stands opposite the movement you perform instead of in the direction of your movement as in the main exercise. If you don’t have a partner, another variation is to perform isometrics by squeezing the ball against a wall using the various neck motions.
Floor Bridge


Safety tip
At the top of the bridge, the shoulders should be in contact with the floor. This should not put any strain on the head or neck.
Execution
1. Lie on your back with your knees bent, feet flat on the floor and spread about hip-width apart. You may need to spread your arms to your sides for balance.
2. Raise your hips and trunk until your body forms a straight line from your knees to your shoulders.
3. Pause at the top position for a couple of seconds, and draw in your core. Slowly lower your trunk nearly to the ground. Hold this position and repeat. Start with five repetitions, and progress as strength improves.
Muscles Involved
Primary: Hamstrings (biceps femoris, semitendinosus, semimembranosus), gluteus maximus, gluteus medius, abdominal core
Secondary: Upper trapezius, splenius, spinal extensors
Soccer Focus
In years past, supplemental training for the neck was limited to neck bridges borrowed from wrestling. In wrestling, neck bridging is an important skill to keep from being pinned, but it is largely isometric and mostly involves neck extension and hyperextension. In soccer, a strong neck not only helps with heading but also is important for stabilizing the head during collisions with the ball, other players, the ground, the goalposts, and more. But there are other options for improving support from the neck and shoulders. Although this is most commonly thought of as a core exercise, the neck and shoulders are one of three points of ground contact and have to work against the push applied by the feet. They are also activated when the trunk is elevated. Be sure to keep the glutes contracted and the abdominals drawn in throughout the exercise.

Variation
An element of balance can be added very easily. Instead of placing your feet on the ground for this bridge exercise, place your feet on a ball. Adding an unstable element and a narrower base of support greatly increases the difficulty of the exercise. In the gym, you can do this exercise with your feet on a large stability ball.

Pull-Up


Safety tip
Avoid straining your shoulders by lowering your body slowly and by not hanging too long in the lower position.
Execution
1. With your hands a bit more than shoulder-width apart, grasp an overhead horizontal bar or handles on a pull-up rack, palms turned away from you.
2. Inhale and draw the navel in. Pull the body weight up until the chin is over the bar. Exhale at the point of greatest difficulty.
3. Slowly return to the starting position and repeat. Do as many as you can.
Muscles Involved
Primary: Latissimus dorsi, upper and middle trapezius, biceps brachii, brachioradialis
Secondary: Levator scapulae, rhomboid major and minor, teres major and minor, infraspinatus, forearm muscles (mostly wrist and finger flexors including flexor carpi radialis and ulnaris, palmaris longus, flexor digitorum superficialis and profundus, and flexor pollicis longus) to grasp bar
Soccer Focus
Many of the exercises in this book use body mass as the resistance. The classic pull-up is a multijoint exercise that uses body mass as resistance and is still hard to beat. For general, all-around work on the shoulders, you could do push-ups, pull-ups, and dips and expect to work almost every muscle with an attachment to the scapula and humerus. Although the pull-up increases strength, it also improves local muscle endurance because improvements are generally seen as increased repetitions. For greater strength, some athletes add resistance and intensity by hanging a free weight to a belt and wearing it around the waist.

Variation
Palms up or palms down? Most agree that a pull-up with the palms up is somewhat easier than a pull-up with the palms down. The reason is anatomy. The biceps brachii originates on the scapula and inserts on the radius. The brachialis originates on the humerus and inserts on the ulna. The motion of the ulna is elbow flexion and extension like the radius, but the radius also rotates over the ulna for forearm pronation and supination. The biceps is a supinator first and an elbow flexor second, while the brachialis is only a forearm flexor. When pull-ups are done with the palms up, the biceps doesn’t need to supinate, so these two muscles work together to flex the elbow. When the palms are down, the biceps tries to supinate, leaving the brachialis to act without much help, making the exercise harder.
One-Arm Dumbbell Row

Execution
1. Kneel on your left knee on a padded bench. Add support by placing your left hand on the bench. Your right foot is flat on the floor, as is a dumbbell.
2. Lean forward at the hip while keeping the spine straight, and grasp the dumbbell.
3. Inhale as you raise the arm and flex the elbow as high as possible, lifting the weight to the trunk.
4. Pause at the top of the lift, and then exhale as you lower the weight until the arm is fully extended. The motion is similar to sawing wood.
Muscles Involved
Primary: Latissimus dorsi, teres major, posterior deltoid, trapezius, rhomboid major and minor
Secondary: Forearm muscles, spinal extensors for posture
Soccer Focus
Modern soccer tactics are twofold. On offense, the team tries to make the field as big as possible to give players room to maneuver and spread the defense thin. On defense, the team tries to make the field as small as possible so the team defense is very compact, and each defender is close to the ball. Players inevitably find themselves in very close quarters while competing for the ball. One of the best ways players, especially strikers, can keep a defender away from the ball is to shield the defender from the ball. This requires back and shoulder strength to make the attacking player seem bigger than he really is and avoid the wrath of the referee for unfair use of the arms. A player who is adept at screening defenders and able to maintain possession of the ball will play a lot of minutes. Possession is a big part of the game, so being able to screen defenders away from the ball is a critical and often overlooked skill.

Variations
Posture is important during rowing exercises. The standing row is a complex exercise, like many barbell lifts. You must raise the weighted bar off the floor to the thighs and then assume the specific posture before executing the row. T-bar rows, especially when performed while lying on a bench, provide support for the trunk and offer a measure of safety. Many cable machines are capable of a rowing motion that isolates the movement for safe execution of the lift.
Prone Dumbbell Fly


Safety tip
This exercise can be very difficult, so don’t use too much resistance.
Execution
1. Lie prone on a padded bench. Your head or neck may hang over the end of the bench. Be sure the bench is well grounded and not at all unstable. Two dumbbells are on the floor on either side of the bench.
2. Grasp the weights. With elbows slightly flexed, inhale and raise your arms to lift the weights, attempting to make the arms horizontal to the floor.
3. Slowly lower the weights as you exhale.
Muscles Involved
Primary: Trapezius, rhomboid major and minor, serratus anterior, posterior deltoid, teres major, latissimus dorsi
Secondary: Triceps brachii (long head), erector spinae, rotator cuff
Soccer Focus
Watch what goes on in the penalty area of a professional match as players prepare to receive a corner kick. The pushing, shoving, grabbing, holding off, and fighting for position in the seconds just before the actual kick might surprise you. A corner kick is a scoring opportunity that has a good enough probability for success that players will be very aggressive when establishing their positions to either deflect or defend the approaching ball. (Interestingly, the scoring probability for a corner kick is not as high as you might expect. Only about 2 percent of corner kicks result in goals. One coach told me his team went 1 for more than 100 in one season.) A striker who is being counted on to gain an advantageous position for these opportunities will not be very effective if he isn’t able to use his arms within the laws of the game to maintain his position in the crowded penalty area.

Variation
Bent-Over Row
A bent-over row is a good alternative to the prone dumbbell fly. Maintain good spinal posture when performing the bent-over row; don’t round the back. This exercise mainly works the muscles that attach to the scapula—the muscles that help maintain good scapular motion, shoulder flexibility, and range of motion.

Neck Machine Flexion and Extension
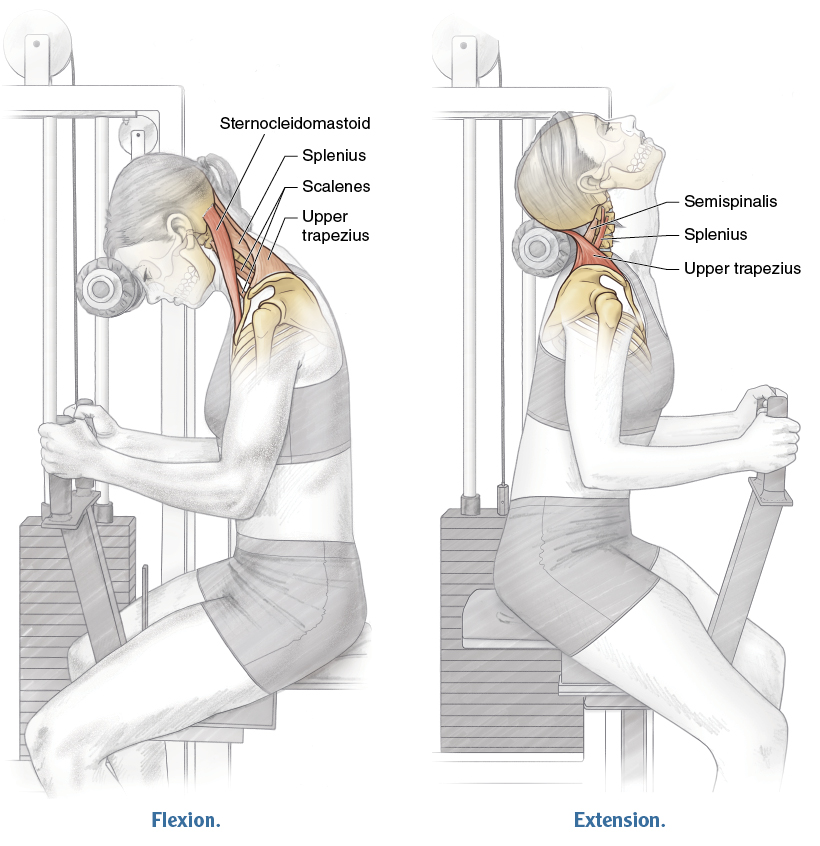
Execution
1. Adjust the seat position for your height. Sit erect with your feet flat on the floor and grasp the handles (if your machine has handles). Begin with the neck in a bit of an extended position.
2. For flexion, place your forehead on the pad. (The pad on some machines accommodates the entire face.) Flex your neck by drawing the chin down toward the chest. Pause and then return to the starting position.
3. For extension, turn around on the seat, and place the back of your head on the pad. This time, begin with the neck in a bit of a flexed position. Perform neck extension by raising your chin toward the ceiling. Pause and then return to the starting position.
Muscles Involved
Primary: Sternocleidomastoid (flexion), upper trapezius (extension), splenius (extension)
Secondary: Scalenes (flexion), splenius (flexion), upper trapezius (flexion), semispinalis (extension)
Soccer Focus
Good neck strength is important for the skill of heading as well as for protecting the head during inevitable collisions. Despite this, surprisingly few coaches include neck strengthening in their training programs. Much of the power for heading comes from the trunk, while part of the finer touch comes from the neck’s action on the head to send the ball in the desired direction. Mostly flexion is used, but rotation, which is a more complex skill, is also possible. And one cannot discount the role of a strong neck in stabilizing the head so that head acceleration during collisions is minimized.

Dumbbell Shoulder Press


Safety tip
Begin with a low weight. You need some initial strength to be able to control the weight when it is overhead.
Execution
1. Sit on a weight bench with your back straight and your feet flat on the floor.
2. Hold a dumbbell in each hand using an overhand grip. Hold the weights at shoulder level.
3. Extend one arm vertically. Briefly hold at the top, and then slowly lower the weight to the shoulder. Exhale when raising the weight, and inhale when lowering the weight.
4. Repeat with the other arm, and do an equal number of repetitions for each arm.
Muscles Involved
Primary: Triceps brachii, deltoid
Secondary: Shoulder stabilizers (rhomboid major and minor, trapezius, levator scapulae, rotator cuff)
Soccer Focus
It is pretty hard to envision this movement as a primary action during soccer. A team picture might suggest that the goalkeeper likely has the most developed shoulders because the arms are integral to his game. That should not mean players other than goalkeepers should neglect this and similar exercises. A well-rounded supplemental strength training program will address all motions, including the shoulders, despite the minor role some motions might appear to play in any particular sport. Because of the speed of play and the amount of contact in the game, all players must be prepared for contact. As described, the dumbbell shoulder press is a unilateral exercise (one side at a time), but it can be made a bilateral exercise if you extend both arms in unison.

Variation
Machine Shoulder Press
As with all free weight exercises, the dumbbell shoulder press requires a certain degree of skill to perform correctly. One of the benefits of commercial machines is that you are fixed into a specific motion and the weights are supported. This provides a measure of safety for the exercise.