5. Visual Basic for Applications Essentials
Visual Basic for Applications (VBA for short) is a vast subject area. Our focus here will be on aspects of the language that can be of immediate use to you in terms of editing your recorded macros, creating new small procedures, and creating user-defined functions.
In this chapter, we will cover:
- Variables at how to declare them.
- Properties and how to use them.
- How to insert new modules.
- The difference between Sub procedures and Function procedures and how to insert them in your project.
- Essential VBA constructs for decision making and controlling program flow.
VBA and Macros
There are three ways you can create a macro in Excel:
- Record your actions with the macro recorder.
- Directly write the code in the code editor.
- The third method is a hybrid of the first two. You first use the macro recorder to record your actions in Excel and let the recorder generate the source code for you. Then you edit the source code to put in the finishing touches.
As a beginner in Excel VBA, the third method is how you should start creating your macros. Even veteran VBA developers use this method to expedite the process. You often only need to write macros from scratch if you’re creating new instances of objects and manipulating them in code.
The Visual Basic Editor Overview
The Visual Basic Editor is an application built into Excel with its own menu and command buttons. You can't run the Visual Basic Editor as a separate application, you can only open it from within Excel.
To open the Visual Basic Editor, click the Developer
tab, and in the Code
group, click on the Visual Basic
command button.
Tip
: A quick way to activate the Visual Basic Editor is to press Alt+F11 when Excel is active. You can also press Alt+F11 to return to Excel when you are done with the Visual Basic Editor, or you can simply click the Close
button on the Visual Basic Editor toolbar.
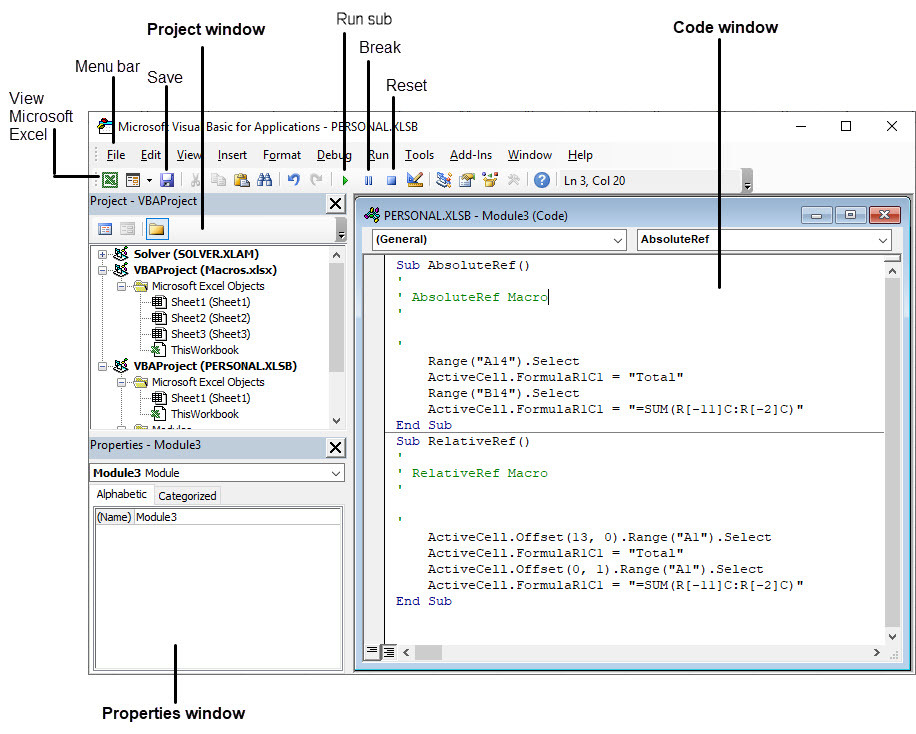
The image below shows the Visual Basic Editor and some of the key parts which are identified. At first glance, the Visual Basic Editor may look quite busy, but it becomes familiar very quickly when you spend some time using it. The Visual Basic Editor is made up of several windows that are highly customisable. You can rearrange, hide, or dock windows in different parts of the screen. The two most important windows, when you're first starting to use the Visual Basic Editor, are the Project window (or Project Explorer) and the Code window.
Menu bar
The menu bar for the Visual Basic Editor works just like the menu bar of other applications you've encountered. It contains commands that you can use to carry out various tasks within the editor. Many of the menu commands also have shortcut keys for them.
Toolbar
Under the menu bar, you have one or more toolbars. These have several command buttons that make it easy to access many of the commands with one click. You can customise the toolbars by adding more commands, move them around, or display other toolbars. The standard toolbar would be sufficient for most new users of the Visual Basic Editor.
Project window
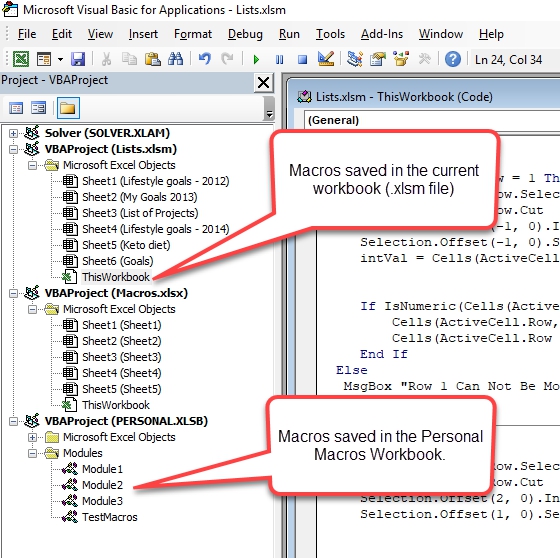
The Project window displays a collapsible tree that shows all the workbooks currently open in Excel and the code modules associated with them. You can double-click items on the list to expand or contract them. If you can’t see the Project window, press Ctrl
+Alt
, or click View
>Project Explorer
on the menu bar to display the window. You can hide the Project window by clicking the close button in its title bar, or right-click anywhere in the Project window and select Hide
from the pop-up menu.
Note that a ‘project’ is made up of all the code and other objects that belong to a particular workbook like worksheets and form controls.
Code window
The code window contains the VBA code recorded with a macro or directly inserted manually. Every object displayed in the Project window has an associated code window. To view the code window for an object in the Project window, double-click on the object. For example, to display the code window for Sheet1, double-click Sheet1 in the Project window and the code window for sheet one will be displayed on the right. If you haven't added any code the code window will be empty.
The macros that you create are stored in modules which are given names like Module1, Module2, Module3 and so on. You can view them in the code window by double-clicking on the module name in the Project Explorer window.
Properties window
The properties window allows you to rename a module. For example, you may want to give a more descriptive name to Module1 or Module2. To do this, simply click on the module you want to rename. In the properties window, in the name field, enter a descriptive name and press enter. When you rename the module, you must use the same naming convention for worksheet ranges. That is, you must begin the name with a letter, and you can’t insert spaces in the name. If you want to separate two words, use an underscore instead, for example, Totals_2019
.


