HDR Post-Production Part II
Enhancing Low Contrast Scenes
The majority of HDR techniques involve creating images from scenes with an EV range exceeding that of your camera, but they can also be used to enhance scenes with a lower EV range that could be captured in a single shot.
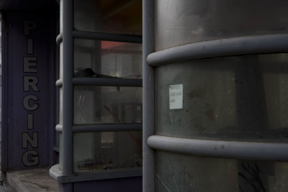
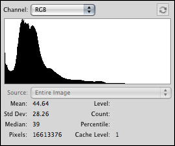
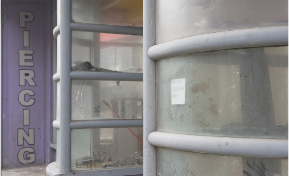
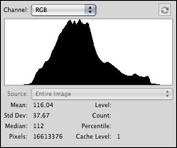
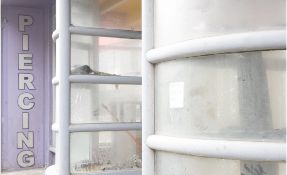
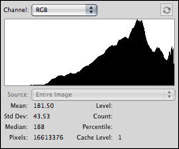
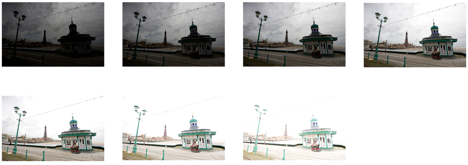
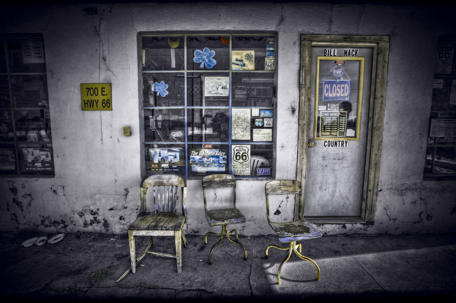
The histograms for the three images of a disused piercing parlor used here show that the metered exposure captures the full EV range of the original scene. Simply increasing the contrast for the metered exposure produces an acceptable image, but it’s quite different to a tone mapped version created from all three frames.
-2EV
Metered exposure
+2EV

A Curves adjusted version of the metered exposure
The top section of the sign on the left of the image is much darker in the version constructed from the metered exposure, while the text on the small piece of paper in the window is much clearer in the tone mapped version. There is also a lot more fine scale detail in the tone mapped image, which is most noticeable in the brighter sections of the windows where you can see every scratch and smear. Overall, the tone mapped version has a much more evenly distributed range of tones than the metered exposure.
Shooting a low contrast scene is a lot easier than shooting a scene with a high EV range, because a three-shot bracketed sequence cannot fail to capture the entire EV range of the original scene. All I would suggest is that you check the histogram of your metered exposure to make sure it isn’t especially biased to either the highlight or shadow detail, then shoot a three-shot sequence using a 2EV spacing. Once you have generated your HDR image you are ready to move on to the tone mapping.
Again, you can proceed with this stage of the process much as we have in previous sections of the book, adjusting the various sliders and controls until you are satisfied with the result. In practice, your aim will be to unify the tonal range of the different areas of the original scene, although each image is different, so each will require some fine-tuning of the settings to produce the best result.

The tone mapped image
FDRTools and Photoshop
While I used Photomatix Pro to tone map and generate the HDR images in this section, you can also use FDRTools and Photoshop, although Photoshop’s tone mapping options are considerably less effective. While you can go through the motions of generating an HDR image, all of Photoshop’s four tone mapping tools will leave you with an image that looks almost identical to the metered exposure. While Photoshop can do a good job of compressing the global contrast of a scene with a large EV range, it does so without introducing much local contrast. This means it can’t unify the tonal range across different areas of the image in the same way as the other programs.
Merging Two HDR Images

Moderate tone mapping
Photomatix Pro Details Enhancer settings
Strength: 71
Color Saturation: 17
Luminosity: 3
Light Smoothing: High
Microcontrast: 10
White Point: 0.000
Black Point: 0.015
Gamma: 0.58
Micro-smoothing: 12 (other settings left at default values)
Up until this point, the workflow we have followed (other than discussing how to tone map a single image), has followed much the same pattern:
• Shoot a bracketed sequence of exposures of the original scene.
• Create a 32-bit HDR file from the bracketed exposures.
• Tone map the HDR file into an 8-bit or 16-bit LDR file.• Carry out post-production.
For the most part, this four-step workflow is all you need, and it works well with most image sequences. However, there are times when the tone mapping stage can be problematic, and trying to determine which settings to use isn’t clear-cut.
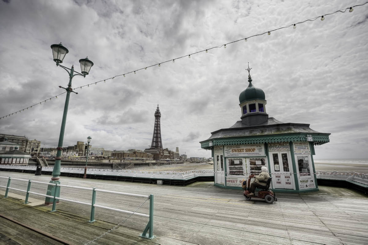
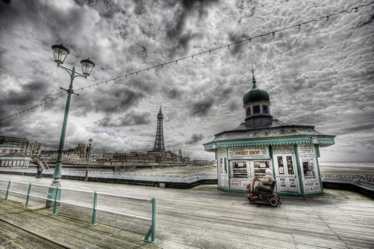
As you can see from the original set of exposures for this image, this scene would have been very difficult to photograph in a single shot, as in the metered exposure the sky is clearly overexposed, yet the small building is very dark. This is clearly an ideal scene for creating an HDR image, but what tone mapping settings should you use? If you take a look at the examples opposite and below, you can see that one version is much more extreme than the other, and if you look at the settings for the two versions, you can see why.

Extreme tone mapping
Photomatix Pro Details Enhancer settings
Strength: 100
Color Saturation: 17
Luminosity: 10
Light Smoothing: Medium
Microcontrast: 10
White Point: 0.000
Black Point: 0.015
Gamma: 0.58
Micro-smoothing: 2 (other settings left at default values)
At this stage, both versions lack contrast, but this can be increased by adding a reasonably strong S-Curve. This clearly improves both images (below), and makes the sky even more dramatic in the extreme version.
You might prefer one version to the other at this point, in which case you could simply produce one tone mapped image using the settings of your choice. But if you think there are aspects of each version that have merit things get a bit more complicated. For example, while I like certain elements in the extreme version—the detail on the pier, the light on the small building, and the woman in front of it—the sky is a bit too dramatic, and draws the viewer’s attention away from the foreground.
Based on what we have discussed so far, this leaves us with three choices; we can go with the extreme version, and accept that we don’t much like the sky; we could use the more moderate settings and sacrifice some of the detail in the foreground; or we could try tone mapping settings that are a compromise between the two extremes. But, if we aren’t entirely happy with either image, and don’t want to “compromise” on the picture, there is a fourth option that will let us retain the best aspects of both versions: we can merge both tone mapped images in Photoshop and take the best parts of each one.
To do this you first need to create both tone mapped versions of the image and save them as 16-bit or 8-bit TIFF files.
Having generated a pair of tone mapped images, open both images in Photoshop. Select the extreme version (Select>All), switch to the moderate image file, then click Edit>Paste to paste the extreme image as a new layer, immediately above the background layer of the original document. If your layers palette isn’t visible, choose Window> Layers. This will show the two layers in your document: “Background” and “Layer 1” (pic A).
At this stage the moderate version won’t be visible because the upper layer is concealing it, so we need to merge the two versions. To do this, add a Layer Mask to the new layer (Layer>Add Layer Mask> Hide All). This adds a black layer mask to the layer (pic B), and the Background layer is the one that is visible.
Moderate version with curves adjusted
Extreme version with curves adjusted
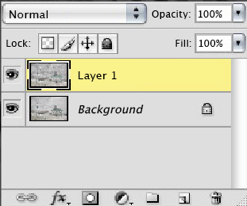
(Pic A)
Pasted layer
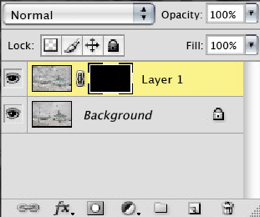
(Pic B)
Layer mask added
To merge the layers, simply erase parts of the newly created mask using the Eraser tool to “reveal” the areas of the top, extreme image that you want to show. You need to make sure that the layer mask is active, not the content of the layer—the active element of the layer is indicated by a broken border around its thumbnail in the layers palette (pic C).
You can now start erasing areas of the layer mask, but there are a few things you should bear in mind with the Eraser tool, namely the size and hardness of the brush you use, and its opacity.
To control the size and hardness of the Eraser tool, right-click on your image to bring up a dialog that lets you change both. Set a brush size that’s large enough to remove the sections of the mask you want to erase without taking too much time, but not so large that you inadvertently erase sections you want to retain.
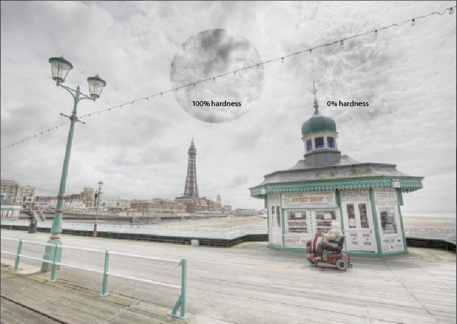
The hardness setting refers to how defined the edge of the eraser will be when removing areas of the mask. A hardness setting of 100% has a clearly defined edge, while a hardness setting of 0% does not, making the blend much smoother (pic D). In practice, it’s almost always better to use a “softer” brush with a setting closer to 0% than 100%, as this will mean that the changes are applied in a more natural way.
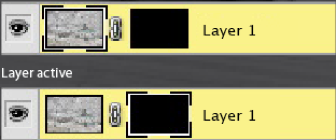
(Pic C)
Layer active – Layer mask active
(Pic D)
The hardness of the Eraser defines the sharpness of its edges
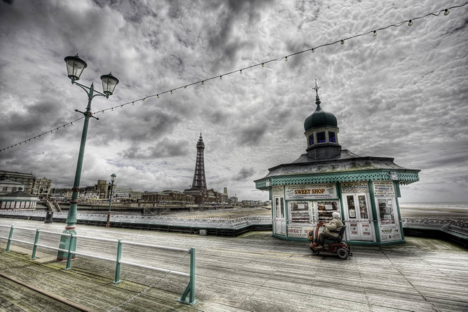
With this image, the aim is to remove the section of the mask at the bottom of the picture, so the more extreme version is visible in this area. This will produce a picture that combines the detail in the foreground of the more extreme version with the moderate sky.
As you erase the mask you can change the Opacity of the eraser using the slider on the toolbar. The Opacity controls the strength of the eraser, and set to 100% it will completely erase an area of the mask when you click on it, allowing the underlying image to show through fully. However, if you set the opacity to 50%, only half of the area you click on will be erased, so in this example the result would be a patch that is half “extreme” and half “moderate.” By varying the Opacity as you work, you can control more precisely the blending of the two images.
While this blending technique is clearly a time-consuming one—not least because you need to produce two (or more) tone mapped versions of your HDR image to start with—it can be used to great effect, especially when the only other alternative is to produce an image that compromises the detail in one area to avoid making another area look too extreme. Compared to both the extreme and moderate tone mapped versions of the original image, my finished picture is clearly “the best of both.”


View from the Hilton Mombai in Sao Paulo
Michael Steighner
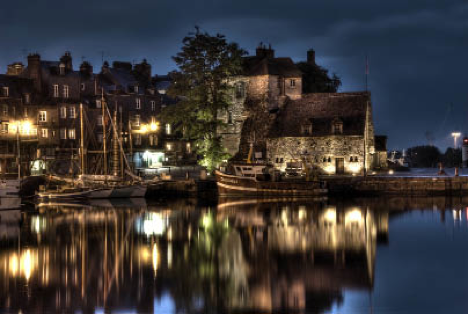
Reflections of Honfleur
Michael Steighner
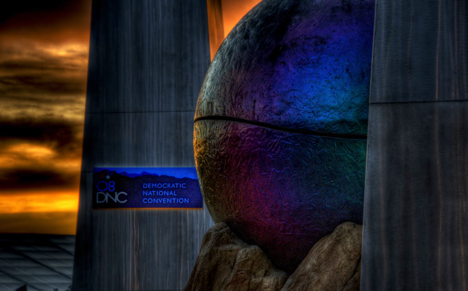
As Wednesday comes to a close at the DNC
Michael Steighner

Lost Capsule
Ben Willmore
Gossip Central
Ben Willmore
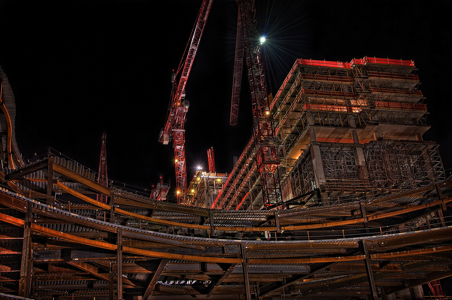
Night construction
John Maslowski
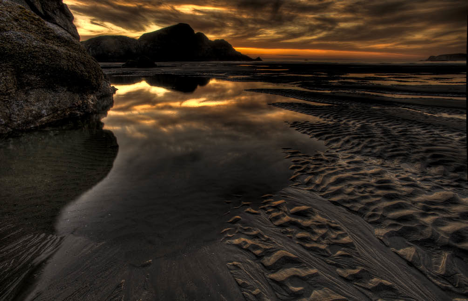
Oregon Coast near Gold Beach
Michael Steighner
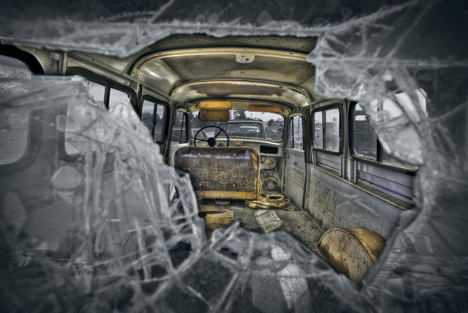
Through the looking glass
Ben Willmore
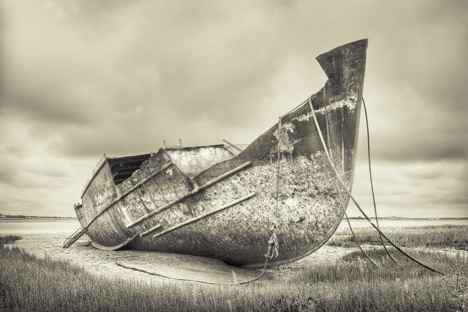
Wyre wreck II
David Nightingale
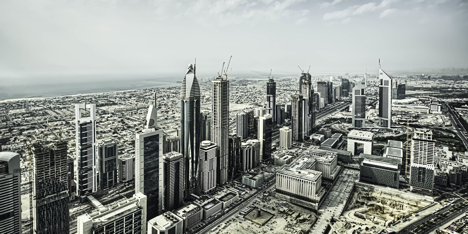
Sheikh Zayed road
David Nightingale
Glossary
Auto-bracketing A method of automatically shooting a sequence of images to produce a set of differently exposed photographs that can be combined into an HDR image. While it is possible to auto-bracket on the basis of shutter speed, ISO, and aperture, only the latter is useful for HDR photography.
Bit depth The number of bits (of data) that are used to record the data in your images. A JPEG file is encoded with 8 bits of data per channel; a RAW file typically uses 12 bits of data, while a decoded RAW file can contain 16 bits of data per channel. An HDR file, on the other hand, contains 32 bits of data per channel.
Black point Within Photoshop, or other image-editing programs, the black point refers to the adjustment point that can be used to remap a particular point in the tonal range to black. In practice, this means that any value equal to, or lower than, the set value will be black in the final image.
Bracketing In HDR photography, bracketing refers to the process of shooting a range of exposures using different shutter speeds at a constant aperture to capture the entire dynamic range of the original scene. See auto-bracketing
Clipping When shadows are underexposed, or highlights overexposed to the point that image detail is lost, they have been “clipped.” This can be caused by selecting the wrong exposure or, in the context of HDR photography, when the dynamic range of the scene is larger than can be recorded by your camera’s sensor.
Contrast ratio The ratio of brightness between the lightest and darkest tones in a scene or image. A typical camera’s sensor can record a contrast ratio of up to 500:1 while the human visual system can adapt to a contrast ratio of 10,000,000:1.
Curves A feature in most image-editing programs, Curves adjustments are often used to increase the global contrast in a tone mapped image.
Details Enhancer The Details Enhancer is one of two methods of tone mapping that are available to you within Photomatix Pro. This method offers a high degree of control over the appearance of your final image and is ideal when you want to produce a more surreal result.
Dynamic Range The dynamic range of a scene refers to the ratio between the luminance of the lightest and darkest areas of the scene. A scene with very bright highlights and deep shadows will have a large (or wide) dynamic range, while a shot with dull highlights and soft shadows will have a smaller dynamic range.
When used to refer to a camera’s sensor, dynamic range is often referred to in terms of the number of f-stops or the EV range that can be captured before the highlights or shadows become clipped. Most DSLRs’ sensors have a dynamic range in the region of 5–9EV.
Equalize Histogram Equalize Histogram is a method of tone mapping your images within Photoshop. For most HDR images this will often produce a tone mapped image with clipped highlights and shadows, so it is not a useful method in most circumstances.
Exposure Value (EV) Exposure Value is a term that denotes the combinations of shutter speed and relative aperture that give the same exposure. For example, an aperture of f/2.8 and shutter speed of 1/60 sec will give the same exposure as f/4.0 and 1/30s, so both have the same Exposure Value.
Exposure and Gamma Exposure and Gamma is a tone mapping option within Photoshop that allows you to control the highlight and mid-tone values within the tone mapped image.
Exposure Blending Combining an original sequence of bracketed exposures to produce a composite image derived from the dynamic range of the entire sequence. This isn’t an HDR technique, but can be used to create a final picture from a scene where the EV range is much higher than your camera’s dynamic range.
F-stop The f-stop is a ratio of the focal length of the lens to the diameter of the aperture. The value is in increments that allow half as much or twice as much light to reach your camera’s sensor as the previous stop.
Ghosting Ghosting can occur within a tone mapped image when one or more components within the original scene moved between exposures, leaving faint traces, or “ghosts,” in the final image.
Global contrast The overall contrast of an image. Adjusting the global contrast of an image changes all elements in the picture by the same amount.
Haloing Halos (lighter areas around the edges of objects)are artifacts introduced by the tone mapping process.
HDR or HDRI Abbreviations of High Dynamic Range and High Dynamic Range Images (or Imaging).
Histogram The histogram, either in-camera or within your image editing software, provides a visual summary of the distribution of the tonal range within an image. This is an especially useful tool in the context of HDR photography.
Hyper-realism While HDR techniques can be used to produce photo-realistic results they can also be used to produce “hyper-real” images that have a more illustrative, or painterly appearance.
LDR Abbreviation of Low Dynamic Range. In the context of HDR photography, an LDR image refers to an pictures with a dynamic range that can be captured and displayed on conventional LDR device such as a computer monitor or photographic paper. All HDR images are tone mapped to create LDR images for viewing or printing.
Local Adaptation The most useful method of tone mapping an image within Photoshop. Local Adaptation provides control over a variety of parameters including a tone curve to adjust the tonal balance of the final image.
Local Contrast The degree of contrast within specific areas of an image. Many tone mapping processes allow you to independently control local and global contrast, so distinct areas of the image can be adjusted individually.
OpenEXR A common file format for saving 32-bit HDR images as it preserves the data in the image.
Photo-realism In the context of HDR photography a photo-realistic image is one that is tone mapped to approximate the appearance of reality.
RGBE (Radiance) RGBE or Radiance is a common file format that can be used to save your 32-bit HDR images, although it can sometimes introduce slight color shifts in some images.
Tone Compressor A tone mapping operator in Photomatix Pro. This method can be used to produce photo-realistic results from sequences of images where the EV range is high.
Tone mapping Tone mapping is the process whereby a 32-bit HDR image is converted into an LDR image. The large EV range of an original scene is compressed into an image that can be displayed and viewed using conventional LDR technology.
White point Within Photoshop, or other image editing software, the white point refers to the adjustment point that can be used to remap a particular point in the tonal range to white. In practice, this means that any value equal to or higher than the set value will be white in the final image.
HDR Software
Adobe Photoshop www.adobe.com
FDRTools www.fdrtools.com
Photomatix Pro www.hdrsoft.com
Dynamic-PHOTO HDR www.mediachance.com
EasyHDR www.easyhdr.com
Hydra www.creaceed.com
pfstools www.pfstoolssourceforge.net
Contributors
David Nightingale www.chromasia.com
Ricardo Aguilar Herrera
Pete Carr www.petecarr.net
Catalin Marin www.momentaryawe.com
John Maslowskiwww.sirius2photo.com
Brooks Potteiger www.brookspotteiger.com
Michael Steighner www.mdsimages.com
Trey Ratcliff www.stuckincustoms.com
Ben Willmore www.thebestofben.com
Acknowledgments
This book would not have been possible without the help of a variety of contributors who kindly agreed to allow me to use their work, so I would like to offer my sincere thanks to Ricardo Aguilar Herrera, Pete Carr, Catalin Marin, John Maslowski, Brooks Potteiger, Michael Steighner, Trey Ratcliff, and Ben Willmore.
I would also like to thank my wife, Libby, for proofreading various sections of the book, offering critiques of the photographs I took for the project, and for generally putting up with me as I worked through a large number of evenings and weekends to get it finished. It wouldn’t have been possible without her.
And last (but not least), I would like to thank Craig (www.id7.co.uk) for proofreading some of the more technical sections of the book.