Shooting for HDR Part II
Alignment
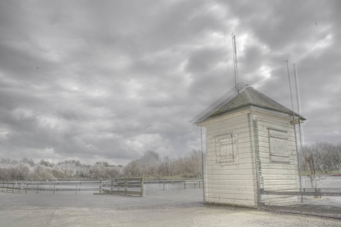
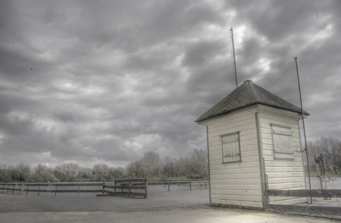
As well as making sure that you shoot enough images to cover the entire dynamic range of the original scene, the content of each frame ideally needs to be identical to the other frames in the sequence, especially in terms of alignment. In these three images of a small hut beside a lake, the position of the camera changed slightly with each exposure. The difference isn’t huge, but the tone mapped result, created from these three images is totally unacceptable due to the misalignment of the various elements.
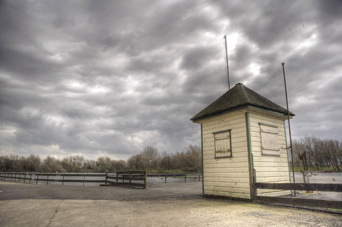
Fortunately, all of the programs we will be looking at in this book offer ways in which such misalignments can be corrected. They all operate in a similar fashion; comparing the content of each frame as the initial HDR image is created, and adjusting the perspective, rotation, and scale so the sequential image are aligned as accurately as possible. In a second tone mapped version of the hut, the source images were aligned using Photomatix Pro, and there are now no traces of the original misalignment.
However, while most HDR generators will do a good job of correcting alignment problems, you should still aim to avoid this problem when you shoot your initial sequence. This is because each image in a sequence needs to be moved relative to the other frames to correct the misalignment, and the various adjustments will invariably mean that your final HDR image will need to be cropped.
If the misalignment between the frames is minor, the amount of the image you will lose won’t be especially large. For this hut image, the amount of cropping required isn’t too great, as indicated by the red crop box, but if the misalignment is higher you may find that the crop needs to be heavier, and this can be more of a problem.
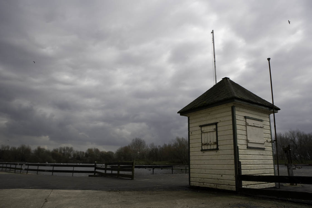
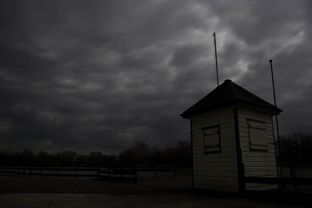
-2EV
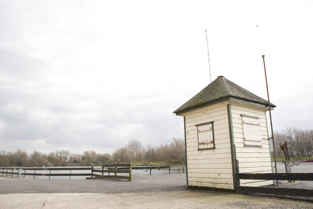
Metered exposure
+2EV
The result of misaligning the source images
The alignment-corrected image
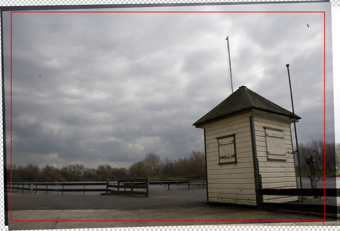
The cropped image
Ghosting
While alignment problems are caused by your camera moving between exposures, ghosting is caused by objects in the scene moving while you make your sequence of exposures. In the hut image, for example, there is a bird in flight, which appears in the top-right corner of the frame. Because the bird changed position while I shot the initial seven- shot sequence, it appears in the final tone mapped images as a “ghost.”
Ghosting is harder to correct than misalignment, and only one of the three HDR programs we will be discussing offers a reliable way of automatically correcting the problem. Therefore, you are much better off avoiding it from the outset, and there are two ways in which this can be achieved—the simplest, and most obvious, is to avoid shooting scenes that contain any movement.
Often, this might not be possible, or you might simply not notice that something moved, like the bird in this image.
However, if you know that something moved—or suspect something might have moved—the answer is to shoot more than one sequence of images. This will give you a range of images to choose from at each exposure setting in the sequence, rather than being limited to one set of images. When you come to construct your HDR image you can choose those images where the movement is either absent or minimal.
When even this isn’t possible, there are still ways in which ghosting can be removed, although as this can often be a time-consuming process, it’s much better to avoid the problem whenever possible.
Checklist: Shooting for HDR
Use a tripod
Although most HDR programs include an automatic method of aligning multiple exposures, they aren’t always reliable, so it’s a good idea to shoot your original sequence using a tripod. Take care not to move the camera between shots and, if you have one, use a remote release or your camera’s self-timer.
Number of exposures
For the best results, you should shoot a minimum of three exposures, making sure the sequence covers the entire dynamic range of the scene—your darkest image should contain no blown highlights and your lightest should contain no blocked shadows.
The easiest way to evaluate the dynamic range of a scene is to use a spot meter to measure the brightest and darkest areas, and calculate your exposure sequence accordingly. If you don’t have a spot meter you can use your histogram to determine your start and end exposures.
Exposure spacing
There is no hard and fast rule about how far apart you should space the individual exposures in a bracketed sequence, but an increment of one to two stops is recommended. Differences of less than one stop needlessly replicate data, while increments greater than two stops risks a loss of data.
Auto-bracketing
Most cameras allow you to shoot an automatic sequence of three bracketed exposures, although some high-end DSLRs allow more. If the dynamic range of the scene can be captured within three shots, you should use this function to minimize the chance of misaligned images, rather than manually altering your camera’s settings.
Manual bracketing
If you need to change your camera’s settings manually, use the shutter speed or your camera’s exposure compensation feature. Don’t adjust the aperture as this will change the depth of field and create alignment problems.
Shoot quickly
If the scene you are recording doesn’t contain any moving components then the speed at which you take your bracketed exposures doesn’t matter. However, if the scene contains rapidly moving components such as people, birds, vehicles, and so on, these cannot be recorded—at least not reliably. With scenes containing slow-moving elements such as clouds, the faster you shoot the more likely they are to be in much the same place throughout the sequence.
Exposing for the shadow detail
The two most important shots within a bracketed sequence shot specifically for HDR, are the lightest and the darkest. The darkest shot is relatively straightforward—you just need to make sure that you haven’t blown the highlights—but the lightest shot is a bit trickier. Make sure that the histogram contains some space at its leftmost edge to capture the full range of shadow detail.