Chapter 13
Oil: Keeping Your Car Young and Happy
In This Chapter
 Understanding why oil is so important
 Picking the correct oil for your vehicle
 Getting the truth about additives
 Changing and recycling your oil and oil filter
When people think about the good life, they tend to think in terms of freedom from pressure, discomfort, and friction. If your car could talk, it would probably agree. When you consider that the temperature in your vehicle’s combustion chambers can get as high as 4,500°F, with high pressures, the shock of combustion, and many metal parts rubbing and grinding against one another, you can see that a vehicle that’s not adequately protected against heat and friction will swiftly come to an untimely death. Luckily, this kind of protection is cheap and easy to ensure. It’s a simple matter of providing sufficient lubrication to keep things running smoothly and then making sure that your vehicle gets regular attention.

This chapter tells you how to choose the right kind of oil for your vehicle, how frequently you should change the oil for maximum performance, and how to do the job quickly and easily.

How Oil Benefits Your Vehicle
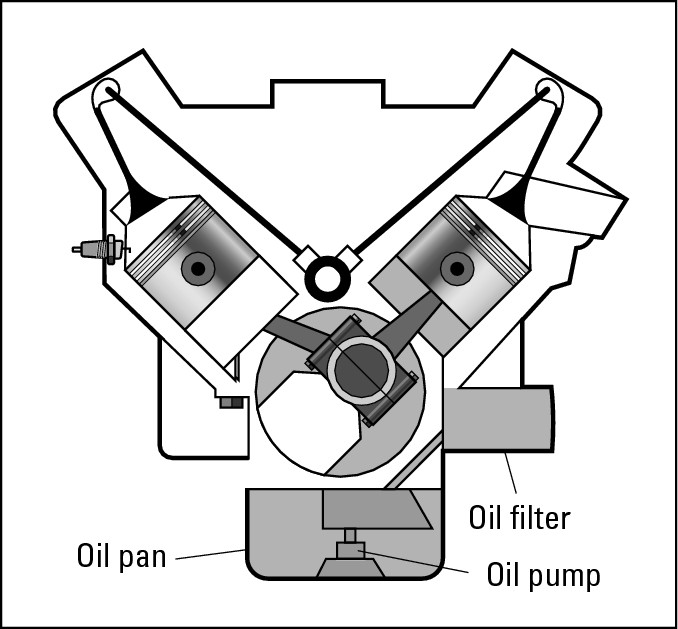
To choose the proper kind of oil, you should know what that oil is expected to do. When your engine isn’t running, the oil slops around quietly in a container called the oil pan, which is located at the bottom of the crankcase just below the engine (see Figure 13-1). When the engine is running, oil is pumped by an oil pump through holes and channels in the engine, where the oil helps to cool and clean the engine and provides a nice, slippery cushion that keeps moving parts from grinding one another into oblivion. The following sections explain in greater detail how oil benefits your vehicle.
|
Figure 13-1: Oil is filtered as it circulates through the engine. |
|
Oil cools the engine
Because the oil pan is located below the engine, where the air that rushes past the moving vehicle can cool it, the oil picks up some of the heat as it travels around inside the engine and then cools off when it circulates through the oil pan. Although this isn’t enough to keep most engines sufficiently cool without a cooling system, it helps.
Oil keeps your engine clean
Most engine oils contain some detergent, which helps flush out the muck that accumulates inside your engine. Not only does detergent remove and dissolve this old sludge, but it also helps prevent new gobs of the stuff from forming. Believe me, you have no idea of the meaning of any of those yucky words until you’ve looked into the engine of a vehicle that hasn’t had its oil changed often enough. Masses of black slimy stuff, hunks of indefinable vileness, and pebble-like particles cling to everything. It’s hard to see how these engines function at all. Even more depressing are the all-too-visible signs of wear on steel parts that have been eroded away by this ugly stuff or have succumbed to friction because the oil lost its ability to protect them. If your vehicle hasn’t had its oil changed often enough, you can consider the growls coming out of its engine to be cries of pain!
Oil cuts down on friction
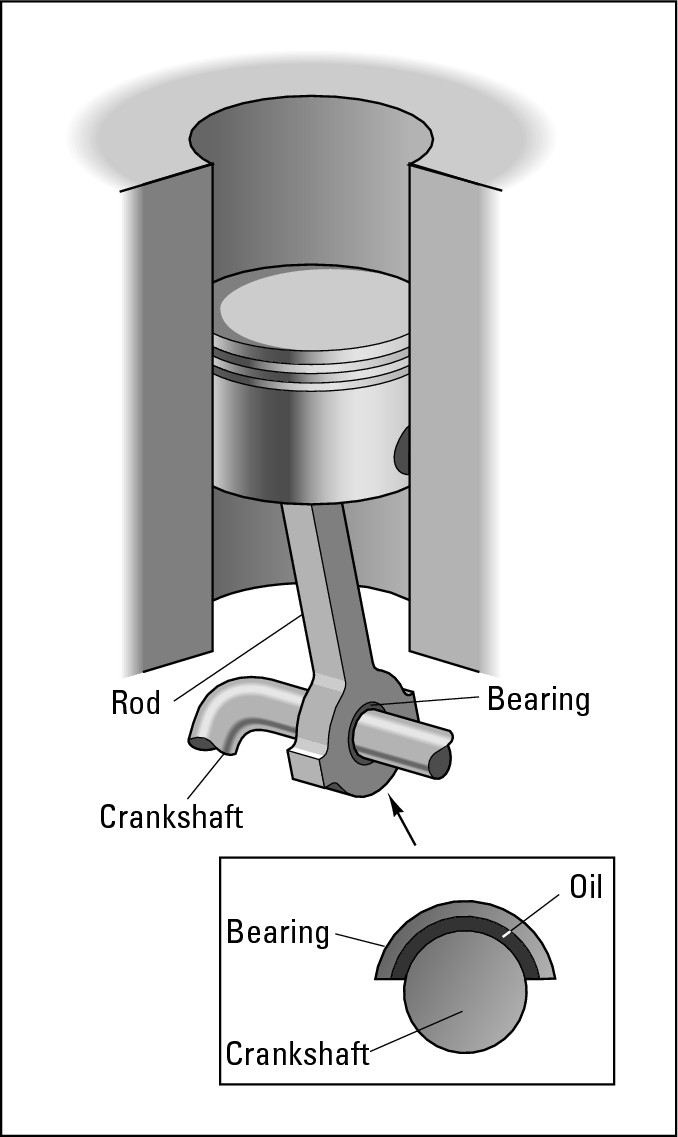
By far the most important thing that the oil in your engine does is to form a cushion between moving parts to help them slide past one another easily. This lubrication cuts down friction, which in turn dramatically reduces the heat and wear that friction can cause.

|
Figure 13-2: Oil forms a cushion to keep your crankshaft and connecting rod from wearing each other away. |
|
Oil retards corrosion
Oil retards corrosion in your engine by enveloping the particles of water and acid that are present. These particles, plus the solid particles that the oil holds in suspension, contaminate the oil and thin it out. You must change the oil regularly to get rid of this stuff before it can build up to the point where the oil can’t do its job properly.
What You Should Know about Oil
Various types of motor oil are on the market, each designed for a particular purpose. This section helps you choose the proper type of oil for your vehicle by explaining the significance of the oil additives, viscosity ratings, and classification codes that you’ll encounter at auto parts stores and service stations.
Oil additives
To help the oil keep your engine cool, calm, collected — and clean and corrosion-free — refiners blend in various additives, which can account for as much as 25 percent of the cost of the oil. (Don’t confuse these with the aftermarket additives sold at auto supply stores, described in the sidebar called “Using aftermarket additives: Should you or shouldn’t you?”)
The additives in oil help in the following ways:
 They enable the oil to pour better in cold weather.
 They prevent corrosion of the metal parts of the engine.
 They cut down on friction between moving parts.
 They dissolve impurities and prevent sludge from building up.
 They prevent foaming at high temperatures.
Viscosity ratings
Oil is rated and identified by its viscosity, which determines its ability to flow. In cold weather, oil thickens and becomes less able to flow through the engine. In hot weather, oil thins out, and although it flows well enough, it may become so thin that it can’t prevent friction.

Using aftermarket additives: Should you or shouldn’t you?
You can buy three basic types of aftermarket additives in auto parts stores, each of which is designed to augment the additives in the oil itself. The first type thickens the oil. The second type loosens junk and dissolves gummy deposits. The third type acts as a friction lubricant to make the oil “tougher” under extreme temperatures and usage.
Remember that even though most oils don’t advertise the presence of additives, they already have most of this stuff in them, and no amount of additional additives can improve the performance of oil unless the oil you start with is of the best grade. If you buy a well-known brand, you get all the protection you need in these categories if your engine is in reasonably good shape. If you use API-rated oil of the proper weight and classification and change it often, you can leave the rest of the additives on the store shelves. They may provide temporary relief if the engine is disintegrating, but they’re not a cure for a worn-down, filthy, miserable old engine. And using aftermarket oil additives actually may void manufacturer’s warranty on some engines.

To find out which viscosity to choose for your vehicle, look in your owner’s manual for an oil viscosity chart. Just select the range of temperatures in any location where you plan to spend a good deal of time driving and the type of driving conditions you will operate under, and look on the chart for the grade of oil recommended for use. If you don’t have an owner’s manual, check with your dealership.

Oil classification codes

The classification codes for vehicles with gasoline engines started with SA in the early 1960s. As engines became more demanding and oil improved, the codes progressed alphabetically from SB onward. Any oil coded before SJ is no longer considered current. You can use SM (and any future grades that come along) in a vehicle of any age to make the engine run and feel better. All the major brands of oil with the API symbol are equally good.
At publication, CI-4 Plus oil is the latest, most advanced oil for diesel engines. Oils with CF (or higher) designations also are currently acceptable. For more complete classifications for diesel oils, see Chapter 9.
|
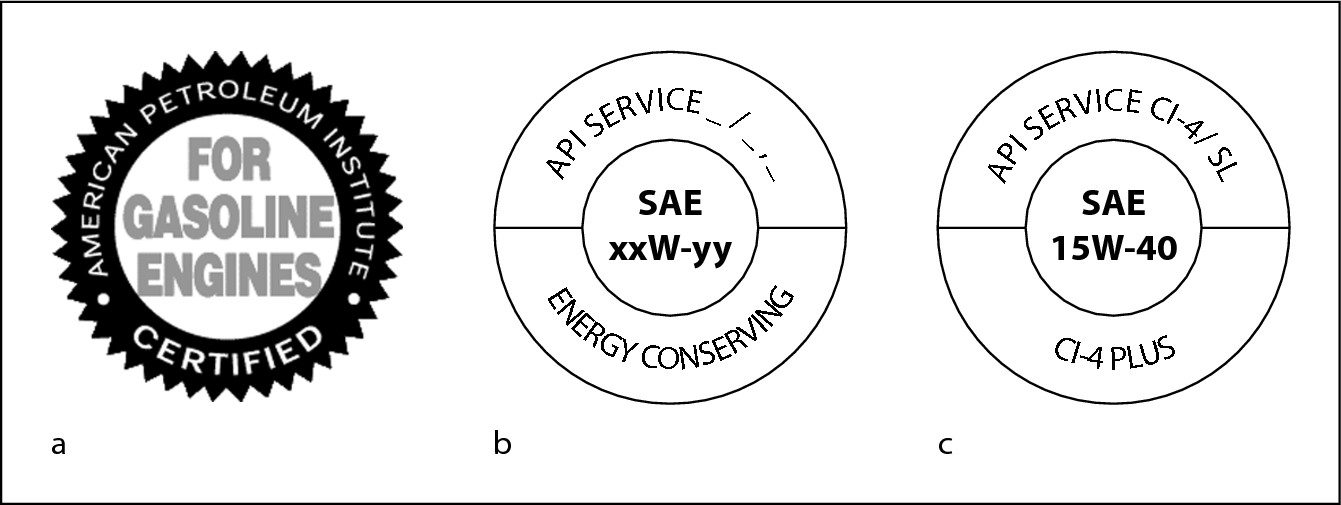
Figure 13-3: API starburst symbol (a), API donut symbol for gasoline engine oil (b), API donut symbol for diesel engine oil (c). |
|
Synthetic oil
A lot of claims have been made about synthetic oils: that they allow longer intervals between oil changes, result in less wear on engine parts, and are able to operate at higher engine temperatures. The longer interval claim has yet to be proven; in fact, one synthetic oil manufacturer that claimed a 20,000-mile oil change interval for its oil has retracted that claim and now suggests that its oil be changed at the normal frequency for mineral-based oils.
A Consumer Reports test found no difference in engine wear between vehicles that had mineral oils in their engines and those that had synthetic oils in their engines. There’s no doubt, however, that synthetic oils do perform better than mineral oils at very low and very high temperatures. So if you live in a very cold or hot climate, or if your engine works very hard pulling a trailer or climbing steep hills, synthetic oil may be right for you. Just be forewarned that synthetic oil is expensive; it can cost three times as much as mineral-based oil.
A compromise between synthetic and mineral oil has been developed. This blend of mineral and synthetic oil sells for less than synthetic oil and more than mineral oil.
Choosing the Right Oil for Your Vehicle
If all the preceding variables have you wondering how you’re going to choose the right oil for your vehicle, ask yourself the following questions:
 What kind of oil have you been using? If your vehicle is running well, there’s probably nothing to be gained by switching to another brand of oil. There’s not a lot of difference between API-rated oils as far as performance is concerned, and you’d have to drain all the oil out of your engine before replacing it with another brand.
.jpg)
 What kind of oil does your owner’s manual recommend? Is your vehicle still under
warranty?
Be sure to use whatever weight of oil the owner’s manual recommends. Using something other than the recommended oil may invalidate the warranty on a new vehicle.

 Do you live in a very cold or very hot climate? Is it mountainous? Are there sharp changes in temperature where you live or where you’re going? Multi-weight oils cover a range of temperatures. Consult a viscosity chart to be sure that the oil you use will flow properly under extreme conditions.
The lower the number after the “W,” the better the oil works in cold weather; the higher the number after the “W,” the better the hot weather performance. For example, the best oil for a Minnesota winter may be a 0W-20 and the best for a Florida summer 30W-50.

If you’re going to be driving your vehicle in an area where the conditions are very different from those at home and those conditions call for oil of a different viscosity than you usually use, drain all the oil from the engine before switching to the new viscosity, and drain it again before switching back to your usual weight oil after the trip is over.
 How old is your vehicle?
If you have a really old vehicle that has been running on single-weight oil for most of its life, it has built up quite a bit of sludge because some single-weight oils don’t have detergent in them.
.jpg)
If you suddenly switch to multi-viscosity oil, the detergent in it will free all the gook in your engine, and the gook will really foul things up.
 How worn is your vehicle’s engine? If your vehicle has been logging a great many miles over several years and has been running on 30- or 40-single-weight oil, multi-weight oil isn’t consistently thick enough to lubricate the worn engine parts that have become smaller while wearing down, leaving wider spaces between them. To keep the oil thick enough to fill these gaps, switch to heavier single-weight oil as your vehicle gets older and starts to run more roughly or burn up oil more quickly. If you’ve been running on 30-weight oil, switch to 40-weight at least during the summer, when oil tends to thin out. The manual for Tweety Bird (my faithful 1967 Mustang) called for 10W-40 oil, but when she had more than 80,000 miles to her credit, I put her on straight 40-weight oil. There’s even 50-weight oil for the real oldies!
Whenever you buy oil, look for major brands or check Consumer Reports. Good brands of oil are often on sale in supermarkets and at auto supply stores, so if you want to save money and you spot a sale of a major brand with API certification, buy a case and stash it away.


What to do when no amount or type of oil can help
If your vehicle has a worn, clanking workhorse engine, investigate the following alternatives to an oil change:
 Find out how much it would cost to rebuild the engine. A simple engine rebuild only replaces parts that are completely worn out, leaving you an engine with some new and some half-worn pieces. The price depends on how many parts have to be replaced and how much work is involved. Prepare to pay up to $2,000 to $4,000 for this service — perhaps more if you have a newer engine.
 Buy a new engine or a good remanufactured one and have it installed. This is a more expensive but often longer-lasting solution if you just have to keep Old Faithful or are restoring a classic car. The cost, including labor, can easily range from $2,500 to over $5,000 — perhaps more for modern engines with fancy electronic components. But that’s still cheaper than a new vehicle, and you get all-new parts.
Be sure to check your vehicle’s current blue book value at www.kbb.com or www.edmunds.com to see whether a new or remanufactured engine is worth the expense, keeping in mind that other systems may be at the point of wearing out, as well.
If rebuilding or replacing the engine will cost more than the vehicle’s blue book value, it’s not worthwhile (unless Old Faithful has sentimental value because your firstborn was conceived in the backseat).
 Put Old Faithful out of its misery. You’ll both be happier in the long run. Either sell it to a wrecker who will resell some of its parts and recycle the rest, or donate it to a charity and put the tax deduction toward the purchase of a replacement vehicle.
How Often You Should Change Your Oil
Dirty oil just doesn’t do the job as well as fresh oil does. The additives in dirty oil boil out, contaminants form in the crankcase and eat metal parts, and water collects over time and forms sludge. The oil holds more and more abrasive particles of metal suspended in it, and these particles wear away the parts of the engine that the oil is supposed to protect. That’s why you should change your oil at regular, reasonable intervals. But what is a reasonable amount of time — or mileage — between oil changes?


Some manufacturers suggest that oil be changed every 7,500 miles or more, but that’s based on optimum operating conditions, and the manufacturers are the ones who get to sell you a new vehicle if your old one wears out prematurely. Although new vehicles can run longer on the same oil than older ones can, and improvements in motor oil have extended its efficiency over longer periods of time, to be on the safe side, I now change my oil every 5,000 miles or every six months, whichever comes first. If you’re a freeway driver who goes on a lot of long journeys at high speeds, you can probably extend the oil change interval, but on anything but the newest vehicles I wouldn’t go longer than 5,000 miles between changes. And never, under any circumstances, go farther than the manufacturer’s recommended maximum interval between oil changes.
How to Change Your Oil Yourself
Changing oil is usually easy. In fact, unless it’s impossible to reach your oil filter and/or oil drain plug, you have good reasons to change your oil and oil filter yourself: It’s cheaper, you know that the job’s being done right, and it requires little time or effort. (During one of my TV guest appearances, Regis Philbin changed the oil in a car in five minutes, and he didn’t get a spot on his Italian silk suit!) All you have to do is unscrew a plug and a filter, let the oil drain out, replace the filter and plug, and pour in some new oil.
If you have a professional do it for you, you have to telephone the shop to make an appointment, drive the car in, either wait for it or find a ride home and back again to pick it up, and then wait until they write up your bill — all of which takes much longer than changing your oil yourself. If you go to one of those quickie oil change places, you don’t know what viscosity and grade of oil they’ve really used, whether they really changed the filter, and whether the drain plug was secured properly. (If you don’t think that’s a problem, check out the nearby sidebar “A tragic tale”!) Most important, when you see how inexpensive and easy it is to do this job yourself, you’ll change your oil as often as necessary rather than adding visits to the service station to your procrastination list!


A tragic tale
Before I stopped being an automotive “dummy,” my family car, Big Green Feller, resided for its first 35,000 miles in a commercial garage where professional mechanics looked after it. Whenever they said that the car needed the oil changed, I scheduled the work promptly. Yet when I took the engine apart in an adult-education automotive class, I found that the mechanics had never changed the oil! This lack of proper lubrication had led to big trouble: The dirty old oil had formed big, black pebbles, and the camshaft had practically worn away! When this happens, either you opt for major and expensive surgery or you get rid of the vehicle. As I sadly watched Big Green Feller vanish into the sunset, the major question on my mind was, “How did this happen?”
The answer, unfortunately, was that I’d depended on someone else for lubrication reminders and had trusted someone else to do the job properly. Not only had I been paying at least twice as much as it would have cost to do the job myself, but I ended up paying to replace a car that could have gone almost twice as far if it had been lubricated properly.
Get your supplies together
Before you start the job, assemble the following items:
 Oil: Check your
owner’s manual
to find the proper oil
viscosity
recommended for your vehicle and the number of quarts you need. (As a general rule, most vehicles require five to six quarts of oil, but you don’t want to risk overfilling it.) If you have no manual, call a local dealer who sells your vehicle’s make and model and ask someone in the service department. Or find the information at your local library in a
service manual
for your vehicle’s make, model, and year.
 An oil filter: Under the hood of most cars, sticking out of the engine is what looks like a tin can screwed into the
engine block.
This is the
oil filter
(see Figure 13-4). As the oil circulates from the
oil pan
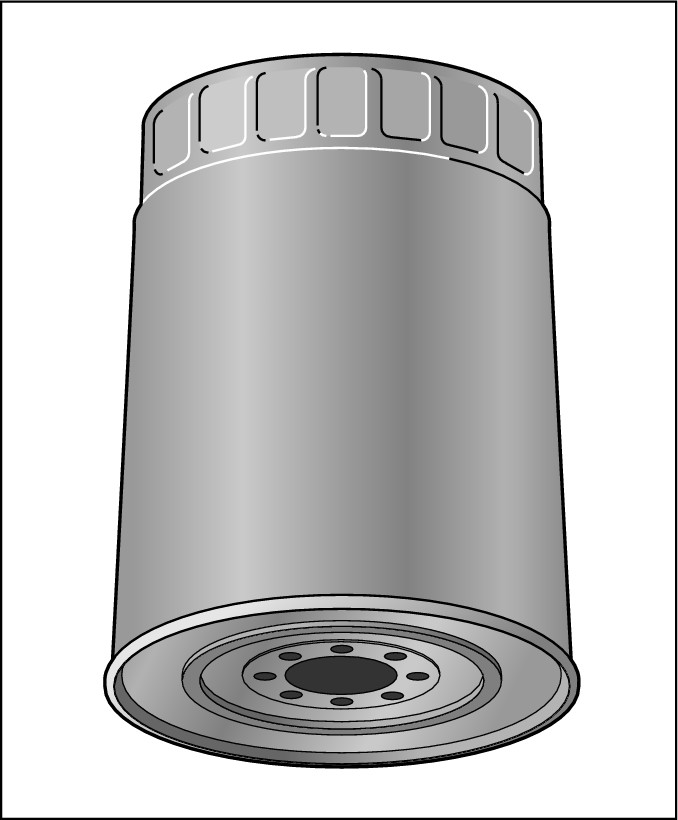
through your engine, it passes through this filter, which cleans the oil and removes some of the particles of metal and dirt. Change the oil filter every time you change your oil, especially if you do it less frequently than every 5,000 miles. Oil filters sell for very little at auto supply stores (at a service station, you’ll usually pay more).
|
Figure 13-4: An oil filter. |
|

Check the price of an oil filter at your dealer’s parts department. If it’s within a dollar or two of the auto parts store price, buy it. It’s probably a better filter. (Some of the auto parts store filters are very cheaply made, and they fail occasionally.) Make sure to get the right filter for your vehicle’s make and model!
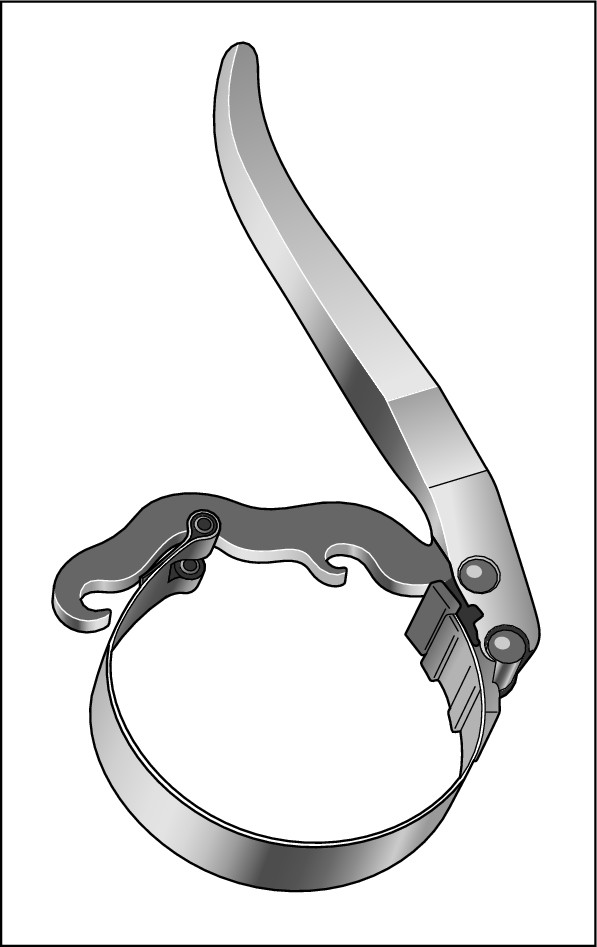
 An oil filter wrench (optional): Most oil filters screw on and off. If your old filter hasn’t been changed in a long time, you may need an oil filter wrench, like the one shown in Figure 13-5, to unscrew your filter. Always tighten the new filter by hand to avoid crushing the seal.
|
Figure 13-5: An oil filter wrench. |
|
 An adjustable wrench: Use this tool to unscrew the oil drain plug. If you’re not sure what an adjustable wrench is, see Chapter 3.
 A screwdriver: Select one that’s strong enough to punch a hole in an oil filter (you’ll find out why later on).
 An oil drain plug gasket:
If you buy your oil filter from a dealership, a new
gasket
may be in the package. If it isn’t, get a gasket for your vehicle’s make, model, and year.
.jpg)
Some vehicles don’t have drain plug gaskets, relying instead on a tapered metal-to-metal contact to prevent oil leakage. Don’t try to use a gasket on one of these arrangements. It won’t work, and you may end up with your new oil in a pool on the floor.
 A drain pan to catch the oil: Find an old basin that’s low enough to fit under your vehicle’s drain plug without the necessity of jacking up the car, and large enough to hold all the old oil — usually about five quarts. Line the basin with a heavy-duty plastic garbage bag, opened so that it can catch the oil, leaving the basin clean.

You can buy a container made especially for catching old oil. These containers are reusable, but you have to wash them out and find a place to keep them, or throw them out and buy another one each time. More important, you can’t recycle the oil that’s drained into them.
 A funnel: Oil is sold in containers that have narrow necks to facilitate pouring the oil into the engine. If you’re still worried about your aim, use a funnel to prevent messy spills. The funnel also comes in handy for decanting the used oil into containers for recycling. See the later section “Recycle your old oil and filter” for instructions on doing that.
 Thin disposable plastic gloves to keep your hands clean: You also can use dish detergent to easily remove oil from your hands.
 Things to clean up oil: You should have a clean, lint-free rag handy for wiping your oil dipstick and a dirty, old, thick rag that you don’t mind throwing away to use on spills and tools. You can use paper towels to clean up spills and tools, but don’t risk bits of paper getting into your engine by using paper to tidy it up. (If you own a cat, kitty litter is the best way to sop up spills on the ground, but not on the engine. See the later section “Clean up spilled oil thoroughly” for more instructions.)
 A work light: A work light helps you see better underneath the vehicle; a flashlight can be awkward if you have to hold it between your teeth!
Do the job systematically

Although the oil change process takes 17 steps to explain, it shouldn’t take more than 15 minutes to accomplish after you buy the necessary stuff. Follow these easy steps to change your oil and oil filter:
1. Either park on level ground or in such a way that the oil drain plug is at the lower end of the oil pan.
.jpg)
If you’ve chosen to disregard my suggestion that you not do the job if you have to jack up your vehicle, at least read Chapter 1 to be sure that you do so safely. Block the wheels, use jack stands, and don’t jack the car up too high, or the oil may not drain out of the oil pan completely. If
you can, jack up the vehicle so that the oil drain plug is at the lower end of the oil pan .
2. Before you begin work, be sure your gearshift is in Park or Neutral with the parking brake on, and set out all your tools and equipment.
Place all the stuff you’re going to use within easy reach so that you don’t have to jump up and run around to the other side of the vehicle in the middle of the job.
3. Warm up your engine for two or three minutes so that the gook gets churned up and can flow out of the engine easily.
.jpg)
You don’t want the engine so hot that you burn yourself. When it’s slightly warm, shut off the engine.
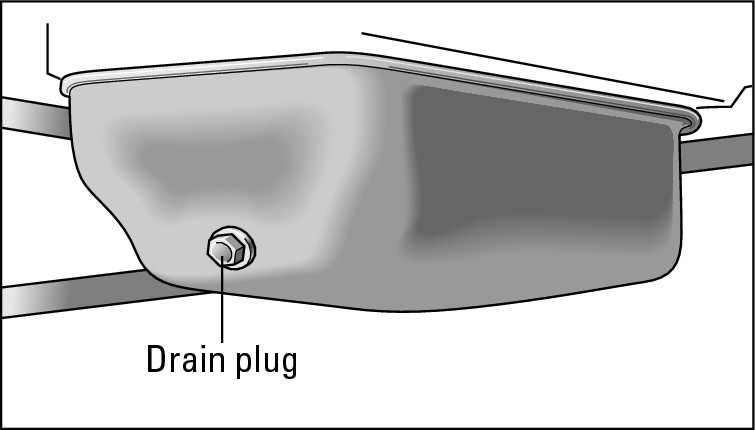
4. Use a work light or flashlight to look under your car. You should be able to see and reach a large nut or plug located under the oil pan at the bottom of the engine (see Figure 13-6).
|
Figure 13-6: The drain plug is located at the bottom of your oil pan. |
|
This is the oil drain plug. It unscrews with the aid of an adjustable wrench. If the plug is too hot to touch comfortably, let the engine cool off for a while longer.

If you can’t reach your oil drain plug easily and you still want to do this job yourself, you’ll have to either crawl under your car to reach the plug or jack up the car.
5. Push the basin with the plastic bag opened inside it (or the oil-change container) under the oil drain plug so that it can catch the oil.
.jpg)
The oil may not come down vertically to start with; it may come out sideways from the direction the drain plug is facing. Allow room for that when you place the drain pan.
6. Use your adjustable wrench to unscrew the oil drain plug until it’s almost ready to come out. Then protect your hand with the dirty rag or a disposable plastic glove, and give the plug a last quick turn by hand to release it. Pull your hand away quickly so that you don’t get oil all over yourself.
If the plug falls into the container, you can retrieve it later. The oil should drain out of your engine into the container (remember to retrieve the gasket if, against my recommendation, you’re going to reuse it). While the oil drains, get out from under the vehicle and take a look under the hood.
7. Remove the cap from the oil filler hole at the top of your engine.
This large cap is easy to recognize: It lifts or screws right off, revealing a largish hole.
8. Unscrew the oil filter using an oil filter wrench if you can’t do it by hand.
.jpg)
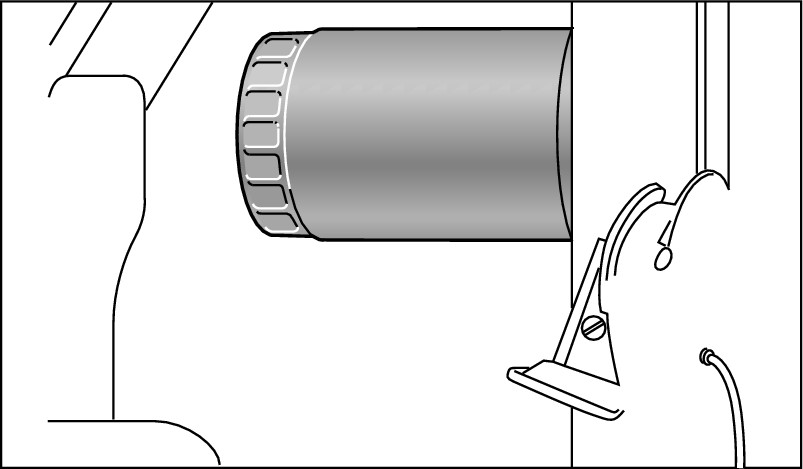
The oil filter looks like a tin can that’s screwed onto the engine (see Figure 13-7). Like most other things you find on a vehicle, the oil filter unscrews if you twist it counterclockwise. The old filter will have oil in it, so be careful not to dump it on anything when you remove it. If any remnants of the rubber seal from the old filter remain on your engine, scrape them off carefully, making sure they don’t fall into the hole.
|
Figure 13-7: The oil filter is screwed onto your engine. |
|

On some vehicles, you can easily reach the oil filter by leaning under the hood. Unfortunately, on other models the filter must be reached from under the vehicle. If your vehicle is one of these, you may have to jack the vehicle up to get at it.
9. Empty the oil from the filter into the drain pan.
Use a screwdriver to punch a hole in the dome of the can (which releases the pressure in the filter) and invert it in the drain pan to allow the oil to flow out. When the filter has drained completely (this can take as long as 12 hours), wrap it in newspaper and set it aside to take to a recycling center with your old oil (see the section “Recycle your old oil and filter” later in this chapter).
10. While the old oil drains out of the engine, open a new bottle of oil. Dip a finger in the new oil and moisten the gasket on the top of the new oil filter. Then screw the new filter into the engine where the old one was.
.jpg)
Follow directions on the filter, or turn it gently until it settles into place, and then turn it another three-quarter turn. Unless the filter manufacturer specifically recommends it or there isn’t enough space to get your hand into the area, don’t use an oil filter wrench to tighten the filter. It should fit tightly, but you don’t want to crush the gasket or the filter will leak.
11. Reach under the vehicle again and use your dirty rag to wipe around the place where the oil drain plug goes.
12. Replace the oil drain plug and use an adjustable wrench to tighten it. If your vehicle uses an oil drain plug gasket, make sure that the old one has been removed, and lay a new gasket on the pan before you replace the plug.
13. After you install the oil filter and replace the oil drain plug, use a funnel — or just good aim — to pour all but one quart of fresh oil into the oil filler hole.
14. Replace the oil filler cap and run the engine for 30 to 60 seconds while you check for leaks from the oil drain plug and around the filter.
The oil pressure light on your dashboard should go out in 10 or 15 seconds (or if your vehicle has an oil pressure gauge, the needle should move off of “Low”). Don’t rev up your engine during this period. Your oil pressure ranges from zero to low while the light is on and won’t reach the proper pressure until your oil filter fills up. If the light doesn’t go out, check under the vehicle and around the engine for leaks. Running the engine circulates oil into the new oil filter, and because filters hold from a half to a full quart of oil, you want to be sure that your filter is full to get an accurate reading on the oil dipstick.
15. Shut off the engine and wait five to ten minutes for the oil to settle into the oil pan. Then remove the oil dipstick, wipe it with a clean, lint-free rag, and shove it back in. Pull it out again and check it.
Refer to Figure 2-10 in Chapter 2 if you don’t know what an oil dipstick looks like. Your owner’s manual should tell you where it is on your engine.
16. Keep adding oil a little at a time and checking the stick until you reach the “Full” line on the dipstick.
17. Remove the drain pan from under the vehicle, drive around the block a couple of times, let the oil settle down again, and recheck the dipstick and the dashboard indicator.
.jpg)
Never keep running an engine or drive a vehicle that tells you its oil pressure is low. Because oil not only lubricates but also helps cool the engine, you can ruin your engine if you drive even a short distance with insufficient oil or with a defective oil pump.

When you see how easy changing the oil is, you’ll tend to change your oil more frequently, and your vehicle will perform better, last longer, burn less fuel, and cause less air pollution. You’ll feel pretty happy with yourself, too!
Clean up spilled oil thoroughly
You can’t just hose off oil you’ve spilled on the ground — it will only rise to the surface of the water and spread to a larger area. The best way to clean up spilled oil is to cover the oil with a generous layer of kitty litter, let it soak up the oil for a few hours (it will even pull some up out of the concrete or asphalt), then sweep up and properly dispose of the oil-soaked stuff. Next, squirt some liquid dishwashing soap onto the stain and scrub with a stiff brush; or on unpainted concrete, scrub the area with a solution of half laundry soap and half bleach. Wipe up the dirty cleaning liquid with paper or cloth towels, and rinse the area well.
Recycle your old oil and filter
.jpg)
So what do you do with your old oil? Decant the oil from the garbage bag that was in your collection pan into clean disposable containers with tight-fitting, screw-on lids — the bottles that the new oil came in or old, washed soda bottles work well. Place a funnel in the neck of the container, tie-off the bag, and hold it above the funnel. Then cut a tiny hole in a bottom corner of the bag and let the oil drain out of the bag into the funnel and container. You may want to cover the ground underneath the container with a thick layer of newspapers. (If you spill oil anyway, see the preceding section “Clean up spilled oil thoroughly.”)
.jpg)
