Chapter 15
Be a Buddy to Your Brakes and Bearings
In This Chapter
 Extending the life of your brakes
 Checking drum and disc brakes for wear and brake lines for leaks
 Checking and packing wheel bearings
 Flushing the system and changing the brake fluid
 Adjusting your parking brake
 Checking your ABS (anti-lock braking system)
As I explain in Chapter 14, all vehicles today are equipped with dual hydraulic brake systems. Many newer vehicles are also equipped with anti-lock braking systems (ABS). This chapter provides instructions for performing preventive maintenance on your brakes and doing checkups that help you to spot trouble before it occurs. If you need professional work done, this chapter also provides tips that enable you to deal with an auto mechanic or brake specialist knowledgeably.

.jpg)

Extending the life of your brakes
The best way you can “be a buddy to your brakes” is to extend their lifespan. You’re also doing yourself a favor, and not just because repairing and replacing brakes is expensive: These techniques will help your brakes help you live longer, too!
 Riding your brakes (keeping your foot on the brake pedal when you drive) causes them to wear out prematurely. The excess heat also can warp brake rotors and brake drums.
 Although being cautious is always a good policy, try to anticipate stopping situations well enough in advance to be able to slow down by releasing the pressure on your gas pedal and then using your brake pedal for that final stop. In slippery conditions or situations that call for slowing down rather than stopping, if you have traditional brakes, instead of jamming on your brakes and screeching to a halt, pump your brake pedal to reduce speed and avoid sliding. If the road is slippery and your vehicle is equipped with ABS, don’t pump the brake pedal; simply apply firm, steady pressure and keep steering.
Maintaining the speed limit so that you don’t have to stop at every light also increases fuel efficiency, which reduces not only your expenses but also global warming! You can find more fuel-saving tips in Chapter 26.
Checking Your Brake System
It’s best to start by going over the brake system in your vehicle and checking each part for wear and proper performance. If it’s safe for you to do the necessary work, I tell you how to do it in this section. If you need professional help, I tell you what the work should probably entail so that you don’t end up paying more than is necessary.
Check your brakes every 10,000 to 20,000 miles, depending on your vehicle’s age, type, braking system, and how much stop-and-go driving you do. If you tend to ride your brakes, they get more than normal wear and should be checked more frequently. If it’s taking longer, your vehicle pulls to one side, or your brakes squeal when you try to stop, check them immediately. (After one of those breathtaking emergency stops on the freeway, I always say “Thanks, pals” and promise myself that I’ll peek at my brakes and brake lines soon and make sure that they’re in good shape.)
.jpg)
Checking your brake pedal
If you’re like most people, you’re usually aware of only one part of your brake system: the brake pedal. You’re so familiar with it, in fact, that you can probably tell if something’s different just by the way the pedal feels when you step on the brakes.
To check your brake pedal, you simply do the same thing you do every time you drive: You step on the pedal and press it down. The only difference is that you should pay attention to how the pedal feels under your foot and evaluate the sensation. The following steps tell you what to feel for:
1. Start your engine, but keep it in Park with the parking brake on. (If your vehicle doesn’t have power brakes, it’s okay to do this check with the engine off.)
2. With the vehicle at rest, apply steady pressure to the brake pedal.
Does it feel spongy? If so, you probably have air in your brake lines. Correcting this problem isn’t difficult; unless your brakes have ABS or other sophisticated brake systems, you can probably do the job yourself with the help of a friend. The “Bleeding Your Brakes” section later in this chapter tells you whether you can bleed the system on your vehicle and provides instructions for doing the job.
Does the pedal stay firm when you continue applying pressure, or does it seem to sink slowly to the floor? If the pedal sinks, your master cylinder may be defective, and that’s unsafe.
3. Release the parking brake and drive around the block, stopping every now and then (but without driving the people behind you crazy).
Notice how much effort is required to bring your vehicle to a stop. With power brakes, the pedal should stop 1 to 1 1/2 inches from the floor. (If you don’t have power brakes, the pedal should stop more than 3 inches from the floor.)
.jpg)
If your vehicle has power brakes and stopping seems to take excessive effort, you may need to have the power booster replaced .
4. If you feel that your brakes are low (meaning that the pedal goes down too far before the vehicle stops properly), pump the brake pedal a couple of times as you drive around.
If pumping the pedal makes the car stop when the pedal’s higher up, either a brake adjustment is in order or you need more brake fluid. Check the brake fluid level by following the instructions in the next section, “Checking your master cylinder.”

If the level of brake fluid in the master cylinder is low, buy the proper brake fluid for your vehicle (see “Flushing and Changing Brake Fluid” later in this chapter for tips) and add fluid to the “Full” line on your master cylinder. Check the fluid level in the cylinder again in a few days. If it’s low again, check each part of the brake system, following the instructions in this chapter, until you find the leak, or have a brake specialist find it and repair it for you.
If you find that you’re not low on fluid, drive carefully to your friendly service facility and ask them to remedy the situation. When they’ve worked their magic, the pedal shouldn’t travel down as far before your vehicle stops.

Disc brakes self-adjust and should never need adjusting. Drum brakes also have self-adjusting devices that should keep the drum brakes properly adjusted. If any of the self-adjuster components on drum brakes stick or break, the drum brakes won’t adjust as they wear out, resulting in a low pedal. Chapter 14 tells you more about self-adjusting devices.
5. As you drive around, notice how your total brake system performs, and ask yourself these questions:
• Does the vehicle travel too far before coming to a stop in city traffic? If it does, either your brakes need adjusting or you need new brake linings.
• Does the vehicle pull to one side when you brake? On vehicles with front disc brakes, a stuck caliper and brake fluid leak can cause this problem. On vehicles with front drum brakes (antiques), a wheel cylinder may be leaking or stuck, or the brake shoes may be wear-ing unevenly. I explain how to check disc and drum brakes in the section “Getting at Your Brakes” later in this chapter.
• Does your brake pedal pulsate up and down when you stop in a non-emergency situation? A pulsating brake pedal usually is caused by excessive lateral run-out (mechanic-speak for wobbling from side to side), which causes a variation in the thickness of the discs. This can happen because your brakes are overheating from overuse.

ABS brakes sometimes pulsate when you need them to stop quickly, so don’t confuse that with a braking problem (read “Checking Anti-Lock Brakes” at the end of this chapter). Make sure that your rear brakes are working; if not, they could be causing your front brakes to work too hard and overheat.
• Does your steering wheel shake when you brake? If it does and you have disc brakes, your front brake discs need to be professionally machined or replaced.
• Do your brakes squeal when you stop fairly short? The squealing is a high-pitched noise usually caused by vibration. Squealing can occur when the brake linings are worn and need replacement, the brake drum or disc needs to be machined, the front disc brake pads are loose or missing their anti-rattle clips, the hardware that attaches the brake calipers is worn, or inferior brake linings are in use.
Properly functioning disc brakes are sometimes a little noisy, and totally eliminating a squeal can be difficult. When you open your brakes to check them, make sure that your brake discs or drums aren’t badly scored or worn and that plenty of lining material is left. Also, the brake pads on disc-type brakes should fit properly into the caliper. Some disc brake pads require special shims to eliminate squeal.
.jpg)
• Do your brakes make a grinding noise that you can feel in the pedal? If so, stop driving immediately and have your vehicle towed to a brake repair shop. Further driving could damage the brake discs or drums. Grinding brakes are caused by excessively worn brake linings; when the lining wears off, the metal part of the brake pad or brake shoe contacts the brake disc or drum and can quickly ruin the most expensive mechanical parts of the brake system.
• Does your vehicle bounce up and down when you stop short? Your shock absorbers may need to be replaced. Chapter 16 has information about shock absorbers.
.jpg)
Checking your master cylinder
Brake fluid is stored in the master cylinder. When you step on the brake pedal, fluid goes from the master cylinder into the brake lines; when you release the pedal, the fluid flows back into the master cylinder. Essentially, when you check your master cylinder, you’re making sure that you have enough brake fluid.
.jpg)
To check the brake fluid in your master cylinder, follow these steps:
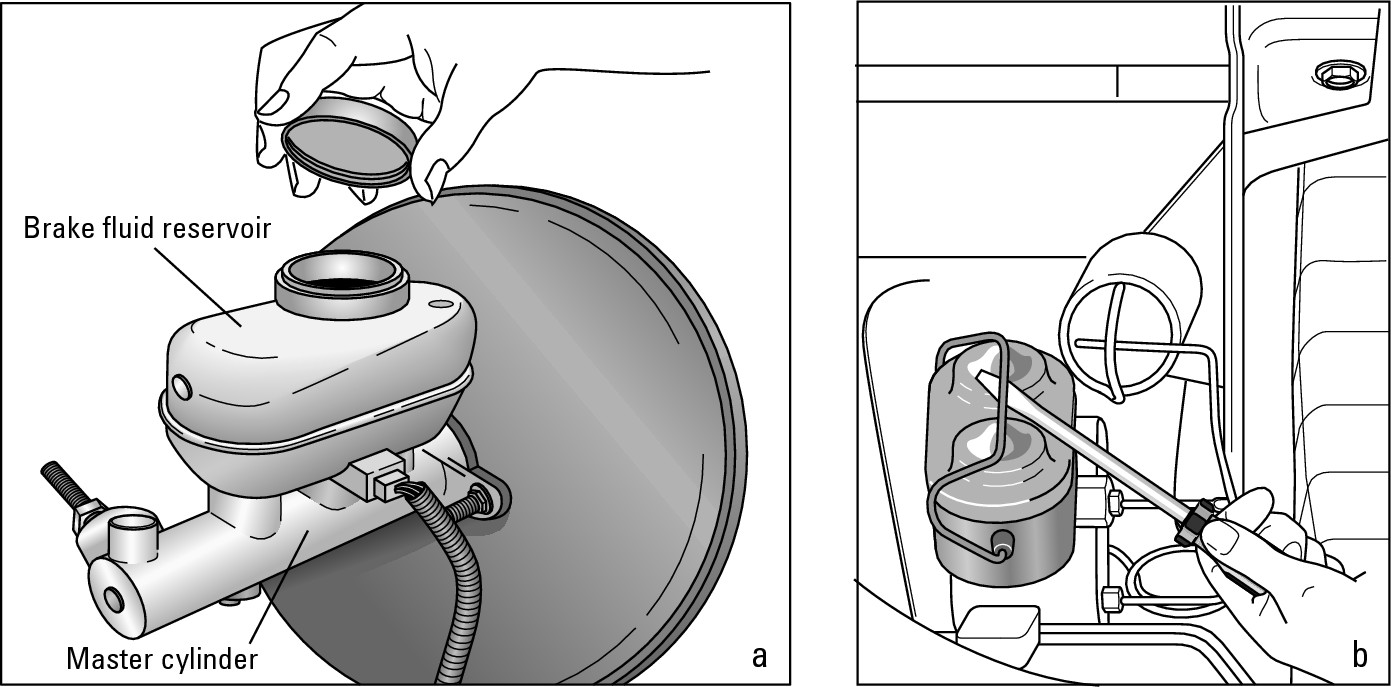
1. Open the brake fluid reservoir on top of your master cylinder.
If you have the kind with a little plastic bottle on top, just unscrew the cap on the little plastic bottle that sits on top of the master cylinder (see Figure 15-1). (Some master cylinders have a cap for each chamber.) If you have a metal reservoir, use a screwdriver to pry the retaining clamp off the top (also shown in Figure 15-1).
.jpg)
Don’t let any dirt fall into the chambers when you open the lid. If your hood area is full of grime and dust, wipe the lid before you remove it.
|
Figure 15-1: Unscrew the plastic reservoir cap (a) or use a screwdriver to release the lid on your master cylinder (b). |
|
2. Take a look at the lid.
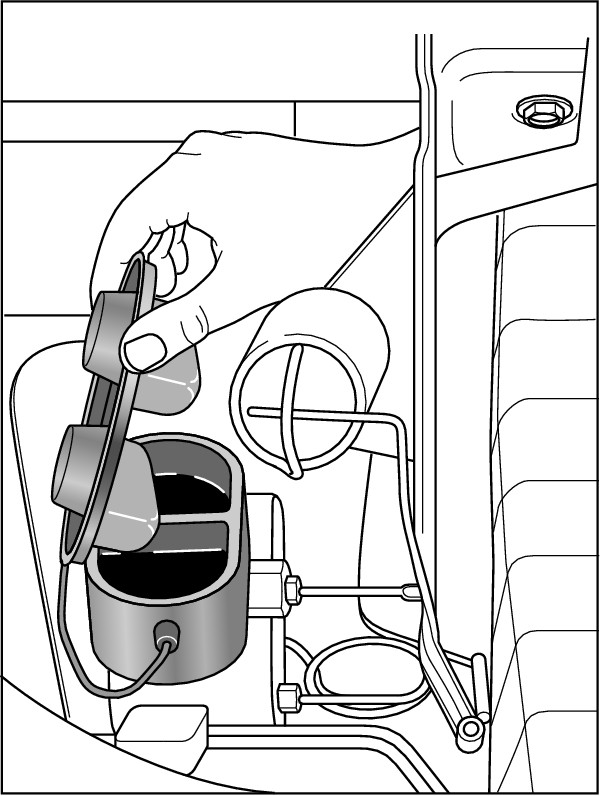
Attached to the inside surface of the lid is a protective diaphragm with rubber cups (see Figure 15-2). As the brake fluid in your master cylinder recedes (when it’s forced into the brake lines), the diaphragm cups are pushed down by air that comes in through vents in the lid. The cups descend and touch the surface of the remaining brake fluid to prevent evaporation and to keep the dust and dirt out. When the fluid flows back in, the cups are pushed back up.

If your brake fluid level is low, or if the cups are in their descended position when you remove the lid, push them back up with a clean finger before you replace the lid.
|
Figure 15-2: Rubber cups inside the lid of a master cylinder. |
|
.jpg)
If the cups seem very gooey or can’t be pushed back to their original position, the wrong brake fluid may have been used. Because some power steering fluid reservoirs are the same shape as the brake fluid reservoirs in master cylinders, there have been cases where power steering fluid was accidentally installed in the master cylinder. If this happens, everything but the steel brake lines must be rebuilt or replaced, includ-ing the master cylinder!
3. Look inside the master cylinder.
The brake fluid should be up to the “Full” line on the side of the cylinder or within 1/2 inch of the top of each chamber. If it isn’t, buy the proper brake fluid for your vehicle and add it until the level meets the line.
.jpg)
Be sure to read the “Flushing and Changing Brake Fluid” section in this chapter to ensure that you buy the proper kind of brake fluid. Also remember to close the brake fluid reservoir as quickly as possible so that oxygen or water vapor in the air doesn’t contaminate the fluid. And try not to drip it on anything — it eats paint!
A low brake fluid level may not mean anything if it’s been a long time since any fluid was added and if your vehicle has been braking properly. If you have reason to believe that your brake fluid level has dropped because of a leak, use this chapter to check the rest of your system very carefully for leaks.
4. If both chambers of your master cylinder are filled with brake fluid to the proper level, close the master cylinder carefully, without letting any dirt fall into it.
If dirt gets into your master cylinder, it will travel down the brake lines. If it doesn’t block the lines, the dirt will end up in your wheel cylinders and damage your brakes.
5. Brake fluid evaporates easily, so don’t stand around admiring the inside of your master cylinder. Close it quickly, and be sure that the lid is securely in place.
.jpg)
Because most master cylinders are pretty airtight, you shouldn’t lose brake fluid in any quantity unless it’s leaking out somewhere else. If your fluid level was low, you’ll find the cause as you continue to check the system.
6. Use a flashlight or work light to look for stain marks, wetness, or gunk under the master cylinder and on whatever is in its vicinity.
If your master cylinder is — or has been — leaking, you’ll see evidence of it when you look closely.

Checking your brake lines
If the fluid level in your master cylinder remains full (see the preceding section), chances are that you don’t need to check for leaks in the brake lines that carry the fluid to each wheel cylinder. However, if you find that you’re losing brake fluid, or if the inner surfaces of your tires are wet or look as though something has been leaking and streaking them, it could be a leak in the wheel cylinders or the brake lines — or a visit from a neighbor’s dog!
The easiest way to check brake lines is to put the vehicle up on a hydraulic hoist, raise it over your head, walk under it, and examine the lines as they lead from the hood area to each wheel. Leaks may be coming from holes in the lines where the steel lines become rubber ones or where the brake lines connect with the wheel cylinders.

To check your brake lines, do the following:
1. Check carefully along the brake lines for wetness and for streaks of dried fluid.
2. If you see rust spots on your lines, gently sand them off and look for thin places under those spots that may turn into holes before long.
3. Feel the rubber parts of the brake lines for signs that the rubber is becoming sticky, soft, spongy, or worn.

Your brake lines should last the life of your vehicle. If they look very bad, have a professional take a look at them and tell you whether they should be replaced. If the vehicle is fairly new and the brake lines look very bad, go back to the dealership and ask them to replace the lines free of charge.
4. Look at the inner surfaces of your tires for drippy clues about leaking wheel cylinders.
Getting at Your Brakes
Checking your brakes to see whether they’re in good condition isn’t as scary as it sounds; in fact, it’s quite simple — with two qualifications: Don’t fiddle with anything unless I tell you to, and be sure to disassemble the stuff that covers your brakes in the proper manner so that you don’t have trouble reassembling it. For details on this foolproof technique, see the section in Chapter 1 called “How to Take Anything Apart — and Get It Back Together Again.”
Keep the following in mind for any major work your brakes may need:
 Don’t attempt to replace brake shoes or discs, linings, or wheel cylinders yourself unless you do so under the eye of an auto shop instructor. If you choose to go this route with proper supervision, the money you save more than pays for your tuition! The job is neither difficult nor complicated. It just needs supervision.
 If you’d rather have the work done for you, find a reliable brake specialist rather than taking your vehicle to the corner garage. If you have an exotic system, go to your dealership. If not, get an estimate from the dealership, and then have the mechanic at your local service station recommend a brake specialist or try the yellow pages or the Internet to locate brake shops in your area. Call a couple of places and ask for estimates on
rebuilding
your brakes. Eliminate the cheapest place as well as the most expensive! Chapter 22 is filled with advice on finding good service facilities and dealing with them successfully.
Things to do and not to do when working on brakes
.jpg)
 Never step on your brake pedal when you have the brake drum off your brakes. The pistons can fly out of the ends of the
wheel cylinders
because the drum won’t stop the
brake shoes
from moving outward. (If this makes no sense to you, Chapter 14 tells you how wheel cylinders work.)
 Never use anything but the correct brake fluid in your brakes.
 Never get oil anywhere near your brake system. Oil rots rubber and will destroy the cups in the master cylinder reservoir and the dust boots on your wheel cylinders. If it gets on your
brake linings,
they won’t grab the brake drum.
 Never get brake fluid on a painted surface. Brake fluid will destroy the paint.
 Never remove wheel cylinders or brake shoes, or tamper with the self-adjusting device on your brakes, without supervision.
Now, here’s what you can do: Most modern vehicles either have disc brakes on the front wheels and drum brakes on the rear wheels or disc brakes all around. Your owner’s manual should tell you what the configuration is on your vehicle. When you know, follow the instructions in the following sections that deal with the type of brakes on your vehicle.

Before you start to check your brakes, scan the instructions later in this chapter (including the “Checking and Packing Wheel Bearings” section) to be sure that you have the necessary tools and products on hand. You don’t want any last-minute surprises when your vehicle is up on jack stands with at least one wheel off! If you’re unfamiliar with the tools you need for the job, see Chapter 3 for descriptions.

A front-wheel drive vehicle doesn’t conform exactly to the following description. You can still check the brakes, but you can’t repack the wheel bearings . Brakes in vehicles with ABS and other brake-related safety systems are linked to sophisticated electronic control systems and have wheel speed sensors mounted on the axles near the brakes, so if your brakes don’t feel right, see the brake specialist at your dealership or a reliable brake shop.
Checking drum brakes
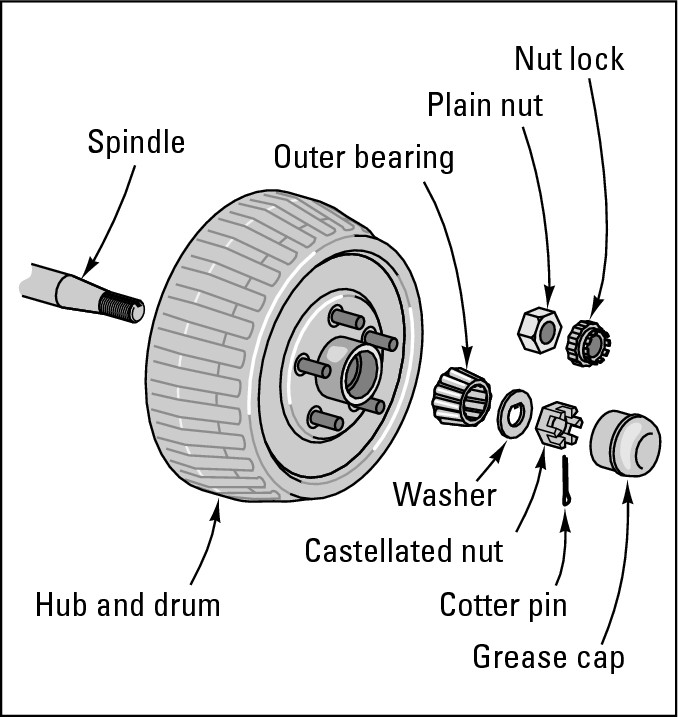
As you can see in Figure 15-3, you have to remove a bunch of stuff to get to a drum brake. The steps in this section explain how to do so and what to look for when you finally get to your brakes.
|
Figure 15-3: The things you have to remove to get at your drum brakes. |
|
.jpg)
Follow these steps to check drum brakes:
1. Jack up your vehicle.
For instructions, see Chapter 1. Be sure to observe safety precautions with that jack!

Brake drums are classified as either hubbed or floating (hubless). Hubbed drums have wheel bearings inside them; floating drums simply slide over the lug nut studs that hold the wheels on the vehicle.
2. If you have a hubbed drum, pry the grease cap off the end of the hub using a pair of combination slip-joint pliers (see the tool in Chapter 3) and lay the grease cap on a clean, lint-free rag.

If you have a floating drum, skip Steps 3 through 7 and just slide the drum off the hub.
You sometimes need to strike floating drums with a hammer to break them loose from the hub.
3. Look at the cotter pin that sticks out of the side of the castellated nut or nut-lock-and-nut combination.
Notice in which direction it’s placed, how its legs are bent, how it fits through the nut, and how tight it is. If necessary, make a sketch.
4. Use a pair of needle-nosed pliers to straighten the cotter pin and pull it out.
Put it on the rag that you’re using to hold all the parts you’ve taken off, and lay it down pointing in the same direction as when it was in place.
5. Slide the castellated nut or nut-lock-and-nut combination off the spindle.
If it’s greasy, wipe it off with a lint-free rag and lay it on the rag next to the cotter pin.
6. Grab the brake drum and pull it toward you, but don’t slide the drum off the spindle yet; just push the drum back into place.
The things that are left on the spindle are the outer wheel bearings and washer.
7. Carefully slide the outer bearing, with the washer in front of it, off the spindle.

8. Whether or not you want to repack your wheel bearings, check them now by following the instructions in the “Checking and Packing Wheel Bearings” section later in this chapter. Then resume with Step 9.
As long as you’re removing your bearings, you should check them for wear. If they’re packable, it’s a good idea to repack them while you have everything apart. (All this task involves is squishing wheel-bearing grease into them, a wonderfully sensual job.)
9. Carefully slide the drum off the spindle, with the inner bearings inside it.
.jpg)
Inhaling brake dust can make you seriously ill. For safety’s sake, never attempt to blow away the dust with compressed air. Instead, put your mask on and saturate the dust completely by spraying the drum with brake parts cleaner according to the instructions on the can. Wipe the drum clean with a rag; then place the rag in a plastic bag and dispose of it immediately.
10. Take a look at the inside of the drum.
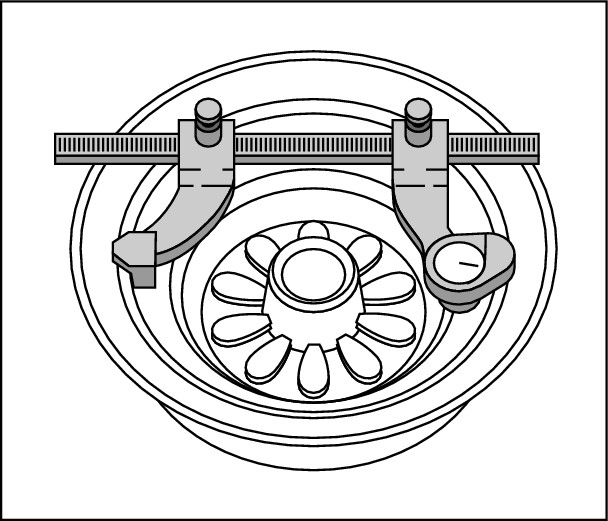
You can probably see grooves on the inner walls from wear. If these grooves look unusually deep, or if you see hard spots or burned places, ask your service facility to let you watch while they check out the drums with a micrometer (see Figure 15-4). If the drums aren’t worn past legal tolerances (0.060 of an inch), they can be reground (or turned) rather than replaced. A special machine called a brake-lathe does this job in a relatively short amount of time. It shouldn’t be a major job in terms of expense. You could do it yourself, under supervision at a school auto shop; most classes have the machine.
|
Figure 15-4: Checking drum wear with a micrometer. |
|
.jpg)
If you need new drums, have a professional install them for you because the brake shoes must be adjusted to fit. Make sure that the shop orders drums for your exact make, model, and year and that they specify drums for front or rear wheels. Brake drums must also be replaced with drums of the same size for even braking performance. The new drums should look exactly the same as your old ones.
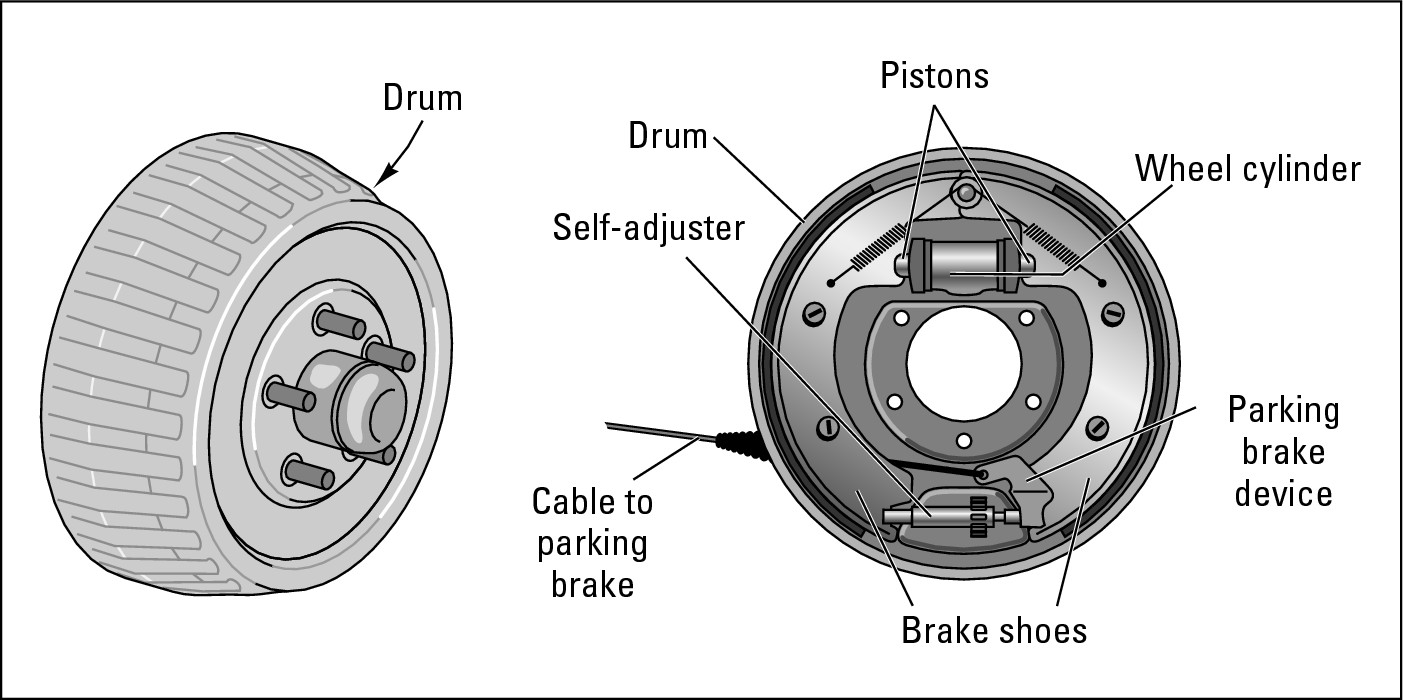
11. Look at the rest of your brakes, which are still attached to the brake backing plate (see Figure 15-5).
|
Figure 15-5: Anatomy of a drum brake. |
|
Here are the parts you should look at, what you should find, and what to do if they need to be repaired or replaced:
• Wheel cylinders: The wheel cylinders should show no signs of leaking brake fluid. If they’re leaky, consult a brake shop.
• Brake shoes and linings: These should be evenly worn, with no bald spots or thin places. The brake lining should be at least 1/16 inch from the steel part of the brake shoe or 1/16 inch from any rivet on brake shoes with rivets, preferably more. The linings should be firmly bonded or riveted to the brake shoes. Most brake shoes and linings are built to last for 20,000 to 40,000 miles; some last even longer. If yours have been on your vehicle for some time, they’ll have grooves in them and may be somewhat glazed.

If your brake drums have been wearing evenly and your vehicle has been braking properly, disregard the grooves and the glazing unless your linings look badly worn. If your linings are worn, have them replaced at once. This job involves replacing the brake shoes with new ones that have new linings on them. For even performance, always replace brake shoes in sets (four shoes for two front or rear wheels is a set). Replacing them all at once is even better.

If your brake shoes need to be replaced, remember that almost all “new” brake shoes are really rebuilt ones. When your brake shoes are replaced, your old brake shoes are returned to a company that removes the old linings, attaches new ones, and resells the shoes.
12. Take a look at the self-adjusting devices on your brakes. (Figure 15-5 shows one of the most common self-adjusters.) Trace the cable from the anchor pin above the wheel cylinder, around the side of the backing plate, to the adjuster at the bottom of the plate.
Is the cable hooked up? Does it feel tight? If your brake pedal activates your brakes before it gets halfway down to the floor, the adjustment is probably just fine. If not, and if the cylinders, linings, shoes, and so on are okay, the adjusting devices may be out of whack. Making a couple of forward and reverse stops should fix them. If this approach doesn’t work, you may need a professional to adjust them. Don’t attempt to fiddle with these parts yourself.
Reassembling drum brakes
After you finish inspecting your brakes, you’re ready to reassemble everything. Refer to Figure 15-3 to make sure that you get everything back in the proper order and direction. The following steps tell you how:
1. As you did with the drums (see the previous section), saturate the dirt on the brake backing plate with brake parts cleaner; then wipe it off with a clean, grease-free rag.

Don’t blow the dust around — it can cause serious lung damage.
2. Wipe the dirt off the spindle and replace the wheel hub and brake drum on the spindle. If you have a floating drum, skip Steps 4 through 8 and slide the drum back over the lug nut studs until it contacts the hub.
Be gentle so that you don’t unseat the grease seal.
3. If you haven’t already cleaned the inside of the drum, spray it with brake cleaner and wipe it out with a grease-free rag.
4. Replace the outer wheel bearing (smaller end first) and the washer.
Don’t let any dirt get on these parts!
5. Replace the adjusting nut by screwing it on firmly and then backing it off half a turn and retightening it “finger tight.”

Another way to complete this step is to back the adjusting nut off one full notch (60 degrees) and, if the notch doesn’t line up with the hole in the spindle, back it off just enough until it does. Then spin the wheel by hand to be sure that it turns freely. If it doesn’t, loosen the nut a bit more.
6. Insert the cotter pin into the hole in the castellated nut.
The cotter pin should clear the outer grooves and go all the way through. Make sure that it’s pointing in the same direction as it was when you took it off (refer to your sketch if you made one in Step 3 of the previous section).
7. Bend the legs of the cotter pin back across the surface of the nut to hold it in place.
8. Replace the grease cap.
9. Follow the instructions in Chapter 1 to replace your wheel, lug nuts, and hubcap, and lower the vehicle to the ground.

10. Don’t try to detoxify the contaminated rags you used on this job by laundering them! Place them in a sealable plastic bag, zip it closed, and dispose of it immediately.
Checking disc brakes
Today, most vehicles have four-wheel disc brakes. Others have disc brakes on the front wheels and drum brakes on the rear wheels.
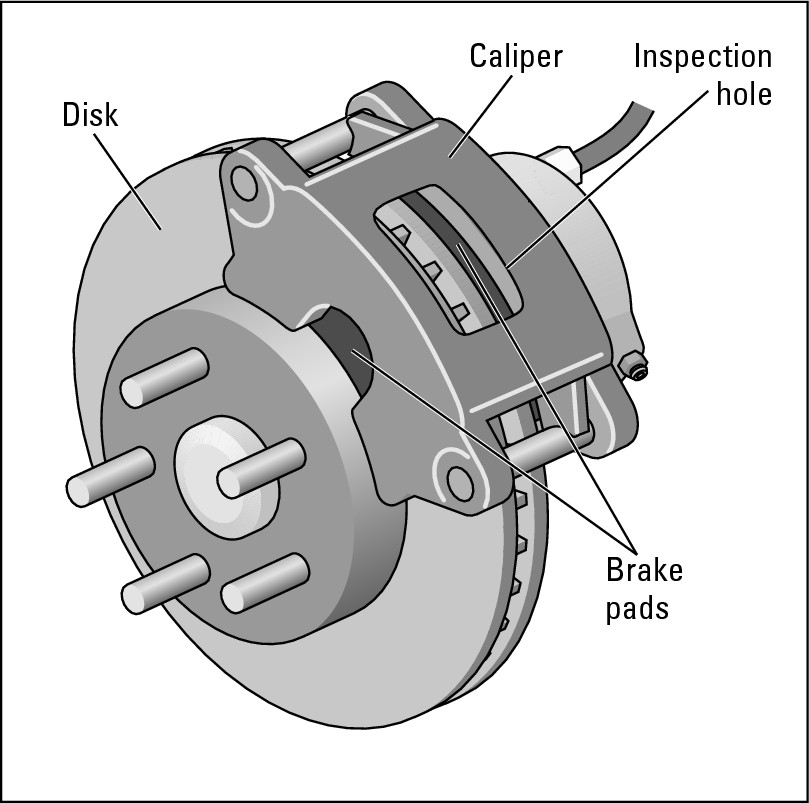
You should check disc brakes (see Figure 15-6) and disc brake linings every 10,000 miles — more often if your brakes suddenly start to squeal or pull to one side, or if your brake pedal flutters when you step on it. Don’t confuse the fluttering with the normal pulsing of ABS brakes when they’re applied in an emergency stop.
|
Figure 15-6: A disc brake. |
|

To check disc brakes, follow these steps:
1. Jack up your vehicle and remove a front wheel.
You can find instructions for how to do this safely in Chapter 1.
2. Look at the brake disc (also called a rotor), but don’t attempt to remove it from the vehicle.
The brake caliper has to be removed before you can remove a brake disc, and the good news is that there’s no need to do so. If you’re working alone, just check the visible part of the disc for heavy rust, scoring, and uneven wear. Rust generally is harmless unless the vehicle has been standing idle for a long time and the rust has really built up. If your disc is badly scored or worn unevenly, have a professional determine whether it can be reground or needs to be replaced.
3. Inspect your brake caliper (the component blocking your view of the entire brake disc).
.jpg)
Be careful. If the vehicle has been driven recently, the caliper will be hot. If it’s cool to the touch, grasp it and gently shake it to make sure that it isn’t loosely mounted and its mounting hardware isn’t worn.
4. Peek through the inspection hole in the dust shield on the caliper and look at the brake pads inside (refer to Figure 15-6).
If the linings on the brake pads look much thinner than the new ones you saw at the supply store or dealership parts department, they probably have to be replaced. If the linings have worn to the metal pads, the disc probably has to be reground or replaced as well.
5. Follow the instructions in Chapter 1 to replace your wheel, lug nuts, and hubcap, and lower the vehicle to the ground.
If the disc and pads seem to be in good condition and your brake pedal doesn’t flutter when you step on it, you don’t need to do anything else.

Checking and Packing Wheel Bearings
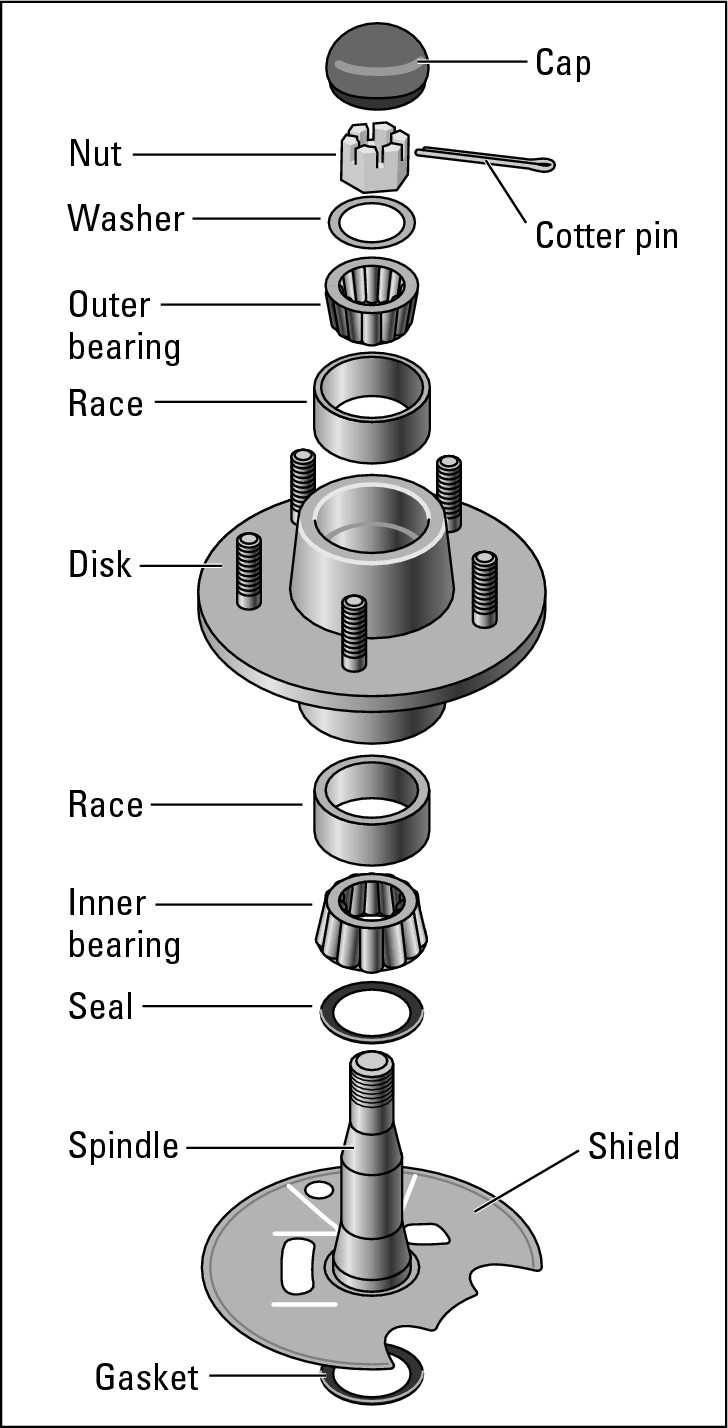
As you can see in Figure 15-7, wheel bearings usually come in pairs of inner and outer bearings. They allow your wheels to turn freely over thousands of miles by cushioning the contact between the wheel and the spindle it sits on with frictionless bearings and lots of nice, gooey grease. This grease tends to pick up dust, dirt, and little particles of metal, even though the bearings are protected to some extent by the hub and the brake drum or disc.
|
Figure 15-7: Getting at wheel bearings. |
|
Usually, only the non -drive wheels (that is, the front wheels on rear-wheel drive vehicles and the rear wheels on front-wheel drive vehicles) have repackable wheel bearings. Vehicles with front-wheel drive have sealed front bearings, but some have packable rear ones. The bearings on four-wheel drive vehicles are quite complicated and should be repacked professionally.

 If you have drum brakes,
it’s important to check the bearings when you check your brakes to make sure that the grease hasn’t become fouled. If it has, the particles act abrasively to wear away the very connection the bearings are designed to protect, and the result is a noisy, grinding ride. In extreme cases, you could even lose the wheel! If the bearings look cruddy, either repack them yourself or get a professional to do it.
.jpg)
 If you have disc brakes,
you have to remove the
caliper
to get at the bearings. Although this task isn’t terribly difficult, certain aspects of the job can create problems for a beginner. Because your brake system can kill you if it isn’t assembled properly, I strongly suggest that if you want to do it yourself, you do the job under supervision at an auto class.

Inspecting and repacking your wheel bearings
If you have disc brakes and you have to remove the caliper to get the disc off the spindle in order to get at the inner bearings, I think that you should inspect and pack them only under supervision at an auto class or under the eye of an experienced mechanic. It’s not a difficult job; it’s just that you may not get the calipers back on right, which could cause your brakes to malfunction. Otherwise, if you have drum brakes, go right ahead and do the job yourself. Figure 15-7 gives you a detailed look at what you’ll encounter. Follow these steps to repack your wheel bearings:
1. If you have drum brakes and your bearings aren’t sealed, to get at the bear-ings follow the instructions in the earlier section “Checking drum brakes.”
When you get to Step 7, where you slide the outer wheel bearings off the spindle, return to this section.
2. If you haven’t already done so, carefully slide the outer bearing, with the washer in front of it, off the spindle.
As you can see in Figure 15-7, the bearings are usually tapered roller bearings, not ball bearings.
3. Take a good look at the grease in the spaces between the bearings. Don’t wipe off the grease!
.jpg)
If the grease has sparkly silver slivers or particles in it, or if the rollers are pitted or chipped, you must replace the bearings. If the outer bearings are damaged, the inner bearings probably are, too. In this case, either replace the bearings in an auto class under the instructor’s guidance or have a repair facility do the job for you.
4. If you don’t intend to repack your outer bearings at this time but you want to continue your inspection, don’t attempt to wipe any grease off them, no matter how icky they look.
Just put them in a little plastic bag and lay them on your rag, pointing in the right direction. The bag will keep dust from getting into them. A speck of dust can wear out a bearing quickly.
If you do intend to repack your outer bearings, clean them thoroughly in solvent or kerosene with an old paintbrush. Don’t smoke when cleaning the bearings!
You need to get rid of all the old grease in order to inspect the bearings properly. Also, when you repack the bearings with fresh grease, you don’t want any old grease spoiling the new stuff.
5. When the bearings are shiny and clean, rinse them off with water and dry them, or use brake cleaner to remove the solvent.
.jpg)
If you pack new grease over the solvent, the grease will dissolve and you’ll ruin your bearings.
6. When the bearings are clean and dry, look at the rollers for signs of wear.
If the rollers are gouged or bluish in color, or if you can almost slip the rollers out of their place, replace the bearing and its race, which is pressed into the hub. You can see the race in Figure 15-7.
7. To repack the outer bearing, take a gob of wheel-bearing grease (which is different from most chassis-lube grease) and place it in the palm of your left hand (if you’re a righty).

You may want to invest in a pair of thin, disposable plastic gloves for this job. However, there’s something kind of nice about fresh, clean grease, and if you use gloves, you miss one of the more sensual aspects of getting intimately involved with your car. In any event, hand cleaner gets the grease off easily.
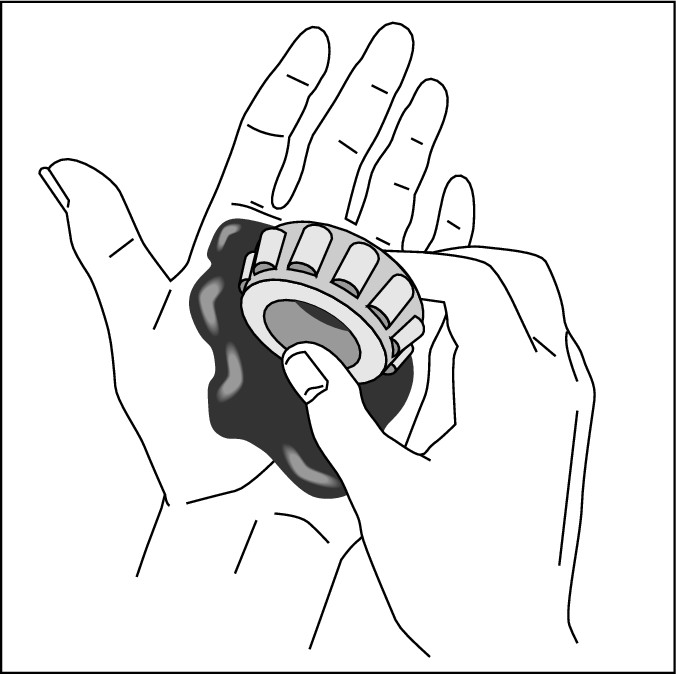
8. Press the bearing into the gob of grease with the heel of your other hand (see Figure 15-8).
|
Figure 15-8: How to pack bearings with your bare hands. |
|
Doing so forces the grease into the bearing and out the other end. Make sure that you work the grease into every gap in the bearing. You want it to be nice and yucky. Then put your bearing down on your clean rag.
Another set of bearings is in the center hole of the drum or disc. These are your inner wheel bearings. At this time, you have to decide whether you’re going to remove the inner bearings to check and pack them. The following will help you decide whether to remove the inner bearings:
.jpg)
• You can’t remove the inner bearing from its seat in the hub unless you have a new grease seal for it. So if you’re just checking on this occasion, leave the inner bearings alone until you’re sure from the condition of the outer bearings that repacking is in order.
• Generally speaking, if the outer bearings look okay, the inner ones are okay, too. Just check each wheel and put everything back according to the instructions for reassembling drum brakes earlier in this chapter.

9. If you’re not planning to repack the inner bearings, do not attempt to take them out of their seat in the drum or disc. Skip Steps 10 through 13 and continue with Step 14.
If you are repacking the inner bearings, slide the brake drum or disc toward you, with the inner bearings still in place, but do not slide the drum completely off the spindle. Instead, screw the adjusting nut back in again, pull the drum toward you, and push it back.
The adjusting nut should catch the inner bearing and its grease seal and free them from inside the hub.
10. Clean and pack the inner bearings using the technique described in Steps 5 through 8.
11. Take a rag and wipe out the hole in the hub of the drum where the inner bearing was; then take a gob of grease and smooth it into the hole.
.jpg)
Be sure that the grease fills the races inside the hub where the bearing fits. Wipe off excess grease around the outside of the hole so that it doesn’t fly around when the car’s in motion, possibly damaging your brakes.
12. Insert the inner bearing into the hub with the small end first. Take the new grease seal and spread a film of grease around the sealing end (the flat, smooth side).
13. To fit the new grease seal into place properly, slide it in evenly; otherwise, it will bend or break and you’ll lose your grease.

Find a hollow pipe or a large socket from a socket wrench set that has roughly the same diameter as the seal. With the flat, smooth side of the seal toward you, place the seal in the hub opening, and use the pipe or socket to move it into the hub gently and evenly. The new seal should end up flush with the outside of the hub or slightly inside it.
14. Return to the earlier sections “Checking drum brakes” or “Checking disc brakes.”
You’ll be glad to know that your rear wheels have no wheel bearings to pack (unless your vehicle has front-wheel drive and the manual says that you can repack the rear bearings). You do have axle bearings, but you must replace these if they wear out; you can’t repack them.

A quick way to tell whether your bearing’s wearing
If you just want to check your wheel bearings for wear without removing the wheels, do the following:
1. Jack up your vehicle and support it on jack stands.
If you’ve been checking your brakes, your car is already jacked up; if not, instructions in Chapter 1 show you how to do this task safely.
2. Without getting under the vehicle, grasp each wheel at the top and bottom and attempt to rock it.
There should be minimal movement. Excessive play may indicate that the wheel bearing is worn and needs adjustment or replacement.
3. Put the gearshift in Neutral if you have an automatic transmission, or take your manual transmission out of gear.
4. Rotate the wheel, listening for any unusual noise and feeling for any roughness as it rotates, which may indicate that the bearing is damaged and needs to be replaced.
5. Shift back into Park (for an automatic transmission) or gear (for a manual transmission) before lowering the vehicle to the ground.
Flushing and Changing Brake Fluid
After checking your brake system, if you find that you have a leak or you have to bleed your brakes (see the section “Bleeding Your Brakes” for more information), you’ll have to restore the brake fluid in your master cylinder to its proper level. Here are some things that you should know about buying and using brake fluid:
 Always use top-quality brake fluid from a well-known manufacturer. Many vehicles call for either D.O.T. 3 or D.O.T. 4 fluid. D.O.T. 5 is now available, too; it’s a great improvement because it doesn’t eat paint or absorb moisture. The downside is that because D.O.T. 5 doesn’t absorb it, water that gets into your brake system can form little pools that can corrode your brakes.
Sometimes the type of brake fluid you should use is listed on the master cylinder reservoir cover or cap. If not, check your owner’s manual or ask the service department at your dealership for the proper type for your vehicle.
.jpg)
 Exposure to air swiftly contaminates brake fluid. The oxygen in the air oxidizes it and lowers its boiling point. Brake fluid also has an affinity for moisture, and the water vapor in the air can combine with the brake fluid, lowering its boiling point and, in cold weather, forming ice crystals that make braking difficult. Adding fluid contaminated with water vapor to your brake system can rust the system and create acids that etch your
wheel cylinders
and master cylinder and foul your brakes, causing them to work poorly — or not at all. It can also destroy vital parts of
ABS
and other expensive braking systems.

If you’re just going to add brake fluid to your system, buy a small can of the correct type, add the fluid to your master cylinder, and either throw the rest away or use it only in emergencies. The stuff is pretty cheap, and your vehicle shouldn’t need more fluid after you fix a leak. If you keep a can with only a little fluid left in it, the air that fills up the rest of the space in the can contaminates the fluid no matter how quickly you recap it.
.jpg)
 Keep brake fluid away from painted surfaces — unless it’s D.O.T. 5, it eats paint.
(If this stuff seems scary, remember that the same statements can be made about turpentine and nail polish remover.)
You should flush and replace the fluid in your brake system every two years. Service facilities now do this with brake flushing machines. If you want to do it yourself, follow these steps:
1. Use a cheap, plastic turkey baster to remove the old, dirty fluid from the master cylinder reservoir.
2. Use a lint-free cloth to wipe out the reservoir — if you can get in there.
3. Pour new brake fluid into the reservoir just until it reaches the “Full” line, replace the cap on the reservoir, and then follow the steps in the next section, “Bleeding Your Brakes.”
As you bleed the brakes, the new fluid pushes the old fluid out of the system. Continue to bleed the brakes until you see clean, clear fluid exiting the bleeder screw.
Bleeding Your Brakes
If your vehicle has squishy-feeling brakes, the way to get the air out of the lines is to bleed the brakes. To do the job, you need either a brake bleeder wrench or a combination wrench that fits the bleeder nozzle on your vehicle, a can of the proper brake fluid, a clean glass jar, and a friend.
.jpg)
Follow these steps to bleed your brakes:
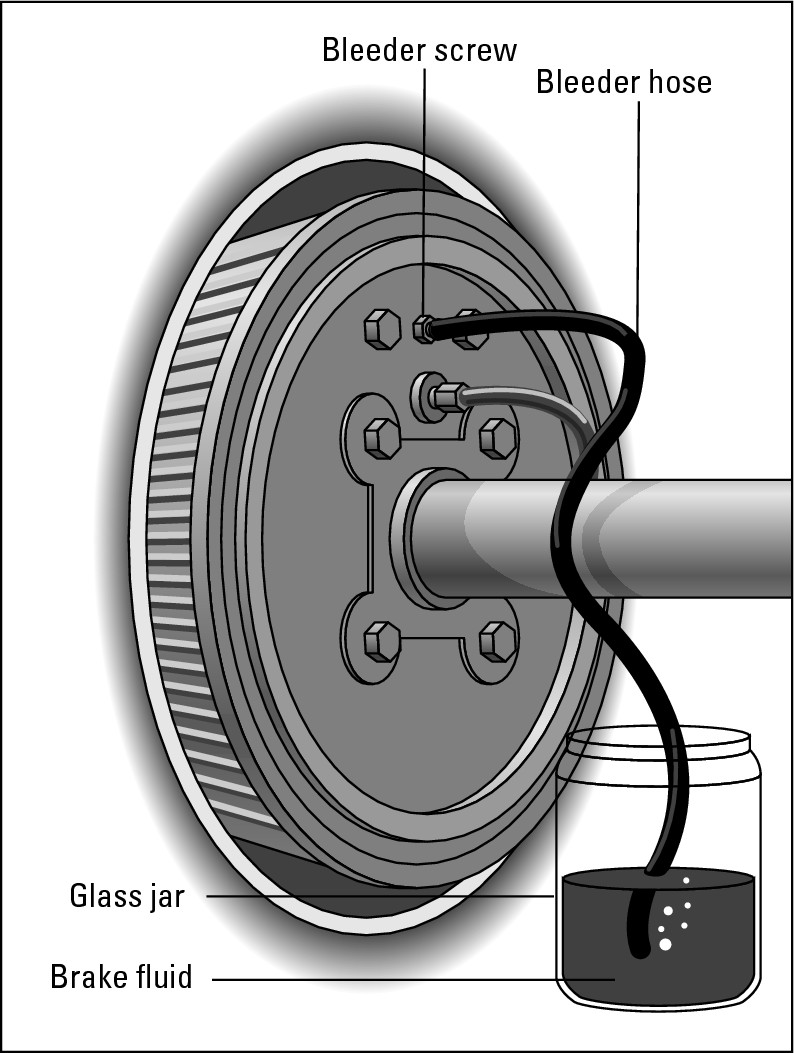
1. Find the little nozzle called a brake bleeder screw (see Figure 15-9) that’s located behind each of your brakes.
|
Figure 15-9: Using a bleeder hose to bleed your brakes. |
|
Reaching this bleeder screw may be easier if you jack up the vehicle (see Chapter 1 for instructions and safety tips). If you’re going to crawl underneath, lay down an old blanket or a thick layer of newspapers first. If you really want to be comfortable, beg or borrow a creeper to lie on and slide around with easily (I describe creepers in Chapter 3).
2. Special wrenches called bleeder wrenches fit the bleeder screw and can prevent rounding the screw’s hex-head. Find the proper wrench or socket that fits the screw, and loosen the screw.
Be careful not to break the screw off or you’ll need professional repairs. If it’s stuck, spray some penetrant like WD-40 around the screw. After you loosen the screw, tighten it again (but not too tight).
3. If you have a small piece of flexible hose that fits over the end of the bleeder screw, attach it and place the end of the hose in the jar. Then fill the jar with brake fluid to cover the end of the hose (see Figure 15-9). If you don’t have anything that fits over the bleeder screw, just keep the jar near the nozzle so that any fluid that squirts out lands in the jar.
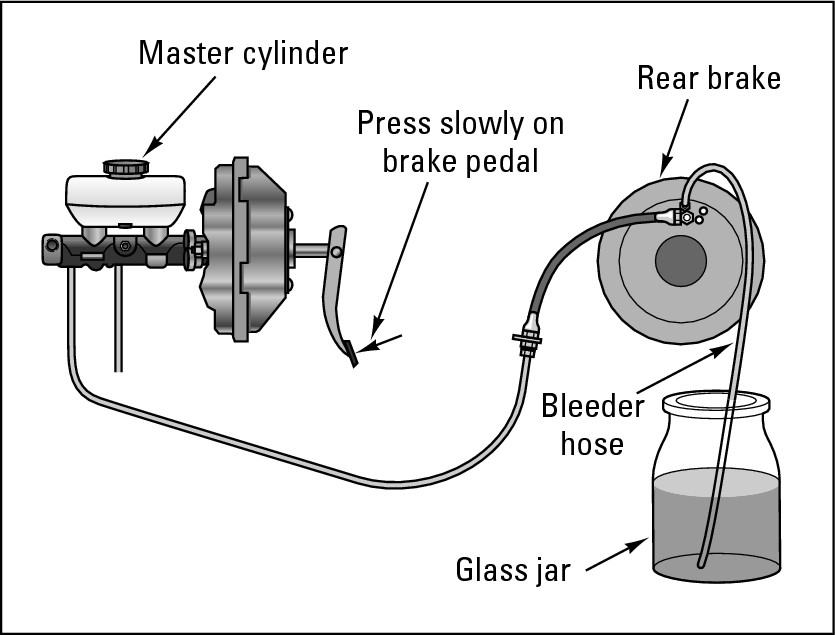
4. Have your friend slowly pump your brake pedal a few times (see Figure 15-10). Have your friend say “Down” when pressing the brake pedal down and “Up” when releasing it.
|
Figure 15-10: How to bleed your brakes. |
|
.jpg)
If the vehicle is jacked up, before you let your friend get into it with you underneath it, make sure that the wheels are blocked in the direction in which the car would roll and that it isn’t parked on a hill. Leave your tires in place so that the vehicle will bounce and leave you some clearance if it falls.
5. When your friend has pumped the pedal a few times and is holding the pedal down, open the bleeder screw.
Brake fluid will squirt out (duck!). If there’s air in your brake lines, air bubbles will be in the fluid. Seeing these bubbles is easiest if you’re using the hose-in-the-jar method, but you can also see them without it.
6. Before your friend releases the brake pedal, tighten the bleeder screw.
If you don’t, air is sucked back into the brake lines when the pedal is released.
7. Tell your friend to release the pedal, and listen for him or her to say “Up.” Then repeat Steps 2 through 6, loosening the screw and tightening it again and again until no more air bubbles come out with the fluid.
8. Open your master cylinder and add more brake fluid until the level reaches the “Full” line.
.jpg)
If you neglect to do so, you run the risk of draining all the fluid out of the master cylinder and drawing air into the lines from the top. If that happens, you have to go back and bleed your master cylinder until you suck the air out of that end of the system. Who needs the extra work?
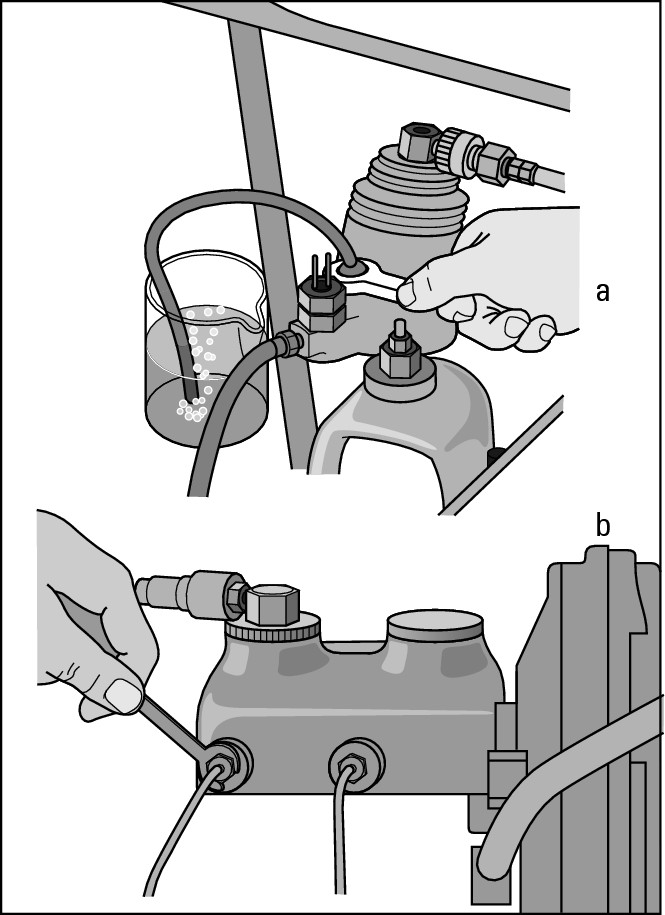
If you goof and have to bleed the master cylinder, it’s the same deal as bleeding your brakes (friend and all). Just bleed it at the point where the brake lines attach to the cylinder or at the master cylinder’s bleeder nozzle if you have one (see Figure 15-11).
|
Figure 15-11: Bleeding a master cylinder: If you have a bleeder nozzle, use the hose and jar method (a). If not, bleed the cylinder at the brake line connections (b). |
|

9. Repeat Steps 2 through 8 with each brake until the air is out of each brake line. Don’t forget to add brake fluid to the master cylinder after you bleed each brake.
10. After you finish the job and bring the brake fluid level in the master cylinder back to the “Full” level for the last time, drive the vehicle around the block.
The brake pedal should no longer feel spongy when you depress it. If it does, check the master cylinder again to be sure that it’s full, and try bleeding the brakes one more time (this situation isn’t unusual, and it doesn’t take as long as it sounds).

If the job seems like too much of a hassle, have a professional do the work. You shouldn’t have to pay for much labor, and if you choose a brake shop wisely, the whole deal shouldn’t cost too much. Whatever you do, just be sure that when the job is finished, they (or you) bleed the brakes and the master cylinder to get all the air out of the lines.

Adjusting Your Parking Brake
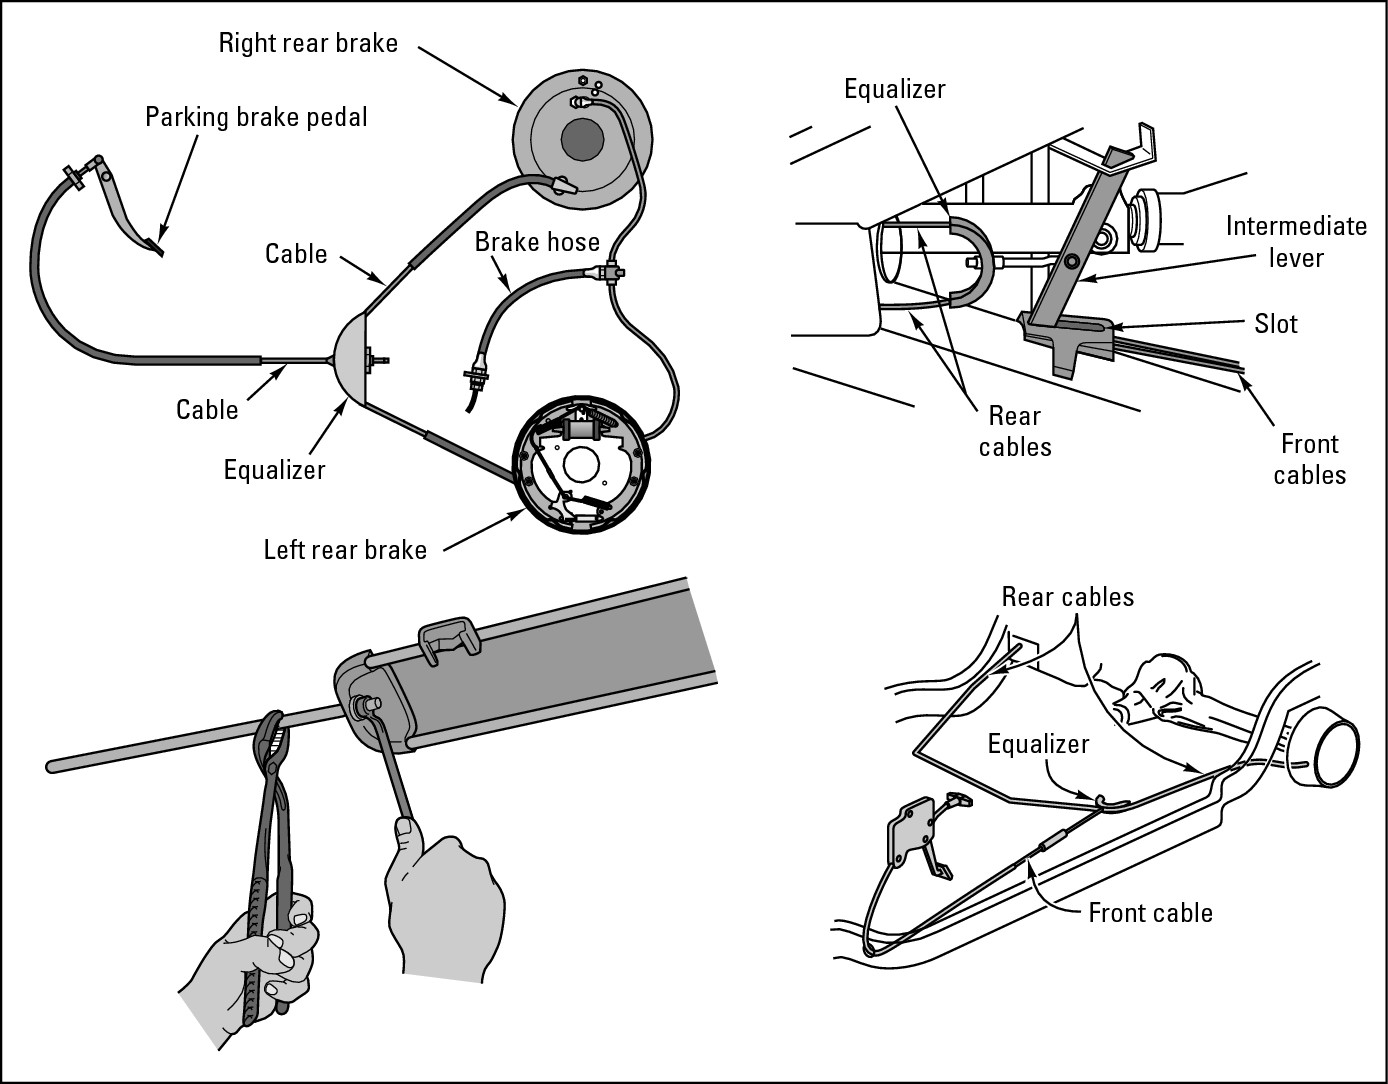
These instructions for adjusting your parking brake work only if you have drum brakes on your rear wheels. If you have a manual transmission, you may have a transmission-type parking brake, which should be adjusted professionally, and parking brakes on rear-wheel disc brakes should be left to professionals, too. Your service manual may tell you which kind you have, or you can crawl under the vehicle and see for yourself. (Chapter 14 describes both integral and transmission -type parking brakes and shows you what they look like.) Because most people have integral parking brakes, that’s the type I deal with in this section. Figure 15-12 shows you several types of integral parking brakes. They may look different, but you adjust them all the same way.
|
Figure 15-12: Integral parking brakes. |
|

To adjust your parking brake, do the following:
1. Jack up the car (a hoist would be lovely) and make sure that it’s secure (see Chapter 1 for instructions). Be sure to leave your parking brake off.
If you don’t want to jack the car up, you can slide underneath it armed with a work light.
2. Trace the thin steel cables that run from each of your rear wheels until they meet somewhere under the backseat of the vehicle.
Where they meet there should be a device (usually a bar and a screw) that controls the tension. Compare what you find with the parking brakes in Figure 15-12 to see which type you have. If you can’t find the system on your vehicle in that illustration, you probably need professional help.
3. Turn the screw (or whatever else you have) until the cables tighten up, and then tighten the screw nuts to hold the screw in place.
You may have to hold the cable to keep it taut (the illustration at bottom left of Figure 15-12 shows you how).
4. Get out from under the vehicle and test-drive it to see whether the parking brake is working.
5. Pay attention to whether the parking brake warning light on your dashboard comes on when the parking brake is engaged. If it doesn’t, check or replace the bulb or fuse.
You can find instructions for checking fuses in Chapter 6. If changing the bulb or fuse doesn’t work, get someone to check the connection between the warning light and the brake; there may be a short in it.
Checking Anti-Lock Brakes
.jpg)
