Chapter 2
Preventive Maintenance: A Monthly Under-the-Hood Check
In This Chapter
 Preventing 70 percent of the causes of highway breakdowns
 Checking the air filter, accessory belts, battery, and hoses
 Dipping into fluid levels
 Looking at wiring, wipers, and tires
Everyone knows a few chronic tire kickers. Before they get in and drive off, these people habitually walk around their cars and kick the tires to make sure that they aren’t flat. The same people habitually open and close all the cabinet doors in the kitchen and check the gas jets every time they go past the stove. You may laugh at them, but they’re probably rarely caught with flat tires, open cabinets, or leaking gas. Why not learn from these folks and make a habit of checking the little things under the hood of your vehicle — maybe not every time you drive somewhere, but definitely once a month and before starting out on long road trips.

What you need to check regularly is anything that can run out of fluid, lose air, jiggle loose, or fray after use — in other words, things like coolant, tire pressure, hoses, and accessory belts. This chapter explains what to look for, how to look for it, and what to do if you discover that something needs to be replaced or refilled. You’ll be happy to know it doesn’t require any special tools.


Getting Your Bearings under the Hood
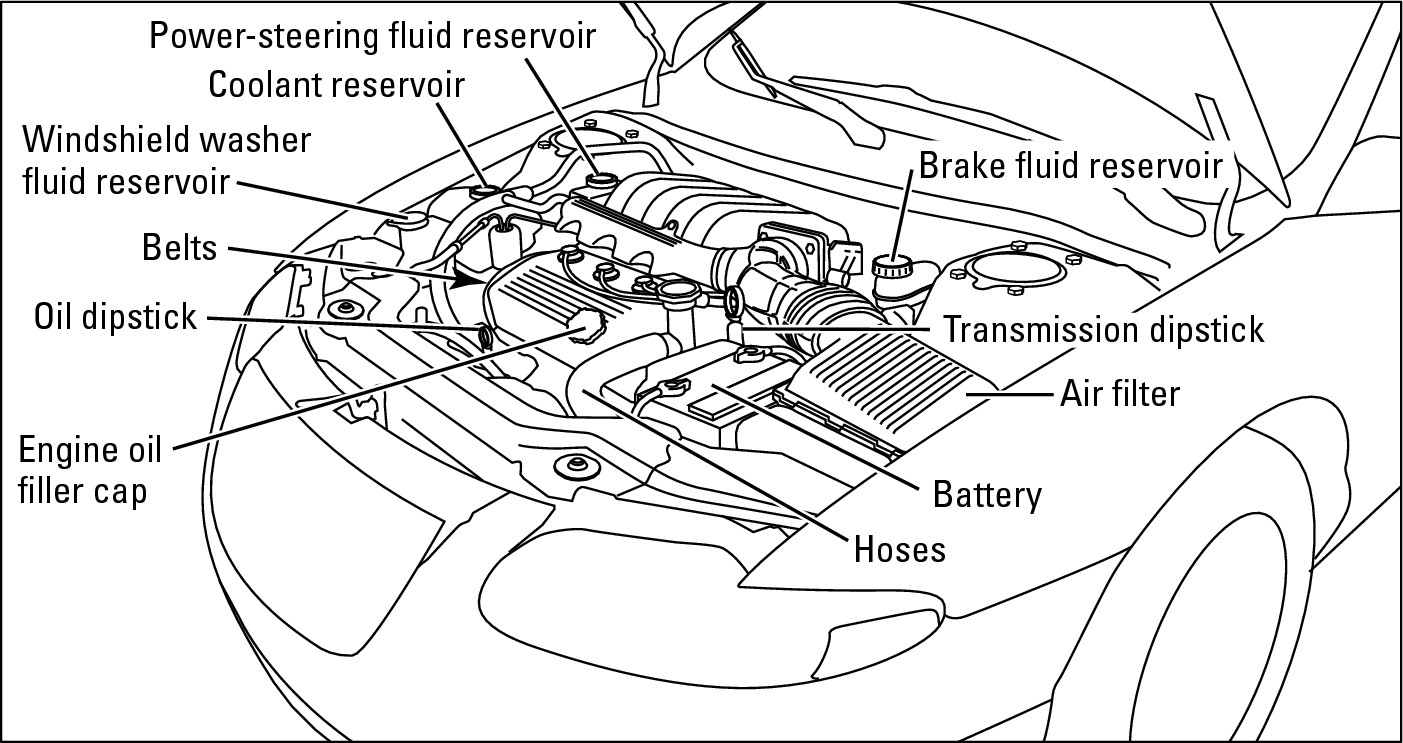
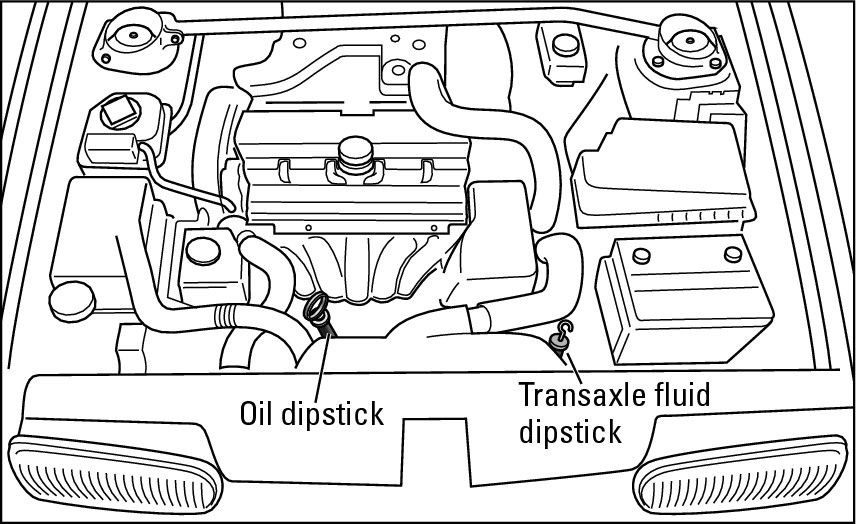
Once a month, in the morning before you’ve driven your vehicle, arm yourself with a clean, lint-free rag and the household tools mentioned in this chapter, and open the hood of your vehicle. (If you’ve never done that, flip back to Chapter 1.) Then check the items in the sections that follow. The checkup may take a bit longer the first time you do it, but after that you should be able to whip through this check in about 15 minutes. As a matter of fact, you may want to grab this book and your owner’s manual (if you have one), go out to your vehicle, and locate each part while you read. Figure 2-1 helps you find each part. Make a game of it. Enjoy!

|
Figure 2-1: Where to find parts under the hood. |
|

Check the Air Filter
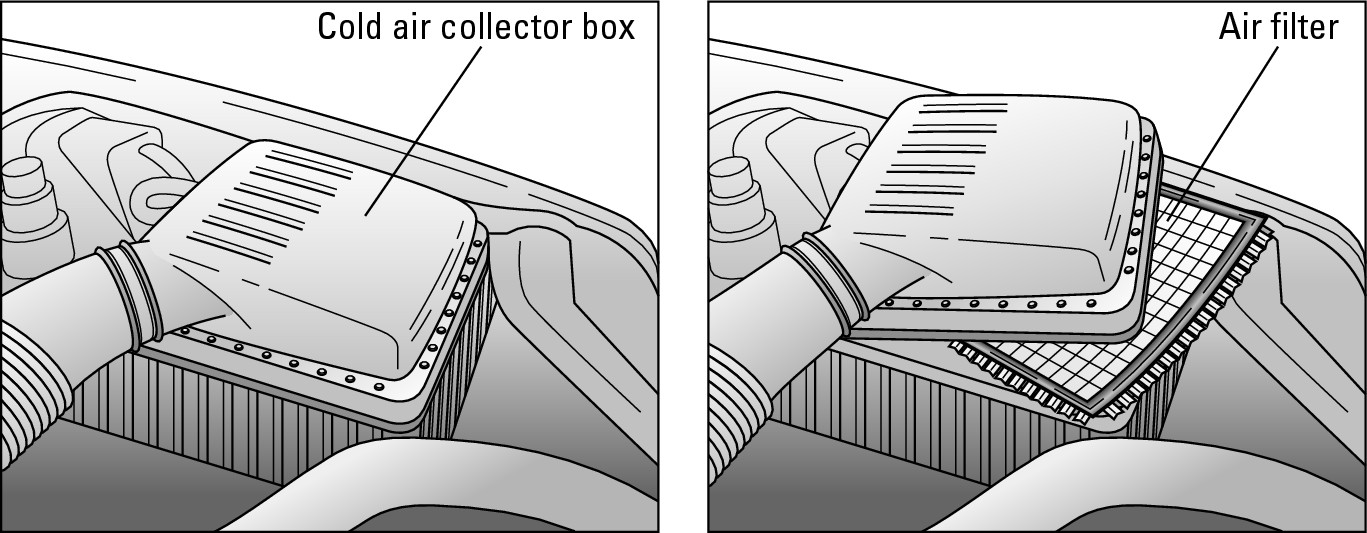
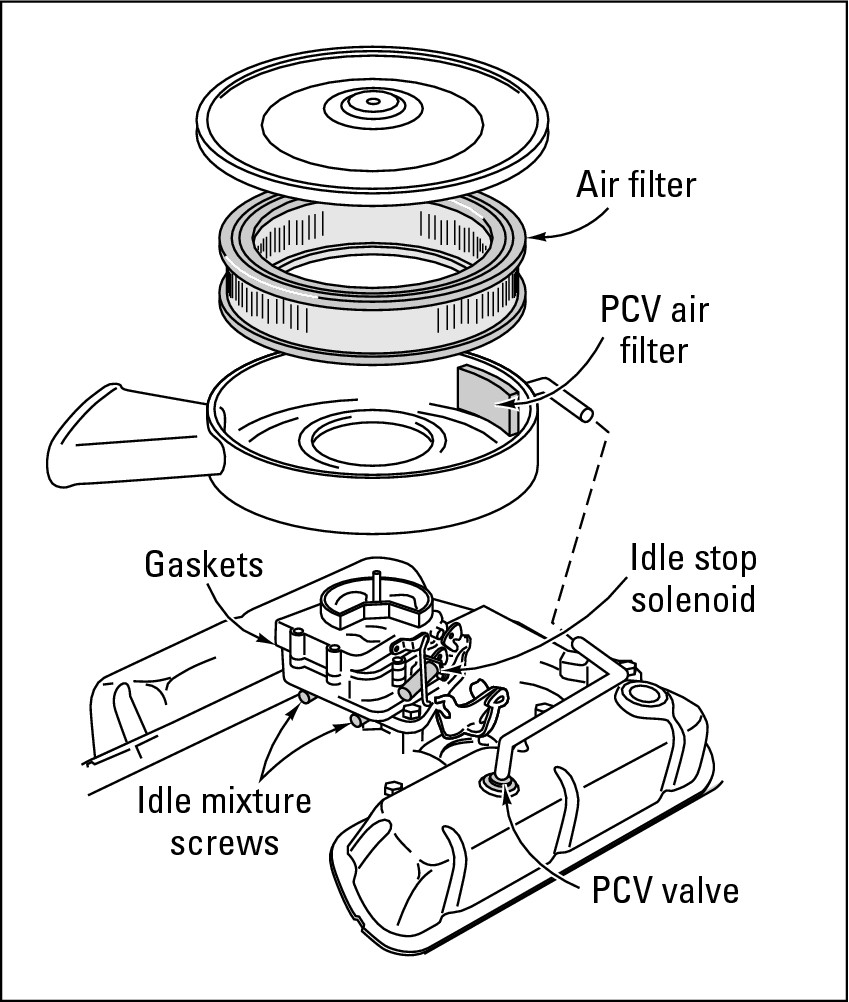
In most newer, fuel-injected vehicles, the air filter is found inside a rectangular box called a cold air collector box (see Figure 2-2). It’s usually close to the front of the vehicle near the inside of one of the fenders. Air that’s scooped up by the front of the vehicle moves through an air intake tube into the air filter inside the box (see Figure 2-2). On older fuel-injected engines and carbureted engines, the filter is found in the air cleaner, which sits atop the engine. As you can see in Figure 2-3, it’s large and round with a snorkel sticking out of the side to facilitate the intake of fresh air. Your owner’s manual should have instructions on how to locate and get at your air filter. If you have no manual, see Chapter 8 for general instructions.
To find out if your air filter needs to be replaced, just lift it out (it isn’t fastened down) and hold it up to the sun or to a strong light. Can you see the light streaming through it? If not, try dropping it lightly, bottom-side down, on a hard surface to jar some dirt loose. (Don’t blow through the filter — you can foul it up that way.) If you drop the filter a few times and it’s still too dirty to see through, you need a new one. Chapter 7 tells you more about air filters, and Chapter 8 has instructions for buying and replacing them.

|
Figure 2-2: The cold air collector box houses the air filter. |
|
|
Figure 2-3: On carbureted vehicles, the air filter is inside the air cleaner. |
|
Check the Accessory Belts
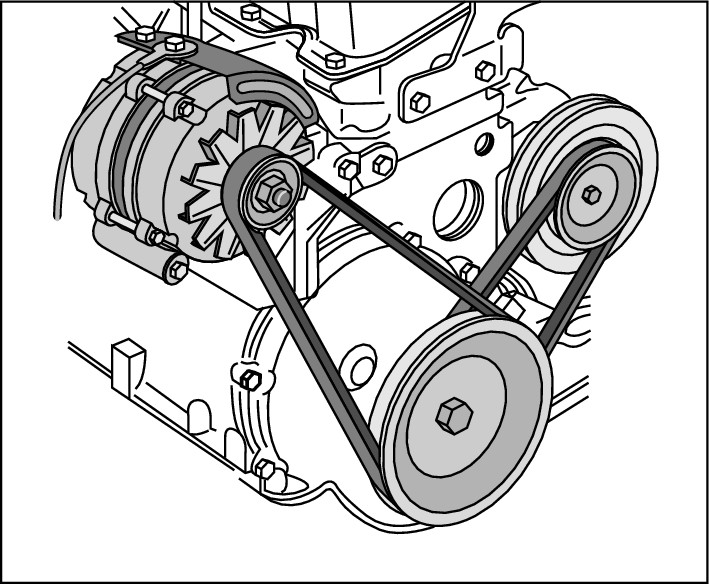
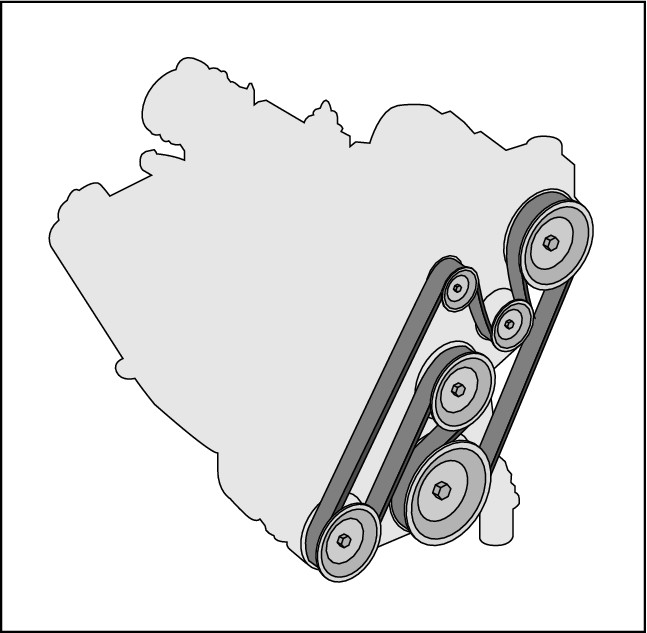
If you’re under the hood of your vehicle and can see without having to remove shields or cowlings, take a look at the serpentine accessory belt that drives the alternator, the power-steering pump, the air conditioning compressor, the water pump in many cases, and other parts of a modern vehicle. (If you drive an older car, look at the separate belts.) Figures 2-4 and 2-5 show you what both types of belts look like.
|
Figure 2-4: Accessory belts. |
|

If you can see an accessory belt easily, here’s what to look for:
 If the belt “gives” more than 1/2 inch when you press on it but otherwise is in good condition, it may just need to be adjusted.
|
Figure 2-5: Serpentine multiaccessory drive belt. |
|
 If the belt is glazed or has oil on it, the slick surface will slip where it winds around the pulleys and it won’t be able to efficiently drive the components connected to it. Your engine may overheat because the water pump isn’t operating properly, or the air conditioner may fail to cool the interior of your vehicle. Have the belt replaced.
 If you see chunks missing from the belt or many cracks across its surface, or if it’s frayed or tearing, debris may be embedded in it, or one of the pulleys may be out of alignment. The safest move is to replace the belt.
Chapter 12 provides more detailed information about how to inspect an accessory belt and whether you can deal with it yourself or have a professional work on it.
Check the Battery
The battery stores the electrical current that your vehicle uses to start and passes electricity along to the parts of your vehicle that need it to function, such as the ignition system, lights, radio, and so on. (For more information about the ignition system in general and the battery in particular, see Chapters 5 and 6.)
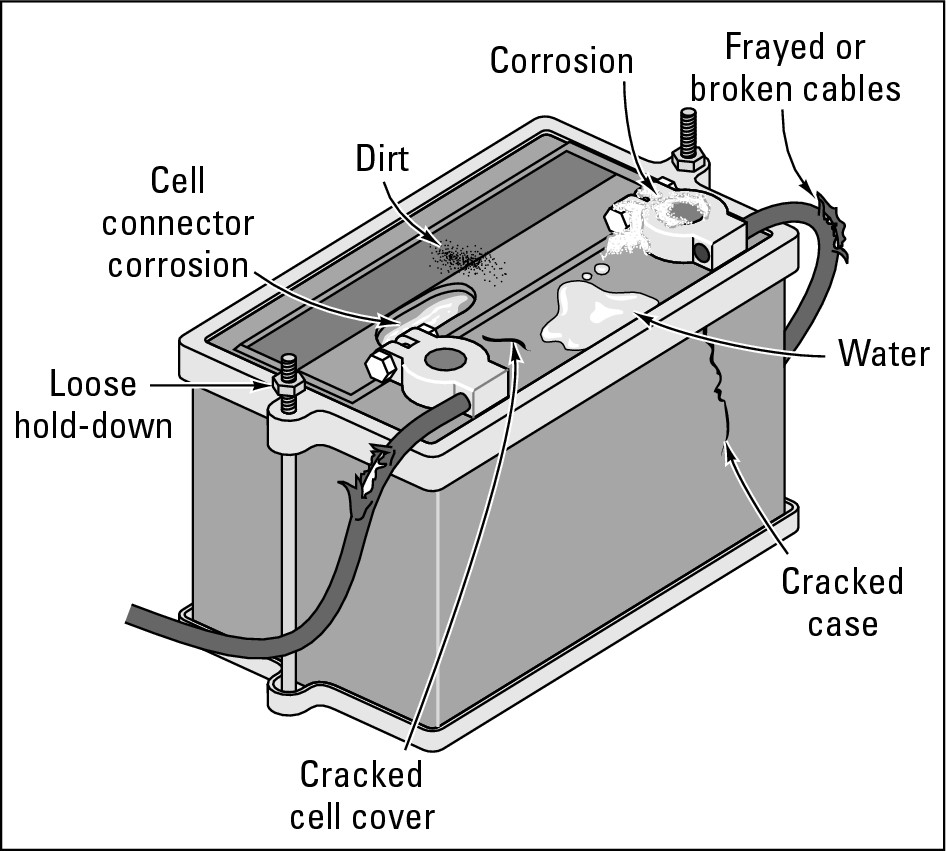
A battery, like other parts of your vehicle, is subject to wear and tear and should be checked regularly. In particular, pay attention to the battery’s trouble spots shown in Figure 2-6. Also, a battery that’s kept clean should last longer than a cruddy one.
.jpg)
 Never work on a battery with a lit cigarette in your mouth. (For that matter, you should not only never smoke while working around your vehicle, you should never smoke at all!) Batteries are filled with sulfuric acid that generates hydrogen gas, so you need to be careful when working around them. If you get acid deposits on your skin or clothes, wash them off with water immediately.
|
Figure 2-6: The parts of the battery to check. |
|
 Disconnect the battery whenever you work on it, but be sure to shut the engine off first!
On most modern vehicles, computers control functions of the engine,
fuel
and
ignition systems, automatic transmissions,
and other stuff. Therefore, when messing about with batteries and their cables, you need to be extremely careful not to inadvertently send a shot of unwanted voltage into one of the computers and destroy it. For this reason, it’s important to disconnect the battery before you work on it.
 Always remove the negative cable from the battery if you plan to work on wiring under the hood. This will prevent you from possibly damaging electrical components or receiving a shock.
 When removing and replacing both battery cables, always remove the negative cable first and replace it last. If you attempt to remove the positive clamp first and your wrench slips and touches something metal, your wrench can fuse to the part like an arc welder.
 Tie the cables back while you work on the battery so that they don’t flop back over onto the terminals. Don’t allow anything made of metal to connect the terminal posts; this can damage the battery. If the cables are connected to the posts when something else interferes, you can destroy the
onboard computers.

The radio may be affected by disconnecting the battery. As a precaution, you can maintain power while the battery is disconnected by making a cheap tool with a cigarette lighter socket and a 9-volt battery. (Most electronics stores can set this up for you.) Plug the 9-volt battery into your cigarette lighter socket before disconnecting the vehicle’s battery, and remove it after the battery is back on.
Don’t let all the cautions that I list here turn you off the idea of checking your vehicle’s battery. It’s easy to check your battery if you follow these steps:
1. Locate your battery.
Figure 2-6 shows you what it looks like and what may be wrong with it.
2. If you see powdery deposits on the positive and negative terminals, clean them off.
The cruddy deposits that form in lovely colors on the top of your terminals are made by battery acid. Before you clean this stuff off, remove the cables from both terminals by undoing the nut on each cable clamp and wiggling the cable until the clamp comes off the terminal post.
.jpg)
This bears repeating: Always remove the cable clamp from the negative terminal first. (It’s the one that’s marked with a “–” sign.) When you’re through with the job, replace the positive cable first and the negative cable last.
To brush the deposits off the terminal posts and cable clamps, sprinkle some baking soda straight from the little yellow box that keeps your refrigerator smelling nice onto each terminal, dip an old toothbrush or disposable brush in water, and scrub the deposits away.

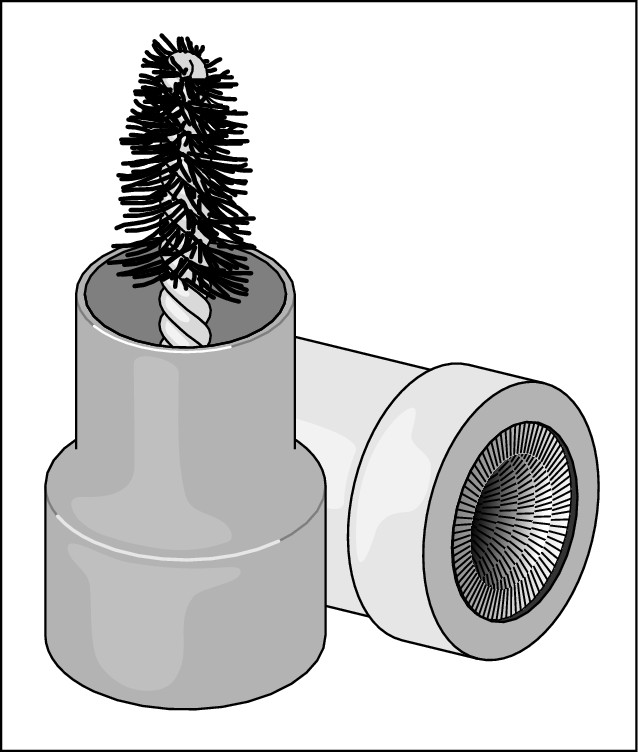
If your cables and clamps won’t clean up completely with baking soda and water, rotate an inexpensive battery terminal brush (see Figure 2-7) on each terminal to shine it up and ensure a good, solid electrical connection. You can also shine up the insides of the cable clamps with the clamp cleaner that’s usually sold as one unit with the brush. A soapless steel wool pad may also do the job.
|
Figure 2-7: A battery terminal brush (inside the cap) and clamp cleaner. |
|
3. Dry everything off with a clean, disposable, lint-free rag.

Try to avoid getting the powdery stuff on your hands or clothes. If you do, wash it off with water right away, and neither you nor your clothes will be damaged.
4. Reconnect the terminals to the battery, replacing the positive cable first and the negative cable last.
After the battery terminals are reconnected, coat the terminals with thick automotive grease or petroleum jelly to prevent corrosive deposits from forming again.
5. Examine the battery cables and clamps to see whether they’re badly frayed or corroded.
If the damage looks extensive, the cables and clamps may need to be replaced; otherwise, the battery may short-circuit, which could damage onboard computers. Have a professional check it out.

6. If you’ve been having trouble starting your engine, if your headlights seem dim, or if the battery is old, check to see whether the electrolyte in the battery is strong enough. If it’s weak, the battery may need to be recharged or replaced before it dies and leaves you stranded.
Ask your local service station to test the battery (assuming you trust them not to sell you a new one you may not need).
7. Check the battery case and the terminals.
If you see major cracks in the battery case or obvious terminal damage, replace the battery regardless of its electrical performance. Chapter 6 tells you how to replace a battery and recycle the old one.
Check the Coolant
The radiator in your vehicle cools your engine and needs water and coolant (sometimes called antifreeze) to function. This section focuses on checking the coolant and adding more, if necessary. (Chapter 11 familiarizes you with the parts of the cooling system and how they work; Chapter 12 tells you how to flush the cooling system and replace the coolant, and how to do minor repairs on it; and Chapter 21 tells you what to do if your vehicle overheats on the road.)
Keep the following points in mind as you check the level of the liquid in your cooling system and add more, if necessary:
 Rather than open the cap on the radiator, just check to see whether the liquid reaches the “Full” line on the side of the coolant reservoir.
(That’s the plastic bottle connected to the radiator that holds an extra supply of liquid, as shown in Figure 2-1. It’s part of the
coolant recovery system.) If the liquid doesn’t reach the “Full” line, open the bottle and add a 5 0/50 mix of water and coolant until it does.

Always use a 5 0/50 mixture of coolant and water to fill or top off the cooling system. Use just water only in an emergency. Most modern engines have aluminum cylinder heads, which require the protective anticorrosive properties of antifreeze. For the purposes of brevity, I refer to that 5 0/50 mix simply as “liquid” or “coolant” from now on.
Some coolant recovery systems are pressurized and have a radiator pressure cap instead of a normal cap. Some older vehicles have no coolant reservoir, so to check and add coolant you have to open the cap on the radiator.
.jpg)
Never add coolant to a hot engine! If you need to add more liquid, wait until the engine has cooled down to avoid the possibility of being burned or cracking your engine block. Don’t open the caps on either of these systems when the engine is hot; if you do, hot coolant may be ejected. Be sure to read up on safely removing pressure caps and checking and adding coolant in Chapter 12 before working on them.
 Coolant is usually red, green, blue, or yellow. If it looks colorless, looks rusty, or has things floating around in it, flush your cooling system and add new coolant.
 If the coolant has a sludgy, oily surface, immediately take the vehicle to your mechanic to check for internal head gasket leakage. The service facility has special equipment for performing this check.
 While you’re messing around with your cooling system, feel the radiator hoses, too. (They’re the big hoses that go into the top and come out of the bottom of the radiator.) If they’re leaking, cracked, bulgy, or squishy, they should be replaced. The next section tells you how to check all the hoses under the hood. For more information about replacing hoses, see Chapter 12.
Check the Hoses
There are a variety of hoses under the hood. Some carry water or air; vacuum hoses have . . . well . . . nothing in them. Walk around the hood area and squeeze every hose you encounter. If you find any that are leaking, bulgy, soft and squishy, or hard and brittle, it’s easy and inexpensive to replace them. You can find instructions for how to do so in Chapter 12.

Check the Dipsticks
Checking dipsticks is a major part of your under-the-hood check. It’s easy to do and provides valuable clues, not only to whether the fluid levels are sufficient but also to the condition of several vital systems on your vehicle. The following sections deal with how to check each type of dipstick. If you have trouble locating a dipstick, check your owner’s manual or ask a service station attendant to check it for you and watch closely to see where it is.
Check the oil
Oil reduces the friction in your engine and keeps it running smoothly. You should check your oil at least once a month to make sure that there’s enough oil and that it isn’t contaminated.

To find out whether your vehicle needs oil, follow these steps:
1. When the engine is cold (or has been off for at least ten minutes), pull out the dipstick (the one with a ring or other type of finger grip on the end of it that sticks out of the engine), and wipe it off on a clean, lint-free rag.
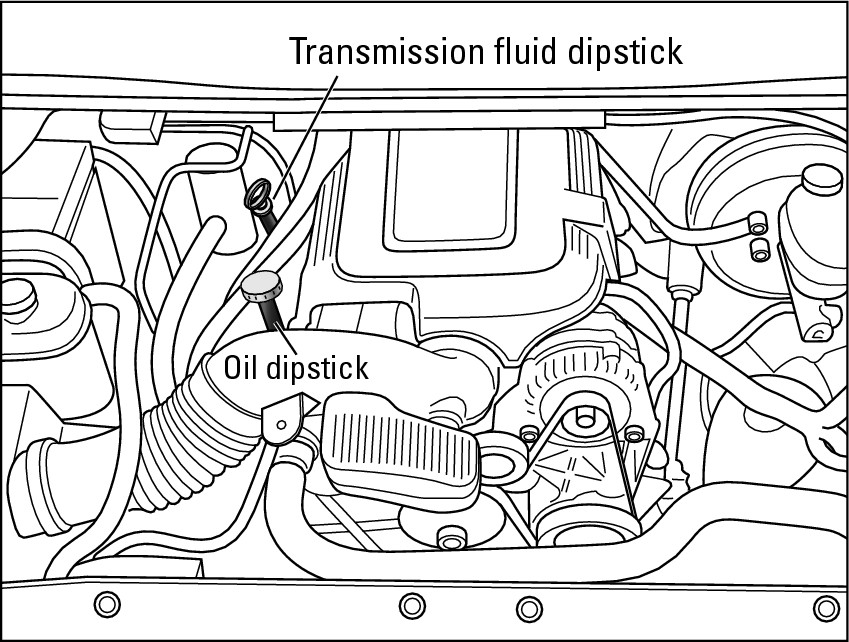
The location of the oil dipstick depends on whether your vehicle has an in-line engine (rear-wheel drive) or a transverse engine (front-wheel drive), as shown in Figures 2-8 and 2-9.
|
Figure 2-8: Where to find the oil dipstick and transmission dipstick on an in-line engine. |
|
|
Figure 2-9: Where to find the oil dipstick and transmission dipstick on a transverse engine. |
|
2. Insert the stick back into the pipe.
If the dipstick gets stuck on the way in, turn it around. The pipe it fits into is curved, and the metal stick bends naturally in the direction of the curve if you put it back in the way it came out.
3. Pull the dipstick out again and look at the film of oil on the end of the stick (see Figure 2-10). Note how high the oil film reaches on the dipstick and the condition of the oil, and add or change the oil as needed.
|
Figure 2-10: Check the oil on the end of the dipstick. |

|

Oil turns black pretty quickly, but that doesn’t affect the quality. Rub a little between your thumb and index finger, and if it leaves a dirty smudge, it probably needs to be changed.
If your oil looks clean enough but only reaches the “Add” level on the dipstick, you need to add oil. You can buy oil the next time you fill up with gas at the service station or you can find it at auto supply stores, supermarkets, discount stores, and large drugstores. Chapter 13 can help you to determine the proper weight oil for your vehicle; it also provides instructions for locating the place to pour in the oil.
If the oil is dirty or smells of gasoline, it should be changed. You can pay a mechanic or an oil-change station to change it for you, but why not head to Chapter 13 to find out how to change the oil yourself? The task is easy and can save you a lot of money.
4. Put the dipstick back into the pipe. You’re done!
Why you should check the oil yourself
The problem with driving into a service station and allowing the attendant to check your oil is that the dipstick always reads a little low because so much of the oil is still inside the hot engine rather then in the oil pan. By adding more oil until it reaches the “Full” level on the stick while the engine is still hot, the attendant may overfill the engine and damage it. For this reason, always wait at least ten minutes after you shut off the engine before allowing anyone to check the dipstick. If you don’t feel like sitting around at a gas station, the best time to check your oil is first thing in the morning, when the vehicle has been sitting all night and the engine is cold.
Check the automatic transmission fluid
To check your automatic transmission fluid, look for a dipstick handle sticking out of your transmission toward the rear of an in-line engine on vehicles with rear-wheel drive (refer to Figure 2-8) or sticking out of the transaxle if your vehicle has front-wheel drive (refer to Figure 2-9).

To check your automatic transmission fluid, follow these steps:
1. With the gearshift in Neutral or Park and the parking brake on, let your engine run. When the engine is warm, pull out the dipstick. (Don’t turn off the engine.)
2. Dip the tip of your index finger into the fluid on the dipstick and rub the fluid between your finger and the tip of your thumb.
The transmission fluid on the dipstick should be pinkish and almost clear. If it looks or smells burnt or has particles in it, have a mechanic drain and change the fluid.
3. Wipe the dipstick with a clean, lint-free rag; then reinsert it and pull it out again.
4. If the transmission fluid is clear but doesn’t reach the “Full” line on the dipstick, use a funnel to pour just enough transmission fluid down the dipstick tube to reach the line. Don’t overfill!
.jpg)

Check the power-steering fluid
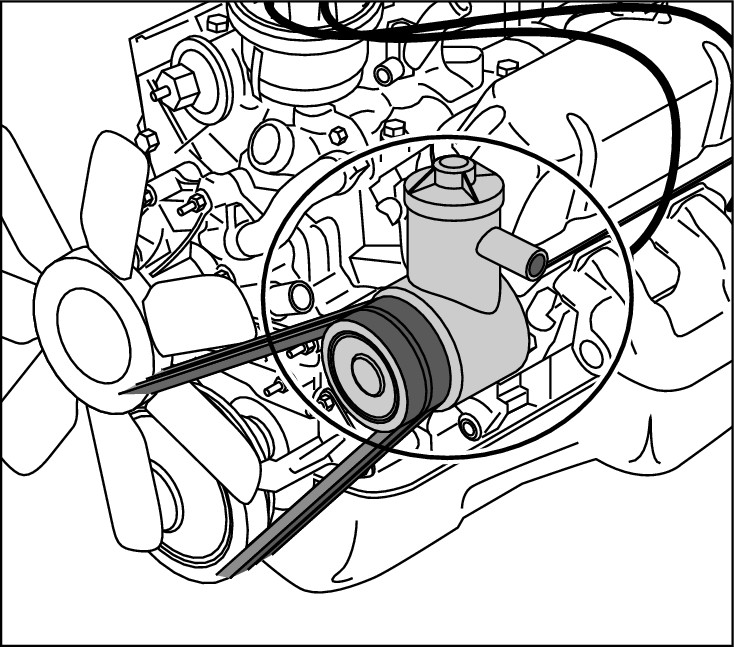
To check the power-steering fluid, locate the power-steering pump in your vehicle (see Figure 2-11). If you can’t find it, your owner’s manual should tell you where it is and whether you need to check it and add to it with the engine running or turned off. Unscrew the cap on the pump and see whether the fluid reaches the “Full” mark on the dipstick. If the level is low, check your owner’s manual or dealership to find out what kind of fluid your power-steering pump requires. Mark this on your Specifications Record in Appendix B for future reference.
|
Figure 2-11: The power-steering pump. |
|
Check the Brake Fluid
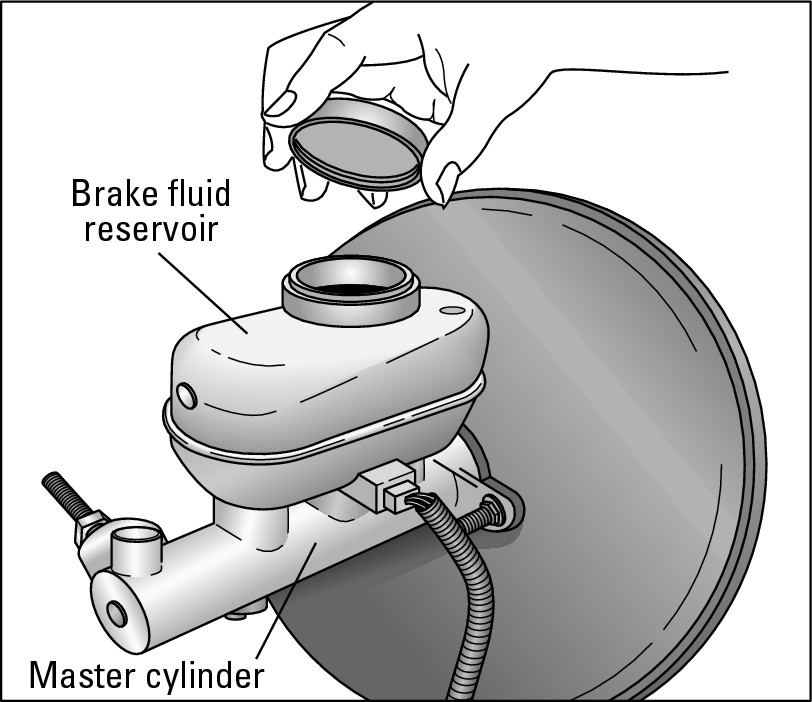
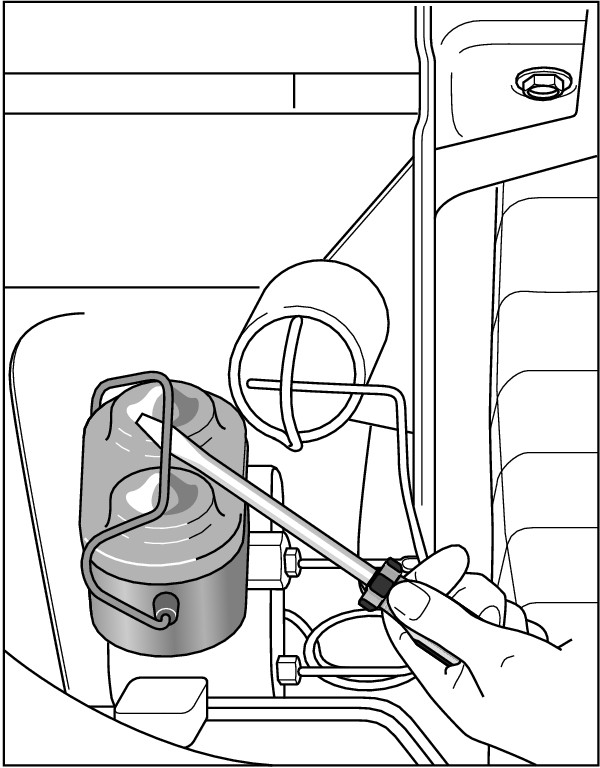
The brake booster is on the driver’s side of your vehicle, usually up near the firewall. Just in front of that, sitting on and connected to the brake master cylinder is the brake fluid reservoir, usually a plastic canister that contains (you guessed it) brake fluid (see Figure 2-12). Older vehicles don’t have a plastic reservoir; instead, the master cylinder is a little metal box with a lid that you must remove to check the fluid level (see Figure 2-13).
|
Figure 2-12: The master cylinder on many popular cars. |
|
|
Figure 2-13: Releasing the lid of a metal master cylinder with a screwdriver. |
|

.jpg)
To check your brake fluid, do the following:
1. Clean the top of the reservoir carefully.
A small amount of dirt falling into the fluid can cause the internal seals of the master cylinder to fail. Your brakes will begin to lose effectiveness and ultimately fail completely.
2. Open the top of your brake fluid reservoir.
If you have the kind with a little plastic reservoir on top, just unscrew the cap of the reservoir shown in Figure 2-12. If you have a metal master cylinder that contains the reservoir, use a screwdriver to pry the retaining clamp off the top (see Figure 2-13).
.jpg)
Don’t leave the master cylinder uncovered or an open can of brake fluid sitting around for too long. Brake fluid soaks up moisture to keep it from settling in the hydraulic components and corroding them. If moist air gets to brake fluid for as little as 15 minutes, the fluid is ruined. So don’t dawdle, and keep the can tightly closed until you’re ready to use it.
3. Look to see where the fluid level lies between the “Low” and “High” marks on the plastic reservoir to make sure that the brake fluid level is within 1/2 inch or so of the cap.
If the level isn’t high enough, add the proper brake fluid for your vehicle. (You can find instructions for buying the proper brake fluid in Chapter 15.) If the brake fluid reservoir is empty when you check it, you may have to bleed the brake system. Turn to Chapter 15 for step-by-step instructions.
4. Check the color of your brake fluid.
Because brake fluid deteriorates with use, it should be replaced by a mechanic if it’s dark in color.

Also keep the following points in mind as you check the brake system:

 Brake fluid is toxic, so take any rags with more than just a couple of small spots of fluid on them and any partially used cans of fluid to a toxic waste center for disposal.
 Don’t get brake fluid on anything that’s painted because brake fluid eats paint. If you spill any, wipe it up immediately and dispose of the rag eco-logically!
.jpg)
 Don’t get grease or oil in your brake fluid; either one may ruin your hydraulic brake system.
Check the Wiring
Feel the wires that you encounter under the hood. If they feel hard and inflexible, if bright metal wires show through the insulation, or if the wires look corroded or very messy where they attach to various devices, they may need to be changed before they short out. Have a professional do the rewiring work for you.
Check the Windshield Washer Fluid
Under the hood of your vehicle is a plastic container that contains the fluid for your windshield wipers. Is it full of liquid? If not, you can fill it with any one of a variety of windshield washer solutions — you can even use a home window cleaner. Just don’t use detergent, which can leave a residue that can plug up your lines. Plus, it isn’t easy to drive with suds all over your windshield!

Check and Replace Windshield Wipers
If your wipers have been making a mess of your windshield, buy new blades or new inserts for them. The rubber wiper inserts are inexpensive and usually just slide into place. The metal blades into which the inserts fit are a little more expensive, but if your old ones look corroded or generally aren’t in good shape, you should replace them as well. Consult your owner’s manual or auto parts store for the type and size of blades you need and for instructions on inserting the blades if you can’t figure out the instructions on the package. Be aware that some vehicles have different-sized wipers for the driver and passenger sides and that other vehicles have only one wiper. If your vehicle has a rear window wiper, don’t forget to check that, too.

Check the Tires
Tires that are low on air pressure wear down faster, increase fuel consumption, and make your vehicle harder to steer. Tires with too much pressure may blow out or steer erratically. For these reasons, keep your tires inflated to within the manufacturer’s specified range. Check the pressure in each tire regularly, and add or release air as needed. Chapter 17 has instructions for performing these easy tasks and checking your tires for signs of problems. Don’t forget to check the sidewalls.
Drive and Enjoy!
If you’ve done this monthly under-the-hood check, congratulations! You now know that your vehicle has what it needs in terms of fuel, oil, water, and other exotic beverages. You can be reasonably sure that it won’t leave you stranded on the highway because of a faulty hose, wire, or belt, and you did it all yourself! Get in and drive around. It feels smoother, right? The pickup is better. Your vehicle knows that you care about it, and your efforts have drawn the two of you closer to one another. Silly romanticizing? Well, I have either an extremely affectionate car or a wild imagination.