Chapter 6
Keeping Your Electrical System in Tune
In This Chapter
 Knowing if it’s time for a tune-up
 Reading, gapping, and changing spark plugs
 Replacing your vehicle’s battery
 Finding and changing fuses
 Adjusting, aligning, and replacing headlights and directional signals
Unlike older vehicles, which needed ignition tune-ups at least once a year, most vehicles on the road today have electronic ignition systems that are built to go for years without the need for them. The term “tune-up” is still used to refer to routine maintenance, which varies with a vehicle’s make, model, and year, so check your owner’s manual for scheduling recommendations.


There are several jobs involving the electrical system that you can deal with yourself. The first involves checking, reading, and reinstalling or replacing spark plugs if your vehicle’s performance suddenly drops and if your vehicle is configured so that you can work on the spark plugs without harming your engine. You also can troubleshoot and replace fuses and replace and adjust the headlights. In this chapter, the sections “Changing Your Spark Plugs,” “Changing Fuses,” and “Dealing with Headlights and Directional Signals” tell you what to do and whether you should do it yourself.

.jpg)
Don’t attempt to work on your air conditioner under any circumstances. It contains refrigerant under pressure that can blind you if it escapes. For service or repairs, head to the dealership or to an automotive air-conditioning specialist. Now, let’s get on to what you can do!

Determining Whether Your Vehicle Needs a Tune-up
Tune-up intervals vary from one vehicle to another. Most older vehicles with non-electronic ignitions should be tuned every 10,000 to 12,000 miles or every year, whichever comes first. Newer cars with electronic ignition and fuel injection systems are scheduled to go from 25,000 miles to as many as 100,000 miles without needing a major tune-up.
.jpg)
 The car stalls a lot. The
spark plugs
may be fouled or worn, the
gap
between the
spark plug electrodes
may need adjusting, or an
electronic sensing device
may need to be adjusted. Stalling also can be caused by problems with the
fuel system
(see Chapters 7 and 8).

If you’re having trouble pinpointing why your vehicle is stalling, you can help your automotive technician diagnose the problem by paying attention to whether the engine stalls when it’s hot, cold, or when the air conditioner is on.
 The engine is running roughly when idling or when you accelerate. Chances are the vehicle needs a tune-up.
 The car gets harder to start. The problem can be in the
starting system
(for example, a weak battery), in the fuel system (for example, a weak fuel pump), in the ignition system, or can be due to an electronic component, such as the
electronic control unit (ECU).
Changing Your Spark Plugs
How often you replace spark plugs depends on the type of plugs you have. You may have 30,000-mile plugs, or if the plugs have platinum tips, they may be good for up to 100,000 miles, although some professionals recommend replacement every 60,000 miles to avoid damage to the engine. (For detailed information about what spark plugs do, turn to Chapter 5.) However, if they become fouled with oil or become defective, spark plugs may need to be replaced ahead of schedule.
There are several ways to tell whether or not the spark plugs on your vehicle need to be changed or just need to be adjusted and replaced. This section tells you how to do that. Of course, before you can evaluate the condition of your spark plugs, you have to find them.
Finding your spark plugs
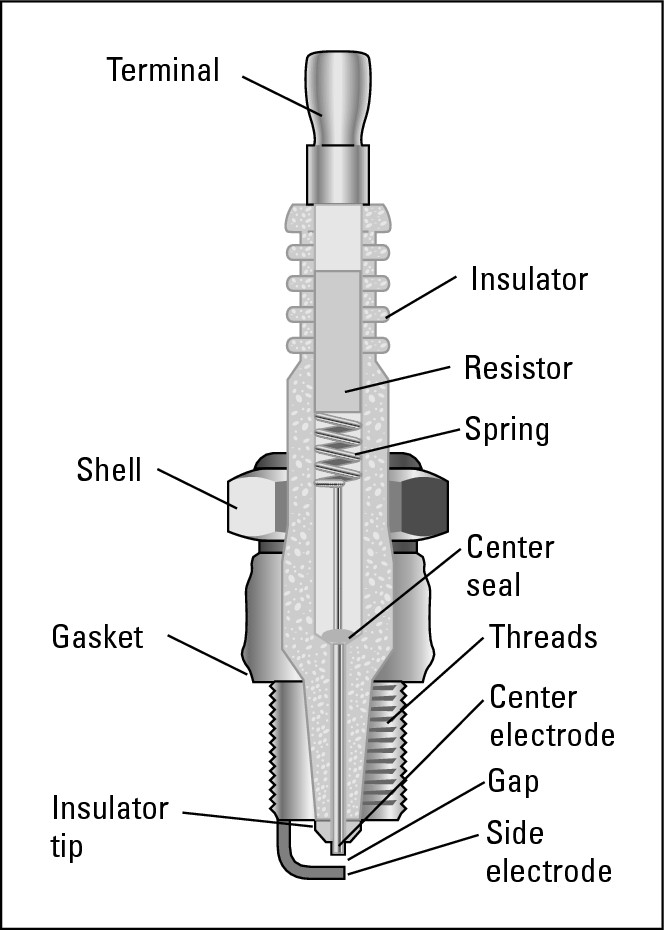
To locate your spark plugs, look for a set of thick wires (or thin cables) that enter your engine block in neat rows — on both sides if you have a V-type engine or on one side if you have a 4- or 6-cylinder in-line engine (also called a straight engine). These spark-plug wires run from the ignition coil (or the distributor on older vehicles) to the spark plugs. You can see where the spark plug wires connect to the spark plugs on various types of engines in Figures 5-10 through 5-16 in Chapter 5. And, if you’ve never met one, Figure 6-3 later in this chapter provides a look at the anatomy of a spark plug.
Don’t see your plugs? They may be hidden or hard to reach, which means that you need to reevaluate your plan to work on them. Be sure to read the following section before you do another thing!
Deciding if you should do the job yourself
The first — and most important — thing to consider is whether or not you should change the spark plugs on your vehicle yourself. Because so many modern vehicles have crammed engine compartments that make access difficult, which can damage the spark plug wires and the threads in the cylinder heads, I honestly feel hesitant about even providing instructions. So take the cautions below seriously before deciding whether or not to proceed.
.jpg)
 There’s so little space between the stuff under the hood that it’s difficult or impossible to get at your spark plugs. Remember, you need room to get a socket wrench in there to unscrew the plug and then replace it, and you need to have an unimpeded view of what you’re doing. Not only that, but if you don’t get the wrench at the correct angle, you can cross-thread the plug or strip the threads it screws into. Both are bad news. You could end up needing a multi-thousand dollar repair.
 The entire engine has to be dismounted and lifted out of the vehicle in order to reach at least one plug. If you have one of these beasts, leave this job to the professionals.

 Your engine has an aluminum cylinder head.
Because the metal is soft, it’s easy to strip the threads in the spark plug’s hole. If you do, the head will probably have to be removed for repair, and that means more mega-bucks. Most modern engines have aluminum heads, so for most people, this fact should eliminate doing this job yourself.
 Your spark plugs are hidden. On some vehicles, you can’t get at the plugs until you remove other parts that are in the way. For example, on some
transverse engines,
you’d have to remove the top engine mount bolts in order to tilt the engine forward to replace the rear spark plugs. And on other engines, you can only get to some spark plugs from underneath or through the wheel well area.
Still other engines conceal the plugs beneath a metal shield that covers the engine. Removing this shield can require disconnecting cables that can seriously affect the ECU. That’s why the shield is there! Some older domestic engines, most modern import engines, and an increasing number of modern domestic engines have systems that place an ignition coil directly atop each spark plug. There are no spark plug wires, and you can’t see the spark plugs until you remove the aluminum cover that’s bolted to the top of that engine.
If I were you, I’d leave all these vehicles to the professionals who have hoists and special tools that allow them to do the work safely and with relative ease.
Okay, with all this in mind, if you can get to your plugs easily and feel that you can do the job safely, proceed to the next section. Otherwise, skip it.

What you need to change and gap your plugs
If you’ve decided that you can get at your spark plugs without damaging your vehicle, assemble the items you need before you begin:

 An old blanket, mattress pad, or padded car protector to place over the fender where you’ll be working to protect it from scratches: Commercial car protectors often come with handy pockets that hold tools and little parts while you work. You can make such a pocket yourself by pinning up the bottom edge of your folded blanket or pad.
 Work clothes: Wear something that you don’t mind getting stained with grease, oil, and other stuff. Changing spark plugs may be simple, but it can get messy. Trust me.
 Hand cleaner: Chapter 3 has suggestions for the best type to buy.
 Clean, lint-free rags: You’ll use these to wipe the spark plugs clean, wipe the cleaner off your hands, and generally tidy up after the work is done.
 A work light (or flashlight, at least): Chapter 3 describes the different types available.
 A new set of spark plugs: The next section helps you determine what type and how many spark plugs your vehicle needs. Buy one for each cylinder in your engine. And don’t be shocked if you’re told that you need eight spark plugs for your 4-cylinder engine. Some engines require two spark plugs per cylinder.
.jpg)
Never change just a few plugs; it’s all or nothing for even engine performance. If you’re feeling especially wealthy, buy an extra plug in case you get home and find that one of them is defective, or in case you accidentally ruin one by dropping and cracking it or by cross-threading it when you install it. If you don’t use it, keep it in your trunk compartment tool kit for emergencies. Spark plugs don’t get stale.
 Anti-seize compound and silicone lubricant (optional): The threads of the spark plugs should be lightly coated with a dab of engine oil off the
oil dipstick
or with anti-seize lubricant before you install them in the engine. Also, if there are rubber boots on your spark plug wires, apply silicone lubricant to them to prevent them from sticking to the porcelain part of the spark plug. (Silicone boots don’t need this.)
 A wire or taper feeler gauge:
You use this to gap spark plugs. (I explain what
gapping
is in the later section “Gapping your spark plugs.”) Chap-ter 3 shows you what these gauges look like and what they’re used for.
 A small set of basic socket wrenches that includes a ratchet handle and a spark plug socket:
If you need to buy a set of
socket wrenches,
Chapter 3 describes them and provides tips on buying good ones.
Buying the right plugs
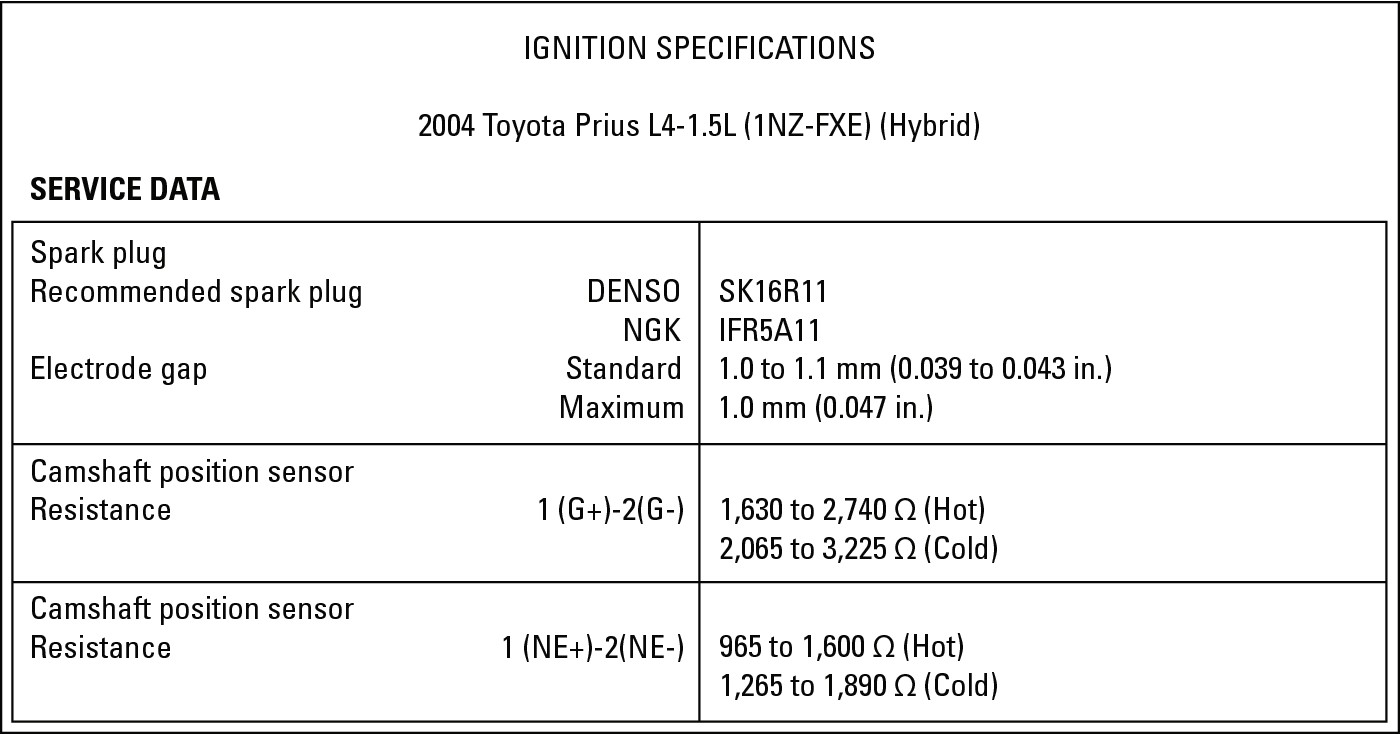
To buy the proper spark plugs for your vehicle, you must know its specifications (or “specs,” as they’re often called). Your owner’s manual may have specifications for buying and gapping the spark plugs on your vehicle. If you don’t have an owner’s manual, or if yours lacks the necessary information, you can find the correct spark plugs and spark plug gap in a general “Tune-Up Specification Guide” (called a “spec sheet,” for short) at an auto supply store. These guides are either in pamphlet form or printed on large sheets, like the one in Figure 6-1, that are displayed near the parts section of the store. If you can’t find a spec sheet at the store, ask a salesperson to show it to you. For a sample spec sheet, see Figure 6-1. I’ve italicized the examples in the list of basic information below so you can find them on the figure.
To obtain the specs for your particular vehicle, you need some basic information. All this information should be in your owner’s manual, and most of it is also printed on metal tags or decals located inside your hood. You can usually find these in front of the radiator, inside the fenders, inside the hood — anywhere the auto manufacturer thinks you’ll find them. I know of one vehicle that has its decal inside the lid of the glove compartment. These identification tags also provide a lot of other information about where the vehicle was made, what kind of paint it has, and so on, but don’t worry about that information right now.
Here’s what you need to know to obtain the specs for your vehicle:
 The make of the vehicle (Toyota, Chevrolet, and so on).
 The model (Prius, Malibu, and so on).
 The model year (2004, 1999, and so on).
 The number of cylinders and type of engine.
 Whether the vehicle has an automatic or a manual (standard)
transmission.
 The engine displacement:
How much room there is in each
cylinder
when the
piston
is at its lowest point? (For example, a 3-liter 6-cylinder engine has a displacement of one-half liter, or 500 cubic centimeters — usually shown as 500 CCs — in each cylinder.) The bigger the displacement, the more fuel and air the cylinders in the engine hold.

 The kind of fuel system:
If your engine is
fuel-injected,
you may need to know whether your car has throttle body injection or multi-port injection. Carburetors, on the other hand, were distinguished by how many “barrels” they had. (Chapter 7 makes sense of this stuff.)
 Whether the vehicle has air conditioning: It’s not usually necessary to take this into account when buying most parts, but you never know when you’ll need it.
|
Figure 6-1: Ignition specifications for a 2004 Toyota Prius. |
|
Courtesy of ALLDATAdiy

.jpg)
Look up your vehicle by make and model under the proper year on the spec sheet at the store. (For example, for my first car, Tweety Bird, a “previously owned” 1967 Mustang, I looked under 1967, then under Ford, then under Mustang, then under “200 cu. in. 6 Cyl. Eng. (1 bbl.)” — which means that Tweety had an engine displacement of 200 cubic inches, a 6-cylinder engine, and a single-barrel carburetor.) Then write down the following information from the spec sheet in the appropriate columns on your Specifications Record:
 The spark plug gap: This is the amount of space that there should be between the center and side electrodes of each spark plug.
 The part number for the spark plugs designed for your vehicle.
Removing old spark plugs
.jpg)
One way to royally confuse yourself and turn the relatively simple task of changing spark plugs into a nightmare is to pull all your spark plugs out at one time. To keep your sanity and to avoid turning this job into an all-weekend project, work on one spark plug at a time: Remove it, inspect it, clean it, and — if it’s salvageable — gap it. Then replace it before you move on to the next spark plug in cylinder sequence order. To maintain the proper firing order, each spark-plug wire must go from the spark source to the proper spark plug. Therefore, only remove the wire from one plug at a time, and don’t disconnect both ends of the wire! This way, you won’t ever get into trouble — unless a second wire comes off accidentally.
Follow these steps to remove each spark plug:
1. Gently grasp a spark plug wire by the boot (the place where it connects to the spark plug), twist it, and pull it straight out.
Never yank on the wire itself (you can damage the wiring). The shiny thing sticking out of the engine block after you remove the wire from the spark plug is the terminal of the spark plug. Figure 6-3 later in this chapter shows you all the parts of a spark plug, including the terminal.
2. Use a soft, clean rag or a small paintbrush to carefully clean around the area where the spark plug enters the block. You also can blow the dirt away with a soda straw.
Cleaning the area keeps loose junk from falling down the hole into the cylinder when you remove the plug.
3. Place your spark plug socket (the big one with the rubber lining) over the spark plug; exert some pressure while turning it slightly to be sure that it’s all the way down.

Like everything else in auto repair, don’t be afraid to use some strength. But do it in an even, controlled manner. If you bang or jerk things, you can damage them, but you’ll never get anywhere if you tiptoe around.
4. Stick the square end of your ratchet handle into the square hole in the spark plug socket.
You may work more comfortably by adding a couple of extensions between the handle and the socket so that you can move the handle freely from side to side without hitting anything. Add them in the same way you added the socket to the handle. If a plug is hard to reach, the sidebar “Getting to hard-to-reach plugs” gives you additional tips.
5. Loosen the spark plug by turning it counterclockwise.
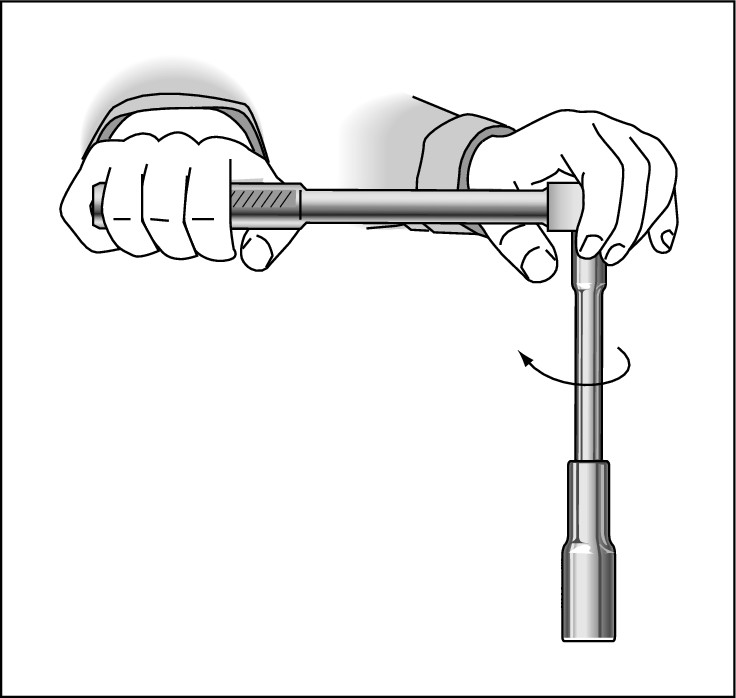
To get the proper leverage, place your free hand over the head of the wrench, grasping the head firmly, and pull the handle, hitting it gently with the palm of your hand to get it going (see Figure 6-2).
|
Figure 6-2: Using a ratchet handle. |
|
.jpg)
It’s okay to exert some strength; just be sure your socket is securely over the plug and that the ratchet is at the same angle as the plug to avoid stripping the threads on the plug or in the spark plug hole in the engine head.

You may have some difficulty loosening a spark plug for the first time. Grease, sludge, and other junk may have caused the plug to stick in place, especially if it’s been a long time since it was changed. If it feels stuck, try a little spray lubricant. You’ll feel better knowing that after you’ve installed your new plugs by hand, it will be a lot easier to get them loose the next time. So persevere. I’ve never met a plug that didn’t give up and come out, eventually.
6. When the ratchet turns freely, finish the job by removing the ratchet handle and turning the socket by hand until the plug is free from the engine.


Getting to hard-to-reach plugs
With all the stuff crammed under the hoods of vehicles, it can be hard to get at some spark plugs and, even when you can reach them easily, they may be difficult to remove. Here are some tips on extracting these spark plugs:
 Almost every vehicle has at least one plug that’s a miserable thing to reach. If you have one, and it’s safe for you to deal with, save it for last. Then you can work on it with the satisfaction of knowing that, when you get the darn thing finished, you’ll have finished the job.
 If you find that one or more plugs are blocked by an air conditioner or some other part, try using various ratchet handle extensions to get around the problem. There are universal extensions that allow the ratchet handle to be held at odd angles; T-bar handles for better leverage; and offset handles for hard-to-reach places (see Chapter 3 for examples). Just remember that you must keep the ratchet handle right in line with the angle of the plug it’s contacting to avoid stripping the threads.
 If you absolutely can’t reach the offending plug, you can always drive to your service station and humbly ask them to change just that one plug. They won’t like it, but it is a last resort. If you get to that point, you’ll probably be glad to pay to have it done.

Mastering the mighty ratchet
Ratchet handles can be a bit tricky if you’ve never used one. When you figure out how yours works, it will make many jobs much easier. The little knob on the back of the ratchet handle causes the ratchet to turn the socket either clockwise or counterclockwise. You can tell which way the handle will turn the plug by listening to the clicks that the handle makes when you move it in one direction. If it clicks when you move it to the right, it will turn the socket counterclockwise when you move it, silently, to the left. If the clicks are audible on the leftward swing, it will move the socket clockwise on the rightward swing.
Every screw, nut, bolt, screw-on cap, and so on that you encounter should loosen counterclockwise and tighten clockwise (“lefty loosey, righty tighty”). If your ratchet clicks in the wrong direction, just move that little knob to reverse the direction. Figure 6-2 shows you the proper way to use a ratchet handle.
Reading your spark plugs
You can (and should) actually read your spark plugs for valuable “clues” about how your engine is operating. To read your spark plugs, follow these steps:
1. When you get the first spark plug out of the engine, remove the plug from the spark plug socket and compare the condition of the plug to the clues in Table 6-1.
Figure 6-3 can help you to identify the various parts of a plug mentioned in the table.
|
Figure 6-3: The anatomy of a spark plug. |
|
2. Check the plug’s shell, insulator, and gaskets for signs of cracking or chipping, which indicate that the plug should be replaced.
3. Look at the plug’s firing end (the end that was inside the cylinder).
As you can see in Figure 6-3, the hook at the top is the side electrode, and the bump right under its tip is called the center electrode. The spark comes up the center of the plug and jumps the gap between these two electrodes. This gap must be a particular distance across for your engine to run efficiently.
4. Take your wire or taper feeler gauge and locate the proper wire. (If your spark-plug gap specifications say .035, look for this number on the gauge.) Then slip that part of the gauge between the two electrodes on your old plug.
If the gauge has a lot of room to wiggle around, it may be because your old plug has worn down its center electrode, causing a gap that’s too large. If the gauge can’t fit between the center and side electrodes, the gap is too small, which means that the spark plug isn’t burning the fuel/air mixture efficiently.

5. Look at the center electrode bump again and use Table 6-1 to judge its condition.
Is it nice and cylindrical, like the center electrodes on your new spark plugs? Has the electrode’s flat top worn down to a rounded lump? Or has it worn down on only one side? Chances are it’s pretty worn because it’s old. When the center electrode wears down, the gap becomes too large. (When you do this job yourself, you’ll probably check your plugs more often and replace them before they get too worn to operate efficiently.)
6. Clean the plug by gently scrubbing it with a wire brush.
7. Either gap or replace the old plug with a new one, following the instructions in the next two sections.
Keep in mind that although you don’t need to clean new spark plugs, you do need to gap them. Some plugs are sold “pre-gapped,” but I recommend checking them with a feeler gauge anyway.
8. Repeat the entire process for each additional plug.

Work on only one plug at a time, and don’t remove a plug unless the one you just dealt with — or its replacement — is safely back in the engine.

Sometimes you can cure a problem — such as carbon-fouled plugs — by going to a hotter- or cooler-burning plug. You can identify these by the plug number: The higher the number, the hotter the plug. Never go more than one step hotter or cooler at a time.

Gapping your spark plugs
As I mention in the preceding section, the space, or gap, between the center and side electrodes needs to be an exact distance across; otherwise, your plugs don’t fire efficiently. Adjusting the distance between the two electrodes is called gapping your spark plugs.

The following steps explain how to gap your spark plugs:
1. If you’re regapping a used plug, make sure that it’s clean (gently scrub it with a wire brush). If you’re using a new plug, it should be clean and new-looking, with the tip of the side electrode centered over the center electrode.
You shouldn’t see any cracks or bubbles in the porcelain insulator, and the threads should be unbroken.
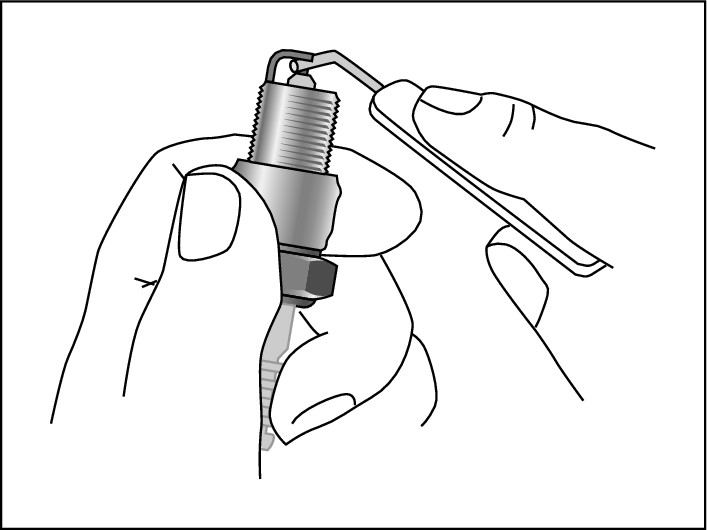
2. Select the proper number on your feeler gauge, and run the gauge between the electrodes (see Figure 6-4).
|
Figure 6-4: Gapping a plug with a wire gauge. |
|
If the gauge doesn’t go through, or if it goes through too easily without touching the electrodes, you need to adjust the distance between the electrodes.
3. Adjust the gap as necessary.
If the wire didn’t go through, the gap is too narrow. Hook the part of the feeler gauge that’s used for bending electrodes under the side electrode and tug very gently to widen the gap.
If the gauge goes through too easily without touching the electrodes, the gap is wide. Press the side electrode very gently against a clean, mar-proof surface until it’s slightly bent down toward the center electrode.
4. Run the gauge through the gap again.
5. Repeat Steps 3 and 4 until the gap is just right.
You want the gauge to go through fairly easily, just catching the electrodes as it passes.
If you keep adjusting the gap too narrow or too wide, don’t feel bad. Everyone I know goes through the “too large–too small–too large” bit a couple of times for each plug, especially the perfectionists.
After you’re done gapping your spark plug, it’s time to insert it in the engine. The next section has the details.
Installing a spark plug
To insert a spark plug into the engine, follow these steps:
1. Clean the spark plug hole in the cylinder block with a clean, lint-free cloth.
.jpg)
Wipe away from the hole; don’t shove any dirt into it.
2. Lightly coat the threads of the spark plug with a dab of oil from the oil dipstick, being careful not to get any on the center or side electrodes.
3. Carefully begin threading the spark plug into the engine by hand, turning it clockwise.
This is called “seating the plug.” You have to do it by hand or you run the risk of starting the plug crooked and ruining the threads on the plug or the threads in the spark plug hole in the engine.

If you have trouble holding onto the plug, you can buy a spark plug starter and fit it over the plug. Or, you can use just about anything you can wrap around or slip over the plug top, including an old spark plug wire boot, a finger cut from a vinyl glove, an old piece of thin plastic tubing, or a piece of vacuum hose.
4. After you engage the plug by hand, turn it at least two full turns before utilizing the spark plug socket and ratchet.
5. Slip the spark plug socket over the spark plug, attach the ratchet handle, and continue turning the plug clockwise until you meet resistance.
.jpg)
Don’t over-tighten the plug (you can crack the porcelain); just get it in nice and tight with no wiggle. The plug should stick a little when you try to loosen it, but you should be able to loosen it again without straining yourself. Tighten and loosen the first plug once or twice to get the proper feel of the thing.
6. Take a look at the spark plug cable before attaching its boot to the plug. If the cable appears cracked, brittle, or frayed or is saturated with oil, have it replaced.
7. Before you attach the boot to the spark plug, apply some silicone lubricant to the inside of the boot; then push the boot over the exposed terminal of the new plug and press it firmly into place.
You’ve just cleaned, gapped, and installed your first spark plug. Don’t you feel terrific? Now you have only three, five, or seven more to do, depending on your engine.
8. Repeat the steps to remove, read, gap, and install each spark plug.
It’s at times like these that owners of 4-cylinder cars have the edge on those who drive those big, expensive 8-cylinder monsters. Unless, of course, they have two plugs in each cylinder. . . .
When you’re done, start your engine to prove to yourself that everything still works. Then wash your hands with hand cleaner. If you’ve had a hard time with a hard-to-reach plug, get some rest before taking on additional work. And take comfort in the fact that, next time, the job should be a breeze.
Leave your distributor to a pro
Most cars built after 1975 have electronic ignition systems that require no regular servicing. Some have no distributors at all. All testing and servicing of these systems should be left to trained professionals because they’re easily damaged if hooked up improperly, and they employ high voltage that can also damage you. If you’re curious, Chapter 5 explains what distributors do.
Replacing a Battery
No matter how well your vehicle is working, if your battery dies and can’t be recharged, you’re stranded in a vehicle that you can’t drive in for service. A battery usually has a sticker on it that shows when you bought it and how long you can expect it to survive. To prevent being stuck on the road with a dead battery, enter that information in your Specifications Record in Appendix B and have the battery replaced before it comes to the end of its life expectancy.

Deciding if you should do the job yourself
Unless your vehicle has a shield over the battery that’s difficult or dangerous to remove, it shouldn’t be hard to replace it yourself. However, if installation and disposal are included in the price of a new battery, there may be no advantage in undertaking the job.
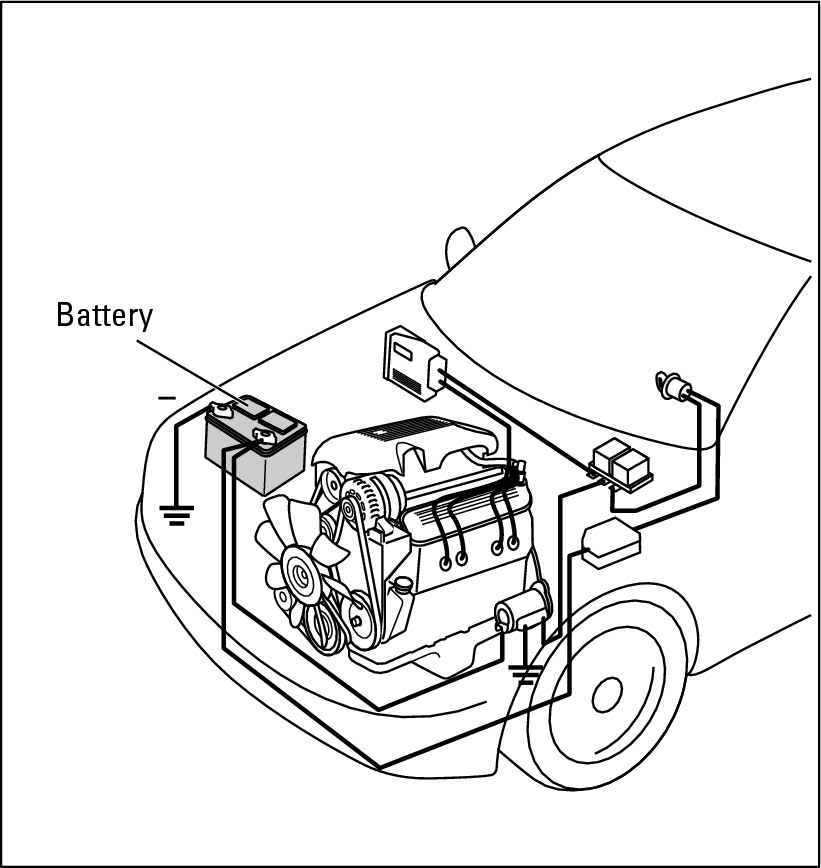
To further assist you in deciding whether or not to do the job, open the hood of your vehicle (Chapter 1 tells you how) and find the battery. Figure 6-5 shows you where it’s located and what it looks like. If the battery on your vehicle is concealed under a plastic shield, take a look at what’s holding it in place. If you see just a few screws or bolts, you can probably unscrew them and remove the shield without much trouble. If it looks difficult to get the thing off, have the battery installed wherever you buy it.
|
Figure 6-5: Locating the battery under the hood. |
|
Buying the right battery for your vehicle
If you’ve decided to replace your battery yourself, the first thing to do is to buy the right one. Keep the following in mind:
 If you haven’t already put the information on your Specifications Record, consult your owner’s manual to find the specifications for the battery designed for your vehicle.
 Buy a brand name battery at a reputable dealership, auto parts store, or battery dealer. (Chapter 1 has useful tips on buying the right parts for your vehicle.)

Batteries are priced by their life expectancy. Most are rated for five years. Don’t risk getting stranded by a poor quality battery that malfunctions, but if you don’t plan to keep your vehicle longer than five years, don’t spring for an expensive long-term battery that will vastly outlive your need for it.
 Take the new battery out to your vehicle and compare it with the original one. It should be the same size, shape, and configuration. If it isn’t, march right back in and return it for the right one.

How to remove and install a battery
When you have your equipment handy and you’re ready to start, follow these easy steps:
1. Make sure that your vehicle is in Park, with the engine shut off and the parking brake on.
2. Open the hood and place a blanket or pad over the fender to protect it.
3. Remove the cables from the battery terminals.
Look in your owner’s manual to see whether your vehicle has negative ground (most do). If it does, use an adjustable wrench to first loosen the nut and bolt on the clamp that holds the battery cable on the negative terminal. (That’s the post with the little “–” or “NEG” on it.) If your vehicle has positive ground, loosen the cable with “+” or “POS” on it first. Remove the cable from the post and lay it out of your way. Then remove the other cable from its post and lay that aside.

If you have trouble loosening the bolt, grab it with one wrench and the nut with another, and move the wrenches in opposite directions. In this case, you don’t want to remove the bolts; just loosen them enough to release the cable clamps.
4. Remove whatever devices are holding the battery in place.

When you’re removing a bolt or screw, after you’ve loosened it with a tool, turn it the last few turns by hand so that you have a firm grip on it when it comes loose and it doesn’t drop and roll into obscurity.
5. When the battery is free, lift it out of its seat and place it out of your way.
6. If the tray on which the battery was standing is rusty or has deposits on it, clean it with a little baking soda dissolved in water.
.jpg)
Wear your gloves because the battery stuff is corrosive and be sure the battery tray is completely dry before taking the next step!
7. Place the new battery on the tray, facing in the same direction as the old one did.
8. Replace the devices that held the old battery in place. Try to wiggle the battery to make sure it’s completely secure.
9. Replace the battery cables on the terminals in reverse order from which you removed them.
(If your vehicle has negative ground, the positive cable goes back first.) Make certain that the clamps holding the cables on the battery terminals are gripping the posts tightly.

10. Take the old battery to a recycling center that accepts batteries.
Batteries are filled with a toxic, corrosive liquid and must be disposed of properly. What’s more, old batteries are usually rebuilt into new ones, so just throwing one in the trash is doubly bad for the environment. If you have your new battery installed when you buy it, the shop will recycle the old one for you. They’ll probably want to charge a few dollars for this service, but try to negotiate it into the price. You also can call your local recycling center for a referral.
Changing Fuses
If your stereo goes dead, your turn signals don’t blink, a light goes out, or some other gadget stops working, it’s often just the result of a blown fuse. You can change fuses yourself, easily and with very little expense. This section shows you how.
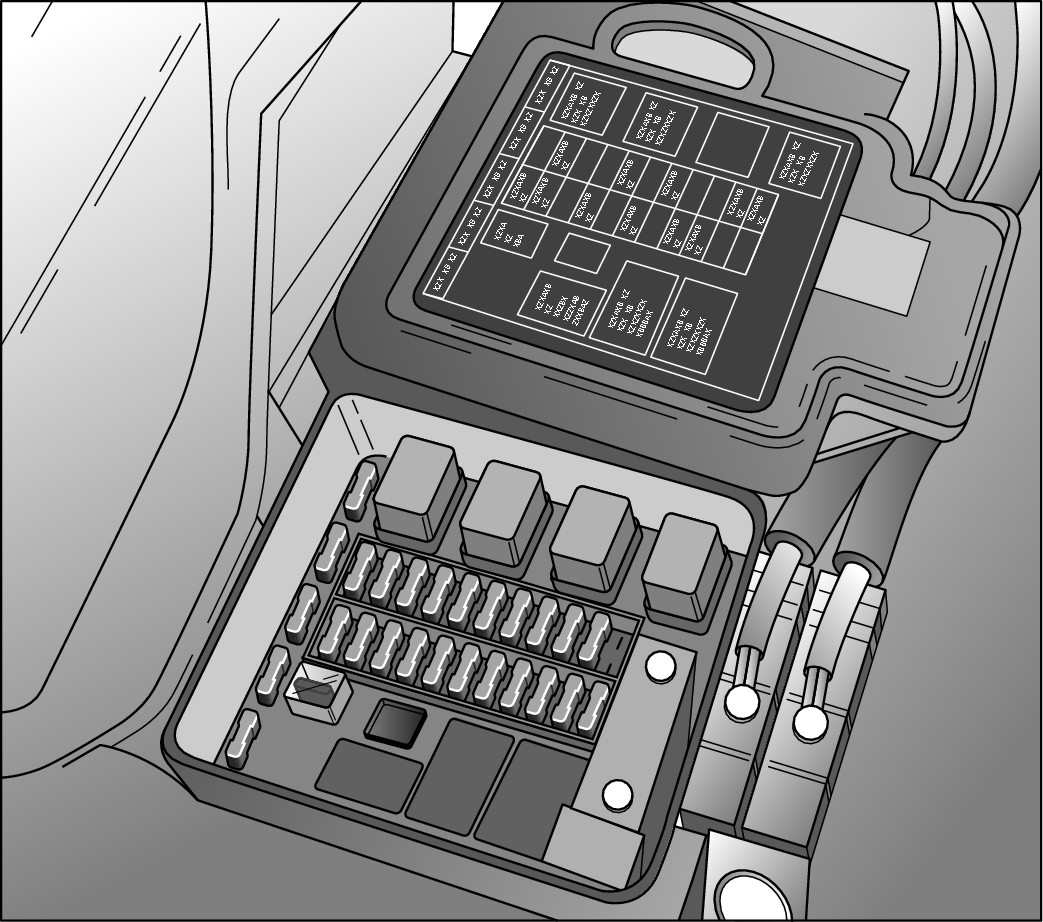
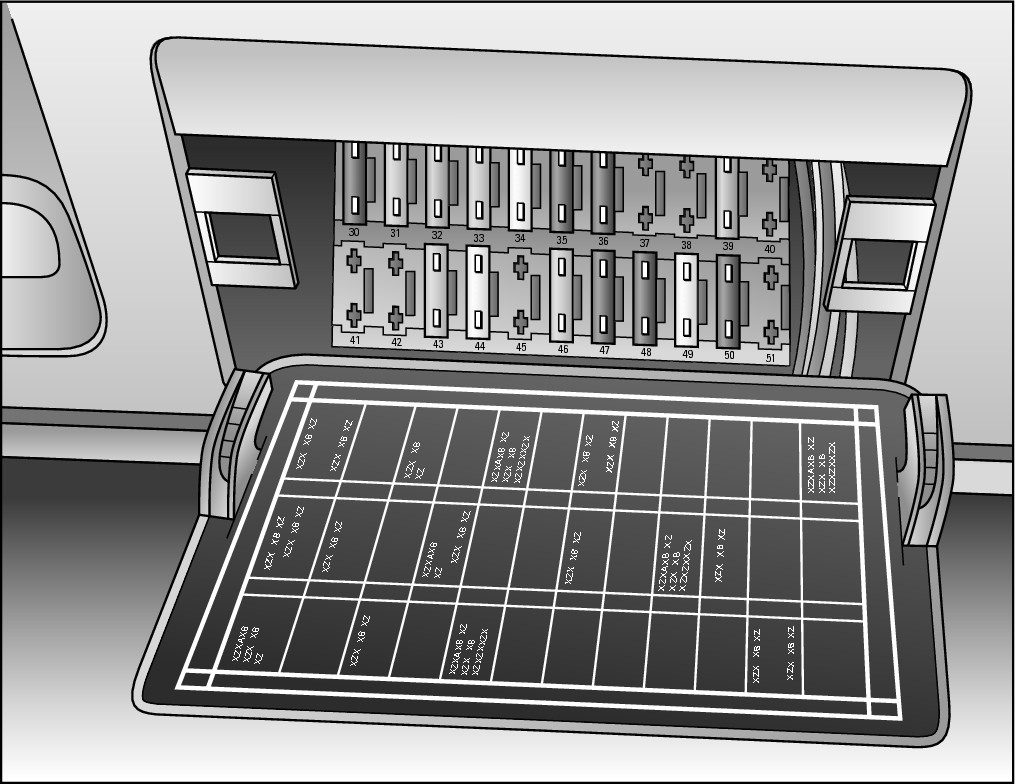
Many vehicles have two fuse boxes: one under the hood and one under the dash. A fuse box is easy to recognize (see Figures 6-6 and 6-7), and replacing burned-out fuses is a fairly simple matter. Changing a fuse is much cheaper than paying for new equipment or repairs that you don’t need (even if you chicken out and have an automotive technician do it), so take a few minutes to find your fuse boxes. Your owner’s manual can help you locate them.
.jpg)
|
Figure 6-6: A fuse box located under the hood. |
|
|
Figure 6-7: A fuse box located under the dashboard. |
|
.jpg)
After you’ve replaced all the burned-out fuses, test the part that malfunctioned to see if it’s operating properly again. If it still doesn’t work, have it professionally repaired or replaced.
Blade-type fuses
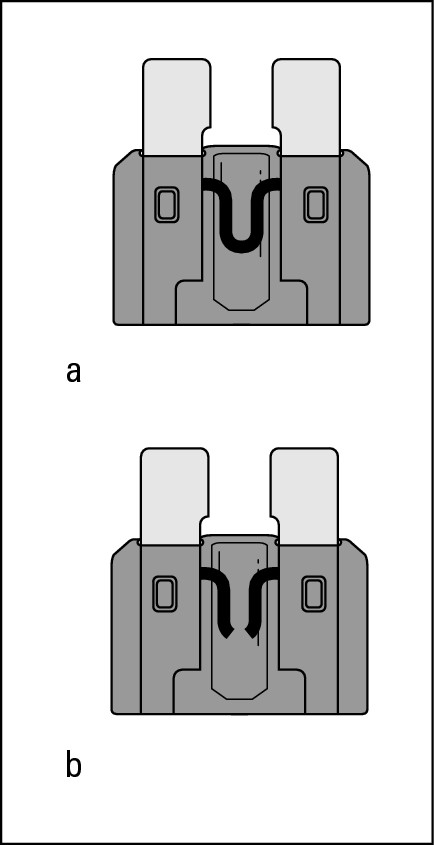
Most modern vehicles have blade-type fuses with prongs that plug into the fuse box the same way that appliances plug into wall outlets (see Figure 6-8). They come in various sizes and are color-coded for amperage.
|
Figure 6-8: A good blade-type fuse (a) and a blown one (b). |
|
If you can’t just yank a fuse out, you need a plug puller. If you’re lucky, your automaker has provided one right in the fuse box. If not, try a pair of tweezers.
You can tell if the fuse has blown by looking at the filaments visible in its little window. If they’re fused (no pun intended) or burned through, the fuse has had it.
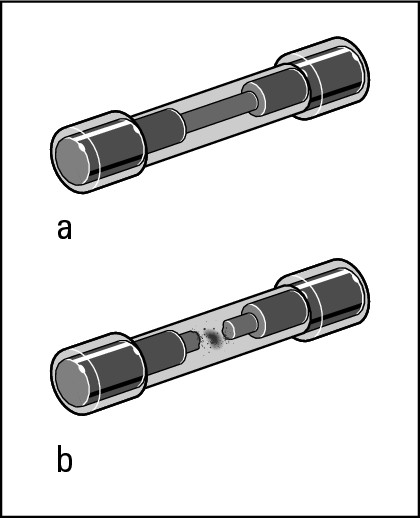
Tubular fuses
If you encounter tubular glass fuses, look for one that’s black inside or no longer has its filaments intact (see Figure 6-9). To remove this blown fuse, gently pry it out with your fingers, a very small standard screwdriver, a small set of pliers, or, as a last resort, a bent paper clip.
|
Figure 6-9: A good tubular fuse (a) and a burned-out fuse (b). |
|

Dealing with Headlights and Directional Signals
Today’s vehicles feature many kinds of illumination: Headlights, taillights, directional signals, and fog lights make it easier for you to see and be seen; overhead lights, map lights, lit glove compartments, and illuminated mirrors on sun visors all require attention periodically. In this section, I deal primarily with headlights and modern headlamps. If you experience problems with other lights, it’s usually just a matter of changing the bulb or changing the fuse associated with the light. If that doesn’t do the trick, seek professional help.

Troubleshooting headlights
Here are some headlight problems and how to tell what may be wrong with them:
 If a headlight doesn’t work on Low beam but does work on High, you have to replace the whole sealed-beam unit or headlamp.
 If a headlight doesn’t work on either High or Low beam, you probably just have a bad connection in the wiring.
 If both of your headlights go out at the same time, chances are the units are okay but the fuse that controls them has blown and needs to be changed. The “Changing Fuses” section earlier in this chapter tells you how to do that.

Determining which headlights you have
Before attempting to replace or adjust your headlights, you need to know whether you have halogen or Xenon headlamps or the old-style sealed-beam units. You can tell which type of headlights you have by looking at them when they’re on at night.
Headlights with sealed-beam units are quickly going out of style. The light they give off is just plain white. Many modern vehicles have halogen headlights. The newest models often come with HID (high intensity discharge lamps), also called Xenon or bi-Xenon lamps. Light from Xenon lamps has a bluish cast.
If you’re in doubt, check the clear outer cover of your headlamp assembly. If it’s marked with D1R, D1S, D2R or D2S, you have HID lamps. (Those markings denote the type of bulb.) If the lens cover isn’t marked and you still see a bluish cast to the light from the lamps, you either have an aftermarket Xenon system or a halogen bulb that’s been tinted. Your parts dealer or service facility can tell which type you need by looking at the bulb.
Replacing and adjusting halogen and Xenon headlamps
Although they are far more powerful than sealed-beam units and enable a driver to see 20 percent farther, these modern units require less power to operate. Xenon are the brightest, have the longest life, and consume the least power. Halogen and Xenon headlamps have also allowed designers to get pretty creative with shapes because they use small, replaceable lamps that don’t have to be contained in round or rectangular housings.
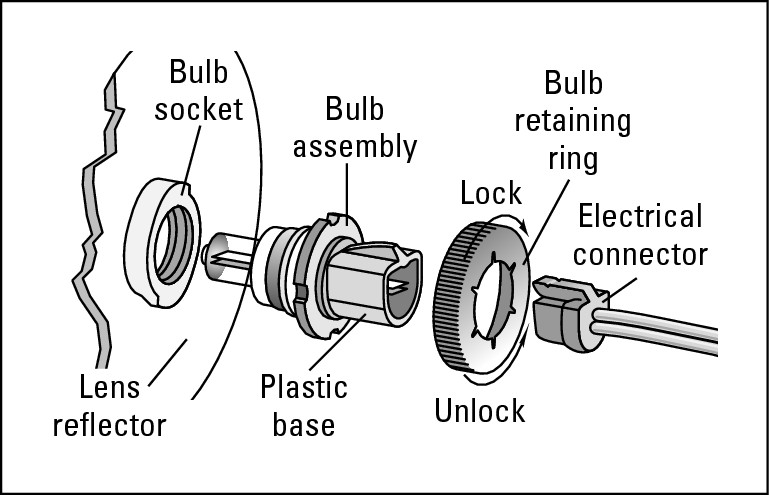
To replace a bulb on a halogen or Xenon headlamp, use Figure 6-10 as a guide while you take the following steps:
|
Figure 6-10: Replacing a halogen or Xenon lamp. |
|
.jpg)
1. Make sure that your vehicle’s ignition is off before you open the unit.
2. Open the hood and find the wiring leading to the electrical connector that plugs into the bulb assembly.
3. Remove the connector.
The connector can be held in place by a ring that unlocks by twisting it counterclockwise, by a little catch that you need to press down while pulling on the plug, or by a metal clip that pulls off (don’t lose it!).
4. Pull out the bulb assembly, remove the old bulb, and install the replacement.
.jpg)
Don’t touch the replacement glass bulb! Natural oils from the skin on your fingers will create a hotspot that will cause the new bulb to burn out prematurely. Instead, handle the bulb by its plastic base or the metallic tip, if it has one. Also, these fragile bulbs are filled with gas under pressure, so be careful to avoid breaking them.
5. Replace everything you removed and replug the connector.
6. Turn your headlamps on. If the bulb is still out and the fuse is okay, have a professional diagnose and fix the problem.
.jpg)
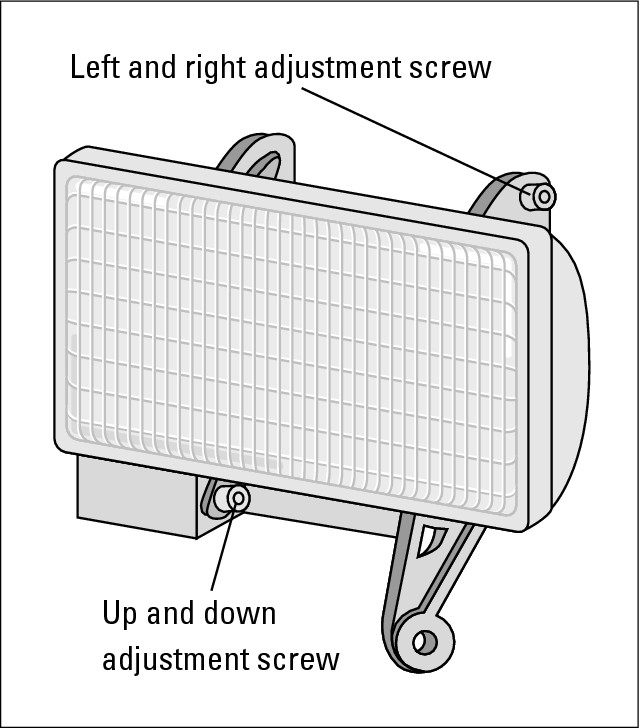
If you need to adjust the alignment of a halogen headlamp, it has two adjusting screws, as shown in Figure 6-11. The screw on the bottom will angle the beam higher or lower; the one at the top or side will focus the beam to the left or right.
|
Figure 6-11: Headlamp adjustment screws. |
|
Replacing and adjusting sealed-beam headlights
Older vehicles have sealed-beam units, which are relatively easy to deal with. If one of your headlights ceases to shine, first consult your owner’s manual to see whether it contains instructions for replacing the bulb. If it doesn’t, the following steps should get you through the job with a minimum of hassle:
.jpg)
1. Make sure that the vehicle’s ignition is off before you open the unit.
2. Remove any exterior rings or frames that surround the headlight.
If you need some exotic tool to do this, forget the job and have it done professionally.
3. Carefully turn the correct screws to loosen the retaining plate that holds the unit in place.
The plate has several screws; round headlights have three screws that loosen the plate, and rectangular headlights have four. The other screws align the headlights by adjusting the angle of the bulb.

If you turn the wrong screws, your headlights go out of alignment, so check your owner’s manual for details. If you think you’ve messed up the alignment, see the next section “Checking headlight alignment.”
4. Remove the bulb.
If the retaining screws stick, spray a little penetrating solvent (like WD-40) on them. Hold onto the bulb as you remove the screws so that it doesn’t fall out and smash. Pull the wiring connector off the back of the old bulb and set the bulb out of the way.
5. Scrape any corrosion off the connector, and check its wiring for wear.
If the connector is very corroded or the wiring looks bad, the problem with the light may be in the wiring rather than the bulb. You’ll know for sure in a minute. . . .
6. Plug the wiring into the new bulb, and insert the bulb into the receptacle.
Be sure to put the new bulb into its locking slots with the unit number at the top. Any small bumps you find on the back edge of the bulb should align with corresponding little depressions in the socket.
7. Hold the bulb in place while you put back the retaining plate. Then replace whatever trim surrounded the headlight.
8. Turn your headlights on. If the bulb is still out and the fuse is okay, have a professional diagnose and fix the problem.
Checking headlight alignment
If you managed to goof up your headlight adjusting screws, or if you just aren’t sure whether your headlights are properly aligned, you can perform a simple check. When you’re driving on a fairly straight road at night, see if your headlights appear to be shining straight ahead and are low enough to illuminate enough of the road in front of you to enable you to stop safely if an obstruction appears. Be sure to check your headlights on both high and low beams.

A cheaper way to check out headlight adjustment is to contact a highway patrol station. The station may have the equipment to check your headlights for you or be able to tell you where their current highway checkpoints are so that you can check the lights yourself. Of course, if the highway patrol finds that your headlights aren’t in focus or finds anything wrong with your vehicle’s emissions, you’ll have to get the problem fixed within a stipulated period or face a fine.

Replacing directional signals
Directional signals are usually easy to replace. On some vehicles, you have to remove the frame from around the signal to reach the bulb. On others, you can access the bulb from the trunk. If any of your directional signals stop flashing or don’t flash in synch, or if the directional signal indicators on your dashboard don’t flash, the signal lights themselves may not be malfunctioning. You can find information about troubleshooting directional signals in Chapter 20.