Chapter 8
Keeping Your Fuel System in Tune
In This Chapter
 Checking and replacing fuel and air filters
 Checking the fuel pump and servicing the PCV valve
 Troubleshooting the catalytic converter
 Gauging compression in the engine cylinders
 Arming yourself with fuel system knowledge for a trip to the store
F uel system problems may occur for a variety of reasons. Some remedies, such as replacing a fuel filter, are relatively inexpensive. Others, such as replacing a fuel pump, are costly. Because unethical mechanics often try the more expensive solutions first and work backwards to the cheaper ones, you end up paying for all the time, labor, and parts involved. You can avoid the expense of repairs that don’t solve the problem by using the instructions in this chapter to check things out before heading for professional help. If you can do the job yourself, great! If you can’t, you will still be able to discuss the less-expensive possible solutions with your service facility and request that they try them first. If these work, they won’t waste their time (and your money) on lengthy test drives and diagnostics. At the very least, try to do the simple adjustments and maintenance tasks (such as changing the air filter ) yourself. Doing so will cost you little in time and money and may prevent major repair bills. Plus you can brag about doing it yourself!
If your vehicle has fuel injection, air and fuel filters, and PCV valves, they should be checked and replaced, if necessary, at the intervals specified in your owner’s manual, or you may risk voiding your warranty . Otherwise, your fuel system should just hum along for years. If it breaks down, don’t monkey with it; take it to a professional for repairs. If your vehicle has a carburetor, it requires periodic tune-ups to keep it operating at peak efficiency. Regardless of what kind of fuel system your vehicle has, it requires the basic maintenance (such as changing air and fuel filters and PCV valves ) mentioned in this chapter. All the work in this chapter is under-the-hood stuff, so you don’t need to jack up your vehicle, and you probably don’t have to indulge in any acrobatics to reach the scene of the action.


Maintaining Your Air Filter
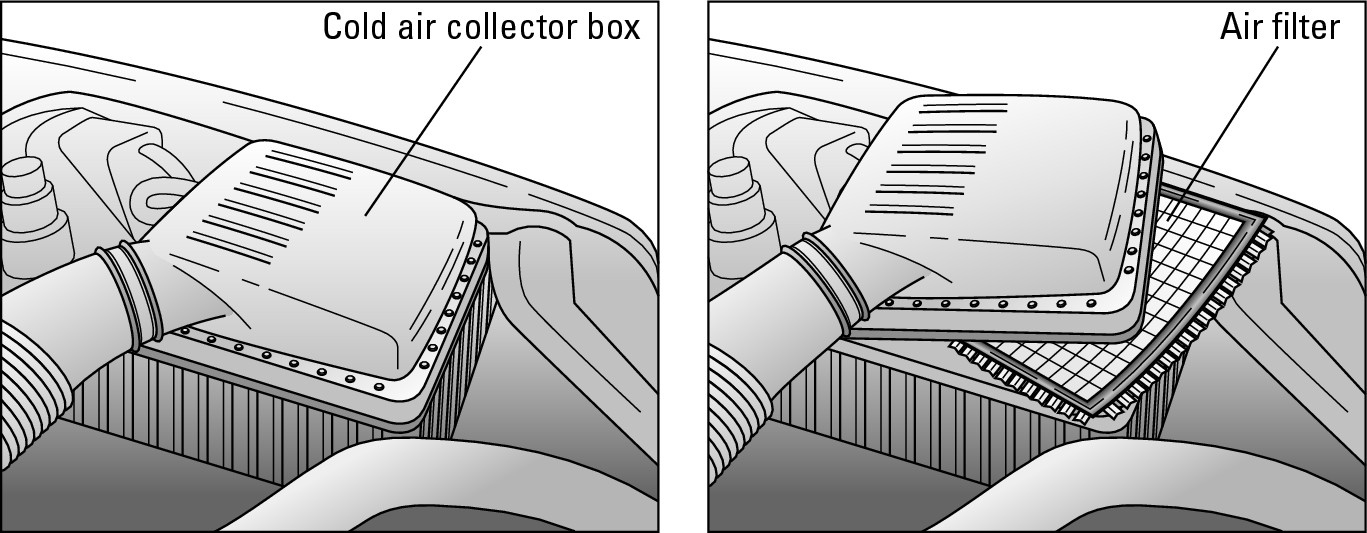
On most modern vehicles, the air filter is under the hood inside a rectangular cold air collector box that’s located up near the front of the engine compartment. Figure 8-1 shows you what it looks like. (Other vehicles, including those with carburetors, have big round metal air cleaners that are hard to miss.)
As you can see in Figure 8-1, the air cleaner has a large air inlet duct (also called the air intake hose) connected to it. Loosen the hose clamp that seals it to the box, and then undo all the screws, clamps, or wing nuts that hold the lid of the box in place. Put the fasteners you removed somewhere safe so that they don’t roll off into oblivion. Open the lid of the box and . . . voila! . . . you should find the air filter inside (see Figure 8-1). Lift out the old filter (it isn’t fastened down) and take a look at it.

|
Figure 8-1: The cold air collector box houses the air filter. |
|
Checking and cleaning your air filter and cold air collector box
To figure out whether your air filter needs to be replaced, just hold it up to the sun or to a strong light. Can you see the light streaming through it? If not, try dropping it lightly, bottom side down, on a hard surface. Doing so should jar some dirt loose. If the filter is still too dirty to see through after you’ve dropped it a few times and it looks as though it just needs a bit of cleaning, you can try to clean it following the directions below. If that doesn’t work, you need a new one.
.jpg)
If the interior of the box is fouled with dust or sand, before you clean the box paste some duct tape over the open end of the air intake hose so that the dirt can’t get in. Then either use the compressed air hose to blow the dirt out of the box or the vacuum cleaner to suck it out.

Buying and replacing an air filter

When buying an air filter, keep the following points in mind:
 Look for well-known, quality-brand filters, especially if you’re buying at discount stores. Unknown brands sell for very little, but they aren’t always of good quality, and if your air filter lets a lot of junk get into your fuel system, you may find that the cheap filter is very costly in the long run.
 If you need help determining which air filter you need, go to your local auto supply store or to the parts department at your dealership. Give them your vehicle’s make, model, and year, and they’ll select the right part number for your vehicle.

When you have the correct part number for the filter, enter it in the Specifications Record in Appendix B.
 To save yourself a trip back to the auto supply store, take the time to open your cold air collector box and check the filter you purchase against your current filter while you’re still in the store parking lot.
.jpg)
Make sure that the filter you get matches your old filter in size and shape. It should look exactly like the old one. If it doesn’t, you’ve bought the wrong filter. If the new filter looks right, replace the old filter with the new one, making sure that the rubber rim is facing up to create a seal between the filter and the box.
When the cleaned filter — or the new one — is in place, put the lid back on the box and replace all the stuff that held it on. Then, remove the duct tape from the open end of the air intake hose and use the hose clamp to reattach it to the box. Done!
Replacing a Fuel Filter
Unless your vehicle suddenly starts to hesitate or run roughly, fuel filters on modern fuel-injected vehicles only need to be checked — and replaced, if necessary — during the tune-up inspections specified in your owner’s manual. The likelihood of a fuel filter malfunctioning is significantly greater if you tend to ride around with an almost-empty fuel tank. (See the sidebar “Why you should keep the fuel tank full” to find out why this is a bad idea.)
If your vehicle starts to run roughly as soon as you fill it up with gas, contaminants in the fuel may have plugged up the filter. In that case, it should be replaced immediately. To decide whether you can do this job yourself, you need to know what type of fuel filter your vehicle has and whether you can tackle the job. Check your owner’s manual or a service manual for your vehicle’s make, model, and year to find the filter and see what’s involved in changing it.
Why you should keep the fuel tank full
Because the space in the fuel tank above the fuel level is filled with air, and because air contains quite a bit of water vapor, the water in the air tends to condense on the sides of the fuel tank and elsewhere on cool mornings. This water vapor can rust the insides of a metal fuel tank, it can mix with the fuel in any tank — metal or plastic — and it can act in a variety of pesky ways to keep your vehicle from operating efficiently. If you keep your fuel tank well-filled, there’s less room for air and therefore less water vapor hanging around. This is an excellent reason for not driving around until your fuel gauge reads “Empty.”
Another reason for making those extra trips to the gas station is that the rust formed by the water vapor in the air tends to sink to the bottom of the fuel tank. These sediments can do no harm as long as they’re happily sloshing around in the bottom of the tank. But if you let the fuel level in the tank get too low, the fuel fed to your engine could be like the last bit of coffee in the bottom of the pot — full of sediment that tends to stick in the throat. Some fuel tanks have filters to prevent this junk from getting through to the engine, but the filters can get choked up if you consistently drive on an empty tank.
Deciding whether to change a fuel filter yourself
Changing the filter on a fuel-injected vehicle can be tricky. On fuel-injected vehicles, you need to disable the fuel pump to relieve the pressure on the fuel lines, which may be secured to the filter with clamps, threaded fittings, or special quick-connect fittings. Lines with threaded fittings require a special flare-nut line wrench. Lines with special quick-connect fittings may require special tools to disconnect them. Ask the clerk at an auto parts store or the service department at your dealership which type of filter your vehicle has. If doing this infrequent job requires purchasing special tools, it’s probably cheaper to have it done by a technician. If not, the first thing you need to do is find the filter.
Locating the fuel filter
Your owner’s manual should show you where your fuel filter is and whether there’s more than one on your vehicle. If it doesn’t, ask someone in the service department at your dealership or consult a service manual for your vehicle’s make, model, and year. (Although it’s a good idea to own one, you can usually find these manuals at your local library.)
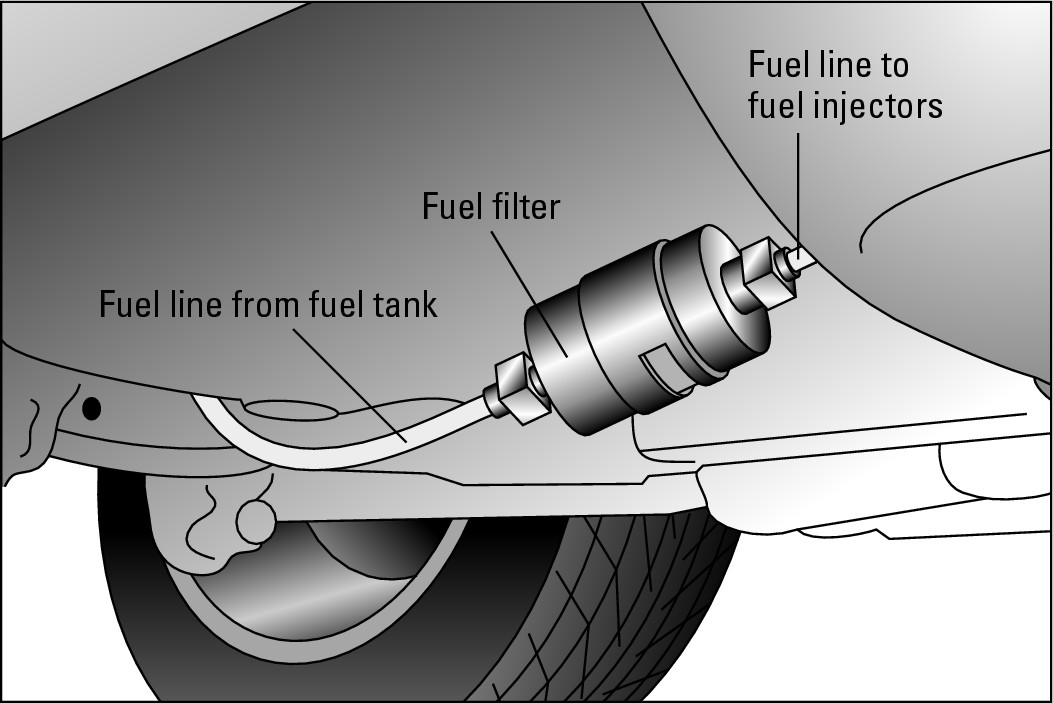
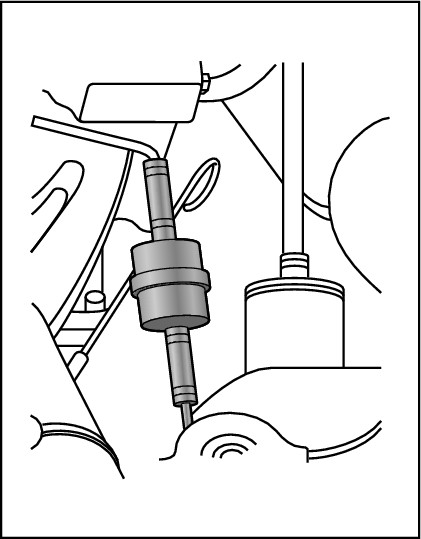
If your engine has fuel-injection, your fuel filter is located somewhere in the high-pressure fuel line, either under the vehicle near the fuel tank (see Figure 8-2) or under the hood in the fuel line near the engine (see Figure 8-3).
|
Figure 8-2: A fuel filter located under the vehicle near the fuel tank. |
|
|
Figure 8-3: A fuel filter in the fuel line under the hood. |
|
Some vehicles also have a fuel filter in the fuel pump as well as a filter screen inside the fuel tank. If they get blocked up, only a professional should deal with them.

.jpg)
Replacing a fuel filter
Here are step-by-step instructions for changing a fuel filter. Before you get started, read them carefully and make sure that you want to do this job yourself.
1. Relieve the pressure in the fuel line before disconnecting it. To do so, you have to disable the electric fuel pump before you start the engine.
To disable the fuel pump, do the following:
1. With the engine off, remove the fuel pump fuse from the fuse box (your owner’s manual should show you where it is), following the instructions in Chapter 6.
2. Make sure that the parking brake is on and that the vehicle is in Park or Neutral, and then start the engine. It won’t run very long after you start it up, but the pressure in the fuel lines will be reduced.
3. Turn off the engine. With the fuel pump disabled, you’re ready to disconnect the fuel lines from the filter.
2. Look at the old filter and the new one before disconnecting anything.
You should see an arrow stamped on both filters that shows in which direction the fuel flows through it. If the new one doesn’t have an arrow on it, look to see in what direction the old filter is installed so that you can tell which end of the new filter goes where.
3. Remove whatever is holding the old filter in place.
4. Put the new filter on with the arrow facing toward the engine or in the same position as the old one was.
5. Replace whatever holds the filter in place, and make sure it’s secure.
6. Replace the fuse for the fuel pump in the fuse box.
7. Make sure that the parking brake is on and that the vehicle is in Park or Neutral, and then start the engine and check for leaks around the filter.
Replacing an insert in a fuel filter
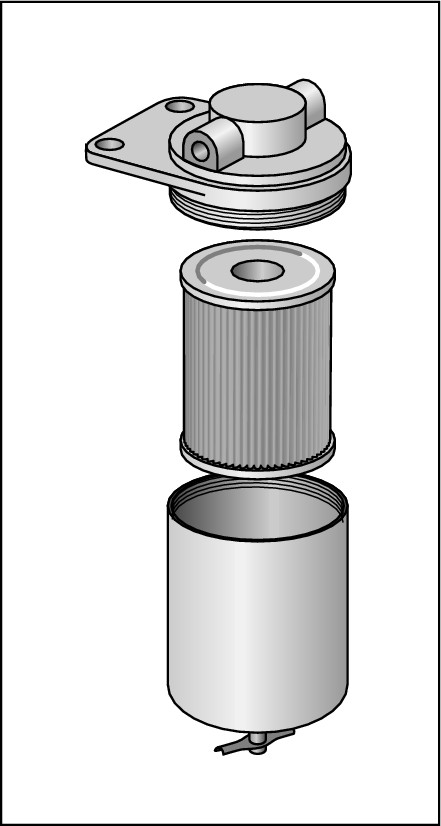
If your vehicle has a fuel filter with an insert that can be replaced, follow Step 1 in the previous section to disable the fuel pump. Then open the cap on the filter, lift out the old insert, and drop in the new one facing in the same direction as the old one was (see Figure 8-4). Be sure to replace the cap securely. Then replace the fuse for the fuel pump, check to be sure the vehicle is in Neutral or Park with the parking brake on, start the engine, and check the filter for leaks.
|
Figure 8-4: Replacing an insert in a fuel filter that has one. |
|
Servicing the PCV Valve
The PCV valve (positive crankcase ventilation valve) is a vital part of the emissions control system on most vehicles. Chapter 7 tells you all about both the valve and the rest of the emissions control system.
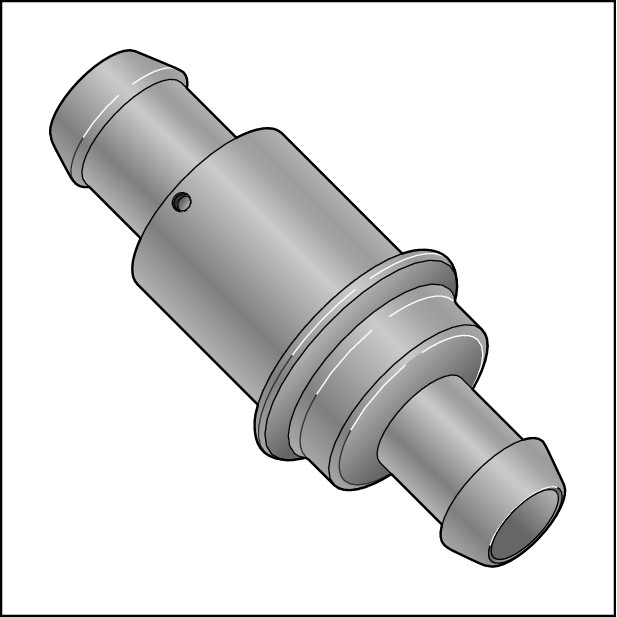
Not every vehicle has a PCV valve, but most do. If yours has one, and if your engine has been idling roughly or a malfunction indicator light goes on, check the PCV valve (shown in Figure 8-5) to make sure that it isn’t clogged with sludge from the contaminants in the exhaust fumes or stuck in the wide-open position.
|
Figure 8-5: A PCV valve. |
|
Car manufacturers suggest that PCV valves be cleaned or replaced after somewhere between 20,000 to 50,000 miles of driving. Consult your owner’s manual to see where the PCV valve is located on your vehicle and what the recommended service intervals are. The valve is usually replaced during scheduled tune-ups, but depending on its type and location, you may be able to check, clean, and replace it yourself. This section has instructions for doing all the jobs.
Locating the PCV valve
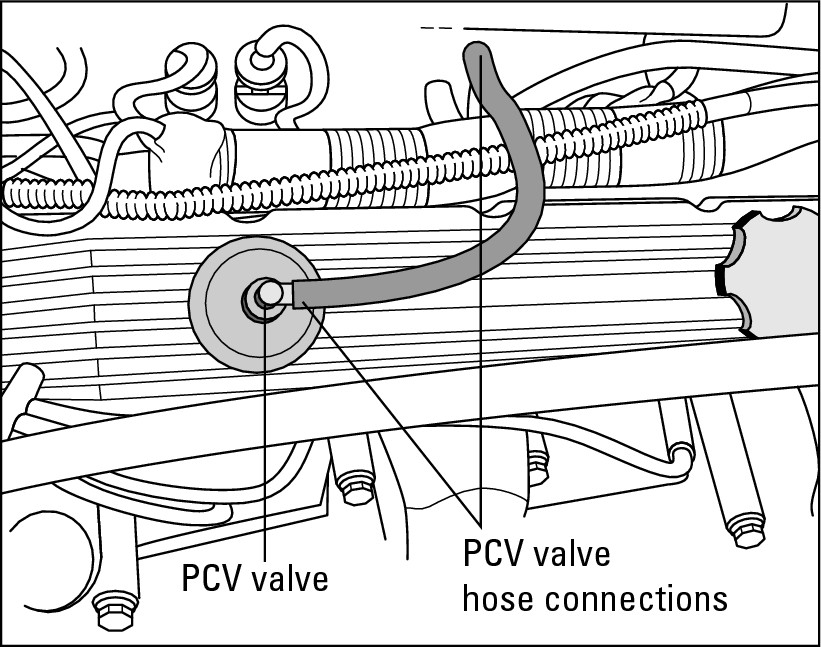
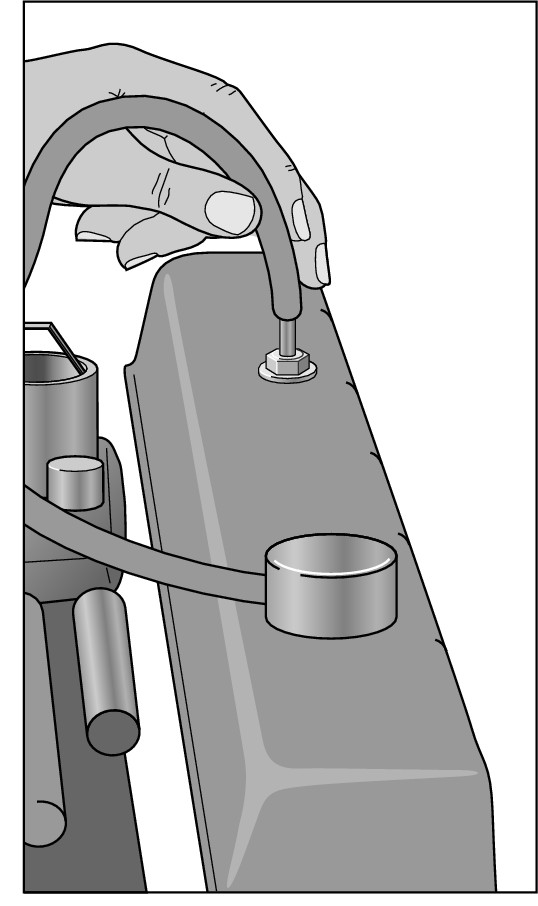
The PCV valve is usually plugged into a rubber grommet in the valve cover (see Figure 8-6), although it may be located on or near the intake manifold (see Figures 8-6 and 8-7). A hose leading to the PCV valve is often kept in place by a clamp. Sometimes there’s a little L-shaped housing on the end of the hose that covers the end of the valve.
|
Figure 8-6: A PCV valve located in the valve cover. |
|
|
Figure 8-7: A PVC valve located on the valve cover, with the hose that leads to it removed. |
|
Checking the PCV valve

 Method 1: Following the instructions in the next section, remove the PCV valve from the
valve cover
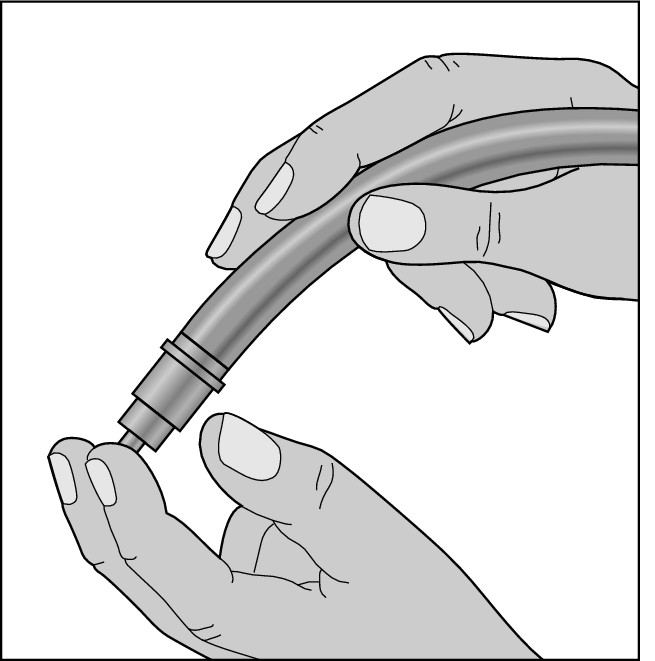
with the hose still attached. Then place your finger over the open end of the hose (see Figure 8-8). If the valve’s working well, you will feel strong suction. Try shaking the valve. If it’s unobstructed, it should rattle. If it’s fouled, the rattle will be indistinct or non-existent.
 Method 2: Remove the cap from the
oil filler hole
on the valve cover and place a stiff piece of paper over the opening. If your PCV valve is working properly, the paper should be sucked against the hole within seconds.
|
Figure 8-8: One way to check your PCV valve. |
|
If the valve doesn’t seem to be working properly, before you go to the trouble to replace it, try cleaning it to see if that makes a difference (see the later section that covers cleaning the valve). If that doesn’t work, replace it with a new valve (following the instructions in the next section). The good news is a PCV valve isn’t terribly expensive.
Removing and replacing the PCV valve
Follow these instructions to remove your vehicle’s PCV valve in order to check, clean, or replace it with a new one:
1. Locate the PCV valve and loosen the hose clamp if there is one, or pull the little L-shaped housing off the end of the valve.
2. Remove the valve.
Some PCV valves are held in place with a rubber grommet and can just be pulled free. Others are threaded into place. If you can’t unscrew the valve by hand, try to grasp its base with the open end of a combination wrench or a small crescent wrench. (See the “Wrenches” section in Chapter 3 for more on these tools.)

3. While you have the PCV valve off, check the hose and the hose clamps or grommet. (You don’t want to have to make two trips to the auto parts store!)
Remove the hose and blow through it. If the hose is dry, brittle, soft, spongy, or full of sludge or hard deposits, you should replace it. If the clamps are rusty or the grommet looks deteriorated, you should replace them, too. In Chapter 12, you find out about the various types of hose clamps available and which kind you should buy for your vehicle.
4. If the new valve screws into place, do this by hand to avoid stripping the threads in the valve cover.
.jpg)
Make sure that the valve is seated securely (it should stick just a little when you try to unscrew it again), but don’t over-tighten it!
5. Reconnect the hose to the PCV valve.
6. Start the engine, and check around the PCV valve for leaks.
Cleaning the PCV valve
If your vehicle’s PCV valve isn’t working, you can clean it yourself by immersing it in carburetor cleaner or solvent your auto supply store deems suitable. There should be no gummy deposits or discoloration on a clean valve. If your PCV valve must be replaced, buy a new one, remove the old valve, and insert the new one in its place (refer to the previous section for instructions on replacement).
Troubleshooting Catalytic Converters
The catalytic converter is a very important part of the emissions control system on your vehicle. (Chapter 7 tells you what this part looks like and how it works.) It’s usually good for the life of a vehicle, but occasionally it does fail. The best thing you can do is be alert for signs of trouble and head for a service facility if you suspect that the catalytic converter is malfunctioning. Technicians will put your vehicle on an electronic diagnostic machine to locate the source of the problem, possibly remove the oxygen sensor from the exhaust manifold or exhaust pipe ahead of the catalytic converter to see if that changes things, and replace the catalytic converter, if necessary.

 Your vehicle’s fuel efficiency suddenly drops.
 Your vehicle doesn’t accelerate when you step on the gas pedal.
 Your vehicle may refuse to start.
 Your vehicle fails an emissions test.
 The
MIL
or Check Engine light comes on.
The most common cause of failure in a catalytic converter in an older car is that it becomes so clogged that the exhaust gases can’t get through it to the muffler and out of the car. (If air can’t get out the rear of the vehicle, it can’t come in the front end, so the engine dies because no air is coming in to form the fuel/air mixture.)
Every car sold in the U.S. since 1996 has had an OBD (On-Board Diagnostic) II system that tests the catalytic converter (among many other things). If the unit allows too much pollution to escape from the tailpipe, it illuminates the MIL and produces a trouble code that can be read by a technician with what’s called a “scan tool.”
The catalytic converter is sensitive to changes in the contents and temperature of the exhaust gases, so another possible cause for failure is if the cylinder head gasket is damaged, allowing oil or coolant to get into the combustion chamber and be burned in the cylinders. Also, if your ignition system isn’t operating properly, unburned fuel in the exhaust gases can cause the catalytic converter to wear out or break down. This is another good reason for going for tune-ups at specified intervals!

.jpg)
Checking the Compression in the Cylinders
If your vehicle has been running roughly or seems to be losing power, it’s possible that there’s a lack of pressure in one or more of the cylinders. Without enough pressure, the fuel/air mixture doesn’t ignite efficiently. If one or more cylinders has a good deal less pressure than the others, the engine doesn’t run evenly.

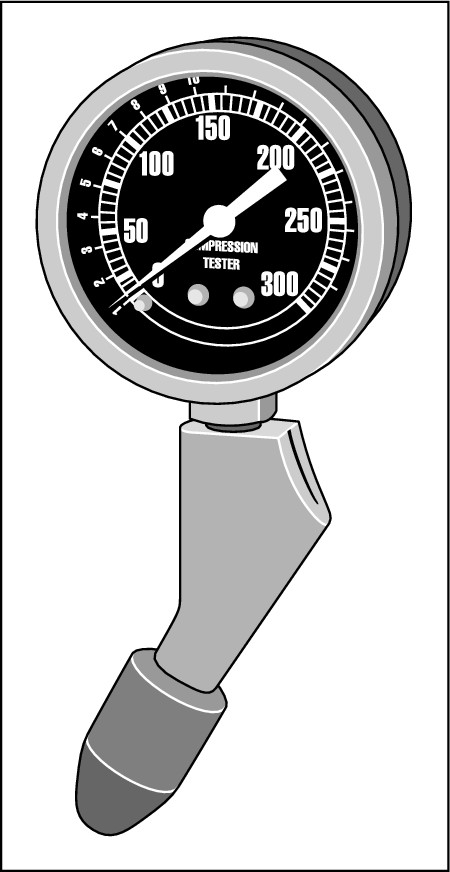
To determine whether pressure’s escaping from the engine, you need to check the compression in the cylinders. For this job, you need a compression gauge (see Figure 8-9). This device tests the amount of pressure that the piston exerts on the fuel/air mixture before the spark plug fires the mixture. Your compression gauge can tell you whether one or more of your cylinders isn’t firing efficiently and whether your rings or valves are worn or out of adjustment. These gauges don’t cost much, and they’re quick and easy to use. Some gauges screw into the spark plug opening, and others have to be held in place.
|
Figure 8-9: A compression gauge. |
|

|
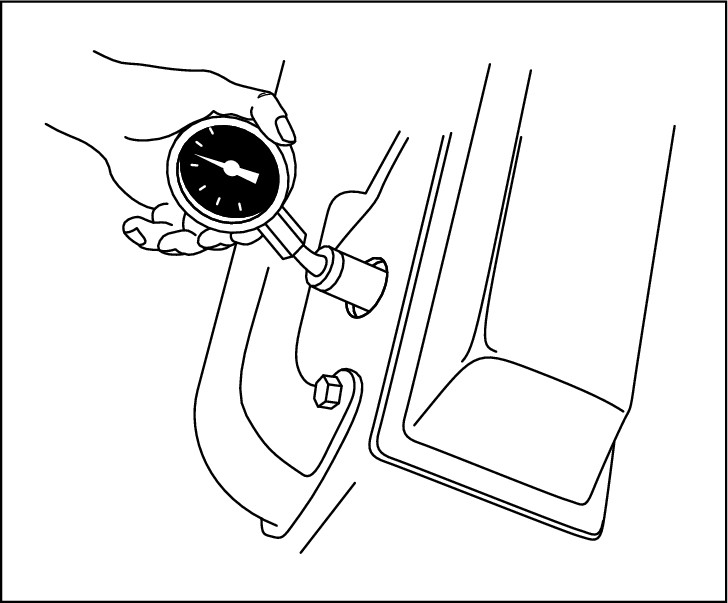
Figure 8-10: Checking compression. |
|
.jpg)
Here’s how to use a compression gauge:
1. Unless you buy or borrow a remote starter switch, have someone sit in the driver’s seat with the engine off, the gearshift in Park or Neutral, and the parking brake on.
2. The next step depends on the type of distributor you have:
• On vehicles with distributors: Pull the big wire that leads to the coil from the center of the distributor cap, and lean the metal connector against an unpainted metal surface as far away from the spark plugs as possible.
• On vehicles with distributorless ignitions: Disconnect the electrical connector at the ignition control module. If you’re not sure what to disconnect, ask a mechanic.
.jpg)
3. For safety’s sake, disable the fuel injection system so that gasoline mist won’t spray out of the spark plug holes and possibly ignite. Remove the fuse labeled “Fuel Pump”; then start the car and let it run until it stalls from lack of gasoline. If you can’t find the right fuse and you want to do a compression test anyway, be especially careful.
4. Before you remove them, label the boots that connect each spark plug wire and each spark plug so that you can remember which plug each boot was attached to.
.jpg)
If you get the plug wires mixed up, you can really screw up your engine.
5. Remove all the spark plugs and lay them down in a clean place.
Keep the labeled plugs in order to insure that you return each one to its original cylinder when the time comes.
6. If you have a remote starter switch, connect one clip to the battery’s positive or “plus” terminal, and the other to small terminal of the starter solenoid.
7. Insert the compression gauge into the hole in the engine where the first spark plug screwed into the cylinder (refer to Figure 8-10).
8. If you don’t have a remote starter switch, have a friend turn on the ignition until the engine cranks over about six times. Otherwise, press the button of the remote starter switch.
Be sure to keep the gauge plug firmly inserted while the engine is cranking. (The car won’t run because the engine has been disabled.)
9. Look at the gauge and write down the reading, which will be in psi (pounds per square inch). Then reset the gauge.
10. Repeat Steps 6 through 8 for each of the other cylinders and don’t forget to reset the gauge and crank the engine each time.
11. After you’ve tested each cylinder, look at the readings.
The highest and lowest shouldn’t vary by more than 15 percent. If one or more of the cylinders reads well below the rest, use a trigger-type oil can to send a good squirt of motor oil down the spark plug opening, and retest the compression of that cylinder with the gauge. If the reading is the same, the valves either are worn (and letting pressure escape) or are out of adjustment. If the reading rises dramatically after you insert the oil, you probably need new rings on the piston in that cylinder. If the pressure recorded by the gauges is less than 100 psi, the cylinder definitely isn’t mechanically sound.

After you know what’s wrong, you have to decide whether the problem is worth correcting. If your vehicle was on its way out anyway, it’s time to get rid of it. If it’s otherwise in good shape, you may want to have the engine rebuilt or replaced with a new or remanufactured one.
.jpg)
12. Replace each spark plug in the cylinder it came from.
Make sure that the ignition is off before you reconnect the spark plug wires, and be sure to put the correct spark plug wire boot back on each plug. Screw the plugs in by hand to avoid damaging the threads in the aluminum valve cover.
If the “Check Engine” warning light comes on after you perform a compression test and doesn’t disappear in a couple of days, have it reset at the dealership.
.jpg)
Poor maintenance results in poor performance
Poor maintenance can cause the rings and cylinder walls to become thinner with wear, creating a gap between them that allows gases to bypass the rings. This reduces compression in the cylinders and, as you know from the section on the four-stroke power cycle in Chap- ter 7, you don’t get as big a bang for your buck, so your vehicle loses power. Piston rings can be replaced, but it’s an expensive job. Before you allow anyone to undertake a “ring job,” check the compression to see whether your car really needs it and be sure that the vehicle’s blue book value warrants such a costly investment. You may save money in the long run by trading in the old “fuel hog” for a more efficient vehicle.
What to Do When All Else Fails
If you try all the fixes that I cover in this chapter and your vehicle still isn’t idling properly, isn’t starting up in the morning without a hassle, or is hesitating or stalling at corners or when you accelerate sharply, then you need extra help. But you don’t have to seek help like a lamb being led to the slaughter!

1. Ask the people at your service facility whether they intend to test your ignition system in case that’s the culprit.
2. Ask whether they intend to test your exhaust gases to see whether you’re running on a fuel/air mixture that’s too lean or too rich or whether your catalytic converter may be at fault.

Notice that I don’t say “tell them” because if you do and the work turns out not to have been necessary, you’ll get charged for it anyway. Just suggest that these may be the culprits to impress them with the fact that you’re an informed customer (and no longer a dummy . . .).
3. After they identify the problem, if the suggested remedy is costly or seems overly drastic, get a second opinion at another service facility.
