Chapter 3
Setting Privacy
Facebook privacy settings let you control who can see information about you and the photos, videos, and other updates you post. You can also set how you connect with friends on Facebook and determine how much of your information is shared with apps, games, and websites via Facebook.
Use the Audience Selector to Control Privacy
Create a Custom Privacy Setting
Control Your Profile’s Appearance in Search Engines
Control How You Connect with Others
Set Who Can See and Post on Your Timeline
Turn Off Tag Suggestions for Photos
Set Access Levels for Facebook Apps
Limit the Audience for Past Posts
See What Your Timeline Looks Like to Other People
Use the Audience Selector to Control Privacy
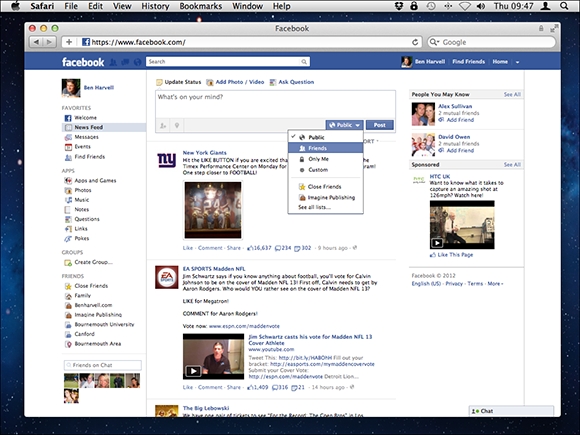
The Audience Selector controls who can see a specific status update, photo, video, or any other information you add to Facebook. Each time you add new information to Facebook, you can set the privacy level for it, whether you want everyone to see it, only your friends, or specific lists of people. The Audience Selector appears next to the Post button when you update your status, add a photo, or check in to a location. You can also set a default privacy setting in order to always show or hide content from set groups when you post to Facebook, unless you set the Audience Selector menu to a different setting.
Use the Audience Selector to Control Privacy
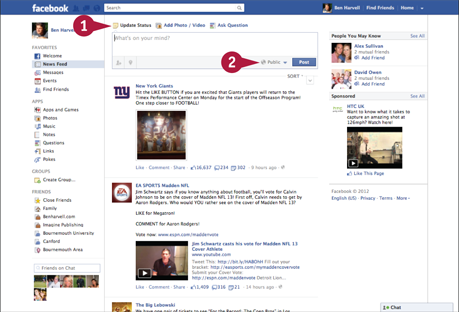
 Click Update Status.
 Click the Audience Selector menu (
 ).
).
The Audience Selector menu appears.
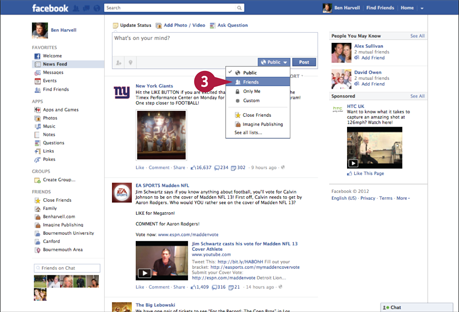
 Select an audience setting for your update.
Note: You can also select a list to share your update with specific friends, groups, or networks.
Create a Custom Privacy Setting
The Facebook Audience Selector offers a custom privacy setting through which you can create your own specific privacy setting for posts. The custom option appears on the Audience Selector menu and launches a new Custom Privacy box within which you can fine-tune your privacy settings and select friends from whom to hide your update. There are a number of reasons to use the Custom Privacy setting, such as planning a surprise for a friend or excluding work colleagues from conversations you may have outside of work.
Create a Custom Privacy Setting
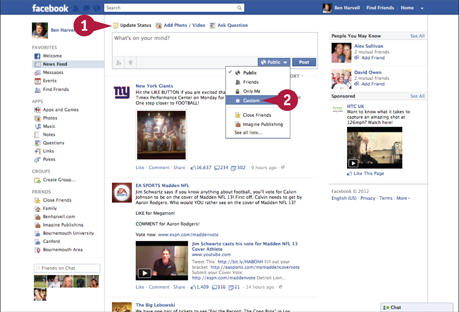
Click Update Status.
Click the Audience Selector menu () and select Custom.
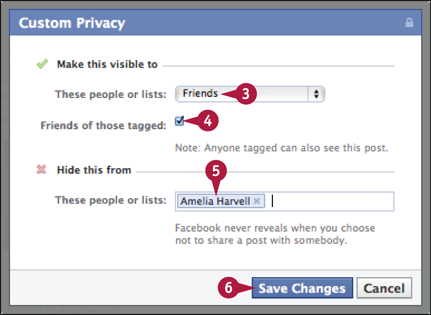
The Custom Privacy box appears.
Click the arrow ( ) and select a group from the pop-up menu.
 Check the Friends of those tagged option to see your update (
 changes to
  ).
).
 Type friends’ names or friend lists to hide the update from them.
 Click Save Changes.
Set Default Privacy Levels
Facebook allows for a default privacy level to be set so that you do not have to use the Audience Selector each time you post to Facebook. Setting a default privacy level helps you to retain your required privacy settings when you are using Facebook on a platform that does not offer the Audience Selector, such as the Facebook app for mobile devices. Setting the default privacy level to private or friends can also help prevent posting content publicly by accident if you do not remember to use the Audience Selector when posting.
Set Default Privacy Levels
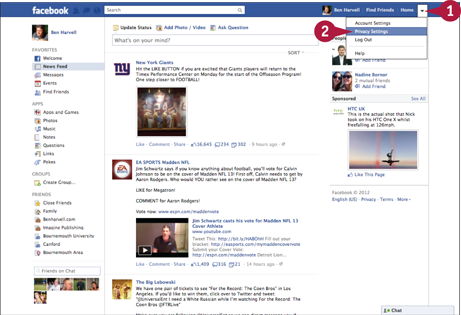
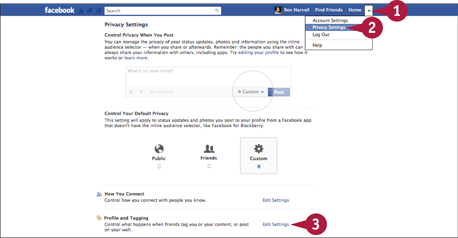
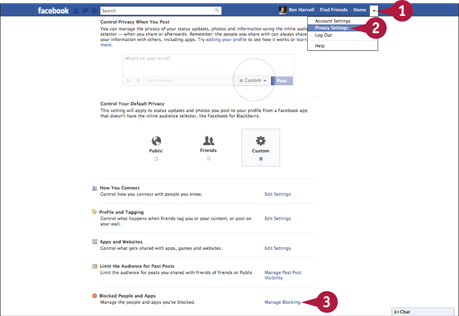
Click the Account menu  .
.
Click Privacy Settings.
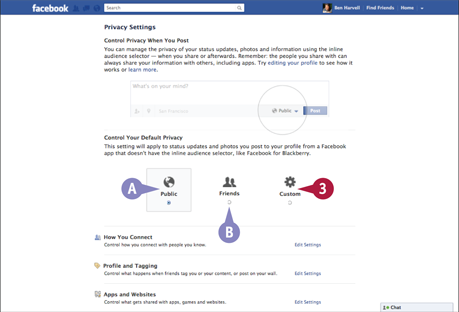
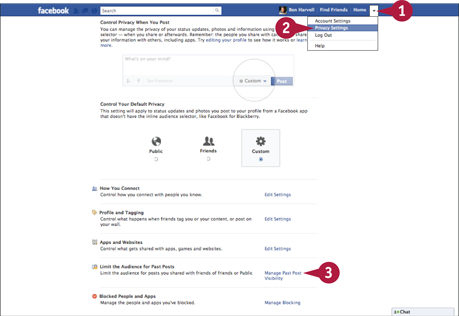
The Privacy Settings screen appears.
A Click the Public option to allow anyone to view your updates ( changes to
  ).
).
B Click the Friends option to allow only your Facebook friends to see your updates ( changes to ).
Click the Custom option to set a custom default privacy setting ( changes to ).
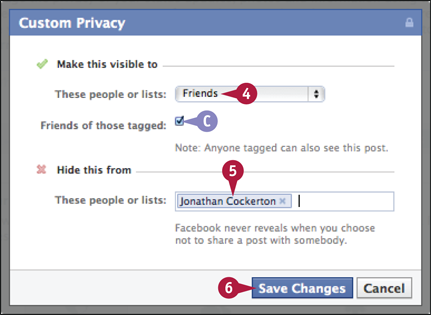
The Custom Privacy dialog box appears.
Click the arrow () and select a group to share your updates with from the pop-up menu.
C To allow friends of those tagged to see your updates, click the Friends of those tagged option ( becomes ).
Type the names of friends or a list name to hide updates from them.
Click Save Changes.

D The Friend Selector now shows Custom.
Control Your Profile’s Appearance in Search Engines
By default, a preview of your Facebook profile shows up when somebody searches for your name with a search engine like Google. To prevent this from happening, you can turn off the public search feature within Facebook. Having a profile preview appear in search results can be useful to help people find and add you as a friend on Facebook, but if you want to keep your profile completely private, you should disable the public search feature.
Control Your Profile’s Appearance in Search Engines

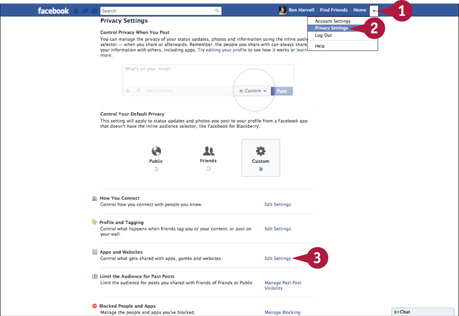
Click the Account menu .
Click Privacy Settings.
Click Edit Settings in the Apps and Websites section.
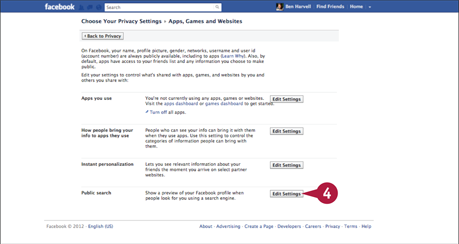
Click Edit Settings in the Public search section.

The Public Search Privacy Settings screen appears.
Uncheck Enable public search ( changes to ).
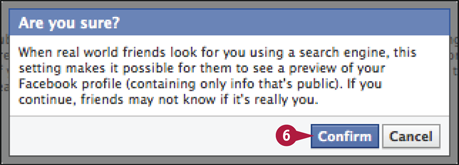
The Are You Sure? dialog box appears.
Click Confirm.
Control How You Connect with Others
You can set who can contact you via Facebook and access your contact information via Facebook’s Privacy Settings screen. Using these settings you can limit the number of people who can see your e-mail address, phone number, and instant messenger usernames, and also who can send you friend requests or messages on Facebook. By default, these settings are configured to allow everyone to access your information and get in touch with you, but you can quickly block specific people or groups from accessing your contact details or adding you as a friend.
Control How You Connect with Others
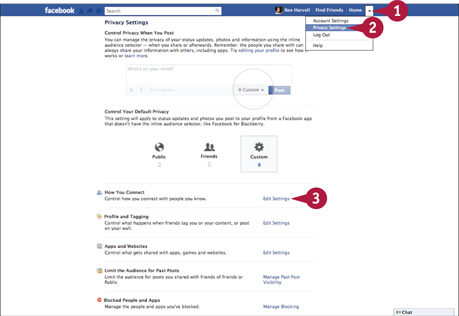
Click Privacy Settings.
Click Edit Settings in the How You Connect section.
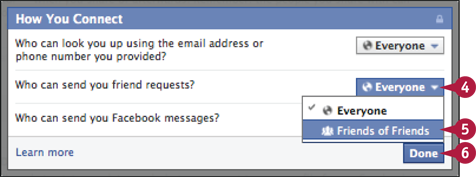
The How You Connect dialog box appears.
Click the Audience Selector () and select Everyone next to each setting that you want to edit.
Select a group option from the menu.
Click Done.
Set Who Can See and Post on Your Timeline
Your Facebook timeline is the central point for all the information and media you post, as well as a place where friends can comment on your posts. Facebook’s privacy settings enable you to set who can post to your timeline, and who can see what others post on your timeline. You can also set who can see posts on your timeline in which you have been tagged. This additional privacy feature helps you to control how your timeline appears to others and to manage the comments made on it.
Set Who Can See and Post on Your Timeline
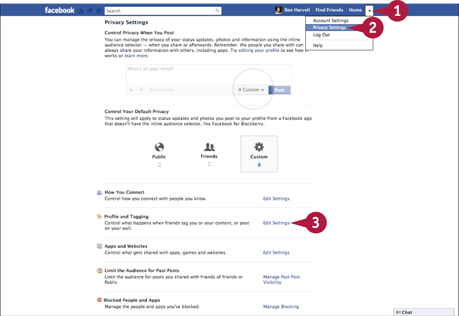
Click the Account menu ().
Click Privacy Settings.
Click Edit Settings in the Profile and Tagging section.
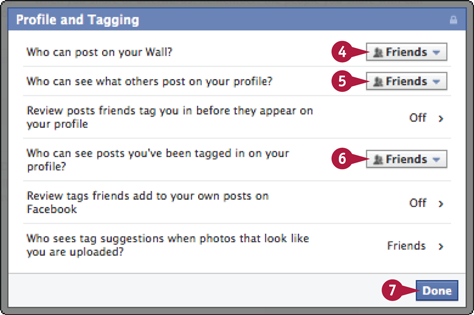
Click the Audience Selector menu () and select who can post on your timeline.
Click the Audience Selector menu () and select who can see items posted on your timeline.
Click the Audience Selector menu () and select who can see posts in which you have been tagged on your timeline.
 Click Done.
Turn On Profile Review
You can set your Facebook privacy settings to allow you to review when you are tagged in posts by others. With Profile Review turned off, any of your friends can tag you in a post which will then appear on your profile. When it is turned on, you must approve a tag before it is added to a post. If somebody you are not friends with on Facebook adds a tag to one of your posts, you are always asked to review it regardless of whether Profile Review is enabled or disabled.
Turn On Profile Review

Click the Account menu ().
Click Privacy Settings.
Click Edit Settings in the Profile and Tagging section.
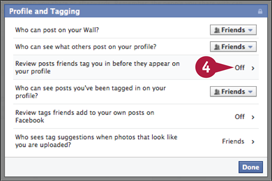
The Profile and Tagging dialog box appears.
Click Off.
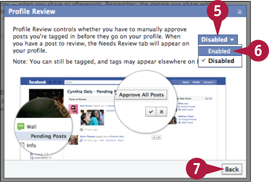
Click Disabled.
Click Enabled from the menu.
Click Back.
Turn Off Tag Suggestions for Photos
When one of your friends uploads a photo to Facebook, Facebook may recognize the image as you, using face recognition, and suggest your friend tags you in the photograph. Within Facebook’s privacy settings, you can allow Tag Suggestions to be made or you can turn them off, so friends are never shown your name in a list of tag suggestions they may receive when uploading a photo. There are two settings for Tag Suggestions, Friends and No One. By default, Tag Suggestions is set to Friends and tag suggestions will therefore be made to friends uploading photos of you or someone who Facebook thinks is you.
Turn Off Tag Suggestions
Click the Account menu ().
Click Privacy Settings.
Click Edit Settings in the Profile and Tagging section.
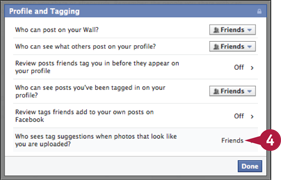
The Profile and Tagging dialog box appears.
Click Friends.

Click the Friends button ( ).
).
Click No One.
Click Okay.
Set Access Levels for Facebook Apps
Hundreds of Facebook apps are available that require different pieces of information from your account in order to work. Apps you install on Facebook could be games, connections to websites, and desktop software, or other social networks and online services. Using the App Settings screen, you can determine which information from your account an app can access via Facebook and who can see posts made by apps you have installed.
Set Access Levels for Facebook Apps
Click the Account menu ().
Click Privacy Settings.
Click Edit Settings in the Apps and Websites section.
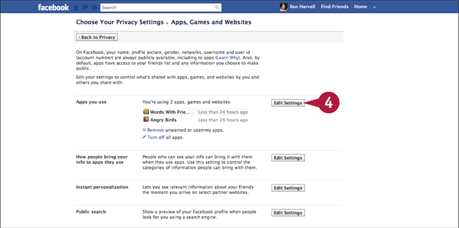
The Apps, Games, and Websites privacy settings appear.
Click the Edit Settings button for Apps you use.
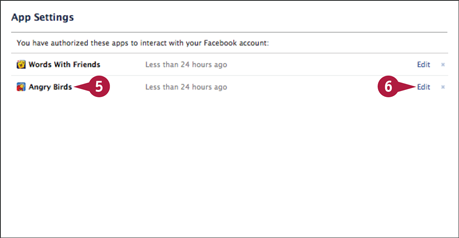
The App Settings window appears.
Select an app.
Click the Edit link next to it.
The app’s information appears.
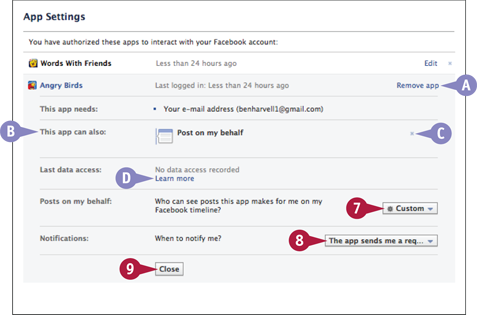
A Click Remove app to uninstall it.
B This section shows what functions the app is allowed to perform.
C Click the X to prevent an app from performing a function.
D This section shows when the app last accessed your Facebook data.
Click the Audience Selector menu () and select who can see posts from this app.
 Click the Notifications arrow () and select when you want the app to send a notification.
 Click Close.
Block Facebook Users
Using someone’s name or e-mail address, you can block a user from ever contacting you on Facebook. Once a person is blocked, they cannot interact with you on Facebook and cannot send friend requests or view any of your posts. You can also unblock users at any time by heading back to the Manage Blocking section of the Facebook Privacy Settings screen. This feature can be useful to prevent spam requests on Facebook or avoid being pestered by unwanted invites.
Block Facebook Users
Click the Account menu ().
Click Privacy Settings.
Click Manage Blocking.
Block a Person by Name
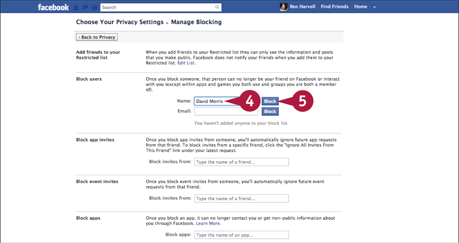
The Manage Blocking window appears.
Type the name of the person you want to block.
Click Block.
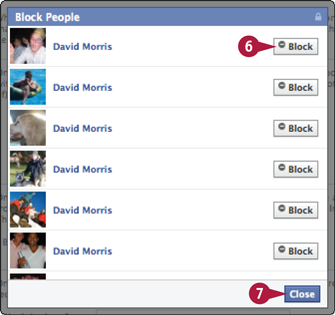
The Block People window appears.
Click Block next to the person you want to block.
Click Close.
Block an E-Mail Address
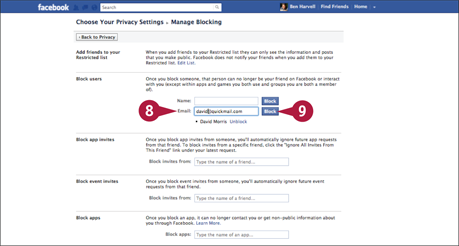
Type the e-mail address of the person you want to block.
Click Block.
 Repeat steps 6 and 7.
Limit the Audience for Past Posts
If you are not sure whether a post was made public or just to friends, or you have made posts without choosing an audience, you can set all your past posts to be visible only to friends. Although you can change the privacy level of individual posts, this process offers a bulk method to ensure that any post you have ever made on Facebook is visible only to your friends.
Limit the Audience for Past Posts
Click the Account menu ().
Click Privacy Settings.
Click Manage Past Post Visibility.
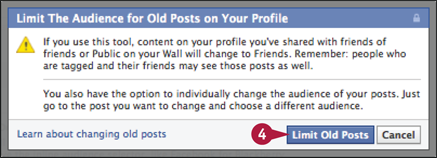
A warning dialog box for limiting the audience for old posts appears.
Click Limit Old Posts.
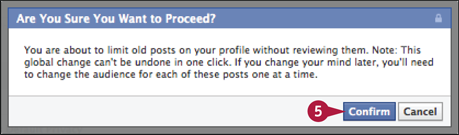
Click Confirm.
See What Your Timeline Looks Like to Other People
You can check your privacy settings at any time by using the View As feature. This setting shows how your timeline looks to the public or Facebook users who are not your friends. You can also type a friend’s name to see exactly what he or she sees when viewing your profile. Viewing your profile in this way can be useful for spotting posts without the correct privacy setting. You can then adjust the setting with the Audience Selector to rectify the situation.
See What Your Timeline Looks Like to Other People
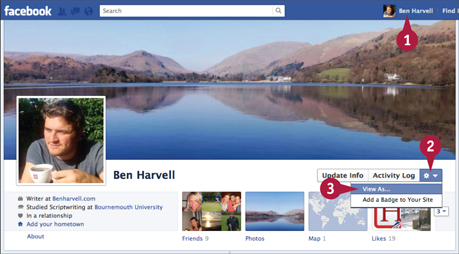
Click your name at the top right of the interface.
Click the Settings button ( ).
).
Click View As....
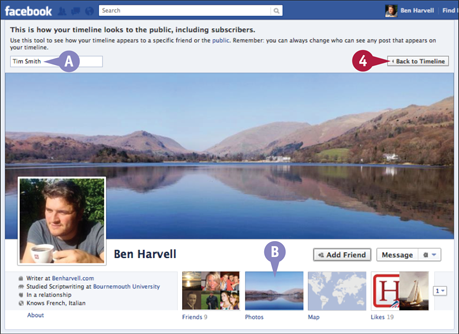
Your profile appears as shown to the public.
A You can type a friend’s name and press  (
( ) to see how your profile looks to him or her.
B You can click other sections of your account to see how they look to others.
Click Back to Timeline.