Cooking and baking gluten-free or dairy-free is easier than you think. The trick is to choose ingredients not just for flavor, but for performance, so that cake is light and moist, pizza crust is tender and crisp, and gravy is rich and creamy. Besides gluten-free flours and rice milk, I use ingredients that you probably already have on hand.
In my recipes I reconstruct classic foods, so I’m looking for ingredients that deliver the same flavor principles. For instance, I was having trouble with my brownies. Batch after batch, Isaiah and I kept tasting something off, something that tasted almost like baking soda, but there was no baking soda in the recipe. It took a while to pinpoint the source of the off flavor, but ultimately we sniffed it out—it turned out to be the tapioca flour (also called tapioca starch) in my flour blend. So I went to the store and bought four different brands of tapioca flour. When I got home, I cut each one open and smelled inside. There was only one that had no noticeable scent: the tapioca flour from Shiloh Farms. I mixed up a new flour blend and baked off a batch of brownies—they tasted exactly right.
Before I started making my own all-purpose flour blend, I tried my share of store-bought ones. They were convenient, but expensive, and the package sizes were barely enough to make a batch of cookies. Another drawback was the types of flours used in the blends. Some contained buckwheat flour or bean flours, which didn’t deliver that classic flavor or appearance I wanted.
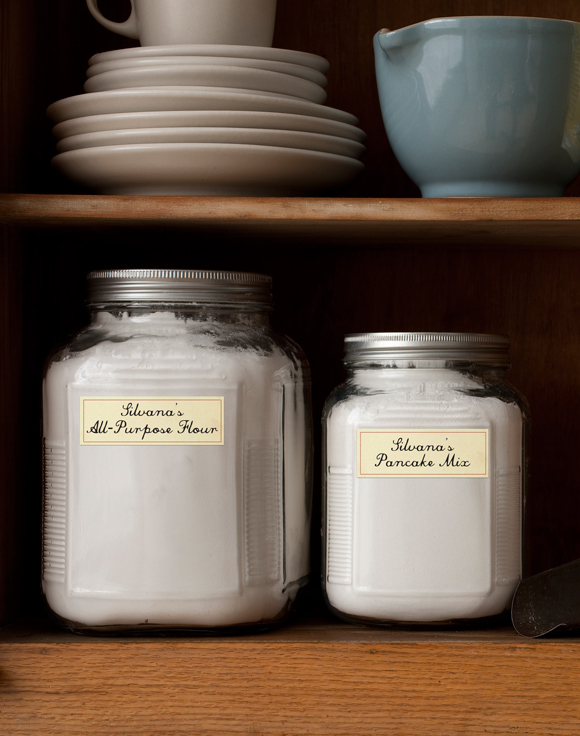
So I developed my own flour blend. I wanted it to have a limited number of ingredients and a neutral flavor so that I could use my blend in all of my recipes. After much experimenting, I chose white rice flour, tapioca flour and potato starch as my base. Next I had to figure out the proportions. The cakes quickly let me know that a higher ratio of tapioca flour to potato starch yielded cakes that had more springiness and were less crumbly. I added salt to my flour blend to round out the flavors. If you’re using the flour blend in everyday cooking, there’s no need to adjust the salt in your recipes. The last ingredient is xanthan gum, a natural emulsifier and stabilizer.
Since my family eats its share of pancakes and waffles, I also wanted be able to have a pancake mix ready, especially for a sleepy Sunday morning. So once I was satisfied with my all-purpose flour, I set out to create a pancake mix. The result was a mix that is not supersweet, which makes it good for other uses, such as coating foods for frying.
You can find all of the ingredients you’ll need for both the flour blend and the pancake mix at your local natural foods store, or you can order them online directly from my two favorite suppliers: Bob’s Red Mill (bobsredmill.com) for the white rice flour, potato starch and xanthan gum; and Shiloh Farms (shilohfarms.com) for the tapioca flour. Be sure to buy potato starch, not potato flour—a mistake I made that turned into a morning of laughs when I couldn’t seem to ever add enough liquid to a pancake batter I was stirring together.
I like to have good-size containers full of all-purpose flour blend and pancake mix on hand. I store them in airtight containers in a cool, dry place. If you have enough room, you can store them in your refrigerator or freezer. Just shake or whisk before using.
Makes about 4 pounds
Prep Time 15 minutes
6 cups white rice flour, preferably Bob’s Red Mill
3 cups tapioca flour, preferably Shiloh Farms
1½ cups potato starch, preferably Bob’s Red Mill
1 tablespoon salt
2 tablespoons xanthan gum, preferably Bob’s Red Mill
1. In a large bowl, whisk together the rice flour, tapioca flour, potato starch, salt and xanthan gum. Transfer to an airtight storage container and store in a cool, dry place or in the refrigerator.
Makes about 2½ pounds
Prep Time 8 minutes
9 cups Silvana’s All-Purpose Flour Blend
1 cup plus 2 tablespoons sugar
3 tablespoons baking powder
2¼ teaspoons salt
1. In a large bowl, whisk together the flour, sugar, baking powder and salt. Transfer to an airtight storage container and store in a cool, dry place or in the refrigerator.
Ingredients
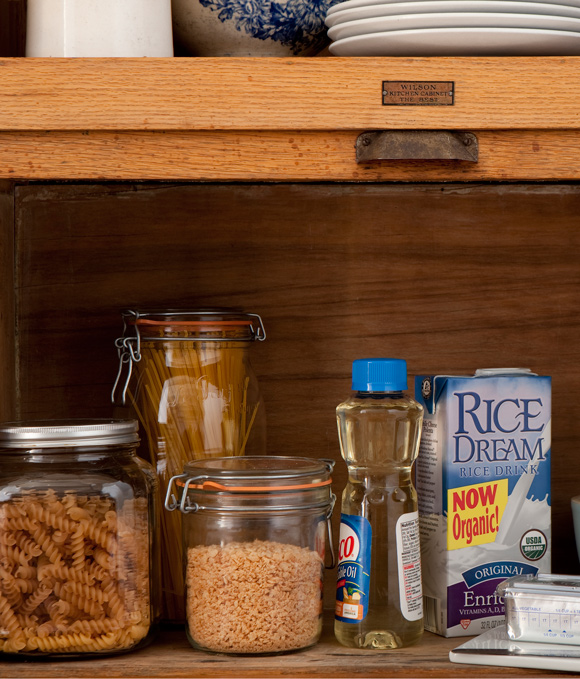
OTHER GLUTEN-FREE AND DAIRY-FREE INGREDIENTS I USE THAT YOU PROBABLY ALREADY HAVE ON HAND:
Rice milk, such as Rice Dream
Vegetable shortening, such as Crisco
Vegetable oil
Corn or rice pasta, such as Sam Mills Pasta d’Oro, Bionaturae, Lundberg, Ancient Harvest or DeBoles
Rice cereal, such as Erewhon, processed into crumbs
substitution chart
The recipes in my cookbook are flexible and accessible to everyone. You can cook up a recipe as is or substitute any ingredient to better fit your lifestyle. Since my recipes use mostly conventional ingredients straight from the supermarket, the substitution list is short.
| I USE… | YOU COULD ALSO USE… |
| Silvana’s All-Purpose Flour | All-purpose flour |
| Silvana’s Pancake Mix | Store-bought pancake mix |
| Rice milk | Other nondairy milk, cow’s milk |
| Vegetable shortening | Unsalted butter |
| Vegetable oil | Melted unsalted butter |
| Corn or rice pasta | Durum wheat pasta |
| Rice cereal crumbs | Dried bread crumbs |
Kitchen Tools
in the drawer…

1. 12-inch balloon whisk (such as Cuisipro)
The most important task a whisk performs in my kitchen is sifting. Instead of using a flour sifter or a sieve, I use a whisk to aerate the flour, which makes baked goods lighter.
2. 1½-inch ice cream scoop (such as Matfer Bourgeat or Norpro)
A scoop isn’t just for ice cream. I use it for measuring out cookie dough onto a baking sheet and filling muffin liners with batter.
3. Large silicone spatula spoon (such as Le Creuset)
Wooden spoons have their well-worn place, but a silicone spatula gets every last bit of batter from a bowl and is great for gently stirring scrambled eggs and getting into saucepan corners.
4. Immersion blender (such as Cuisinart)
This is all you need to transform a soup or sauce from chunky to smooth and creamy—and it takes up less space than a regular blender or food processor.
5. Set of measuring cups and spoons (such as RSVP measuring cups and KitchenArt adjustable measuring spoons)
In any baking recipe, accuracy is important. If you’re just starting to cook, measuring out ingredients for any recipe teaches you about proportions.
6. Tapered wooden rolling pin (such as Vic Firth)
I’ve tried them all—with handles, silicone, marble—and none gives me better control than a classic tapered wooden rolling pin.
7. Digital cooking thermometer and timer (such as Polder)
Many distractions fill my kitchen, so I depend on this timer to save my life—and my recipes. I use the thermometer whenever I’m cooking a roast.
on the stove…
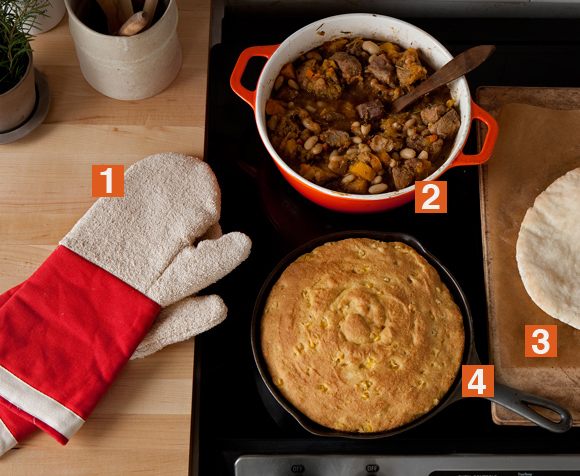
1. 14-inch oven mitt with magnet (such as Le Creuset)
When I owned my Italian bakery, I wanted long oven mitts to protect myself and my bakers from burns, an inevitable part of daily baking. Not only were these mitts long, they were also magnetic, which meant we could throw them against the oven and they’d always be there when we needed them.
2. 5½-quart round Dutch oven (such as Le Creuset)
When I graduated from college, this was all I wanted. Later, when I got married, I asked for more. I like the flexibility a Dutch oven gives me. I can go from stove to oven to fridge with one cooking vessel.
3. 14-inch by 16-inch baking stone (such as Old Stone Oven)
I’ve done my due diligence on this baking stone. Many pizzas later, it has outperformed an upside-down baking sheet, delivering a crispy, golden-brown crust every time.
4. 10¼-inch seasoned cast-iron skillet (such as Lodge)
I didn’t inherit my cast-iron skillet from my grandmother, but from my husband. It fries up bacon crispy like nothing else and gives my cornbread its much-loved crusty edges (see Double-Decker Toasted Cornbread).