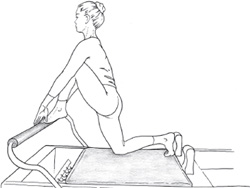
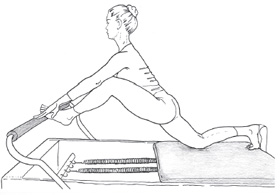
FORWARD LUNGE
and Foot/Ankle Instability

This exercise requires steady ankle alignment and can therefore reveal or exacerbate any weaknesses in the joint.
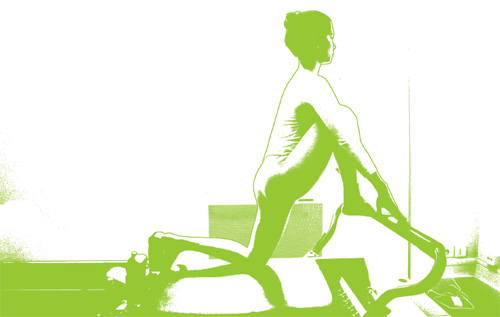
Starting Position
Forward Lunge is a version of a front split that calls for very specific placement of the feet— one on the carriage against the shoulder rest, the other with the toes on the bar and the heel raised. One knee is on the carriage, and the knee closer to the bar is free. The hands are placed symmetrically on either side of the trunk to help maintain balance.
Note that the feet are in two different positions: The foot on the carriage is in dorsiflexion, with the toes turned toward the shin. The foot on the bar, at least at the beginning of the exercise, is in plantar flexion, which we call “pointed.”
The Movement
Both knees start to straighten to press the carriage out. The instep of the foot on the bar is forced into a more extreme point, and the foot on the carriage goes into more extreme extension. This pattern is reversed on the return.
Throughout this exercise, we try to stabilize the pelvis and keep it from turning. The two feet move differently. The back foot moves from a flexed to a more pointed position (in that the heel pulls away from the shoulder rest). The front foot goes from a pointed to a less pointed position.
Observations
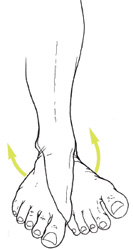
In the course of this exercise, the foot on the bar often turns and changes shape. Why?
When we place the foot in a point on the bar, it simultaneously:
- twists on itself so that the sole is turned inward (and not toward the floor); and
- tends to move to the lateral side, which brings the heel more toward the little toe.
This movement occurs at the ankle and involves several other joints of the foot as well.
The Ankle: A Structure Composed of Two Joints
The upper portion of the ankle joint is itself composed of two superimposed joints—the ends of the two bones of the lower leg, the tibia and the fibula. The ankle can thus be more precisely recognized as the tibia-fibula-talus.
The ends of the tibia and the fibula fit snugly together like a monkey wrench over the upper part of the talus, which resembles the top of a pulley wheel. The two “fingers” of the wrench correspond to the malleoli. This joint allows only for front and back movement:
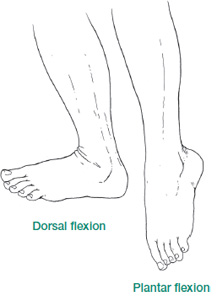
- to the front, dorsal flexion (dorsiflexion)
- to the back, plantar flexion
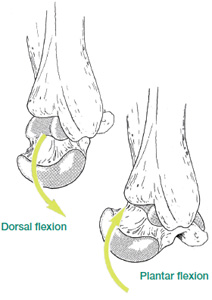
The ankle bones are generally stable, but there is some room for movement in certain positions. In plantar flexion, for instance, we can see that the posterior part of the “pulley,” which is narrower than the front, is in the monkey wrench. Because it’s narrower, it fits less snugly, and there is therefore room for tiny lateral and rotational movements. Even though the movement is minimal, it means that the ankle is less stable in this position— at least when we look exclusively at the bones.

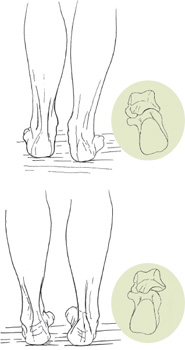
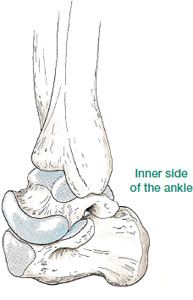
The Lower Heel: Talus-Calcaneus
Two surfaces on the underside of the talus articulate with two corresponding surfaces on the top of the calcaneum. This area of articulation (illustrated at right) allows for a greater diversity of movement, but with less range of motion than at the ankle. Lateral movement is dominant here.
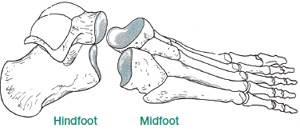
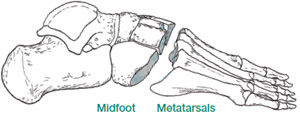
The Instep: The Midtarsal and Tarsometatarsal Joints
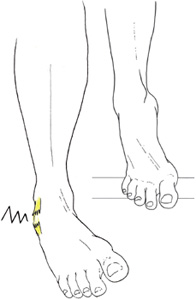
At the front of the ankle is the instep, which joins two articular lines, each one involving several bones. The Forward Lunge exposes the instep of the foot on the bar.
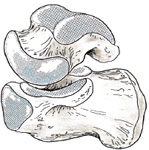
The Midtarsal (the Joint Behind the Instep)
The midtarsal unites the calcaneum and the talus with the two bones situated more anteriorly. It is the first joint of the foot that is on a vertical plane.
The midtarsal joint can make the same types of movement as those made by the subtalar joint. It permits the hindfoot to adapt to the midfoot, especially when they are bearing weight, as when the foot is on the bar.
Midtarsal joint
The Tarsometatarsal (the Joint at the Front of the Instep)
The tarsometatarsal joint unites the bones of the midfoot with the five metatarsals. It allows for the same movement as the midtarsal joint, although with less mobility.
Tarsometatarsal joint
These multiple joints increase the foot’s movement possibilities, but they can make alignment more complicated. Therefore, ankle support and alignment most often require coordination of the surrounding muscles.
Plantar Flexion Encourages Inversion
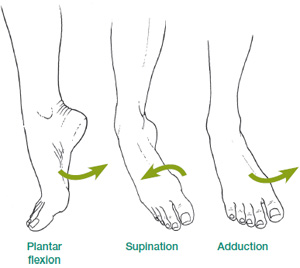
When movements of the ankle and foot employ all of the joints described above, two results predominate: inversion and eversion. When the ankle goes into plantar flexion, inversion tends to occur. Inversion combines three movements. The ankle goes into plantar flexion, while the joints below and in front of the ankle tend to:
- supinate (meaning that the internal edge of the foot lifts, while the external edge drops); and
- adduct (the instep turns toward the midline of the body).
Why this combination? Generally speaking, inversion is a result of both the shape of the articulating surfaces and the predominant muscular action: most of the muscles that cause plantar flexion are also supinators.
In effect, an unstable talus is guided by the action of the dominant muscles, which in this case are supinators. In Forward Lunge, the foot that is held in plantar flexion will tend not to stay aligned, but to move into inversion.
Inversion moves the talus and the calcaneum away from the lateral malleolus. When this happens, the ligaments at the outside of the ankle are put under tension.
The Ankle and Its Outer Ligaments
The lateral malleolus has a “V” shape: its two edges meet in a point. It has ligaments that connect it both to the talus and to the calcaneum.
- In the front, a ligament runs from the anterior edge to the talus (1).
- At the bottom, a ligament runs from the point to the calcaneum (2).
- In the back, a ligament runs from the posterior edge to the talus (3).
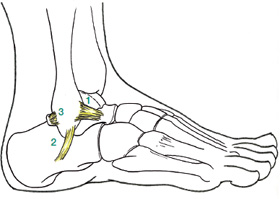
These three ligaments provide stability for the ankle. They are put under tension during inversion.
Inversion Particularly Stretches the Anterior Ligament
Among the three ligaments, the one that is stretched the most in inversion is the anterior ligament. This is the ligament that is most often overstretched and injured when the ankle is twisted.
In Forward Lunge, the foot tends to go into a position where the ankle is in torsion. Even if this doesn’t directly cause a twisted ankle, it might predispose you to one.
How to Stabilize the Foot
The way to prevent ankle strain is to stabilize the foot during Forward Lunge and other similar exercises.
1. Define Optimal Leg Alignment from the Hip to the Knee
This can be done standing on the mat, with the legs parallel and about hip width apart.
• Internally rotate the femurs and note how the knees turn inward toward each other. The tibias will follow the same pattern and bring the taluses with them.
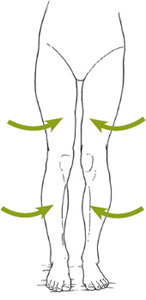
• Do the opposite and turn the hips into external rotation (by contracting the glutes, for example). This time the kneecaps will turn outward. The tibias, which are pulled into external rotation, will bring the taluses into supination.
• You can find a balance between the two positions. The legs will be just slightly more externally rotated, and this will allow the kneecaps to face forward and avoid supination or pronation of the feet.*12
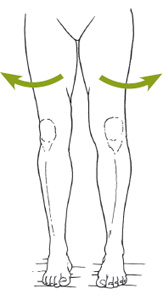
To coordinate the entire lower extremity, one of the best exercises is still the plié.
Start in the same position as in the previous exercise, standing on the mat with the legs parallel and about hip width apart. While the plié actually requires alignment of the entire body, here we will focus on hip-knee-foot alignment.*13
- Bring the legs together so that the big toes, the medial malleoli, and the knees touch. Bend the knees, keeping the heels on the mat and the three points (toes, malleoli, and knees) touching.
- Once you have mastered this step, separate the legs to hip width apart and go into a plié, keeping the ankles in the same position as when the legs were touching.
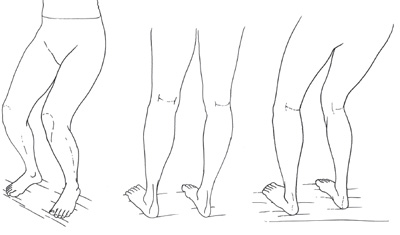
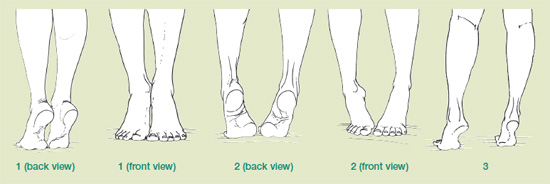
Stand with the legs and feet together. Come up into a demi-point—putting your weight on the metatarsals. Initially, while keeping the legs together, we try to keep the malleoli in contact (1). If they separate (2), this is because the feet are starting to go into inversion.
Next, separate the legs. While maintaining the same knee-ankle-foot alignment, come up onto the metatarsals and then lower the heels (3). This is the time to discover whether your heels drop to the outside (supinate) when you raise them. If so, practice raising them without supinating.
4. Prevent Supination
Supination of the foot—and thereby inversion— can also be caused by the knee dropping outward (1). At first, we try to keep the knee aligned with the hip and foot. We can even try dropping it slightly inward (2).
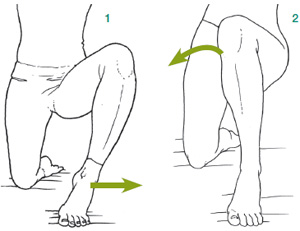
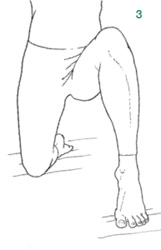
Later, if we allow the knee to drop slightly outward (via abduction and external rotation of the hip), we will specifically be able to avoid letting the foot rock to the outer limit of its area of contact (3).
Other Exercises That Encourage Ankle Instability
Reformer Exercises
All of the exercises that put pressure on the foot will be challenging to the ankle. Here, we focus on those that involve plantar flexion.
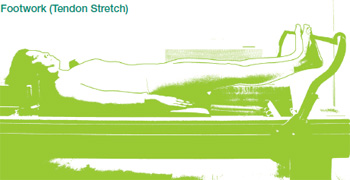
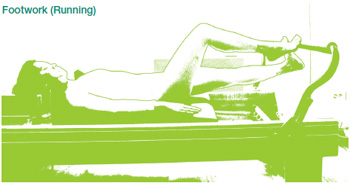
Footwork
In this series, there are variations such as Tendon Stretch and Running where the toes are on the bar and there is a tendency to fall to the outside of the foot.
Stomach Massage
In this series, we see the same inversion of the foot when the toes are on the bar in the basic exercise and the variations.
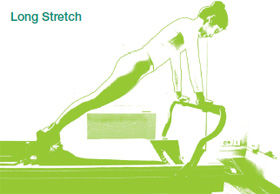
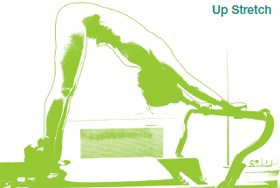
Long Stretch, Up Stretch, Arabesque, Front Split
In these four exercises, there is a strong tendency to plantar inversion since both feet are in demi-point.

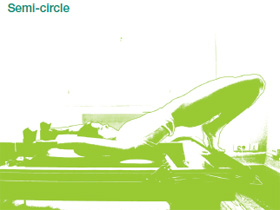
Semi-circle
This position of extreme plantar flexion encourages the foot to drop outward.
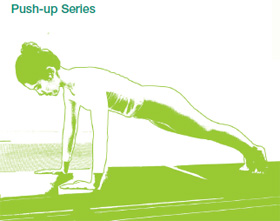
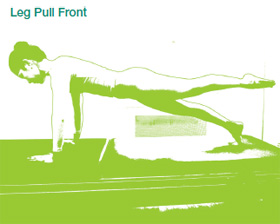
There are not many mat exercises that call for the weight of the body to be supported on the feet. However, both the Push-up series and Leg Pull Front can create inversion of the ankles.
Push-up Series and Leg Pull Front
These two exercises that involve putting weight on the hands and the feet can cause inversion problems. In both cases, the solution is to focus the weight on the axis of the foot that passes through the second toe. This helps prevent the foot from turning to the outside.