CHAPTER
14
Augmented Reality: Create Real-World Experiences with ARIS
The augmented reality (AR) technology that captivated the world with Pokémon Go! is already in use throughout classrooms. The University of Wisconsin– Madison, created a free, open-source AR platform called ARIS (Augmented Reality for Interactive Storytelling). Using this technology, schools can create any number of immersive experiences for themselves and their communities. Bringing history and stories to life, building AR around current events, or helping students become engaged with their community—the possibilities are endless.
People all around the world use ARIS for variety of purposes. Most are involved with learning: from classrooms to museums, afterschool clubs, and community action. Elementary teachers can easily incorporate this form of coding and computational thinking into social studies and literacy standards through a community-based tour.
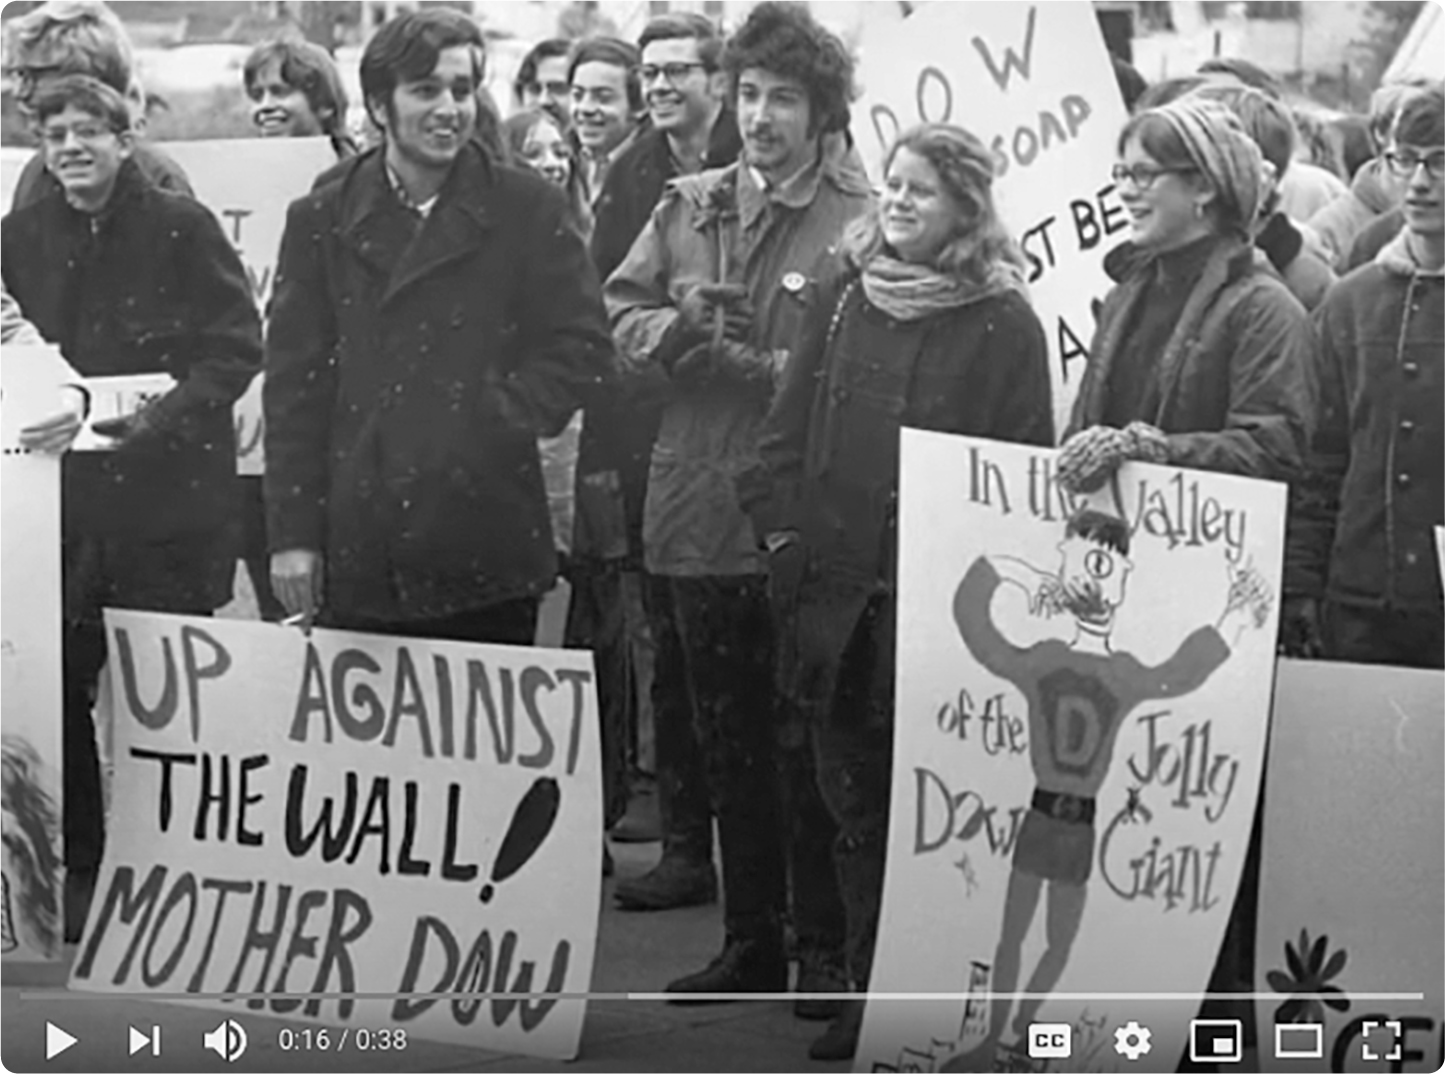
One of the first ARIS projects was “Dow Day,” an interactive, location-based documentary for prospective students visiting the University of Wisconsin–Wisconsin campus. The documentary was designed to allow future learners to experience a historic Madison protest that took place during the Vietnam War. The user was given the role of a reporter who was asked to cover a historic protest at the university in 1967 against the Dow Chemical Company. Jim Matthews, educational director of the Field Day Lab at UW–Madison, shares the inspiration for the project:
Students often think of history as events that happened somewhere else. I wanted to spark their curiosity about the history of their own community. After playing Dow Day, it is not uncommon for students to say things like, “Wow, I walk on Bascom Hill all the time and I never knew something like that happened here.” Part of what grabs them is they can relate to the people, issues, and places in the story. After playing “Dow Day,” many folks are eager to create their own documentaries and stories. This opens up some great opportunities for community-based learning. (University of Wisconsin-Madison, 2012)
While standing at the top of the hill on campus, the reporter sees video footage from when the students began to protest the Dow Chemical Corporation for making napalm for the war. As the reporter, you are sent on various quests to investigate the different interests and perspectives of students, police, and Dow employees.

Figure 14.1. Dow Day project created in ARIS. Watch the video at youtu.be/XrjcY3D02wE.
Why Teach with ARIS
By incorporating coding and computational thinking into your curriculum, you have taken one step as an early adopter. You have also exercised your ability and the ability of your students to “live in beta,” to troubleshoot, test, and find the answers to problems. Exploring the learning opportunities for emerging technologies is another way to proactively teach in the digital age. To prepare students for the requirements of their future workplace, exposure to the tools and environments they will encounter is essential. Computer science is a growing field, and many of today’s students will be the creators of technologies such as ARIS.
Design Thinking
ARIS founder Jim Matthews shared that creating “Dow Day” required an “iterative process of research, design, and media production [that] was required to translate source materials, such as photos of protest fliers or interviews from newspapers, into an interactive experience” (University of Wisconsin-Madison, 2012). Creating real-world scenarios and interactive stories requires the stages of design thinking. Students must have empathy for the user and consider the user’s experience as they design the game. They must define their objectives and generate ideas for communicating those objectives in a geographical situation. Finally, students will need to prototype and test the experience to arrive at a finished project that others can use.
Community-Based Learning
Using augmented reality can connect users more deeply with their real surroundings (Krosinsky, 2011) and can be a powerful tool for the teacher looking to impart learning on the next field trip or excursion. It is also an innovative and interactive way to teach local or regional history, as it redefines the learning space of the traditional classroom. At the end of this chapter, you will hear from two educators who created a walking tour of their community in ARIS—and engaged their students and community in the process.
Deeper Connection with Subject Matter
Social studies teachers Beth Stofflet and Larry Moberly used ARIS during a unit on the African continent. Students were asked to choose from a list of social issues and then imagine a real person facing that issue. They used ARIS to tell interactive stories from that person’s perspective (Medium, 2016).
Using ARIS
In order to implement ARIS within the classroom, educators need to understand that the software components consist of three pieces of software:
Client (app): Used to play games and collect data.
Editor: Interface used to make ARIS experiences.
Server: Where games live on a database in the cloud. The client and editor read from and write to it. Upside: no need to install games or go through the app store. Downside: you need an internet connection to play.
Getting Started
To download the app, scan the QR code or search the App Store store for “ARIS.” Once you have downloaded the app, you’ll need to create an account and login. Each player using ARIS needs an account. [QR 13.1]
The ARIS website has many manuals (manual.arisgames.org) to help you get started. You will want to start with a basic understanding of objects, triggers, and scenes.
Objects
Objects are containers for content you want your players to see or interact with. There are many types of objects, but think of each one as a type of media. When you work on class projects, each individual student’s paper, video, or picture would be considered one object.
Triggers
In ARIS, the trigger is what connects the game world to the physical world. Think of a trigger as something that will allow you to see the student paper, video, or picture. For example, if you are going to visit a museum and you have your student draw a picture of the museum (the picture would be the object), you would place a trigger on the ARIS map at the location of the museum to trigger (an action) the picture to pop up on the screen as you walk up to the museum.
Scenes
Every game needs at least one scene to move action along. Every experience you are creating for your user must be within a scene, as it has to happen somewhere. For K-5 teachers just starting out, one scene for your game works well.
For the K–5 teacher, I would recommend starting out with the ARIS Basics course (fielddaylab.org/courses/aris). This will get you up and running with the basics of ARIS and using the objects, triggers, and scenes mentioned above. Be forewarned: to get started you will need a laptop or desktop computer and an iPhone or iPad for the ARIS app. One downside of the app is that it is currently only available for Apple products. There are plans of releasing an Android app in the future, however.
Your next step would be to create a community tour using the ARIS website Mobile Tour course. In this course, educational director Jim Matthews introduces a basic design process that you will be able to use for this and future projects. The course takes about four hours to complete and is divided into nine lessons, but is well worth the time investment.
 |
Get familiar with ARIS with the ARIS Basics course (fielddaylab.org/courses/aris), then create a mobile tour using the tutorial (bit.ly/32djng1). |
 |
The Community Tour
While many of the applications of ARIS have been for the middle and high school level, there is one application that K–5 teachers have been implementing in their classroom: the neighborhood tour.
Create a tour using ARIS that other people can play in order to learn more about your community and what it is like living there. The following are some elements of an engaging tour:
- It has a clear opening or introduction.
- It has a clear and consistent theme.
- It includes your personal perspective. The tour is written in your own voice or style and lets players into your world.
- It feels like it was made by an insider or someone with local knowledge.
- The conversations feel believable or realistic.
- It is well paced. It is not too long or too short and does not lag at certain points.
- Players know what they need to do next and throughout the tour.
Download ARIS and familiarize yourself with it by playing games that are currently being created by others around the world. Look for ways to connect your students with their community or create real-world experiences around content you are teaching.
Case Study: Walking Tour of Waukesha
Teachers are always looking for ways to engage students in a project-based learning environment. Traci Koepke and Tiffany Humphrey, two third grade teachers from Waukesha, Wisconsin, decided to take their social studies unit on Waukesha history to the next level using ARIS. A description of their journey in their own words follows.
We are fortunate to be able to team-teach a class of forty-three third graders. Our team had an upcoming social studies activity that encompassed learning about our town’s history. In previous years this activity involved students getting on a bus and riding around the town while their teacher read facts about the history of the city. We were looking for a way to have our students do that “heavy lifting” by learning about the history of our town and sharing their research with the community.
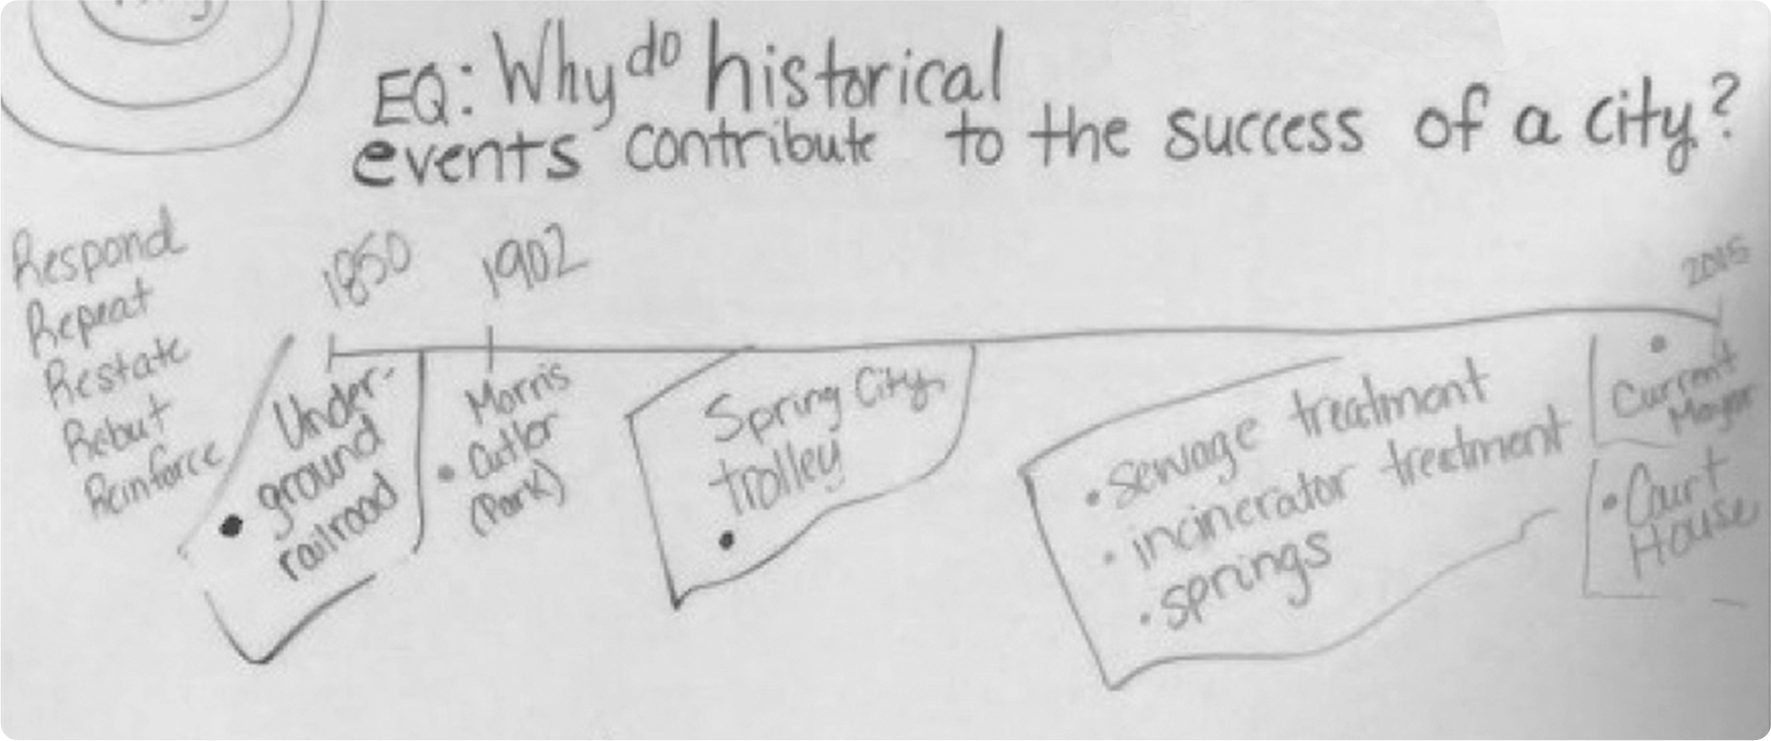
With the pressure of needing to meet all the standards, we knew that we had to look at this unit with a different lens. We began with the end in mind by looking at the required standards. Next, we brainstormed a list of infrastructures that make our city successful (figure 14.2). After many drafts and discussions, we crafted our essential question: “What historical events/infrastructures contributed to the success of our city?”

Figure 14.2. Essential question for walking tour project.
The team wanted to work smarter, not harder, so we looked at which reading, writing, and speaking standards could also be incorporated into this unit. On note cards, the standards were written in “I can” statements that would ultimately be proven by student evidence.
The conversation then turned to how students would show their evidence of learning for each standard. We decided to create a research guide that would help students organize their thinking. For example, one statement read, “I can identify the important infrastructures that help the city be successful.” In small groups, students would create a graphic organizer on their device, listing all the infrastructures they could think of.
Then students met to share their thinking, and a class web was created. Students would sit in a circle and use their conversational moves during the discussion. For example, Christy and Mike said, “I think one of the important infrastructures of our city is transportation.”
Another group responded by saying, “I would have to agree with what they said. We also added the airport to our web, which goes with transportation.”
Students created a list of two infrastructures that they were interested in diving deeper into. Our team looked at the student lists and created student partnerships. The partnerships began researching, using a variety of books and internet resources. In the research guide, students began answering the following questions: where, when, and what?
The end result for our students was to create a flyer to share their research about their infrastructure. After about a week and a half of our students researching, many of our groups were ready to begin the writing process of their flyer. During this time, we were able to incorporate many of our non-fiction writing standards and conventions. To the right, you will see an example of a flyer. Students also needed to include a question at the end of the flyer for the reader to respond to.
After all of the flyers were completed, another social studies standard that was incorporated was “I can determine the time and sequence of a historical event.” As a class, students had to figure out when their infrastructure fell on the timeline. The conversations that occurred during this time were amazing! It is very useful to have a tack strip available so students can easily move their flyer around.
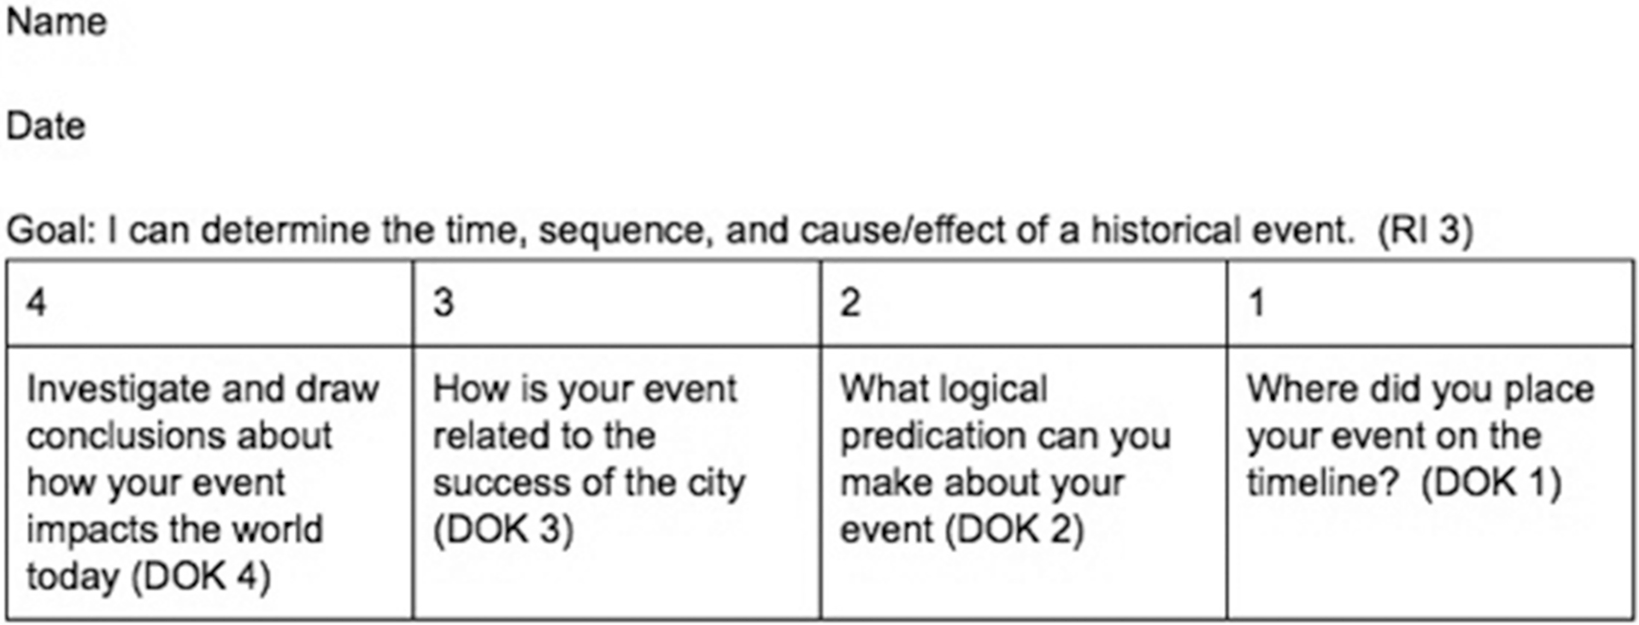
One example of a rubric that we used for this standard also incorporated depth of knowledge (DoK) levels (figure 14.3). This information was shared with the students before they began to write their flyer. When we met with the students after their flyer was complete, we had the students self-evaluate themselves using this rubric. Then we evaluated them using the rubric and provided students with feedback.
The next step was integrating the flyers into ARIS. Our team copied and pasted the flyers into the app to prepare for our field trip. On the day of the field trip, students were in small groups with a parent volunteer. We used one device for two students.

Figure 14.3. Rubric used in walking tour activity.
Students would then either hotspot off a volunteer’s phone or a portable hotspot unit. We also created parent tour guides. In the book, parents could see approximately where the triggers were located and how many there were. We have found that four stops for a field trip from 9:00–2:00 seems to be a manageable amount for our third graders.
When we arrived at a location in our community, there were approximately four to five triggers in a given area. This gave student groups the opportunity to spread out and learn about an infrastructure that their peers had researched. Student partnerships took turns reading the flyer to each other that popped up. Then they would respond to the question at the end of the flyer and record their thinking in the notebook located inside ARIS.
ARIS took our class’s learning to the next step from passive learning to active learning. Students were able to dig right into the research and share the facts with the class and the community. One student said, “This is awesome! I am learning from my friends and about my community!”