Chapter 9
JavaScript
JavaScript is an important part of EPUB 3. It helps add more functionality to your EPUB files. With the ability to program functionality into the EPUB, your imagination and skill are the only limits. Like most things, it is important to practice. JavaScript is no exception.
I need to make something clear about this chapter before we begin. Books on JavaScript can be quite large, so this chapter is not an exhaustive overview of JavaScript. The contents are a basic primer to get you started so you can understand some basics of JavaScript code when you see it in an EPUB. So, let’s get started.
Getting Ready
You need two basic things to get ready to practice JavaScript. You need to download Notepad++ from www.notepad-plus-plus.org (Notepad++ will need some add-ons). For Linux systems, you could use Gedit or Geany. Also, you will need a web browser program (Google Chrome and Chromium have good support for CSS and JavaScript).
NOTE
Be aware that at the writing of this book, Sigil does not support JavaScript. It should be added in the future. You may check Sigil to see if it has been added before using Notepad++.
Notepad++ is an incredibly powerful text editor. It lets you specify a file type, such as HTML, JavaScript, etc., so you can work on a particular file. Of course, you can create simple text files as well.
Download and install Notepad++ and then open it. Once opened, go to Plugins on the menu and select Plugin Manager and then Show Plugin Manager. Now a window should appear showing a list of available plug-ins that can be added to Notepad++.
The list is in alphabetical order, so go down the list and select ImgTag, NewFileBrowser, Tidy2, and XBrackets Lite. Once all of these are checked, click the Install button. After the plug-ins have been installed, Notepad++ should ask to restart itself. Select Yes, and the program should restart. When Notepad++ starts up, select Plugins | NewFile&Browser | Settings. Make sure that the option for New File 1 is set to HTML. The second should be set to JS for JavaScript; then click Save.
The XBrackets Lite plug-in allows for the autocompletion of ending brackets when you type the beginning bracket. If you find this useful, you should go into the settings for it and enable it. Tidy2 is an HTML plug-in that cleans up the HTML code so it is easier to read. Again, you can use it if you need it.
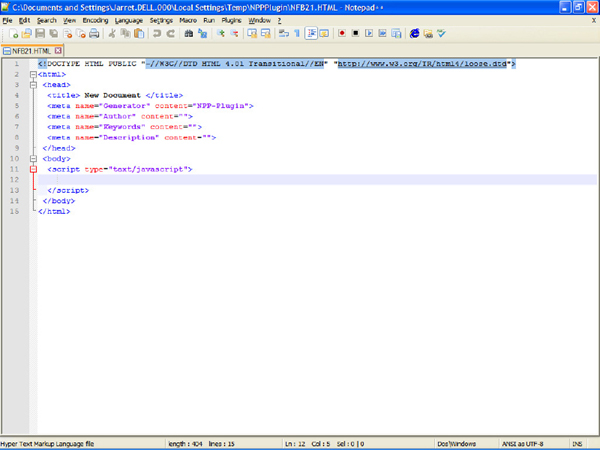
Once you have made all of the appropriate settings, go to Plugins | NewFile&Browser and then select Create New File 1. You should see something similar to Figure 9-1.
Figure 9-1 Empty Notepad++ HTML file
The code that appears is a basic HTML file with a section ready for JavaScript. You can use the basic template or load in an existing XHTML file from your EPUB. A good way to get a file from your EPUB is to open the file with the View Content method (for Windows) as described in Chapter 1. Once the EPUB is opened in a compression utility, drag an XHTML file to a folder and then load it in Notepad++.
Setting Up a Spot for JavaScript
Keep in mind that JavaScript is not Java. Java and JavaScript are two completely different computer languages.
JavaScript can be embedded, or placed, into an XHTML file. It also can be placed into an EPUB, although this feature is only supported by EPUB 3 devices.
NOTE
EPUB 3 devices are not required to support JavaScript. If a reading system supports EPUB 3, be aware it may not support JavaScript.
JavaScript must be separated from the XHTML tags, so any JavaScript is placed into <script> tags as shown:
The first tag starts the scripting section, and it is followed by the JavaScript code. Once the code is finished, the end tag is used to show that the JavaScript is completed and the XHTML code should resume. The MIME type is also given with the opening tag text/javascript.
The last line is the closing </script> tag. All JavaScript code is placed between these two tags.
If a reading system does not support scripting, then the tags will be ignored. The problem is that the code between the tags is not ignored and will not display the desired result shown in Figure 9-2, taken from the following code included in c09-01.epub (available at www.mhprofessional.com/EPUB):
Figure 9-2 JavaScript output on nonsupporting device
To prevent the JavaScript from displaying on the reading system, we can place the code in a comment section. HTML supports comments, which are ignored and not displayed. The characters used to denote a comment in HTML are not the same in JavaScript. The comment characters are <!-- to start the comment and --> to end it. A comment can cover multiple lines, so you need to place the beginning comment after the <script> tag and the end comment before the </script> tag as shown:
So, if this is done in the previous example, the output would be a blank screen on a nonsupporting JavaScript device. You can test this with c09-02.epub.
Be aware that on some EPUB 3 devices, commenting out the JavaScript makes it inaccessible. It is advised not to add the comment marks in these cases.
With XHTML files, you need to do the same commenting, but use the following code:
NOTE
Commenting out the JavaScript code in a file with an XHTML extension will sometimes cause it to be inaccessible. To make it work, rename the extension to HTML. See sample file c09-03.epub.
To add comments in JavaScript, use // at the beginning of the line to comment that single line.
The sample file c09-02.epub also includes the tags <noscript> and </noscript>. These tags are used by systems that do not support scripting. As long as the <script> code is commented out and some XHTML tags are placed in the <noscript> elements, then you should get some type of message. For example, in the c09-02.epub file, the following was added after the </script>:
On a non-JavaScript device, only a message “This feature is not supported on your device.” should be displayed.
JavaScript Programming
You have had a little taste of JavaScript, but there is quite a bit more to cover. Remember to practice everything you learn.
Variables
You may be thinking, “No, not algebra!” Don’t worry—it’s not quite the same. In any programming language, you need a placeholder to represent values. A variable holds on to values so you can use them when needed and make changes when required.
A variable is a name given to the placeholder. A variable name can begin with _, $, a number, or a letter. Keep in mind that JavaScript is a case-sensitive language. That is, the variable A is different from a and Value1 is different from value1. Be consistent when capitalizing any letters within a variable.
Variables are declared using the var command. For example, if you wanted to declare a variable named x and set it equal 5, the declaration would be:
NOTE
All declarations and statements need to end with a semicolon.
Be aware that a variable needs to be declared only once. An error occurs if a variable is declared more than once with var.
You could just as easily declare the variable x to be used but not assign it an initial value, as shown:
Multiple declarations can be done at once. For example, if we wanted to set x to 5, y to 9.5, and z to –23, we would do the following:
There are two types of variables: global and local. These are discussed later in this chapter.
Variables can hold different types of data. Each type of variable then has a different data type.
Numbers
Numbers are an easy one. The variable represents some type of number. Whole numbers and even decimals can be represented with a numeric variable. Three examples follow:
Strings
Strings are variables containing letters. The values are enclosed in quotes, as follows:
As we noted earlier, multiple variables can be defined on one line:
Numbers can also be placed in a string, but then it must be converted to a number to allow addition functions to be performed on it (other math functions such as subtraction, multiplication, etc., will convert the values automatically):
With strings, there is some distinction between the single quote (') and double quote ("). Let’s look at the following:
The string is fine and will work. The problem occurs when you want to include the double quotes instead, such as:
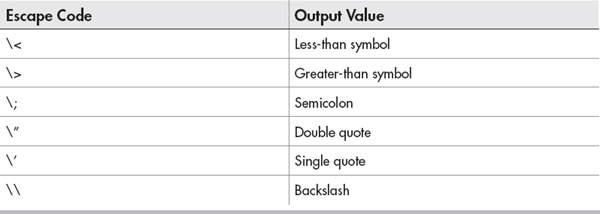
You see that now there are more than two double quotes, and it appears as if there were two strings with characters between them. The line will not work and will cause an error. So, to fix this problem, we use an escape code as shown in Table 9-1.
So, now to fix the previous line, we would use:
In an EPUB, since everything is in XHTML, we can also use those codes. For instance, instead of using \n for a new line, we can use <br />:
In this case, the two lines would not be printed as one line, but two.
What Is document.write?
With a reading system, whether a device or an app, there is a place for the text to be displayed. The display area is treated as your “document” and you can perform tasks in this area. Whatever is enclosed in the parentheses will be written to the display unless the statement is an error. In the case of “document.write(string1+string2);” we are writing the contents of string1 followed by string2.
If using an XHTML file, use the command XHTMLDoc.Write( ) instead.
Document.Write and XHTMLDoc.Write do not work very well on EPUB reading systems. There are other ways to display text to the screen from JavaScript, which will be covered later in this chapter.
Boolean
Boolean variables have two values: true or false. A Boolean variable can be set up as follows:
Boolean values are useful when dealing with conditional statements, which will be discussed later in this chapter.
Null
If a variable is defined without giving a value, the value is “undefined,” as in the following code:
The output would say “undefined.” The reason the value was given as undefined is because it wasn’t defined or set. If you want a variable to not be undefined but not give it a value, you can set it to null. The null value is the same as nothing.
If you see the following code, are the two variables the same?
They are the same. If you print out the contents of x and y, x is null and y is undefined. If you test them as being equal, JavaScript says they are the same. The reason they are the same is because both set to a value of nothing.
Math Operators
The math operators are mostly straightforward and easy to understand. Like math class in school, you have addition (+), subtraction (–), multiplication (*), division (/), and modulus (%). Modulus is the one term that most people haven’t heard of—at least not by that name. Another, more familiar term that means the same thing is “remainder.”
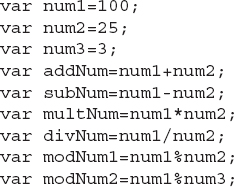
Look at the following code:
The answers for these would be
 addNum = 125
 subNum = 75
 multNum = 2500
 divNum = 4
 modNum1 = 0
 modNum2 = 1
The first four are easy to understand. The answer for modNum1 is 0, which is the remainder of 100 divided by 25. For modNum2, the answer is 1 since 100 divided by 3 is 33 with a remainder of 1.
Two simple math operators that are useful are the operators to add or subtract 1 from a variable. To add 1, you name the variable and follow it with two plus (+) signs. Subtraction is done with two minus (–) signs. An example of each follows:
It is possible to also add strings. Look at the following:
Can you guess what z would contain? The answer is “keylatch.” It is possible to make z = y + x, which would make the contents of z equal to “latchkey.”
Because you can add strings, the results are similar even when the strings are numbers. If the variables are strings of numbers and you use any math operator other than addition, the variables are converted to numbers and the result is given. The following shows an example:
The value of c is 321111 because the two strings are joined together. Variable d holds the value of 210. The multiplication, division, and modulus operators perform the actual math function.
NOTE
The exception to the rule about adding strings is when you place a string in a variable and then add one with ++. The variable will be converted to a number and 1 is added to it.
Assignment Operators
An assignment operator, as you saw in previous sections, is used to assign a value to a variable. The main assignment operator is the equal sign (=). For example, to assign the value of 5 to a variable named number1, you would use the following code:
NOTE
In most code examples, it is assumed the variable has been previously declared. In the previous example, the var number1; code has already been executed.
To assign a value from a math operator, we could do the following:
Here we are taking the value of count and adding 41 to it and then placing the value back into count.
We could do the same thing with the following code:
The process can be done with the other math operators as shown:
Arrays
Arrays are a set of variables with the same name. Think of it as a stack of variable holders. Each holder is numbered to differentiate it from the others. It is important to remember that when numbering the holders, the first one is 0 and not 1.
For example, if we wanted to place five names in an array, we would do the following:
Notice we declare the variable as an Array and add in five names. There are five elements to the array, and they are numbered 0 to 4 (making a total count of five). To reference an individual element, you place the number of the element in brackets ([#]). For example, the fourth element, Morgan, would be names[3].
Be aware that arrays can hold numbers as well as strings.
Properties
Properties are the characteristics of an object. Objects are any data type that has properties and methods, both of which are covered later in the chapter.
Properties can describe an object—for now, this is an array. For example, we can use the length property to find how many elements are in an array. Properties are connected to the variable but separated by a period. To print out the length of the names variable, we would execute the following code:
Methods
Methods allow some action to be done with the object to which it is connected. Similar to properties, methods are separated from the variable name by a period.
Methods usually manipulate the data within the variable or perform some task with the data. For example, the write method for document will write the specified variable or property to the document.
concat The method concat allows two arrays to be joined into one array. For instance, if we had the two following lists of names, we could join them into a third array:
The length of names3 would be given as 7, and its contents would be “Devyn”, “Logan”, “Caleb”, “Eilly”, “Alyse”, “Morgan”, “Grant”.
The order of the concat statement determines the order. The order of each individual array is kept the same, but if the statement were names2.concat (names1), it would change the order of names3. The contents of names3 would be “Eilly”, “Alyse”, “Morgan”, “Grant”, “Devyn”, “Logan”, “Caleb”.
join The join method is used to create a string from the array list. If we needed to print a list of every element in an array, we would have to print out each element one at a time. The join method joins each element, separating them with a comma by default, as shown:
The output of this statement would be:
You may have noticed the parentheses after the join method. Parentheses are usually used to pass some type of information to the method. In this case, we can specify the character or characters to use to separate elements. In the following statement, we will separate the array elements with a comma and a space to make the output string look a little nicer, as shown:
sort Sort is a method that is self-explanatory. It sorts the elements in the array in alphabetical order. For example, if we used the previous array called names3, we could sort it and see the output as shown:
Notice that the sort occurs in place. What this means is that the sorted values are placed back into the original array of names3.
Sorts are done on the elements as if they were strings. Even if the elements were numeric, they would be converted to strings before being sorted. Because of this conversion, the number 4 would alphabetically occur after 15.
reverse The reverse method is used to reverse the order of the elements in the array. The first element is now the last, while the last is now the first. If you needed an array to be in descending order, it would be easiest to sort it alphabetically and then perform a reverse on it. If we did a reverse on names3 after it had been sorted, the results would be:
Multidimensional Arrays
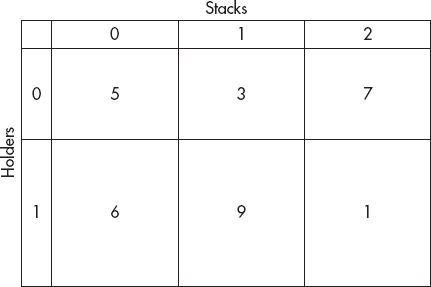
So far we have discussed one-dimensional arrays, which can be thought of as a stack of holders. With multidimensional arrays, we are talking about multiple stacks of holders.
Let’s assume we have two holders in three stacks as shown in Figure 9-3. The array would be initialized as shown:
Figure 9-3 Multidimensional arrays
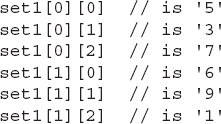
The first set is (5,3,7) and is referenced by the element 0. The second set is (6,9,10) and is referenced by element number 1.
To access the third element, the number 7, it would be done as set1[0][2]. Individually within the first set, the number 7 is the third element, so it is numbered as 2. The specific values are as follows:
Associative Arrays
Arrays are usually accessed by using the element numbers. But what about an array that has a dozen or more elements? It can become difficult to keep track of what data is in which element. Instead of numbering the elements, we can name them. For instance, look at the following code:
This list could continue on quite a while. If an element needed to be referenced, it would be done the same way. If we were to output a sentence with the name, height and weight, it would look like this:
The output is:
Functions
Functions are sections of reusable code that can be run as many times as needed. Functions can be very helpful when using forms.
What About Forms?
Forms are useful in XHTML to create an input box and get some type of user input. An example would be to ask for a name. Buttons can also be added to select when the information has been entered.
The form is part of XHTML code and is not placed in the <script> section. Let’s look at the following code:
After the form is started, Your Name: is printed followed by a box for input, which allows for text to be typed into it. The next line has a button that is labeled Done. Once the button is clicked, a function called validate is processed. In most cases, these functions will process the data within the input box to verify the contents. We’ll cover other form styles later in this chapter.
So if we use a form to ask for a name, we can call a function to perform a task on the input data. In most cases, a <script> tag is placed in the <head> section of the XHTML file. Within this section is where functions are placed. Functions can also be placed within the <body>, but sometimes it is easier to keep the code simpler by moving the functions out of the main script sections within the <body>.
Let’s make a simple function to check the name typed in the form. First you start with the word “function” followed by the function name—in this case, printdata. Anytime a function is made or referenced, it must be followed by parentheses. The function statement is ended with an open curly bracket ({), or brace, to show the beginning of a section of code that belongs to the function. Once we have included all the code for the function, we end it with the closing brace (}). So far we have:
Now, to print out the data in the input box, we must be able to access the form. The forms are treated like arrays. The first form in a document is forms[0]. In the previous example of a form, there were two elements: the input box and a button as shown in Figure 9-4. The input box is elements[0] and the button is elements[1].
Since the form is located on the display, it is accessed as part of the document. To access the data in the box, the code would be document.forms[0].elements[0].value. We can write out the data as shown in the following code:
Similar to associative arrays, objects can be given names and accessed with those as shown:
The function would look like:
You’re probably still wondering about the parentheses. The parentheses are used to pass parameters to a function. For instance, if we were writing JavaScript code and occasionally we needed to know what value a specific variable contained, we could do it with a function. An example is shown:
Within the coding would be a line such as:
This would pass control to the showdata function, passing the variable count to the parameter data. Inside the function, the alert would be performed with the count variable.
What Is the Alert?
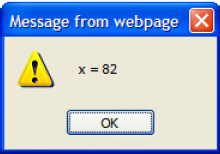
Instead of printing information to the screen, you can have a box pop up with information in it. The data placed in the parentheses can be variables or literals. The alert box will appear with the specified data printed in the box and include an OK button. Once you click the OK button, the box disappears.
This is a quick and easy way to display data without cluttering your display and messing it up if you are trying to produce a specific layout.
An example of an alert box is shown in the following illustration from the code:
Keep in mind that is useful from a coding standpoint. You should use this when you need to check variables from the interface you use to check your JavaScript code. Alerts do not work on some EPUB reading systems. The document.write also will not work correctly on some EPUB reading systems.
NOTE
Similar to the comment lines used in HTML and XHTML file extensions, document.write works in files with the HTML extension and not XHTML. The files can be written in the same manner—just rename the file extension.
You may wonder why I have even covered these details. Some of your code should be tested before you place it into an EPUB. You can test your code in Notepad++ and then copy the code to Sigil, making sure the comment marks are in place. Once you know it all works, then you import the EPUB into Readium. Readium is a good tester for EPUB 3 files.
Multiple parameters can be passed. Any function can have zero to infinite parameters. For example, you could create a function with three parameters as shown:
Of course, this function would be called in the same way as a function with one parameter. If a parameter is not needed, it can be left blank. For example, to call the previous function with a value for count1 and count3, the code would be:
Return
Some functions may not simply perform tasks on data, but are used to perform calculations and return data that represents the calculations. For instance, to create a function to convert Celsius to Fahrenheit, you would use the following code:
The parameter is passed to the function as Celsius. The variable is then used in the equation; it is multiplied by 1.8 and then 32 is added to the result. The value is placed into the variable temp that is then returned to the statement that called the function. The calling statement is:
You can see that the function’s result is placed in the variable called C. The variable C now can be used with an alert or a document.write. The value held in C is 113.
Global and Local Variables
Variables can be used in a program as a whole or specifically in functions, depending on where they are created. If a variable is declared, or defined, within a function’s braces, it only exists within those braces. In this case, the variable is a local variable. It only exists locally within the function itself.
If the variable is declared outside a function, it can be used anywhere, even within the function. These variables are global variables since they can be accessed throughout the program. Take the following example:
The output would be:
The first two lines (Global: 56 and Local: 7) are from within the function. Inside the function, the global variable should still be set as 56. The local variable was set to a value of 7. Outside the function, the global variable is still 56. The local variable outside the function is set to 1 as shown in the last two output lines.
Objects
Objects are data types that you can create yourself, as well as properties and methods for those objects. Let’s make an example object and look at it in detail:
We now have an object called book, which has four holders. The object has four properties: title, isbn, author, and year. Since the name of “this” is used, it is replaced with the value attached to it, as shown:
Now the object is created and we have an object with four properties: epub.title, epub .isbn, epub.author, and epub.year. These can be accessed and changed as needed throughout a program.
We can create multiple objects with different names, such as adding one to the object we previously created:
Now we can access the two together in JavaScript:
Objects can also be created in the following manner:
Methods
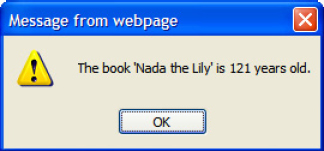
Methods can be created for objects that perform some task on the object’s data. For instance, if we wanted to compare the age of the books by the publishing date, we would use the following code:
With all the code put together, the alert is shown in Figure 9-5.
Figure 9-5 Alert from object
Methods can be made to perform many different tasks on the object for which it has been created.
Conditions
Conditions are statements that are used to test something. The test can compare the data in a variable to another variable or a specific value. There are three types of conditional statements: the if statement, if-else statement, and the switch statement.
if statement
The if statement compares one or more values to another value. Depending on the result, certain tasks are then performed. For instance, the value in the variable count can be tested to see if it is less than 5 as shown:
If the value of count is less than 5, the code within the braces is executed. If the value of count is greater than or equals 5, the code in the braces is skipped. The code in the braces can be one or more lines as needed, based on the condition.
NOTE
The comparison section must be in parentheses. If the comparison is not in parentheses the if statement is skipped or generates an error.
Instead of comparing count to a number, we can compare it to another variable as shown:
Literals can also be used to test for a certain value:
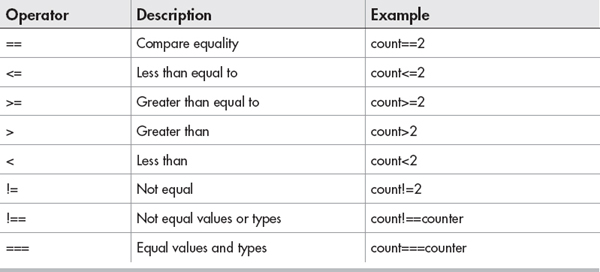
Initially, you may be wondering about the double equal signs (==). If one equal sign is used, we are assigning a value to a variable. Two equal signs are for comparison or to test if they are the same. Table 9-2 shows a list of comparison operators.
Table 9-2 Conditional Operator Types
The last two lines in Table 9-2 may seem a bit confusing. Values can be equal, in a sense, even when the two variable types are different. For example, if we set one variable to 2 and another to “2”, they would be different types as shown:
 var counter=2; //type is numeric
 var count=“2”; //type is string
If we use the === operator, the value would be false when comparing the two. The first is a numeric variable, and the second is a string variable since it is in quotes.
If we compared counter to count using the double equal signs (==), the result would be true. Why? When two variables are compared and one is numeric, the other is converted to numeric before they are compared. So the following statement would run the code in the braces:
It is possible to place one if statement within another. This is called nesting. Say, for instance, we wanted to check if the value of count is between 5 and 10. We would use the following code:
In this example, count is set to 7. The first if statement checks to see if count is greater than 5. Since the statement is true, the code in the braces is executed. The next line tests that count is less than 10. The condition is also true and causes the code in the braces to run, which creates an alert. If either if statement were false, the alert would not have been excuted.
Statements can become difficult if they are nested too deeply. To help ease this problem, we can create one if statement using special operators, as shown in Table 9-3.
Table 9-3 Logical Operator Types
As shown in the previous example, we are testing that the value in count is greater than 5 and less than 10. The code would look like this:
Now the count value can be tested on one line to see if it is between 5 and 10. Notice that the condition sets are each enclosed in parentheses while they both are enclosed in one as well. The conditions must always be within parentheses even if there are ten or more items being tested on one line.
AND Using the AND operator tests that both conditions are true on either side of the &&. If someone asks for a pen and paper, you give them both a pen and paper. The AND requires that both sides be true. If either side of the AND is false, then the whole statement is false. If you give someone a pen and no paper, it cannot be what they needed: a pen and paper.
OR The OR operator tests to see if either statement is true. If one or both statements on either side of the OR (||) are true, then the whole statement is true. An OR statement can only be false if both statements are false.
NOTE
The | key is above the enter key on the keyboard and under the backspace key.
If someone asks for a pen or paper, you can give them a pen, paper, or a pen and paper. Each of these would be true for the statement given. The only way it could be false is to give them a pencil or some other type of writing instrument or material to write on.
NOT The NOT operator is used to change a true statement to a false one and a false one to a true one. For example, if someone does not want a pen or paper, they do not want pen, paper, or pen and paper. Basically, figure out what value the comparison would be and change the answer to the other one, true to false and false to true.
The statement is true since count is not greater than 5 OR count is not less than 10. Count is set to 2, and the first condition is true, while the second condition is false. The condition is now true since the AND was changed to an OR. In most cases, changing an AND to a NOT also requires it be an OR.
if-else statement
The if statement allows code to be executed if the condition is true. What if code should be executed when the statement is true as well as when it is false? That is where the if-else statement is needed. The code looks like this:
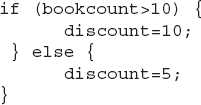
Now we can perform different tasks when the condition is true or false. For example, if we sold books, giving a discount of 10 percent for those who bought more than ten books, but only 5 percent for all others, the code would be:
Switch
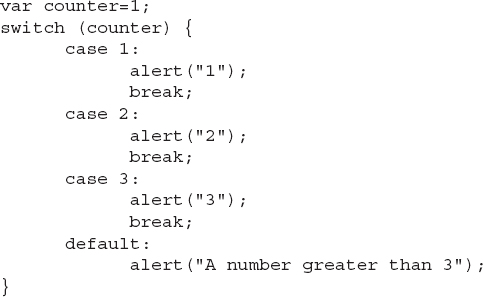
A switch is a set of possible conditions. An example is shown:
In this example, we are testing the value of counter, which is initially set to 1. When the switch condition is checked, we are looking at the value of counter. The first section is where it is equal to 1. In this case, it is true, so the alert statement is performed, followed by the break statement. The break statement causes control to exit the switch; otherwise, each statement would be checked. The default statement is executed whenever the other values are not performed. If you did not break out after a true statement, then the default section would be performed as well. The default section does not need a break since it is the last section anyway. One could be used, but it is not necessary. If, for any reason, the switch value could be something other than the values listed, use a default section.
Loops
Loops are used to perform a set of code over and over for a specified number of times. There are three types of loops, and any can be used, based on personal preference.
For Loop
The for loop is used to run code a specific number of times. A counter allows you to specify a starting count and an ending count. If needed, you can break out of the for loop when certain conditions are met. The counter also allows you to specify a counting increment for each loop. The syntax is as follows:
To add the numbers 1 to 10, for example, use the following code:
The value of sum is 55 when done. The loop starts with x = 1 and continues while x <= 10. When x = 11, the test condition fails and the for loop ends. During each loop, the value of sum, which starts at 0, is incremented by the value of x (sum += x). At the end of each loop, x is incremented by 1 (x++).
Any number of lines of code can be placed between the braces. When a certain condition is reached, you can use a break statement to exit the for loop. There is also a continue statement that skips the current for loop iteration and begins the next, such as:
The answer is 25. The added if statement checks whether the value of x is divisible by 2. If x divided by 2 has no remainder (x%2==0), then the iteration is skipped and the sum is not incremented. Only the odd values are incremented into sum.
While Loop
The while loop specifies a condition and processes the loop over and over until the test condition is returned as false. For example:
The difference between the while loop and the for loop is that you must initialize and increment the counter.
By using the while loop, the condition is tested before the loop is run. If the condition tests false, then the loop is not executed.
Do While Loop
The do while loop is similar to the while loop, except that the loop is executed once before the condition is tested, as shown:
Here the test condition is not examined until the loop has completed one time. If the value of count were set to 11 at the beginning, the loop would execute once.
Events
When certain things happen in an EPUB, then certain code can be run. The things that occur are events. Various events can be used, which are listed in Table 9-4.
For instance, consider a form with an input text field and a button on a page as shown:
Let’s look at this line by line. The first line shows it is a form. The action specifies what page is loaded when the form is submitted. The (action=) method determines how data is sent to the referred page. The get method sends the data appended to the URL. The post method sends the data in the header. When the form is submitted, the validate() function is run, and the value returned from it is returned to the submission. The form is submitted if the onsubmit returns a true value.
The second line generates a text box (type=“text”) with an initial value of null (value=“”). When the data is sent in the URL, it will be sent with the name txtname—for example, ?txtname=Grant in the URL since it uses the get method.
The third line is a button, labeled Start, that is used to submit the data to the action page.
Another example involves the onload event, which is placed in the <body> tag as shown:
When this page is loaded, the function fillIn() is executed. The function can help place JavaScript data within the displayed page. This is covered next in the “Example Functions” section. Also, check the sample file c09-04.epub.
Example Functions
There are many useful features in JavaScript that can assist you in EPUB. One involves passing data from one page to another and the ability to retrieve the data for use. A second is the ability to print data from JavaScript to the display to be included into the EPUB.
Passing Data
To pass data from one file to another when it is loaded is tricky. The first method demonstrates some commands in JavaScript, but the second method that will be discussed is often easier.
First Method We previously covered the get method used in forms. This method provides a means to place form data in the URL. What can be done with the data in the URL? We can retrieve the data and allow it to be passed from one page to another. An example is given in c09-04.epub of a personalized book. On the first page, the reader enters their name. The information is passed on to the next page and then the next. The name is substituted in place of the character’s name in the book. This is a short example, but it shows a lot of different techniques.
NOTE
Keep in mind that this example is just demonstrating JavaScript code. The method does work, but on EPUB devices, the data would be lost when a reader goes back a page.
Now to get the form data from the URL. JavaScript has a special built-in function called window.location.search. The command retrieves the data, called a query string, and places it in a variable as shown:
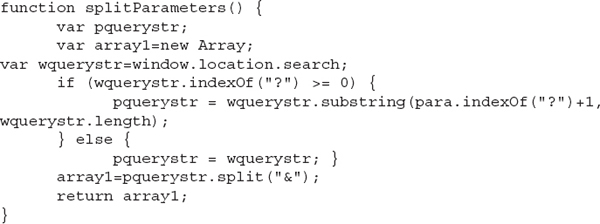
Once the string is retrieved, we can manipulate the data to get the information we need. We can use something similar to the following:
To use the function, we create an array and then execute the function as shown:
The function first creates a variable (pquerystr) and an array (array1). Then, the variable pquerystr (part of query string) is created and the query string is retrieved and placed into wquerystr (whole query string).
The wquerystr is checked for the value of a question mark, which should be the first character (wquerystr.substring(“?”)). If the question mark is found, then the section of the wquerystr where the question mark is located is moved one over to the right (past the “?”). The rest of the string is taken and placed into pquerystr. If the question mark doesn’t exist, then all of the query string is placed into pquerystr.
The next line (array1=pquerystr.split(“&”);) is used to look through the pquerystr and find the “&” that are used to separate the data values. Once split, the values are placed into array1 and returned back to the calling statement, where the contents of array1 are placed into listOfData.
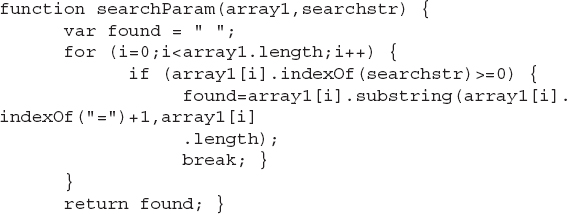
To retrieve the needed values out of the array, we can use the following function:
In this function, we pass the array from the previous function (listOfData) and the search string we are looking for in the query string. For example:
Here we’re looking through the array listOfData and looking for the query data of txtname. The data connected to the text box named txtname, if found, will be placed into the variable readerName.
The variable found is created and a for loop is performed starting at 0 and iterating through the number of elements in the array (array1.length). The array is checked one element at a time to find the searchstr. Once found, it retrieves the information after the equal sign and places the data in found. A break is used to exit the loop, and the value in found is returned and placed into readerName.
Second Method The second method used to pass data is similar to cookies. To set up this ability, you need to use the following code:
The code can be placed on the form load event to start the storage of data and initialize the data elements. The elements can be set up as blank and when the data is received, it can replace the existing stored data.
For instance, if we retrieve a value for txtname, we can place it in storage as shown:
Now that the data is stored, it can be retrieved from any page within the EPUB by using the following command:
Be aware that when using the setItem or getItem method, there are two parameters for setItem and one for getItem. The two for setItem are the key and its value. The key is the name used to keep it separate from the other elements. With getItem, the key is the only parameter and is used to retrieve the specific element.
See the sample file c09-05.epub for an example of using the storage method to pass data between pages.
Printing Data to the Screen
You should have seen this procedure in the sample files c09-05 and c09-06. Here is an example and the details:
In this case, the data is retrieved from storage and placed into the variable called uname2. The second line finds in the document an element with an ID of “name.” Inside this element (innerHTML) with a matching ID, the contents of the variable uname2 are placed.
The HTML code for the placement would appear as:
As long as the variable uname2 contains some data, the data will be placed into the <span> element.
One line must exist with innerHTML for each insertion ID. If you have an innerHTML line that points to a nonexistent ID, errors will occur. Since most reading devices do not show an error but try to continue, other insertions may not occur.
External JavaScript Code
Instead of placing all of the JavaScript code into the XHTML file, you can create an external file of your most-used functions. Once the file is created, you add it to the Misc directory in Sigil and add a link to it as shown:
Other functions and code can be placed after the line before the end script (</script>) tag. With the external files imported in with this command, it works just as if the functions were located in the XHTML file.






 addNum = 125
 subNum = 75
 multNum = 2500
 divNum = 4
 modNum1 = 0
 modNum2 = 1









 var counter=2; //type is numeric
 var count=“2”; //type is string


