Although it is ultimately the images you produce that count the most, achieving that end result is often easier if you’re using the right kit. For that reason, there’s a whole host of manufacturers out there who are looking to ply you with “must have” accessories to aid your photography. In many cases, these are indeed useful add-ons that will broaden the scope of what you can do with your camera, but these “little extras” can quickly become expensive when you start adding the costs together.
This chapter takes an alternative approach to the “buy, buy, buy” mentality and looks at ways of maximizing your equipment options by making your own. Sure, the end result is not always as refined or pretty as a commercial alternative, but at a fraction of the price it’s often hard to complain.
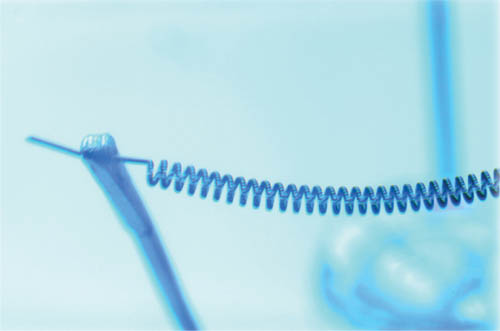
A camera strap is pretty much taken for granted if you want to take an SLR camera or CSC out and about and have it ready to shoot at a moment’s notice. However, the traditional attachment method—two eyelets on the top of the camera—can get in the way at times, especially with digital cameras and their numerous control points. A camera sling alleviates this problem by attaching to the bottom of the camera, utilizing the tripod mount to keep the strap out of the way of your buttons and dials. Worn diagonally across the body, from shoulder to hip, it can also make carrying your camera more comfortable as well.
• Strap from laptop bag, camera bag, or similar with rotating metal ends
• Small right-angle bracket/corner brace
• 1/4-20 UNC bolt (approx. 1/2-inch long)
• 1/4-inch or 6.5mm drill bit
• 1/4-inch washer (optional)
• Thread-locking fluid (optional)

1
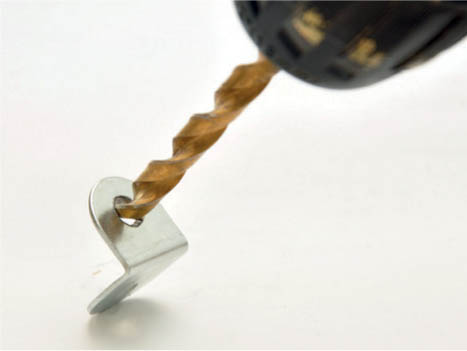
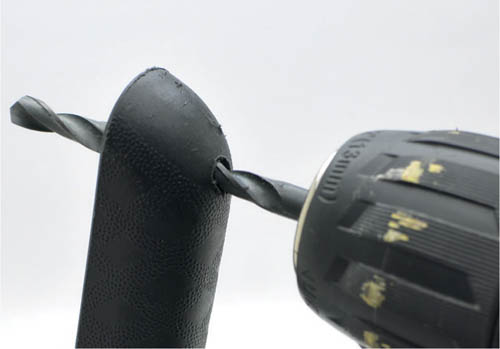
Start by checking that your bolt will fit through one of the holes in the angle bracket. If it doesn’t, use your drill with a 1/4-inch or 6.5mm drill bit to enlarge the hole. Make sure that the bracket is clamped firmly while you drill it, and don’t forget your eye protection—a metal shard in the eye isn’t fun!
2
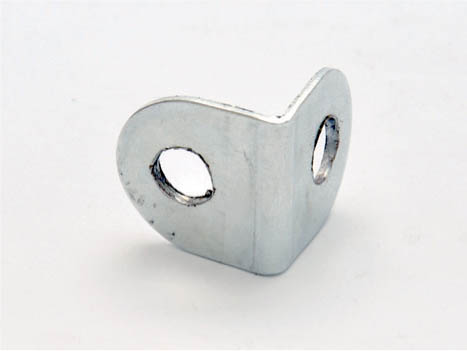
With the hole enlarged for the bolt, check that your strap will fit the other hole in the angle bracket. You only need to make sure that one of the strap’s clips fits the hole, but if it doesn’t (or doesn’t fit comfortably) you’ll need to reach for your drill again. Take your time and use a slow speed setting to keep the friction (and heat) to a minimum—this will help extend the life of your drill bit.
3
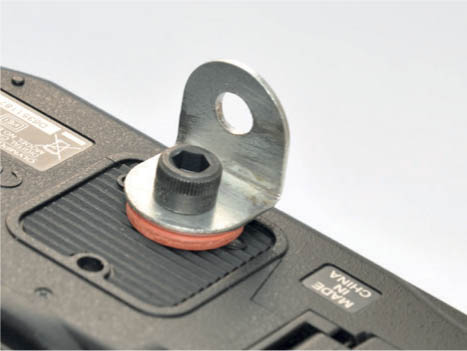
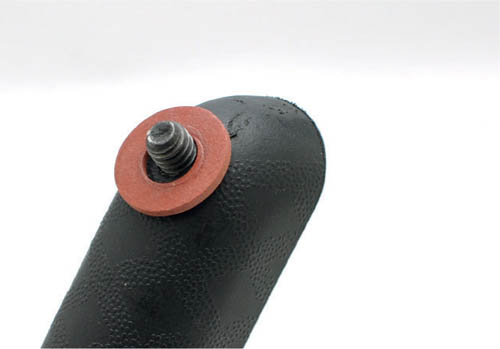
Once your angle bracket is cool enough to handle, you can put your sling together. Start by bolting the angle bracket to the tripod socket of your camera, using a washer between the bracket and camera if you want to. I’m using a fiber washer here, simply because I had a stash in my workshop. You can also use thread-locking fluid on the bolt to make sure it doesn’t work itself loose.
4
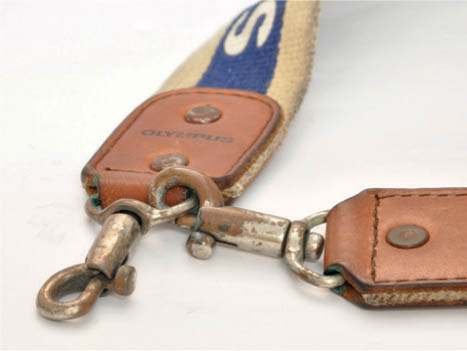
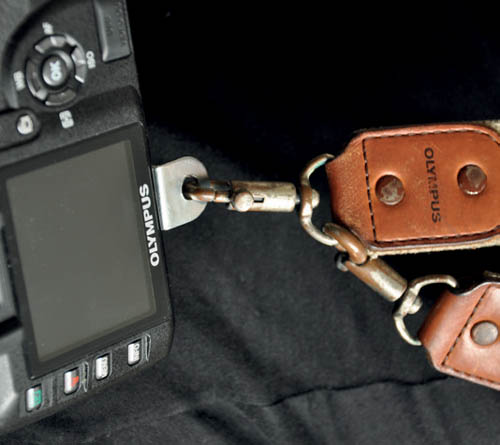
Attach one end of the strap to the other to create a loop (I’m using an old-school Olympus camera strap for this project) and then clip the free end of the strap to the angle bracket on the camera. Adjust the length of the strap so your camera sits comfortably and you’re good to go!
All small-format cameras (film and digital) use a 1/4-inch UNC tripod thread with 20 threads per inch. If you’re looking for a suitable bolt, this is often written as 1/4-20 UNC, followed by the length of the bolt.
Use a strap with metal and not plastic ends. Metal is much stronger so will increase the longevity of the sling.
A camera sling can also be used with a compact camera. This is more convenient than the wrist strap this type of camera often comes with.
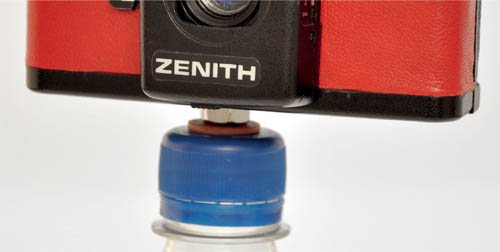
A tripod is great for holding your camera steady, but if you’re using a compact camera rather than a full-blown SLR kit—and you mostly want to “point and shoot”—then it’s not something you want to take out with you, especially if it’s big and bulky. Even a portable “travel tripod” can be overkill on a casual night out. However, this doesn’t mean you have to rely on steady hands to keep your low-light shots sharp—in just a few minutes you can transform the cap from a regular soda bottle or water bottle into a drop-it-in-your-pocket, go-anywhere compact camera support.
• Bottle cap from a soda or water bottle
• 1/4-20 UNC bolt (3/4-inch long)
• 1/4-20 UNC nut
• 1/4-inch washer (optional)
• 1/4-inch or 6.5mm drill bit
• Craft knife
The bottle cap you use to start with will determine how versatile your bottle cap ’pod is: Some caps will fit a wider range of bottles than others, so choose carefully to start with. If in doubt, pick a “big brand” soda that you can get from almost any store, or consider making more than one ’pod cap using different sized caps.
A bottle cap ’pod won’t be strong enough to support an SLR camera, and long, heavy lenses can also create problems with balance. However, it’s a great solution for a compact camera or lightweight CSC and lens.
1
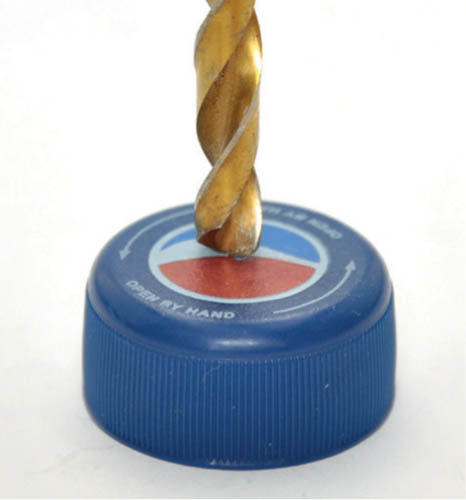
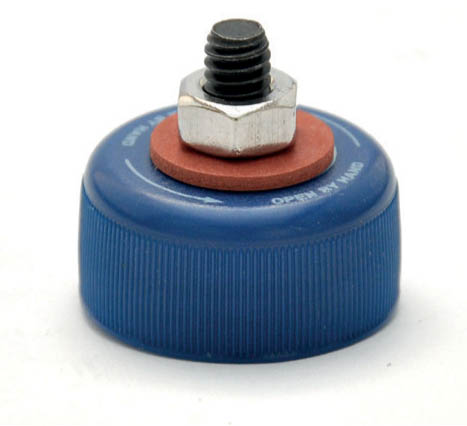
The first step is to grab your drill and make a hole in the center of the cap, going all the way through. Most bottle caps have a molding mark on the outside at the center of the cap, which is great because you can use this as a mark to aim your drill. Use your craft knife to tidy up the edges of the hole if there’s any ragged plastic.
2
Slide your bolt through the hole from the inside of the cap and fit the washer (if you’re using one), followed by the nut. I’m using a 3/4-inch long socket cap bolt and a fiber washer for my bottle pod.
3
Tighten the nut until you’re happy everything’s secure, and that’s it done! All you need to do when you want to use it is to buy a bottle of soda or water, swap the regular bottle cap for your bottle cap ’pod, and attach your camera. A full bottle will provide a surprisingly stable support that’s perfect for low-light shots in a bar or club, or simply when you’re out and about.
We all know how important it is to hold your camera steady when you shoot. It doesn’t matter if you’re shooting still images or recording movies, a camera that’s moving around isn’t likely to produce great material: still images will likely be blurred due to camera shake, while video footage can bounce around and make your audience nauseous. The traditional method for holding your camera still—beyond good camera technique—is to mount it on a tripod, or use a monopod or beanbag as a support, although in-camera image stabilization can also help if you’re shooting handheld.
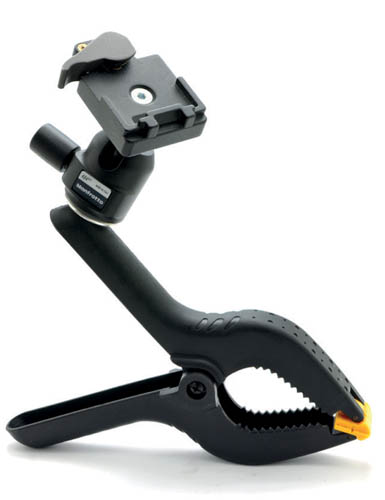
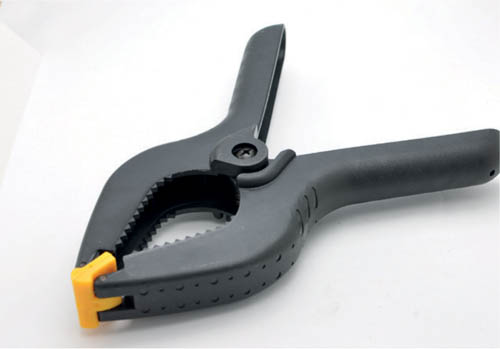
These are all great options, but they are not always that practical or versatile, which is where this project comes in: the quick clamp. Utilizing a large clamp, we’re going to produce a lightweight camera mount that can be attached to railings, tree branches, or any number of other objects, to guarantee rock-steady images or video footage.
• Large plastic clamp
• 1/4-20 UNC bolt (1/2-inch long) and washer
• Mini tripod head (optional)
• Drill with 1/4-inch (6mm) drill bit
The heavier your camera is, the more robust the clamp you use will need to be. The 8-inch clamp used here will hold a digital SLR and standard zoom lens, but a lighter clamp would be OK to use with a point-and-shoot camera.
1
The main ingredient for this project is the clamp. I’m using the sort of heavy-duty plastic clamp that can be found in a dollar store or hardware store: I got a pack of 12 mixed sizes for under $10, including two of these giant, 8-inch long versions.
2
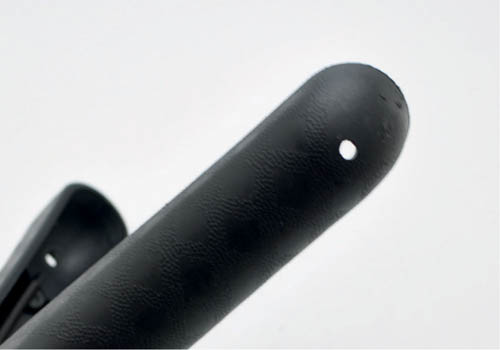
Take your drill and make a 1/4-inch hole at the top of one of the handles, near the end. I lucked in with this clamp: it already has a pair of small holes in the right place on each handle, so I just needed to make one of the holes larger. Because you’re drilling plastic, this is pretty quick.
3
Next, fit your 1/4-20 bolt through the hole from the “inside” of the handle, and put the washer on the outer side. If you want to, you can attach your camera directly to the bolt at this stage—just use more washers to act as spacers between the camera and grip if you need to shorten the thread of the bolt.
4
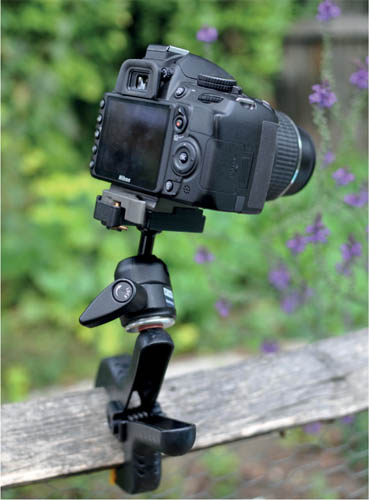
Alternatively, attach a mini tripod head instead of your camera. You can often pick up small tripods in yard sales or thrift stores for a couple of bucks—just make sure the head can be removed; is working; and has a 1/4-20 thread to attach it to the camera (some use a larger 3/8-inch thread).
5
With the head in place, you’re good to go: just attach your camera, clamp it to a suitable and convenient object (think railings, tree branches, or anything similar to these), and you’re guaranteed rock-steady images or video footage.
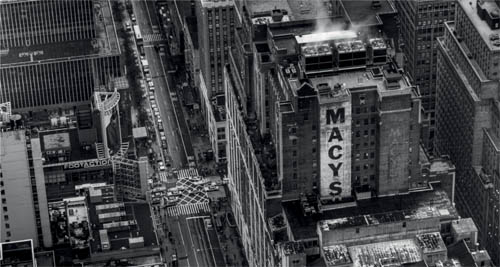
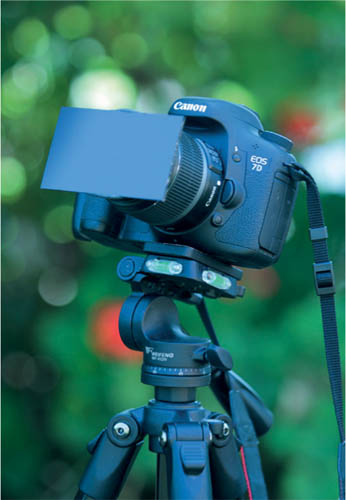
A quick clamp is ideal in the urban environment, especially in places where a tripod wouldn’t be practical or allowed. In this example I used it to support the camera while I shot an HDR exposure sequence.
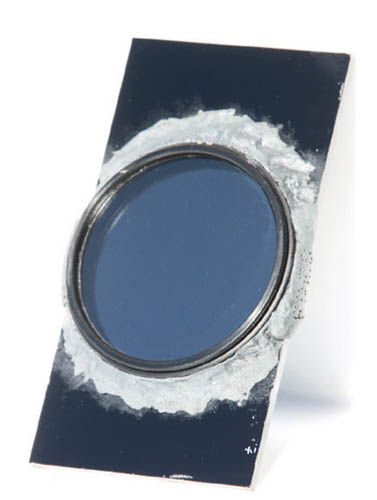
By increasing your exposure times a neutral density (ND) filter can create incredible results, but they can be expensive, especially if you want to start stacking more than one filter for extreme exposure extension. However, if you have a spare screw-on UV filter (or filter adapter ring) and some strong adhesive, you’re already 2/3 of the way to creating your own “Super ND” filter: all you need to add is a piece of welding glass.
As with regular ND filters, welding glass comes in different strengths, known as “shades:” the higher the shade, the less light passes through. A shade 10 welding glass is a good starting point for this project, as it will reduce the amount of light entering your camera by approximately 14 stops. You can get replacement welding glass from most welding supply stores, or online, and it should cost you no more than a few dollars. The only downside here is that you’re going to have to work on your images to get the color right: welding glass isn’t “neutral.”
• Replacement welding glass
• UV screw-fit filter (or filter ring adapter)
• Adhesive putty
To transform your welding glass into a filter, you will need a UV screw-fit filter (or a filter system adapter ring) that matches the diameter of your lens, and some solid-setting adhesive putty. Give the welding glass a thorough clean in a solution of warm water and washing-up liquid, and allow it to dry before buffing it with a lens cloth. Then, simply use the adhesive putty to stick the welding glass to your filter (or adapter ring), working it around the edges to make sure you prevent any light leaks. Allow this to cure overnight and your super ND filter is ready for action!
The basic method of using your Super ND filter is no different to using a regular photographic ND filter. Start with the filter off the camera, so you can see as you focus and compose the shot. Then, select your camera’s Bulb mode and the aperture you want to use, and make a note of the meter reading given by the camera. Set the lens to manual focus and hold the barrel still while you screw on your Super ND filter.
Now comes the tricky bit—determining the exposure. Assuming you’re working with a shade 10/14-stop filter, work out roughly how long the shutter will need to be open based on the initial exposure reading. For example, if the meter reading is 1/30 sec without a filter, a 14-stop increase would extend this to approximately 500 seconds (roughly 8–8 1/2 minutes).
It goes without saying that you need to make sure the camera is steady for the duration of the exposure. A tripod is essential and it must be on a solid surface. To hold the shutter open for what could be several minutes, set your camera to Bulb and use a remote release. You could hold the shutter-release button down manually, but this is likely to cause movement during the exposure. When you have finished, look at the LCD and histogram to determine if you need to adjust the exposure time and reshoot.
A major problem with long exposures is digital noise, and the longer the exposure, the more noise you will see in your final image. It is much better to shoot Raw files and apply noise reduction when you convert your images, rather than employing in-camera noise reduction and shooting JPEGs.
Welding glass produces a strong green tint. You can try to counter this using your camera’s automatic white balance setting, or by creating a custom white balance, but it’s likely that you will need to use your editing software if you want to get an image with relatively natural colors. Adding magenta to your image will usually help balance it out, although you may also need to adjust the color temperature to get a more realistic hue. Shooting Raw makes this a lot easier than shooting JPEGs.

Your super ND filter can extend your exposures considerably: A shade 10 welding glass will reduce the amount of light reaching your sensor by 14 stops.
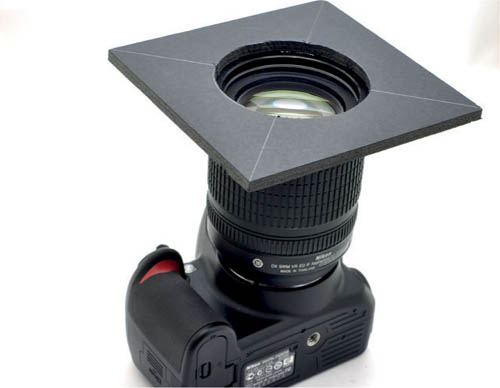
You can have the finest lens on the planet, with the very best coatings, but it’s still guaranteed that if light strikes the front element at a certain angle you’re going to suffer lens flare. In the past, you’d simply fit the lens hood that came supplied with your lens and that would be that, but today it’s not quite so straightforward: some manufacturers don’t include caps with all of their lenses; the long focal length range of some zooms makes the supplied lens cap all but redundant (the negligible shade provided at the wide end becomes wholly ineffective when you zoom in); and, of course, lens caps get broken and replacements are expensive. Yet all it takes is a sheet of black foam board, some hook and loop fastener, and a filter system adapter ring, and you’ve got all the ingredients you need to start building a bespoke lens hood “system.”
• Black foam board (1 x 11 x 14-inch/A3 sheet)
• Pencil
• Pair of compasses
• Hook and loop fastener
• Filter system adapter ring (see Tips)
• Glue
Use a filter adapter ring that matches the largest diameter lens in your collection, and fit stepup rings when you want to use it with smaller diameter lenses.
A five-inch square/125mm mount is ideal for wide-to-standard focal lengths, but for telephoto lenses you may want to reduce the size to prevent the shade from becoming overly long.
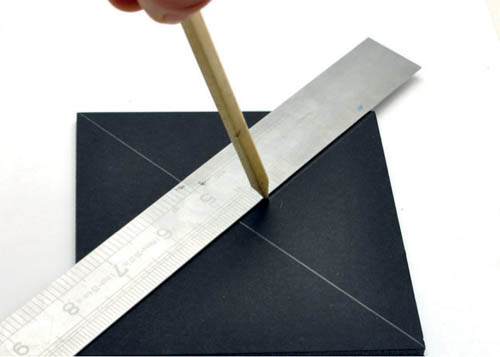
1
Start by cutting a five-inch/125mm square out of your foam board and marking its center. You can find the center by drawing a line diagonally from corner to corner: the point at which these lines intersect is the mid-point.
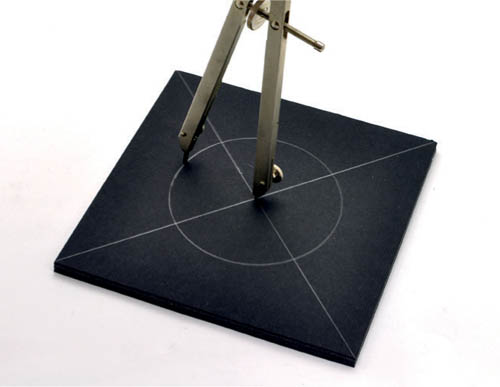
2
Take your pair of compasses and set the legs so they are slightly wider apart than the radius of your filter adapter ring (here I’ve set the compasses to 35mm for a 67mm filter ring). Draw a circle that is centered in your square piece of board and cut this circle out. Attach your filter ring to the camera and hold your black square of board against it, so that the top of the square is level. Make a pencil mark on both the board and filter ring so you can realign them at the next stage.
3
Stick the filter ring to your foam board square using double-sided tape. Centering the ring on the hole you just cut out, and align the marks you made in the previous step.
4
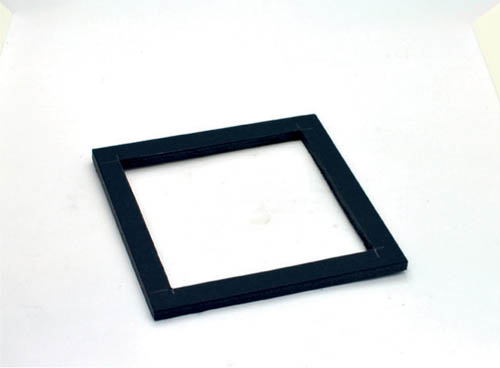
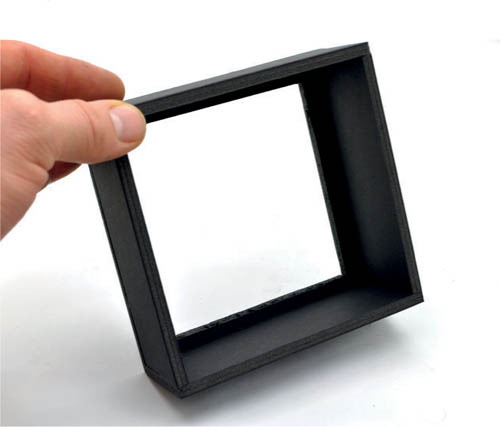
Cut another five-inch square out of your foam board, and then cut a four-inch square out of its center so you’re left with a 1/2-inch wide frame.
5
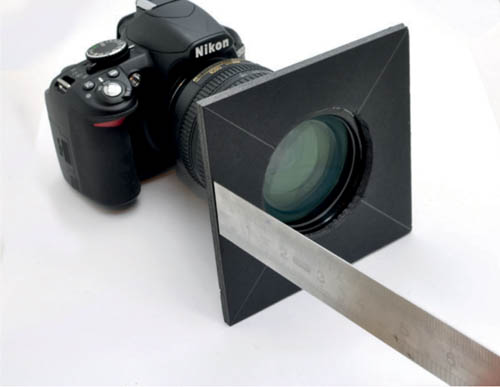
Now you can make the hood itself. You need to know the optimum size for this, so mount your filter ring (and square black board) to your chosen lens and hold a ruler at the left (or right) edge of the board, pointing directly forward. Look through the viewfinder and slide your finger along the ruler until it enters the frame: that is roughly the size you want to make the sides of your lens shade.
6
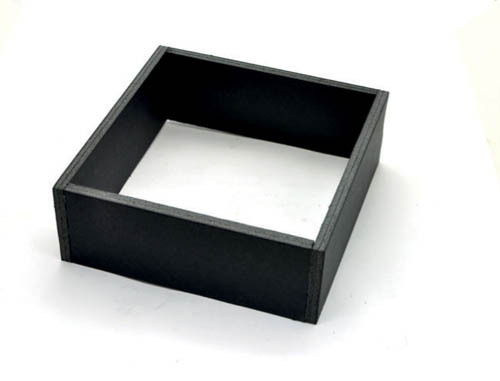
Cut four rectangles of foam board measuring five inches multiplied by the measurement you noted above (here two inches) less around 20%. Once cut, trim two of these boards by a measurement that is equal to double the board’s thickness (so trim off 3/8 inch if you’re using board that’s 3/16 inch thick, for example). This should be cut from the five-inch side of the rectangle, just so that there aren’t any gaps when you join the sides together. Once cut, stick the four rectangles together to form a five-inch square box.
7
Glue your box to the 1/2-inch frame to create your “shade,” and attach this to the filter ring mount using a tab of adhesive hook and loop fastener in each corner. Your hood is now ready for action!
The reason for making the frame and attaching the shade with hook and loop is simple: If you want to make a shade for another lens, you can simply repeat steps 6–8 and use the same mount.
For zoom lenses, consider making separate shade units for different focal lengths: with an 18–105mm lens you might want to make shades for the 18mm, 50mm, and 105mm focal length settings, for example.
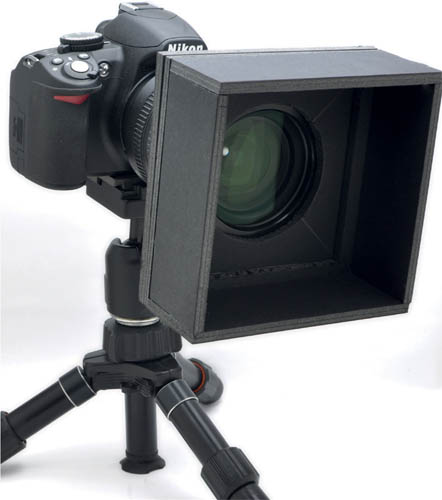
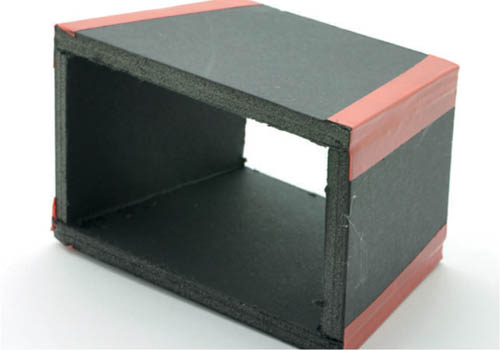
Although digital cameras have been around for a good 20 years now, and the technology has snowballed into the high-end cameras we have today, there is one area that hasn’t changed that much: the reflectivity of the rear LCD screens. To be fair, manufacturers have a tough challenge: the screen needs to be protected from harm (clear plastic is the obvious choice), but as soon as light strikes this from an angle it becomes nearly impossible to see the image or shooting information on screen. As a result, a whole raft of supplementary screen shades is available, ranging from cheap, simple shades, through to remarkably sophisticated units. Alternatively, you can simply make your own, using foam board or thick card. As an added bonus, this design also includes a “flip-up” magnifier for checking the screen more closely.
• Black foam board or thick card
• Glue
• Craft knife
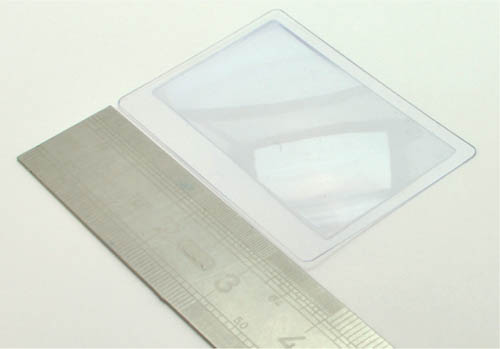
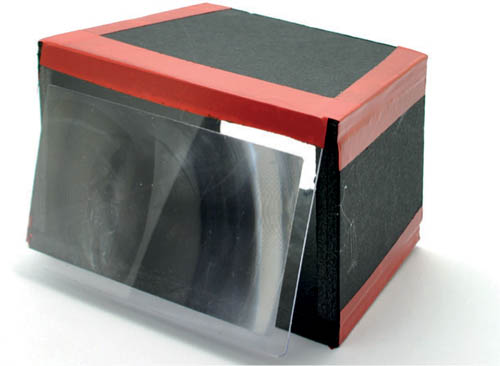
• Credit card-sized magnifier
• Electrical tape
• Adhesive putty/sticky tack
Credit card-sized magnifiers are readily available via eBay for less than $1 each, although it’s purely optional: you can use the shade without one.
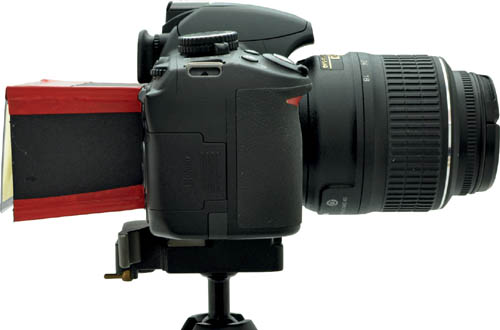
There are countless ways that you can attach the shade to your camera if you feel sticky tack is not strong enough. Hook and loop fastener is one option, and tape is another. Alternatively, elastic bands can be used to hold the shade in place, so experiment to find the one that works best for you.
1
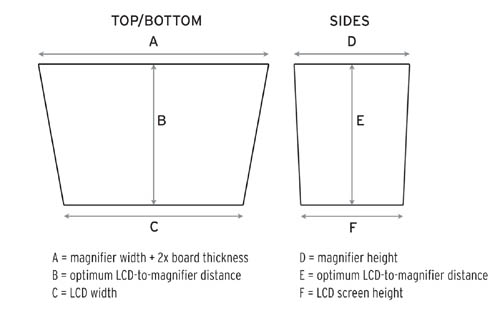
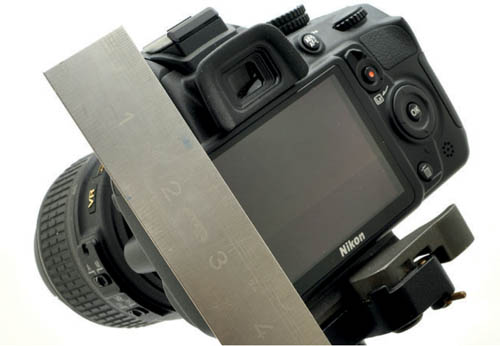
The first step is to measure your camera’s LCD screen. Take a measurement for the top or bottom and one of the sides, and make a note of both so you know the size that the base of your screen shade needs to be.

2
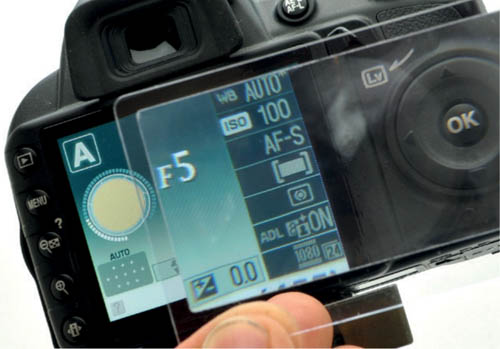
You also need to know how deep your shade should be. Switch on the rear LCD screen and hold the magnifier up to the screen. Move it slowly away until the image becomes unacceptably soft, then start moving it closer until you find the “sweet spot” in terms of focus. At this point, measure the distance from the screen to the magnifier and make a note of it.
3
The third and final measurement is of the magnifier itself. You will again need to make a note of the width and height measurements.
4
Armed with your three sets of measurements you can draw out the sides of your shade on your foam board, using the accompanying template as a guide. Note that you will need to add twice the thickness of your board to the top and bottom screen measurements.
5
Once drawn, cut out your panels with a craft knife and assemble them as shown, gluing the joints. You could also tape the edges to tidy them if you wanted to.
6
Use a strip of electrical tape to form a hinge that attaches the magnifier to the top of the shade. This will enable you to flip the magnifier into position when you want to use it, but also to flip it up and out of the way when you just want to use the shade on its own.
7
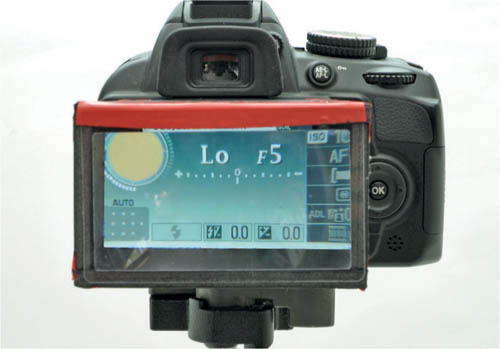
Finally, you need to mount the shade to your camera. By far the easiest way to do this is to use a sticky tack adhesive putty: a blob in each corner of the shade will be enough to hold your lightweight shade on the camera.
There are numerous tools that you can use to enable you to photograph small subjects, ranging from relatively inexpensive close-up lenses that screw to the front of a lens in the same way as a filter, through to dedicated macro lenses or reversing your lens so you shoot through it “back to front.”
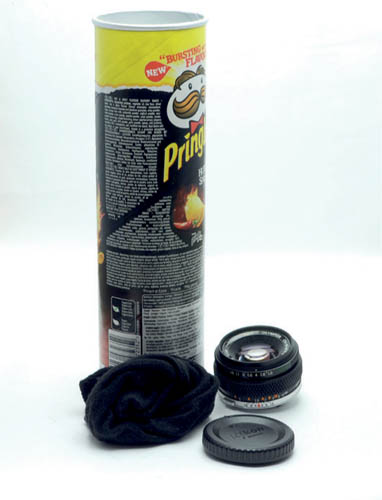
Alternatively, one sure-fire way to macro photography success is to move your lens away from your camera body, using extension tubes, macro bellows, or even a teleconverter to enable your lens to better record tiny objects. The idea of getting the lens away from the camera body is the basis of this project, which uses an empty potato chip tube as a low-cost “spacer.”
• Camera body cap
• Manual focus lens (see Notes)
• Empty Pringles can (or similar)
• Black cloth
• Drill/Dremel/similar
• Hot glue gun/epoxy resin
In this project you will be cutting plastic (body cap) and metal (end of the chip can), so be sure to wear appropriate eye protection—no one wants a piece of plastic or a sliver of metal embedded in their eyeball.
A prime, manual focus 50mm lens is the ideal partner for your macro tube. As you’re not attaching it to your camera, it doesn’t matter if it’s the “right” lens mount, so you can look for low cost lenses, rather than the brands that command premium prices. You can also use the same lens that you would use for freelensing (Project 08).
If you tilt your lens slightly in the end of the macro tube you can create a pseudo tilt lens effect.
1
Before you begin you’re going to need to collect the various items you’ll need: a camera body cap (that you’ll effectively trash); a lens (a manual 50mm prime is perfect); some black cloth (I’m using an old sock); and an empty Pringles tube (or similar).
2
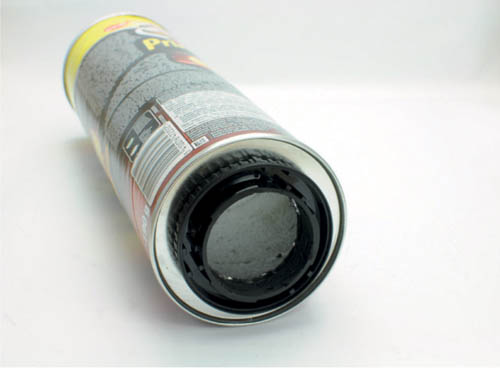
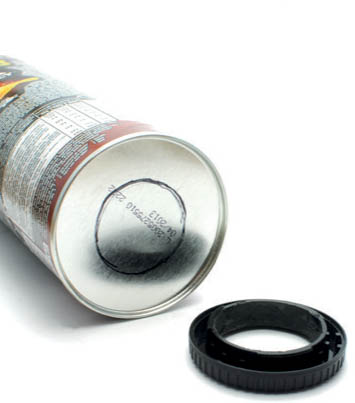
Start by taking your body cap and “coring” out the center. You will be using this as the lens mount for your tube, so work from the inside and remove all of the plastic inside the mounting ring (as marked). Use a Dremel, a drill, or whatever else will do the job.


3
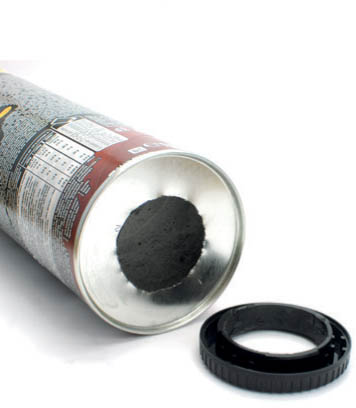
Place your lens cap on the metal end of your Pringles can and mark the hole you’ve cut out. Using your preferred cutting tool, cut out the circle you’ve marked so you have matching holes in your body cap and chip can.
4
Take your glue gun or epoxy resin and mount your body cap to the chip can, aligning the holes you have cut in both. Clamp the two parts together while the glue dries.

5
The next step is to cut your chip can to length. As a rough guide, the longer the tube, the closer you will be able to get to your subject(s). However, as the tube length increases, you will lose light, which will lengthen your exposure times. This, coupled with the physically longer tube, will increase the chance of camera shake, so a small amount of compromise may be needed. For this tube I felt that a length of 6-inches/15cm would give me the best overall performance with my 50mm lens, although the measurement doesn’t have to be precise.
6
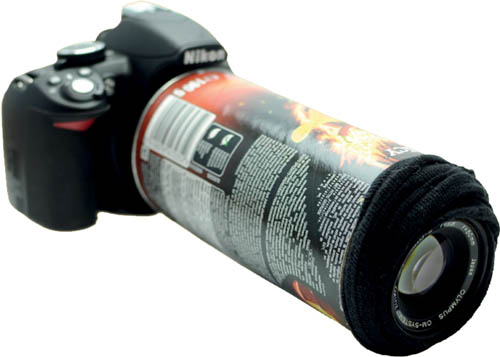
To mount your lens to the tube, take your black cloth and wrap it around the lens barrel—how much cloth you need will depend on the diameter of the lens. The aim here is simple: you want to wrap enough cloth around the lens so that it fits snugly into your macro tube as shown. Try to make sure that the lens is relatively square in the tube.
To focus your macro tube you will need to move the camera or subject (the focus on the lens is redundant). You will likely need to determine your exposures manually as well: take a test shot and use the histogram to “chimp” your exposure.
The filament of tungsten lightbulb, photographed using a homemade macro tube and the “wrong” white balance.
Although digital capture has effectively sidelined conventional film-based photography, analog capture still dominates one area: lo-fi photography. Championed by Lomography, Holga, and SuperHeadz, lo-fi photography is typified by plastic cameras that produce unique results thanks to their low-tech, often plastic lenses and no-frills specifications. These cameras aren’t about producing technically superb results, where the focus is accurate to the nearest millimeter and the exposure correct to within one hundredth of a stop, but about celebrating optical imperfection and the “happy accident.”
Shooting film isn’t for everyone though: it’s more expensive than digital capture, and it’s becoming increasingly difficult to get film processed, not to mention actually buying it in the first place. Of course, you can try to emulate the lo-fi look with your image-editing program, but this can often look contrived, overly polished, and, well, just too digital.
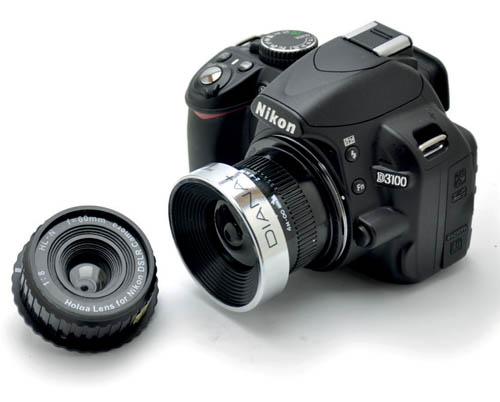
In this project we’ll be looking at a third option: combining a lo-fi camera lens with a hi-tech digital camera. In the past this would have involved a homebrew hack to physically remove the lens from a medium format camera and mate it to a digital camera, but today there’s a much easier option: buy a dedicated lo-fi lens. There are two options, both based on classic lo-fi cameras: a Diana lens adapter (and lenses), or a Holga lens. But which one should you go for, and what should you expect? And how can you get the best from it?
Use the following grid to determine which lo-fi lens options are available for your digital camera:
Lens mount |
Diana adapter |
Holga lens |
Canon EF |
YES |
YES |
Nikon F |
YES |
YES |
Nikon 1 |
– |
– |
Olympus Four Thirds (SLR) |
– |
YES |
Olympus PEN |
– |
YES |
Panasonic Lumix G |
– |
YES |
Pentax K |
– |
YES |
Samsung GX |
– |
YES |
Sony Alpha |
– |
YES |
Sony NEX |
– |
YES |
Introduced in the 1960s, the medium-format plastic Diana camera was originally used as a promotional tool or giveaway gift, rather than for “proper” photography. However, the quirky properties of its ultra-cheap plastic lens were soon seized upon by creative types and the lo-fi aesthetic that we know today was born, complete with heavy vignetting, focus fall-off, and the odd multiple exposure.
Although the original fixed-lens Diana was short lived, it was reborn when Lomography launched the Diana F+ in 2007. The latest incarnation displays many of the same characteristics as its predecessor, but one of the key differences is the crude bayonet system that allows the plastic lens to be removed and changed. There are currently five lens options—20mm fisheye, 38mm superwide, 55mm wide/close-up, 75mm “standard,” and 110mm telephoto—and it was perhaps inevitable that a lens adapter would not be far behind, allowing them to be used on a digital camera instead of the medium-format film-based Diana+.
The Diana lens’ lo-fi heritage makes it a logical option for your digital lo-fi escapades, but don’t expect the same results when you switch to digital—far from it in fact. For a start, all of the lenses become “longer” due to the camera’s sensor size, so the 38mm lens behaves more like a “standard” lens on a full-frame digital SLR, or a mild telephoto on a camera with an APS-C sized sensor.
In addition, Diana lenses are designed to deliver their “best” lo-fi results when they’re used on medium-format film to shoot images measuring 5.2 x 5.2cm. On a digital sensor (be it full-frame or APS-C) you simply don’t see the heavy vignetting and focus fall-off that typically appear at the edges of the frame as these lo-fi “defects” are effectively cropped out. Instead, you are left with a slightly soft-focus result instead—although some people may like this, it isn’t a “true” Diana look.
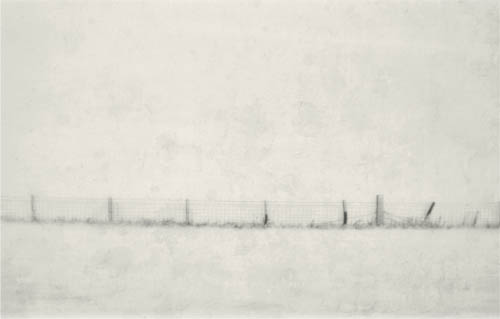
This shot was taken using a Diana lens on a Nikon digital SLR. An aged effect has been added in post-production, but the lens exhibits none of the vignetting that characterizes the original Diana camera, just an overall soft focus.
The first Holga cameras appeared in China in the early 1980s, long after production of the original Diana had ceased. It was not intended as a Diana replacement though—it was instead designed to be a “camera for the masses” at a time when many Chinese families used medium-format 120 roll film. However, the primitive plastic-bodied, plastic-lensed snapper soon became popular with international photographers looking to get a lo-fi “edge” to their images.
Again, it was only a matter of time until the first “ready made” Holga lenses for digital cameras appeared, although it’s fair to say that the first attempt was disappointing: for many photographers it simply wasn’t as “lo-fi” as the analog camera’s lens. In 2011, this was redressed, when a new “digital Holga” lens was released.
Unlike the Diana lenses, the iconic lo-fi Holga lens has been designed specifically for small-format digital capture, which has meant that all of the original lens’ characteristics have been retained. This applies not only to cameras with full-frame sensors, but also on cropped-sensor formats as well, with the digital Holga lens exhibiting strong vignetting and focus fall off, as well as chromatic aberrations and lens flare.
There are some differences between an analog and digital Holga though. For a start, the aperture is fixed at a nominal setting of f/8, although in reality it is much slower than this, as explained below. Also, the 60mm focal length doesn’t deliver the same wide-angle view that it does on a medium format Holga. Instead you get a slightly-longer-than-standard view with a full-frame digital camera, and a mild telephoto effect on cropped-sensor cameras (90–120mm depending on the camera you are using). However, that aside, the resulting images have a strong lo-fi appeal, and are certainly more in keeping with the original camera than the Diana lenses are.
It perhaps goes without saying that a low-tech lo-fi lens isn’t going to house the sophisticated electronics used by a digital camera to determine the aperture setting, focus distance, and so on. With some cameras you will still be able to use TTL metering and choose between Aperture Priority and Manual, but with others you may have to rely totally on setting the exposure manually, and possibly without assistance from your camera’s meter.
If this applies to you, then you could use a regular lens (or a handheld exposure meter) to take an exposure reading, and then dial this into your camera manually. However, you should be aware that the f/8 aperture of a Holga lens is much slower—roughly 4-5 stops slower in fact—so a Holga lens should be treated as if it has an aperture of f/45.
Alternatively, with a Diana lens you can use the “Sunny 16” rule: on a bright sunny day set the aperture to f/16 and the shutter speed to the reciprocal of the ISO (so ISO 100 and 1/100 sec, ISO 200 and 1/200 sec, and so on).
Regardless of how you determine the exposure for your shots it’s a good idea to assess the histogram after you’ve taken a photograph, and adjust your settings and reshoot if necessary.
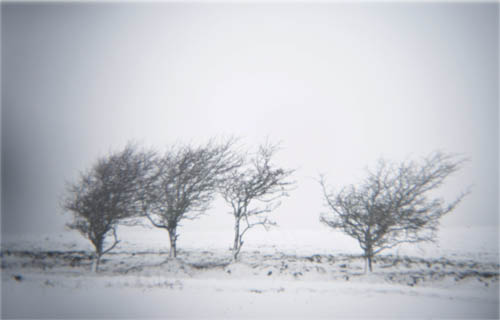
Just like an analog Holga camera, a Holga lens exhibits strong (and uneven) focus and exposure fall off toward the edges of the frame.