Wool Appliqué … My Way
Wool appliqué is a raw-edge method of appliqué, and, as with any technique, there are at least two distinct schools of thought on how to execute it. One advocates the use of a double-sided fusible web, both as a pattern transfer and as a means of adhering the wool appliqué to the background. The other calls for using the wool as is and employing freezer paper as a means of transferring the pattern to the wool. Both approaches typically use a decorative edge stitch to finish the appliqué.
There are pros and cons to each method. My experience has been that the fusible web is a good tool to reduce fraying if the wool is loosely woven or the appliqué shapes are small or pointed. Wool that has been well felted typically will not have fraying issues, but loose weaves, even after felting, may still present a problem.
The downside to using fusible web, in my opinion, is that the wool becomes very stiff and flat and is hard to stitch through. The downside to not using fusible web is that the edge is more ragged or primitive, and small, clean shapes are difficult to achieve. To a large extent, the decision comes down to personal preference. One technique or the other may better lend itself to the look you are trying to achieve in a given project.
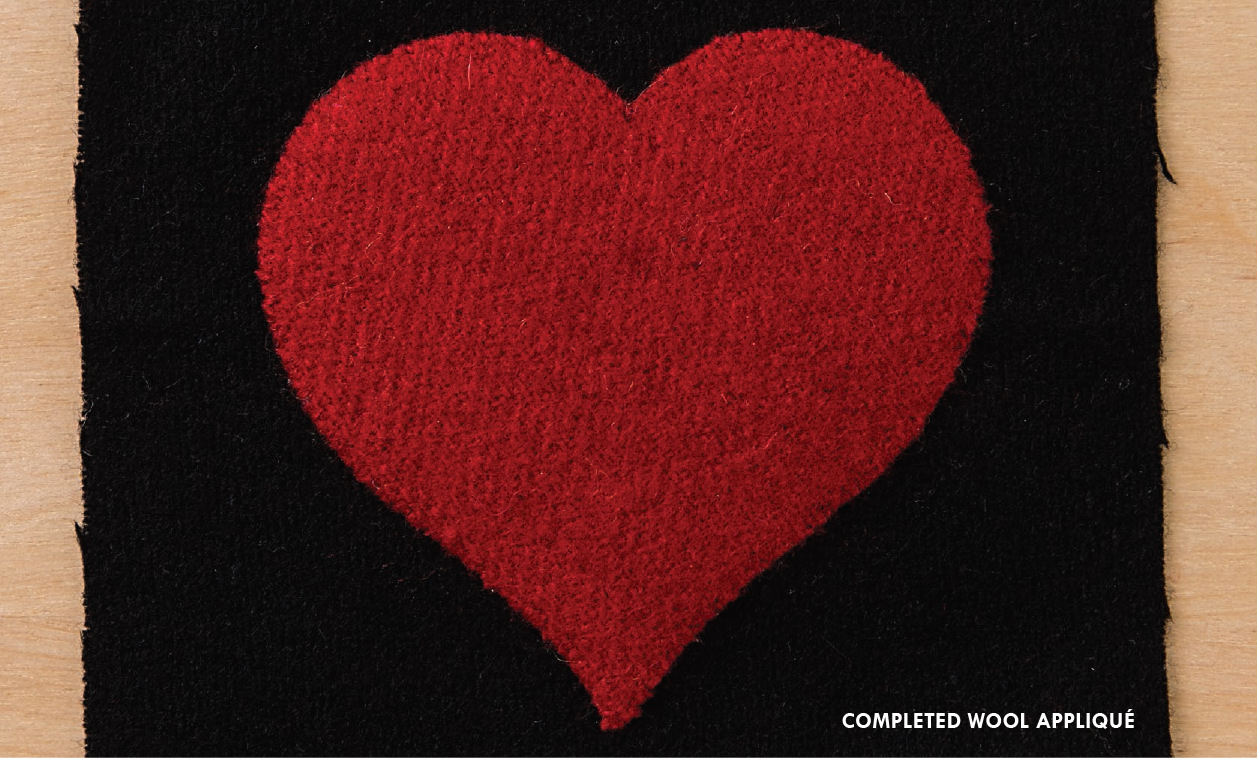
My method falls somewhere in between. It uses a lightweight fusible interfacing (different from fusible web) on all the wool appliqué elements. It is fusible on only one side and remains soft while reducing fraying on the edges of the appliqué pieces. It also gives added loft to the finished appliqué elements. I am often asked what I have placed under the appliqué, and a trapunto application is the expected answer. Simply, there is nothing beneath the fabric except the interfacing. I strive for an invisible edge stitch rather than a pronounced decorative one. Any kind of edge stitch can be used for embellishment if desired, but decorative stitching is not required, as the affixation to the background is virtually invisible.
Here’s how to approach wool appliqué … my way:
1. Apply the interfacing to the wrong side of the wool before cutting. (I use a product made by Pellon called EK130 Easy-Knit. It is a nonwoven tricot product.) Follow the manufacturer’s instructions for adhering the interfacing. Be sure to use a pressing cloth and a light water spritz for the best adhesion.

Apply interfacing to back of wool.
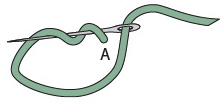
2. Trace all the appliqué shapes, in the quantities indicated, onto the matte side of freezer paper. Refer to the pattern photos for color placement.
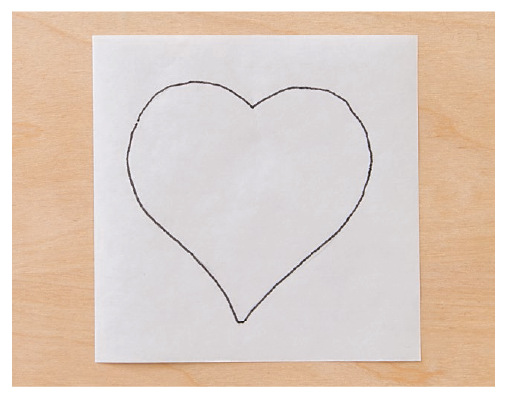
Trace appliqué pattern.
Note:
• Full-size right-reading images of all the appliqué shapes are included with each project.
• Broken lines on the appliqué patterns indicate the completion of each shape as it would appear beneath the one on top of it.
• You may prefer to draw small circle shapes (such as the wool pennies for Bohemian Dance) onto the freezer paper with a circle template rather than using the patterns given.
3. Using paper scissors, cut out the templates on the lines.
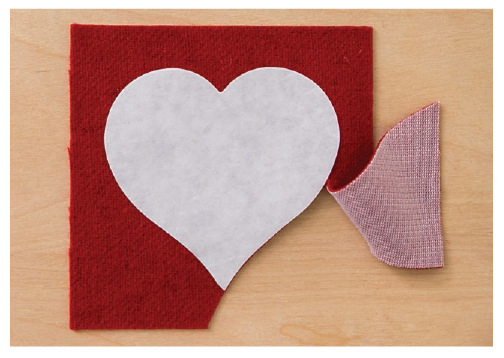
4. Iron the templates to the right side of the prepared wool.

Press to right side of wool.
5. Cut out the wool using sharp, pointed fabric scissors. Follow the edges of the freezer-paper templates and make all your cuts as smooth as possible.
Cut out appliqué piece.
TIP • A good pair of sharp scissors is important. Refer to Favorite Things for some great suggestions!
6. Remove the freezer-paper templates. Using a pressing cloth and light water spritz, re-press the cut appliqué pieces from the back. This will tighten the edges of the appliqué pieces and slightly pull back the edges of the interfacing from the edges of the wool.
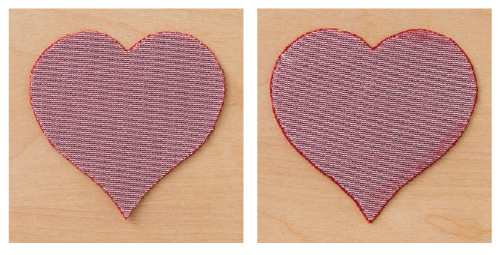
Back of appliqué before and after second ironing
TIP • The process of appliquéing may cause the background fabric to feel like it has shrunk or shifted. Stitching can do that, depending on the density of the pattern and how careful you are at initially finding the right orientation. Oversizing the background is a great way to compensate for either of these common issues. Mark the general appliqué area with lines of basting stitches or chalk lines showing the block size plus the seam allowances. By making the background piece oversize, you can, if necessary, make any adjustments to the trim line of the background once the appliqué is complete.
7. Fold the background piece in half in both directions to find the center. Gently press the fold lines to make orienting your appliqué work easier.

Find background center.
8. Lay out your design on the background, referring to the pattern photographs and images.
Note: The appliqué patterns are all marked with letter codes. These codes refer to the order in which you should appliqué the pieces in place. Appliqué all the elements of the design, working from the background up, as indicated by these codes on the pattern images. First appliqué all the shapes coded with A, then all the B elements, then the C elements, and so on.
9. Secure the pieces to the background one layer at a time, with either small dots of Roxanne Glue-Baste-It (see Favorite Things) or small appliqué pins.
TIPS
• If you are using Glue-Baste-It, try to avoid gluing in areas where you will be stitching. The glue, although temporary, can be quite hard to stitch through. In addition, use a frugal hand; small dots are plenty to hold a piece in place while you work.
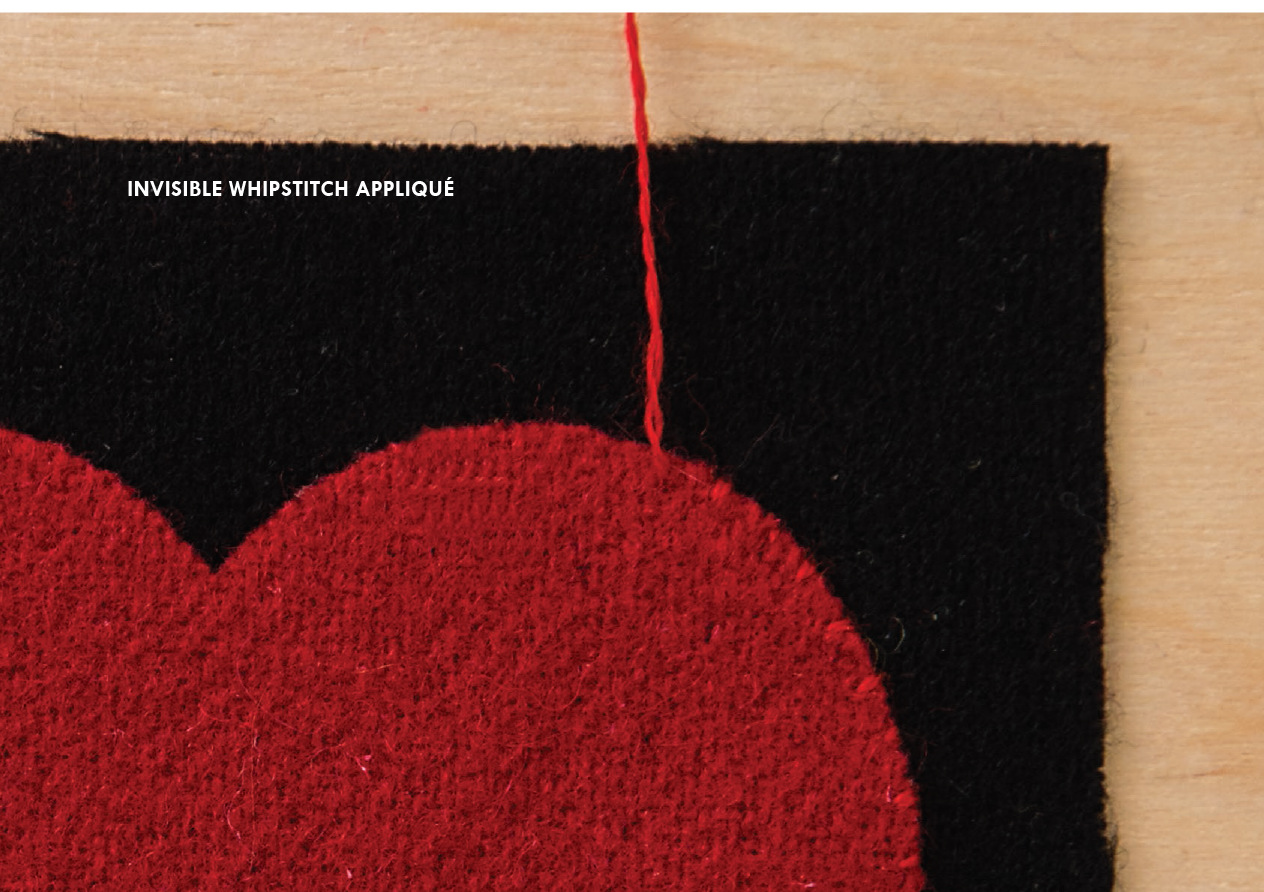
• I invisibly whipstitch my wool appliqué in place using a chenille #24 needle and wool thread. Genziana, Aurifil Lana Wool, and the new Wonderfil Ellana are all great products. Custom-color wool thread kits are available for many of the projects presented here and can be found on my website.
• Cut threads no longer than 18˝. This will reduce the chance that the thread will unravel or thin too much while stitching.
• Keep your stitches shallow and perpendicular to the edge of the appliqué for the most invisible results. Wool thread has no sheen and will naturally bury itself in the wool elements. The interfacing applied before cutting will reduce the fraying of the edges and points and give added strength to the weave of the wool, thus allowing you to take very shallow yet secure stitches. Too tight of a stitch will cause the edge to ruffle. Practice will help you achieve the most even and invisible result.
10. Invisibly stitch the appliqué edges in place.
POINTS
A sometimes-troublesome detail in wool appliqué is handling points. It is the natural tendency of wool to fray when elements of a design are very pointed. You can certainly round off points when cutting, but if you follow the process that follows—along with the addition of the interfacing—you can achieve a very crisp outline.
Assuming you are right-handed, it will seem natural to stitch around an object in a counterclockwise direction while holding the object in your left hand. If you are left-handed, that would be reversed. Remember to take small perpendicular stitches on the surface of the appliqué, traveling (going from one stitch to the next) on the back side of the project and coming up in the appliqué. Stitches should be about ⅛˝ or less apart. The appliqué will be secured onto the background with basting glue before you begin to stitch, but the points may still tend to curve away from you as you approach them. These few steps should help in keeping them straight. As you approach a point, follow this order of stitching:
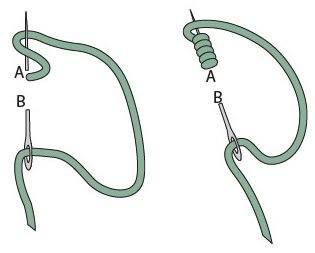
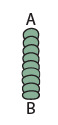
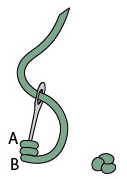
1. As you approach the point, stop stitching ⅛˝–¼˝ away from the point (A).
2. Secure the opposite edge (B); then come up in the background fabric, just barely beyond the point of the appliqué.
3. Stitch directly into the point using a point-and-stab motion (C).
4. Return to the edge of the appliqué from which you approached the point or corner, and, if necessary, complete the line of stitching. Resume stitching away from the point or corner you have just secured on the opposite side.

Stitching points
The techniques expanded upon within the pattern instructions are ones that I revert to often in the construction of these projects. That is not to say that these methods are the only ways to accomplish these ends, but they are mine. Experiment with different approaches, and find the ones that best fit you, your tools, and your lifestyle.
Double-Fold Straight-Grain Binding
1. Piece the binding strips together with diagonal seams to make a continuous binding strip. Trim the seam allowance to ¼˝. Press the seams open.

Sew from corner to corner.
2. Press the entire strip in half lengthwise, with wrong sides together. With the raw edges even, pin the binding to the front edge of the quilt starting a few inches away from a corner, leaving the first few inches of the binding unattached. Start sewing using a ¼˝ seam allowance.

Completed diagonal seam—right side
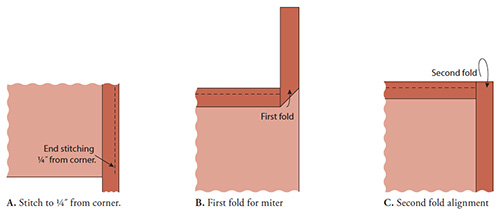
3. Stop ¼˝ away from the first corner (fig. A), and backstitch 1 stitch. Lift the presser foot and needle. Rotate the quilt one-quarter turn. Fold the binding at a right angle so it extends straight above the quilt and the fold forms a 45° angle in the corner (fig. B). Then bring the binding strip down even with the edge of the quilt (fig. C).
4. Begin sewing at the folded edge. Repeat in the same manner at all the corners.
5. Continue stitching until you are back near the beginning of the binding strip.
FINISHING THE BINDING ENDS: METHOD ONE
1. After stitching around the quilt, fold under the beginning tail of the binding strip ¼˝ so the raw edge will be inside the binding after it is turned to the back of the quilt.
2. Place the end tail of the binding strip over the beginning folded end. Continue to attach the binding, and stitch slightly beyond the starting stitches.
3. Trim the excess binding. Fold the binding over the raw edges to the quilt back and hand stitch, mitering the corners.
FINISHING THE BINDING ENDS: METHOD TWO
1. Fold the ending tail of the binding back on itself where it meets the beginning binding tail. From the fold, measure and mark the cut width of the binding strip. Cut the ending binding tail to this measurement. For example, if your binding is cut 2½˝ wide, measure 2½˝ from the fold on the ending tail of the binding, and cut the binding tail to this length.

Cut binding tail.
2. Open both tails. Place one tail on top of the other tail at right angles, right sides together. Mark a diagonal line from corner to corner and stitch on the line. Check that the seam has been sewn correctly and that the binding fits the quilt; then trim the seam allowance to ¼˝. Press open.

Stitch ends of binding diagonally.
3. Refold the binding, and stitch this binding section in place on the quilt. Fold the binding over the raw edges to the quilt back and hand stitch.
Embroidery
BULLION KNOTS
Bullion knots are used to accent the poppies in Umbrian Fields. Using variegated thread gives an added dimension to the embroidery.
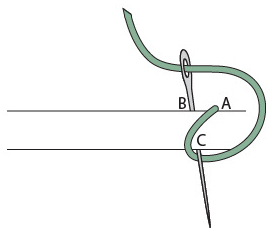
1. To begin the bullion knot, bring the thread up from the back of your work at what will be the top of the stitch, point A. Leaving the thread loose on the face of the fabric, go down at point B (the end of the stitch) and emerge again at point A. Do not pull the needle all the way through to the face.
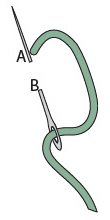
2. Wrap the thread around the point of the needle in a clockwise motion as many times as it takes to cover approximately the same amount of space on the needle as there is space between points A and B. Make the wrapping solid but not too tight.
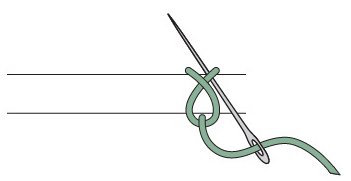
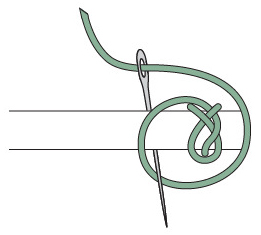
3. Holding the wrapping with your fingers, slowly pull the needle through the wrapped thread and the fabric.
4. Gently lay the wraps back down on the face of the fabric, and pull the needle down again at point B. Adjust the wraps if needed to straighten.
STEM STITCH
A stem stitch is often used as an outline stitch around an appliqué element or as a line of stitching that might represent a stem, for example. It is used in Ode to My Divas for the pistils of the flowers.
1. Using a chalk pencil or removable marker of your choice, draw the line that you would like to stitch onto the background.
2. Knot your thread on the back and come to the surface at point A. Working from left to right, go down at point B and come back up through point C. Continue in the same manner down the entire length of the drawn line.

COUCHING
Couching is a hand embroidery technique that is simply an exposed whipstitch crossing over a yarn or cord at regular intervals, perpendicular to the yarn. Elements can be couched with a matching thread, making the application, especially with yarn, virtually invisible. For added interest, consider couching with a contrasting color or texture of thread. We use alternative textures in textiles—why not extend the concept to thread?
Yarn to be couched is temporarily secured onto the background by placing pins only into the background on either side of the yarn, with the yarn held in place beneath the shafts of the pins.

FRENCH KNOTS
French knots are used as “punctuation,” or dots of color and texture, in some of the projects. This embroidery stitch is great for creating texture.
1. Bring the needle straight up from the back of the fabric where you want to place a French knot.
2. Wrap the thread around the needle in a counterclockwise motion 3 or 4 times.
3. Reinsert the needle into the fabric at the same point you emerged, bringing the wraps moderately tight. The looser you leave the wraps, the looser and larger the knot will be on the project surface.
ROSETTE CHAIN STITCH
The rosette chain stitch is used to outline the center medallion elements of the Echoes of Italy Bolster.
1. Draw 2 parallel lines with chalk pencil as far apart as you want the width of the stitches to be. For embellishing the appliqué, the top line will be right where the appliqué and background meet, and the bottom line will be on the appliquéd piece. You’ll be working from right to left.
Knot the thread and bring your needle up at the top line at point A. Move over about ⅛˝. Push the needle down at point B and bring it up on the bottom line at point C, but don’t pull the needle all the way through the fabric.
2. Bring the thread from right to left over the top of the needle, and wrap it from left to right under the needle. Then pull the needle through.
3. Now bring the needle through the right leg at the top line. Pull the thread through gently.
4. Begin the next stitch by moving ⅛˝ to the left on the top line. End the row of stitches by taking a stitch ⅛˝ to the left to tack down the last full stitch, and tie off.
Beading
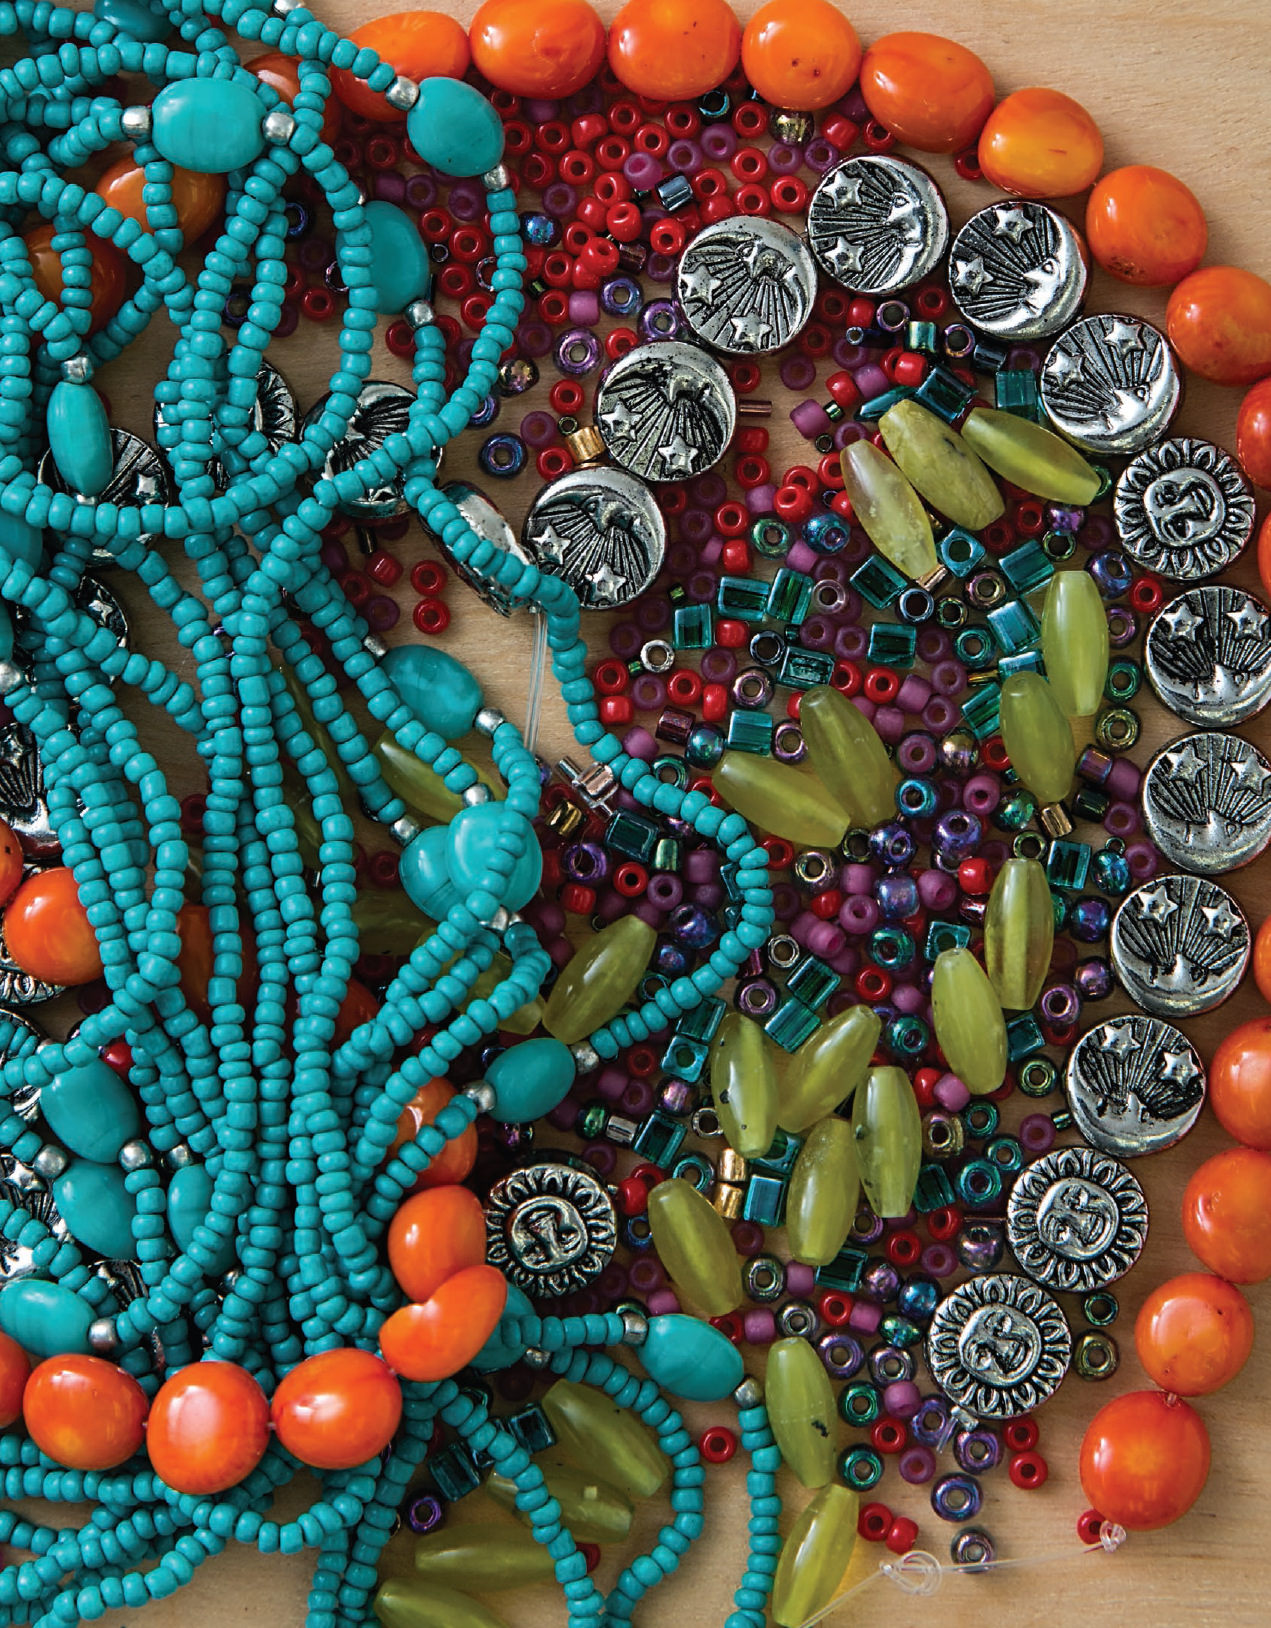
Beading would take an entire volume in itself to explain adequately, and honestly, I have only begun to explore the possibilities this medium holds. I can say that my approach to it as a “crayon,” however, is not just one of embellishment. Certainly, beading can lend that characteristic shimmer we all associate with it, but beads can also create a texture all their own. And they are not even all round! Who knew that seed beads could be peanut shaped or that such things as piggy beads even existed? There is so much to explore. In the Echoes of Italy Bolster, I scattered beads in kind of an ombré pattern throughout the appliqué background, changing the density of their placement to sculpt the background of the appliqué.
First, a few basics I have learned. Beads can be added to quilt projects as edge embellishment, background texture, or surface embellishment that takes the place of—or augments—an appliqué detail. They play heavily in the embellishment details of Echoes of Italy.
I use either a beading or sharps #10 needle and Nymo synthetic thread for attachment. When I began adding beads to projects, I initially used a cotton thread but quickly came to understand that not all beads are created equal. Many may have a rough edge around the hole, which is quite capable of cutting typical sewing threads.
In choosing thread, natural or synthetic, two considerations are foremost—visibility and use. Most thread will not be seen, but if you are using transparent beads it may, and the color that reads through is a consideration. Natural thread offers many more beautiful color options than synthetic. Cotton or silk embroidery floss can be used on pieces where the thread shows. If the piece you are beading will be handled, a synthetic thread like Nymo, which is more durable, should be considered. Synthetic thread comes in a variety of sizes; choose the largest thread size that will still fit through the bead you are using.
When working with any thread, cut lengths no longer than 18˝–20˝. Stretch the thread before you begin beading. Hold a cut thread in both hands and pull from the opposite ends. This will help straighten the thread and make it less likely to tangle when in use. When threading, moisten the eye of the needle, not the thread. If the thread frays or is difficult to insert into the eye, try both ends of the thread and both sides of the needle. The eye of a needle is typically larger on one side than the other because of the way that needles are manufactured.
The traditional stitches, and the simplest ones I have used in beading, are the single bead stitch and the running bead stitch. They are illustrated below.
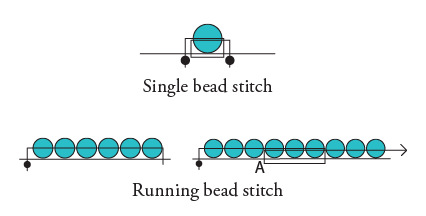
The constant in both stitches is that you start with a knot similar to a French knot. Wrap the tail of the thread around the needle several times. Holding the thread wraps on the needle in your hand, pull the needle through. This will create a tight knot at the end of the thread. Come up from the back of the fabric to begin attaching the first bead.
The temptation when sewing on beads is just to string them one to the next in a continuous row without stopping. This can be done, but I advise against it. I have found that, depending on the bead, I often go through a single bead several times before moving on to the next to ensure that it lies flat.
It is also not a bad idea to take a tacking stitch or knot off after 1˝ of beading or after five or six bead stitches have been added. This way, if a thread should get cut and a few beads are lost, at least you won’t lose the entire beaded length. Knot off the thread by using a typical tacking knot: Take a short stitch on the back side of the fabric in a concealed place. Before tightening the loop of the stitch, go through twice more and tighten.