“I think I can. I think I can.” Now she ran steadily up the track and at last popped joyously out of the tunnel on the other side of the mountain. “I thought I could! I thought I could!”
—The Little Engine That Could
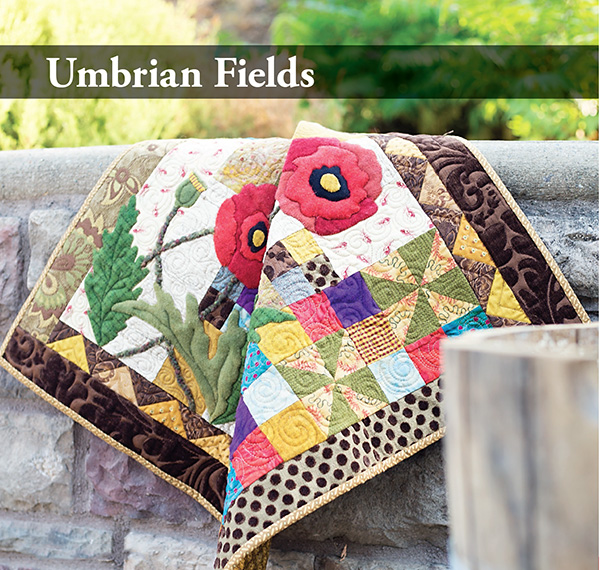
Umbrian Fields Wallhanging
Finished blocks:
Four-Patch: 3˝ × 3˝ • Pinwheel: 4˝ × 4˝ • Flying Geese: 1½˝ × 3˝
Finished wallhanging: 25˝ × 25˝
Umbrian Fields was one of the first mixed-medium colorways I introduced. Its intent was to illustrate the versatility of the eclectics concept by applying it in a multitude of project types. I created this design after returning from a trip to the Umbrian region of Italy, where one could not help but be inspired by the color and texture of the landscape. There, poppies grow wild in great abundance during late spring and wave in the wind.
These projects are made of simple traditional blocks executed in nontraditional fabrics. Wool, tapestry, raw silk, woven silk, and a vast variety of cottons all found a home in the Umbrian Fields color palette. The project focus is on contrasting textures and my method of executing wool appliqué.
The background for an appliqué project does not always need to be a solid or a single piece of fabric. The background for this project is generally light but has sparks of color and contrasting textures, making it as interesting as the appliqué itself.
Read Exploring New Textiles: Eclectic Fabric Guidelines before beginning.
Materials
Fabric requirements are based on a fabric width of at least 40˝, except where noted.
FABRICS FOR BORDERS AND BACKGROUND
Brown textured upholstery: ¼ yard for top and bottom borders
Brown chenille dot on green and green tapestry print: ⅛ yard each for side borders
Assorted light fabrics: ⅜ yard total of at least 4 fabrics for background
Green woven wool: 1 fat quarter (18˝ × 20˝) for background and Pinwheel blocks
FABRICS FOR BLOCKS
Mixed-medium fabrics: ½ yard total of at least 7 fabrics for Four-Patch blocks and background squares
Gold cotton print: 1 fat quarter (18˝ × 20˝) for Pinwheel blocks
Gold cottons: ⅛ yard each of 3 fabrics for Flying Geese blocks
Gold upholstery: ⅛ yard for Flying Geese blocks
Brown cotton: 1 fat quarter (18˝ × 20˝) for Flying Geese blocks
HAND-DYED WOOL FOR APPLIQUÉ
Reds: 3 fabrics, each approximately 6˝ × 8˝, for poppies
Greens: ¼ yard each of 2 fabrics (medium and dark) for leaves and pods
Gold: Approximately 4˝ × 4˝ for poppy details
Black: Approximately 6˝ × 6˝ for poppy details
OTHER MATERIALS
Interfacing for hand-dyed wools and silk
Green yarn: Approximately 3 yards each of 2 different textures for stems
Color-coordinating wool thread for appliqué
Perle cotton #8: Valdani #O521 for details on poppy pods (optional)
Backing: ⅞ yard
Binding: ¼ yard
Batting: 28˝ × 28˝
Cutting
BROWN TEXTURED UPHOLSTERY
• Cut 2 strips 2½˝ × 25½˝ (A).
BROWN CHENILLE DOT ON GREEN AND GREEN TAPESTRY PRINT
• Cut 1 strip 2½˝ × 21½˝ from each fabric (B and C).
ASSORTED LIGHT FABRICS
• From light 1, cut 1 strip 3½˝ × 13½˝ (E) and 1 strip 3½˝ × 5½˝ (D).
• From light 2, cut 2 strips 3½˝ × 5½˝ (G and H) and 1 strip 2½˝ × 3½˝ (F).
• From light 3, cut 1 strip 3½˝ × 18½˝ (K) and 1 strip 3½˝ × 10½˝ (J).
• From light 4, cut 1 strip 3½˝ × 10½˝ (M) and 1 strip 3½˝ × 8½˝ (L).
GREEN WOVEN WOOL
• Cut 1 strip 3½˝ × 5½˝ (N) for the background.
• Cut 6 squares 2⅞˝ × 2⅞˝ for the Pinwheel blocks.
MIXED-MEDIUM FABRICS
• Cut 15 squares 2½˝ × 2½˝ for the background.
• Cut 12 squares 2˝ × 2˝ for the Four-Patch blocks.
GOLD COTTON PRINT
• Cut 6 squares 2⅞˝ × 2⅞˝.
GOLD COTTONS AND GOLD UPHOLSTERY
• Cut 4 strips 2˝ × 3½˝ from each of the 4 golds. (You will have 2 extra.)
BROWN COTTON
• Cut 28 squares 2˝ × 2˝.
BINDING
• Cut 3 strips 2½˝ × width of fabric.

Fabric placement

Construction
All seam allowances are ¼˝ unless otherwise noted. Construct all the block elements of the background before joining the columns shown in the wallhanging assembly diagram.
FOUR-PATCH BLOCKS
Note: These blocks are intended to be scrappy. Mix the textures, being mindful of the fabric weights. Try not to place two heavy fabrics next to each other.
1. Select 4 squares 2˝ × 2˝ from the assorted mixed-medium fabrics. Vary the colors and textures.
2. Sew 2 sets of 2 squares each. Press toward the lighter-weight fabric.

3. Nest the seams with right sides together and sew the 2 pairs together. The block should measure 3½˝ × 3½˝ and will finish in the project at 3˝ × 3˝. Repeat to make 3 Four-Patch blocks.
FLYING GEESE BLOCKS
1. Draw a diagonal line from corner to corner on the wrong side of each brown square.
2. Place 1 square on the left side of each 2˝ × 3½˝ gold strip, right sides together. Stitch on the drawn diagonal line. Trim the seam to ¼˝, and press the remaining triangle away from the gold center.
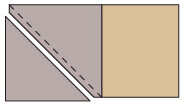
3. Add a second brown square to the right side of the completed unit. Stitch on the drawn diagonal line, trim, and press as shown.

The block should measure 2˝ × 3½˝ and will finish in the project at 1½˝ × 3˝. Make 14 Flying Geese blocks.
PINWHEEL BLOCKS
Refer to Wool for sewing with wool.
TIP • Triangle paper (2˝ finished size) can be used to make the half-square triangle units for this block, or you can construct them in the traditional manner that follows.
1. Draw a diagonal line from corner to corner on the wrong side of each 2⅞˝ gold square.
2. Pair a green woven wool square with a gold cotton square. Align the raw edges, right sides together, and stitch ¼˝ on each side of the drawn diagonal line.
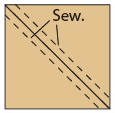
3. Cut on the line and press toward the gold cotton.

4. Trim the units to 2½˝ × 2½˝.
5. Join 4 half-square triangle units to create a Pinwheel block. Make 3.
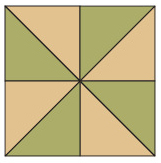
Pinwheel block
TIP • Press the seams open to reduce bulk.
Quilt Assembly
1. Sew the strips and Four-Patch blocks into 5 columns following the fabric placement diagram.
2. Working from left to right, sew the columns together along their long edges. Press the seams toward the right. Set this section aside.
3. Lay out the remaining pieced section of the background on a flat surface.
4. Sew 2 squares 2½˝ × 2½˝ together. Press. Sew the unit to one side of a Pinwheel block. Press the seam toward the squares and away from the Pinwheel block. Repeat for each Pinwheel block.
5. Join the remaining squares into 3 rows of 3 squares each.
6. Lay out and stitch the units together as shown.
7. Sew this section to the right side of the section assembled in Step 2. This center background will measure 18½˝ × 21½˝.
8. Sew together 2 rows of 7 Flying Geese blocks along their short sides. With the points in both rows facing in the same direction, press the seams in one row to the right and the other row to the left. The rows will measure 2˝ × 21½˝.
9. Add the Flying Geese row that was pressed to the right to the top and the Flying Geese row that was pressed to the left to the bottom of the assembled background, with the gold geese all pointing toward the center. Match the seams with the columns of the background. Press the seams toward the background.
10. Add the side borders.
11. Add the top and bottom borders. The wallhanging will measure 25½˝ × 25½˝.

Wallhanging assembly

Appliqué
Refer to Techniques and Wool Appliqué … My Way.
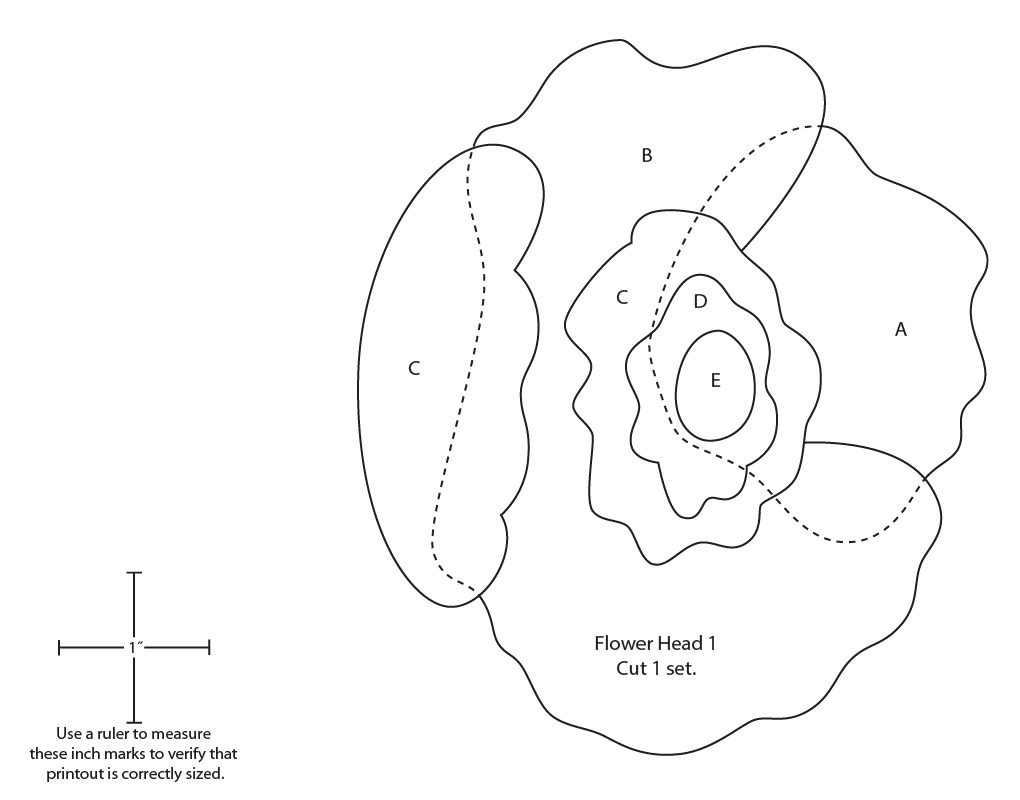
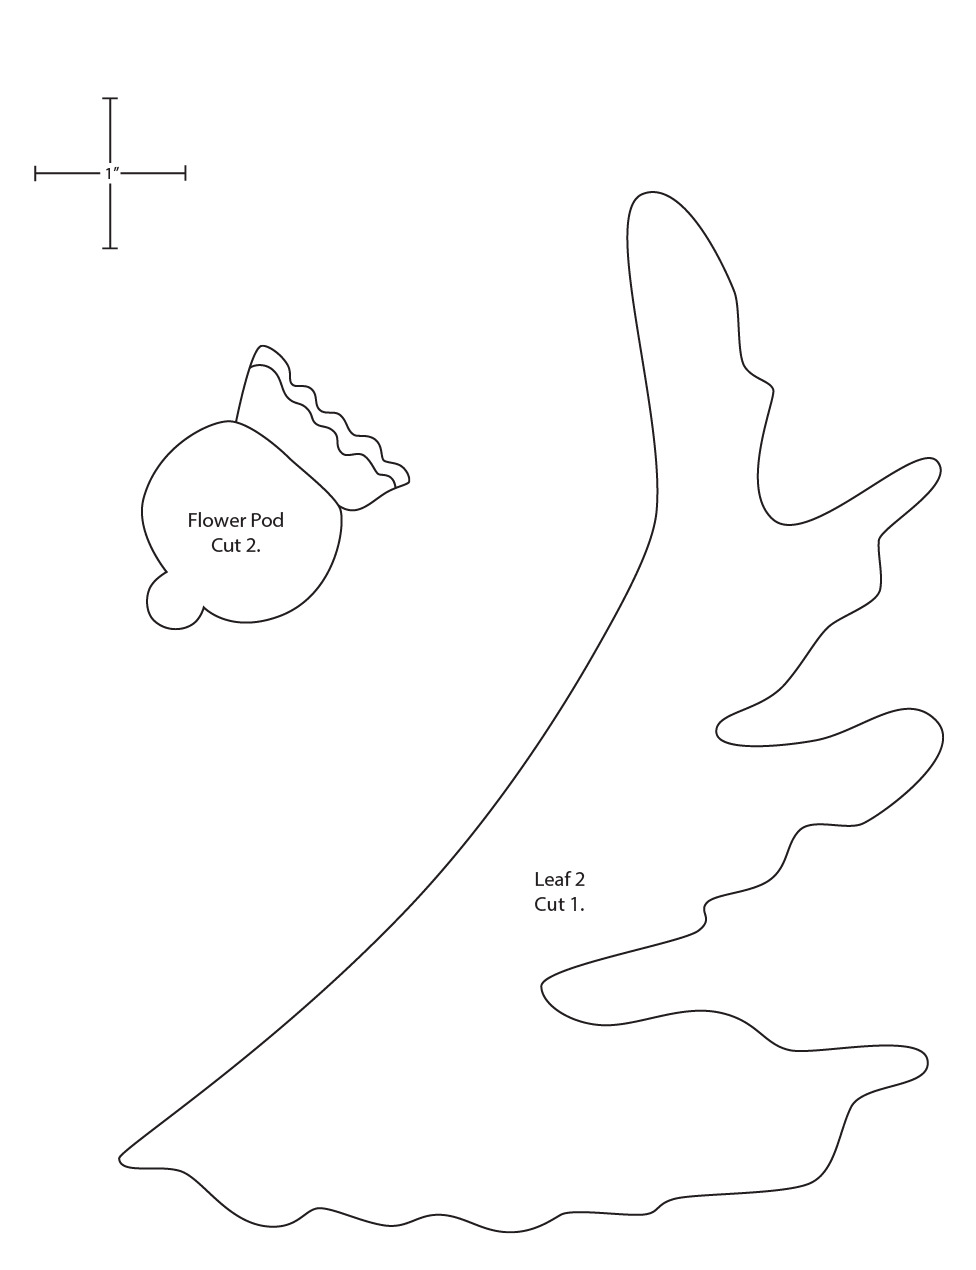
1. Prepare the appliqué pieces using the project patterns (below).
2. Referring to the project photo, lay out all the appliqué elements.
3. Couch the yarn stems in place (see Couching). Secure the ends of both yarns together in the area beneath the flower head with a pin. Twist the 2 yarns together to achieve the desired thickness and texture. Pin loosely in place and couch with wool thread to match the yarn.
TIP • I began each stem with two lengths of green yarn (one thick and one textural) approximately 1½ times the length needed to reach from behind the flower head to the base.
4. Trim the yarn at the base of the stem, making sure the yarn will be concealed under the appliquéd leaves.
5. Appliqué the leaves, pods, and flower elements in place. Work from the background up, as indicated by the dotted lines and the letter codes on the patterns.
6. Embellish the flower pods with bullion knots using perle cotton #8.
TIP • Add any beaded embellishments after the project is quilted.
Finishing
1. Layer, baste, and quilt as desired.
2. Add binding.
For all printable patterns or digital content: http://tinyurl.com/11255-patterns-download

For all printable patterns or digital content: http://tinyurl.com/11255-patterns-download
For all printable patterns or digital content: http://tinyurl.com/11255-patterns-download

For all printable patterns or digital content: http://tinyurl.com/11255-patterns-download