
Bohemian Dance Queen/King Quilt
Finished block: 12˝ × 12˝ • Finished quilt: 94˝ × 94˝
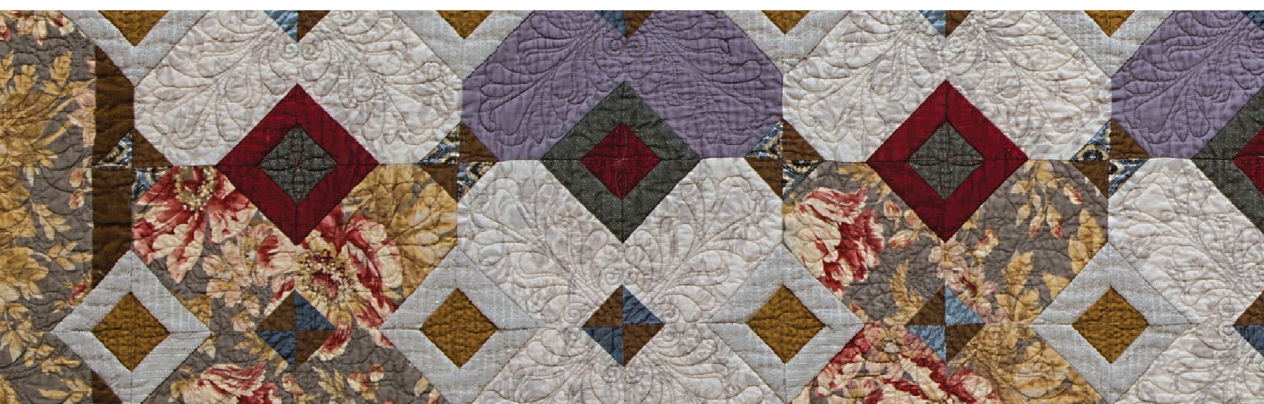
Bohemian Dance was so named because of its happy Bohemian-looking fabrics that seem to dance across the quilt top. The Bohemian Dance Queen/King Quilt has a much more sophisticated appearance than the wallhanging and a smooth elegance that is more like a waltz, hence its original name of Urban Waltz. The glorious floral fabric is used in both the background blocks and the outer border. The inner border is silk dupioni.
The Bohemian Dance Queen/King Quilt can be made even larger by increasing the size of the outer border strips to 8˝ × width of fabric instead of 4˝ × width of fabric. The finished size, with enlarged border cuts, will be 102˝ × 102˝.
Read Exploring New Textiles: Eclectic Fabric Guidelines before beginning.
Materials
Gray large-scale floral print: 3⅜ yards for block A backgrounds and outer border
Light gray print: 3 yards for block B backgrounds
Taupe Radiance silk/cotton blend: 1¼ yards for block C backgrounds
Red silk dupioni: 1⅝ yards for diamond frames and alternating centers
Gray stripe: 1⅝ yards for diamond frames and alternating centers
Cream textured-silk home decor fabric: 2¼ yards for diamond frames
Gold print: ¾ yard for diamond centers
Dark silk print: ¾ yard for quarter-squares
Brown print: ¾ yard for quarter-squares
Bronze silk dupioni: ¾ yard for inner border
Interfacing for silks
Backing: 8½ yards
Binding: ⅞ yard
Batting: 102˝ × 102˝
Cutting
GRAY LARGE-SCALE FLORAL PRINT
• Cut 64 squares 6½˝ × 6½˝.
• Cut 4 squares 5½˝ × 5½˝.
• Cut 10 strips 4˝ × width of fabric.
LIGHT GRAY PRINT
• Cut 96 squares 6½˝ × 6½˝.
TAUPE RADIANCE SILK/COTTON BLEND
• Cut 36 squares 6½˝ × 6½˝.
RED SILK DUPIONI
• Cut 112 squares 3½˝ × 3½˝.
• Cut 112 squares 2˝ × 2˝.
GRAY STRIPE
• Cut 112 squares 3½˝ × 3½˝.
• Cut 112 squares 2˝ × 2˝.
CREAM TEXTURED-SILK HOME DECOR FABRIC
• Cut 224 squares 3½˝ × 3½˝.
GOLD PRINT
• Cut 224 squares 2˝ × 2˝.
DARK SILK PRINT
• Cut 226 squares 2˝ × 2˝.
BROWN PRINT
• Cut 226 squares 2˝ × 2˝.
BRONZE SILK DUPIONI
• Cut 10 strips 2˝ × width of fabric.
BINDING
• Cut 10 strips 2½˝ × width of fabric.
Construction
Follow the instructions for the Bohemian Dance Wallhanging for the general construction of this project. Keep in mind that the color orientation of the framed diamonds in the Bohemian Dance Queen/King Quilt is slightly different. The strong-colored diamond frames in the Bohemian Dance Wallhanging are organized row by row—that is, one row is fuchsia diamond frames, the next row is turquoise, and then it repeats. Assembling one row with red silk dupioni frames and then one row with gray diamond frames in this quilt would result in the red rows being the only rows you would see. The red is too dominant. To balance the color better, I alternated the diamonds in all the rows and let the secondary cream textured-silk diamond frames recede visually. This required careful placement of the color during construction. A design wall where you can arrange the whole project is a great asset.
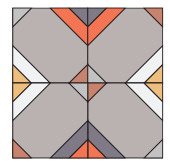
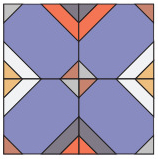
As with the Bohemian Dance Wallhanging, this quilt is a single-block quilt with pieced borders. The “on-point” diamond patterns and quarter-squares form as the blocks are pieced together. One simple technique is used throughout the construction: connecting corners. Each 12˝ finished block is made from four layered 6˝ finished squares of the same background. To facilitate the color placement of the layered connecting corners, half the blocks, regardless of their background, will be oriented as shown in pressing diagram 1, and the remaining half will be oriented as shown in pressing diagram 2. Follow the diagrams carefully.
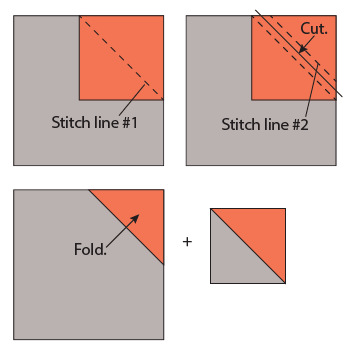
CONNECTING-CORNERS TECHNIQUE
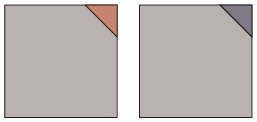
Draw a diagonal line from corner to corner on the wrong side of a 3½˝ square. Draw a second line on the square a scant ½˝ away and parallel to the first drawn line. Layer the marked square on a corner of a 6½˝ background square. Stitch on the drawn lines. Cut between the seams to create a block unit and a dividend unit. Press both units open.
BLOCKS
Block A

Block B
Block C
1. Using the connecting-corners technique, add 3½˝ red silk dupioni squares to the upper right corners of half the 6½˝ block A gray floral print squares. Trim and press.
2. On the remaining 6½˝ block A squares, add 3½˝ gray stripe squares to the upper right corners. Trim and press.
3. Add 3½˝ cream home decor squares to the lower left corners of all the block A squares from Steps 1 and 2.
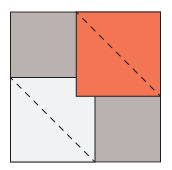
4. Using the connecting-corners technique, add a 2˝ square on all 4 corners of each block A square, following the color placement in the block A diagram.
5. Press half the A units as shown in pressing diagram 1 and half as shown in pressing diagram 2.
Pressing 1

Pressing 2
Note: It is important to the quilt’s secondary pattern that you place the fabrics in the correct color orientation. Opposing seams will result in flatter blocks with better pattern joins. Refer to the block diagram for color orientation.
6. Repeat Steps 1–5 using the 6½˝ block B squares to make 96 B units.
7. Repeat Steps 1–5 using the 6½˝ block C squares to make 36 C units.
Note: See the Dividend projects for ideas on how to use the dividends (leftover half-square triangle units).
Note: Refer to the pressing direction of the units before assembly. The arrows indicate the pressing direction of the seams joining the block.
8. Arrange 4 units of the same background. Choose 2 squares following pressing diagram 1 and 2 following pressing diagram 2. Lay out the units as they will appear in the quilt top, making sure that the pressing directions alternate and the color placement follows the block diagrams.
9. Sew together the 2 top units. Press to the right.
10. Sew together the 2 bottom units. Press to the left.
11. Sew the 2 rows together, matching and pinning the opposing seams as needed. Press the center seams of blocks A and C up. Press the center seams of blocks B down.
12. The assembled blocks will measure 12½˝ × 12½˝ and will finish at 12˝ × 12˝. Make 49 blocks, as follows:
16 blocks A 24 blocks B 9 blocks C

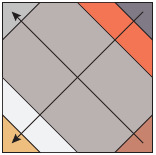
Quilt Center Assembly
1. Join the completed 12½˝ × 12½˝ blocks into 7 rows of 7 blocks each. Follow the quilt assembly diagram.
2. Press the rows in alternating directions.
3. Sew the rows together. Press the seams in one direction. The quilt top will now measure 84½˝ × 84½˝.
Border Assembly
The borders for the Bohemian Dance Queen/King Quilt are constructed in exactly the same manner as the Bohemian Dance Wallhanging borders, except for the color distribution and the number of units.
1. Sew together a 2˝ × width of fabric bronze silk dupioni strip and a 4˝ × width of fabric gray floral print strip to make a strip set. Make 10. The strip sets will measure 5½˝ × width of fabric.
2. Subcut the strip sets into 56 border strips 5½˝ × 6½˝.
3. Build connecting corners on the lower right corners of 7 of the border strips using 3½˝ gray squares. Build connecting corners on the lower left corners of 7 of the border strips using 3½˝ gray squares.

Border block D
4. Build connecting corners on the lower right corners of 7 of the border strips using 3½˝ red squares. Build connecting corners on the lower left corners of 7 of the border strips using 3½˝ red squares.
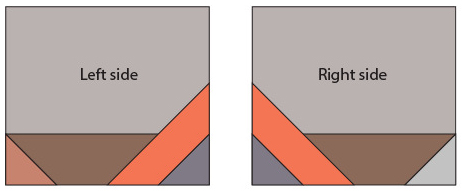
Border block E
5. Build connecting corners on the lower right corners of 14 of the border strips using 3½˝ cream squares. Build connecting corners on the lower left corners of 14 of the border strips using 3½˝ cream squares.
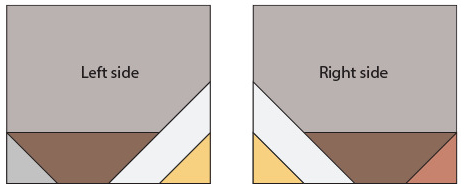
Border block F
6. Add the 2˝ squares in the same manner, following the color orientation shown in the border block D, E, and F diagrams.
7. Pair the matching right and left units. Sew together along the 5½˝ sides. Make 7 border blocks D, 7 border blocks E, and 14 border blocks F, each measuring 5½˝ × 12½˝.
8. To make the corner blocks of the border, add a 2˝ dark silk print square to a corner of a 5½˝ gray floral print square. Make 2. Add a 2˝ brown print square to a corner of a 5½˝ gray floral print square. Make 2. The corner blocks will measure 5½˝ × 5½˝.
9. Sew together 4 border blocks E and 3 border blocks D end to end, alternating the colors of the framed diamonds. The row will measure 5½˝ × 84½˝. Press to the right. This is the top border.
10. Sew together 4 border blocks D and 3 border blocks E end to end, alternating the colors of the framed diamonds. The row will measure 5½˝ × 84½˝. Press to the right. This is the bottom border.
11. Sew together 7 border blocks F end to end. The row will measure 5½˝ × 84½˝. Make 2. Press to the right. These are the side borders.
12. Sew the top and bottom borders to the quilt top, matching the red and gray diamonds and the color rhythm of the quarter-squares. Press toward the inner border.
13. Add a corner block to each end of both side borders, matching the rhythm of the colors. Press toward the center of the row.
14. Sew the side borders to the quilt top, matching the cream diamonds and the color rhythm of the quarter-squares. The quilt top will measure 94½˝ × 94½˝.
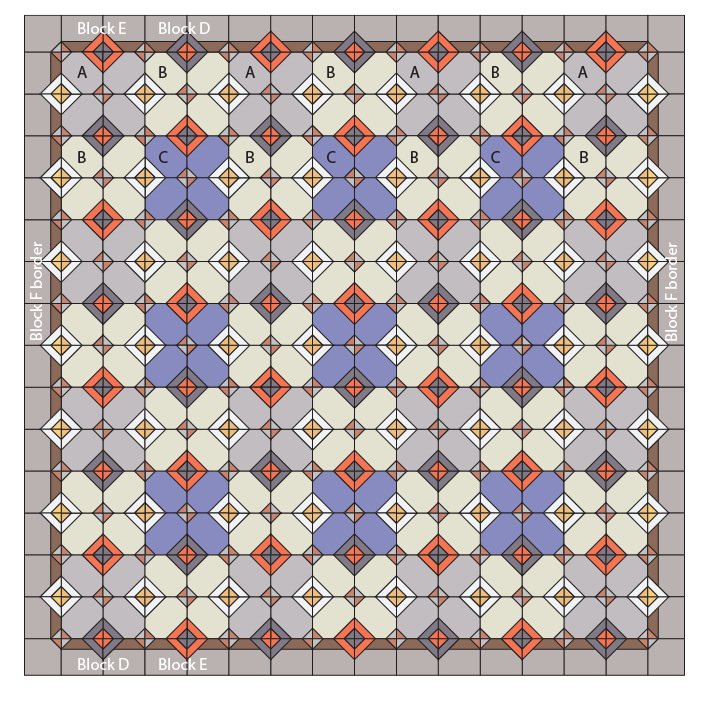
Quilt assembly
Finishing
1. Layer, baste, and quilt as desired.
2. Add binding.