
And those who were seen dancing were thought to be insane by those who could not hear the music.
—Friedrich Nietzsche
Sisters Wallhanging
Finished blocks: Flying Geese: 3˝ × 6˝ • Square-in-a-Square: 6˝ × 6˝
Finished wallhanging: 50˝ × 69˝
The first project in the Sisters design series, also known as Tribal Dance, is a column quilt with top and bottom borders. It was designed to showcase the uniqueness of its fabrics, and it is all about the fabric! The two primary fabrics are hand-stamped artisan batiks with large-scale dominant prints that I saw as Flying Geese. They have a soft hand and an irregular appearance. I combined them with some of their companions in the line but then added contrasting textures. These prints are cut lengthwise, parallel to the selvage, so be sure to take the direction of the print into consideration when making your fabric selections.
The only true piecing in the quilt is in the three columns, with leftover half-square triangle units combining for the pieced borders. Controlling the background color of the Flying Geese blocks gives the illusion of vertical ribbons behind the triangles, and contrasting textures and shine do all the work in creating added dimension and interest. This project is a great example of playing with eclectics. It also illustrates how the fabrics do the work and the pattern is at times secondary.
Read Exploring New Textiles: Eclectic Fabric Guidelines before beginning.
Note: Interface all the silk dupioni before cutting. Also test any other loose weaves to determine whether they would benefit from interfacing before you begin.
TIP • When using wool in the piecing of projects, I do not typically interface it. But by the nature of its fiber and weave, wool can have some stretch. When it is designed into the body of a quilt and sewn on all sides, there is not much of a stability issue. In this project, wool is used as the outer top and bottom border. Seaming will not be an issue, but if you intend to have the wallhanging quilted by a longarm quilter, I would encourage you to put a lightweight interfacing on it before cutting to minimize stretching during quilting. It is not a requirement but rather something that my quilter and I thought might be a good idea. Just be sure to keep the interfacing light in weight so that you will still benefit from the loft you get when quilting wool.
Materials
Focal batik prints in 2 contrasting colorways—green and gray: 1⅝ yards each for columns, piecing, and binding
Mixed batiks: 1 fat eighth (9˝ × 20˝) each of 8 coordinating colors for Flying Geese blocks
Radiance silk/cotton blends: 1 fat quarter (18˝ × 20˝) or ¼ yard each of 3 coordinating colors for Flying Geese and Square-in-a-Square blocks
Gray silk dupioni: ⅓ yard for border
Olive-green silk dupioni: ⅓ yard for border
Turquoise wool (at least 52˝ wide): ½ yard for border
Interfacing for silks
Backing: 3¼ yards
Binding: ⅝ yard (included in yardage at left)
Batting: 58˝ × 72˝
Cutting
To ensure the best results, make sure that all the fabrics are first pressed well and free from folds or wrinkles. Prepare the fabrics as needed by referring to Exploring New Textiles: Eclectic Fabric Guidelines.
FOCAL BATIK PRINTS
From each of the 2 prints:
• Cut 1 strip 10½˝ × 45½˝ on the lengthwise grain.
• Cut 1 strip 6½˝ × 45½˝ on the lengthwise grain.
• Cut 4 strips 3½˝ × length of fabric; subcut 50 squares 3½˝ × 3½˝. Use the extra fabric left over after cutting the 10½˝ and 6½˝ strips to cut some squares if needed.
• Cut 3 strips 2½˝ × length of fabric for the binding.
MIXED BATIKS
• Cut 4 strips 3½˝ × 6½˝ from each of the 8 batiks.
RADIANCE SILK/COTTON BLENDS
• Cut 4 strips 3½˝ × 6½˝ from each of the 3 fabrics for the Flying Geese blocks.
• Cut 1 square 6½˝ × 6½˝ from each of the 3 fabrics for the Square-in-a-Square blocks.
GRAY SILK DUPIONI
• Cut 3 strips 1½˝ × width of fabric.
OLIVE-GREEN SILK DUPIONI
• Cut 3 strips 1½˝ × width of fabric.
TURQUOISE WOOL
• Cut 2 strips 6½˝ × 50½˝.


Construction
Sew all the seams with an accurate ¼˝ seam allowance. The fabrics should be paired and sewn right sides together. Follow the pressing instructions in the diagrams, and press consistently throughout the construction process. These instructions will help you achieve opposing seam conditions and make for a flatter quilt face.
The seams should be pressed on the right side of the blocks. With the silks, take care that your iron is not too hot; do a test sample first. Press from the back if necessary or use a pressing cloth. Consult Exploring New Textiles: Eclectic Fabric Guidelines.
The Flying Geese blocks in this project are made in the traditional way: by layering squares onto strips, stitching from corner to corner, and trimming away the excess. Using the two contrasting focal prints as the “sky” fabric in each block creates the illusion of vertical stripes behind the geese. To achieve this illusion, as well as to maintain the rhythm of the contrasting bands in the finished quilt, it is important to control the color placement.
FLYING GEESE BLOCKS
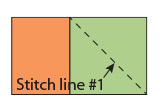
1. Draw a diagonal line from corner to corner on the wrong side of each 3½˝ green focal batik square. Layer a marked square on the upper right corner of a 3½˝ × 6½˝ mixed batik or Radiance strip. Stitch on the drawn line.
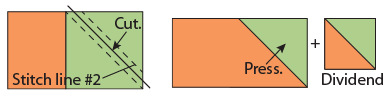
2. Draw a parallel line a scant ½˝ from the sewn line. Sew on this second line and cut between the lines of stitching. Press the seams toward the green focal batik. The cutaway half-square triangle unit is a dividend! Set this aside, as it will be used later in the pieced borders. You will also have 6 extra focal batik squares, which will be used later.
3. Draw a diagonal line from corner to corner on the wrong side of each 3½˝ gray focal batik square. Layer a marked square on the upper left corner of a unit made in Step 2. Stitch on the drawn line.
4. Draw a parallel line a scant ½˝ from the sewn line. Sew on this second line and cut between the lines of stitching. Press the seams toward the gray focal batik. Set aside the cutaway half-square triangle units for the pieced borders. You will also have 6 extra focal batik squares, which will be used later.

5. The Flying Geese blocks will measure 3½˝ × 6½˝. Make 44. You will have 5 extra geese but the right number of dividends for the pieced borders.
6. Trim all the dividend half-square triangle units to 2½˝ × 2½˝. You will have 44 with the green focal batik and 44 with the gray focal batik.
SQUARE-IN-A-SQUARE BLOCKS
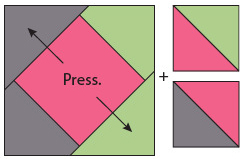
1. Layer a marked 3½˝ green focal batik square on the upper right corner of a 6½˝ Radiance square. Layer a marked 3½˝ gray focal batik square on the lower left corner of the same Radiance square. Sew from corner to corner on the drawn diagonal lines.
2. Draw a parallel line a scant ½˝ away from each of the sewn lines. Stitch on the lines.
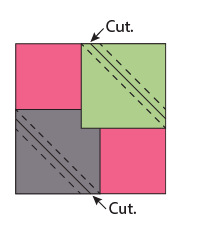
3. Cut away the half-square triangle units. Press toward the focal batiks, and trim the units to 2½˝ × 2½˝. More dividends!

4. Layer a marked 3½˝ green square on the lower right corner and a marked 3½˝ gray square on the upper left corner of the layered square sewn in Step 3. Sew from corner to corner on the drawn diagonal lines.
5. Draw a parallel line a scant ½˝ away from each of the sewn lines. Stitch on the lines.
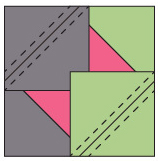
6. Cut away the half-square triangle units. Press toward the focal batiks, and trim the units to 2½˝ × 2½˝. 2 additional dividends!
7. The Square-in-a-Square blocks will measure 6½˝ × 6½˝. Make 3. You will have 12 additional half-square triangle units—6 with the green focal batik and 6 with the gray. There are now 100 half-square triangle units. Set these aside for the pieced borders.

Quilt Assembly
1. A pieced column consists of 14 blocks: 1 Square-in-a-Square block and 13 Flying Geese blocks. All the geese should be pointed in the same direction. Press the seams in each column in one direction. The column will measure 6½˝ × 45½˝. Make 3 columns.
TIP • Position the Square-in-a-Square blocks within the columns so that they are scattered evenly throughout the quilt top. This is an old art-school trick that helps your eye travel through the project as it picks up the lightest, or in this case shiniest, points and draws your eye’s attention. These Square-in-a-Square blocks also interrupt the expected pattern of Flying Geese blocks, making the layout more interesting and giving your eye a place to rest.
2. Referring to the quilt assembly diagram, sew together the following pieces, working from left to right:
6½˝ × 45½˝ green focal batik strip
6½˝ × 45½˝ pieced column, with the geese flying up
10½˝ × 45½˝ gray focal batik strip
6½˝ × 45½˝ pieced column, with the geese flying down
10½˝ × 45½˝ green focal batik strip
6½˝ × 45½˝ pieced column, with the geese flying up
6½˝ × 45½˝ gray focal batik strip
3. Press the seams toward the focal batiks. The quilt top will now measure 45½˝ × 50½˝.
4. Sew together the 3 olive-green silk dupioni 1½˝ × width of fabric strips end to end. Subcut 2 strips 1½˝ × 50½˝. Sew these strips to the top and bottom of the quilt top. Press toward the silk strips.
5. The second border is made up of half-square triangle units, but you have already done all the piecing. It is here where you will use the dividends! Having sewn the Flying Geese blocks by adding both a green and a gray focal batik square to each strip, you now have pairs of half-square triangle units. Each pair shares the same goose fabric, but one has a green half and one has a gray half. Assemble 50 pairs, as shown: 25 pairs will be left-handed and 25 pairs will be right-handed. Sew the pairs together. Each unit will be 2½˝ × 4½˝.
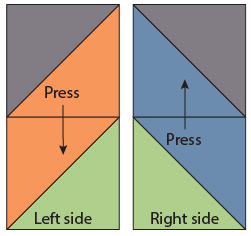
Border pairs
6. Sew together 2 border rows using 25 pairs in each row. Alternate the left- and right-handed pairs to create the chevron pattern. The rows will measure 4½˝ × 50½˝. Press in one direction.

Border
7. Add one pieced horizontal border to the top of your quilt top and the other to the bottom. Orient the borders so that the gray halves of the half-square triangle units are sewn to the olive-green silk dupioni border. Press toward the silk border.
8. Sew together the 3 gray silk dupioni 1½˝ × width of fabric strips end to end. Subcut 2 strips 1½˝ × 50½˝. Sew these strips to the top and bottom of the quilt top. Press toward the silk strips.
9. Sew the 6½˝ × 50½˝ turquoise wool strips to the top and bottom of the quilt top. Press toward the silk border.
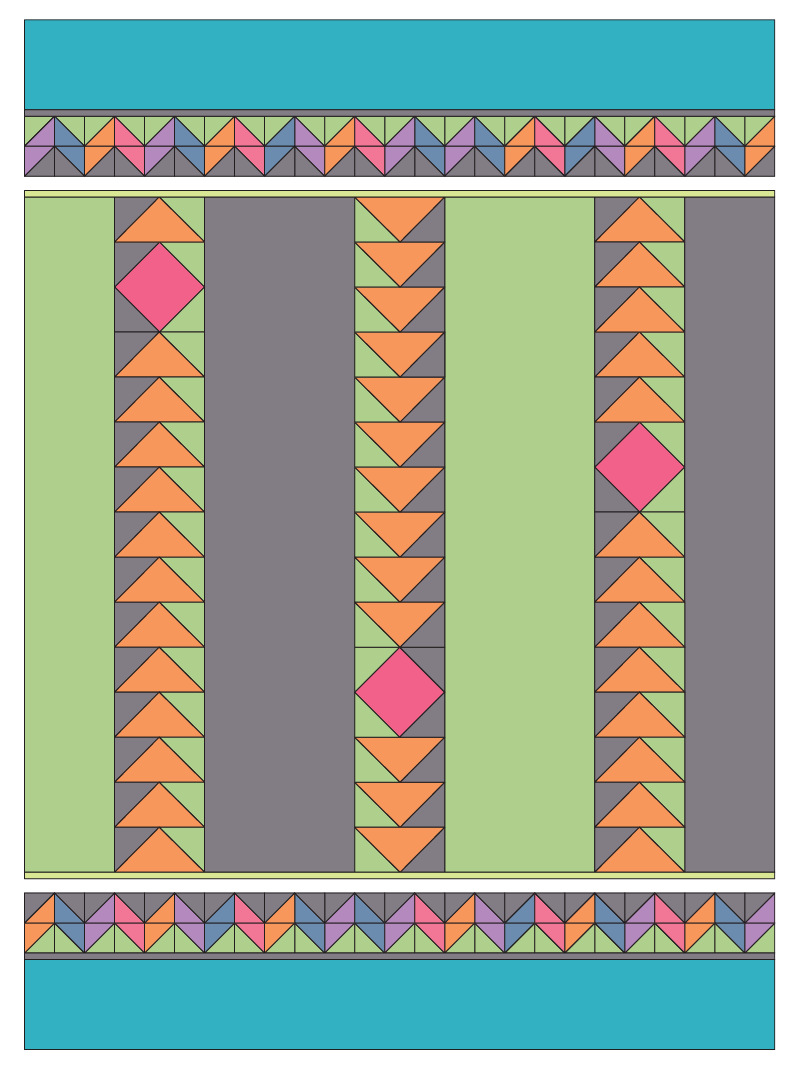
Quilt assembly
Finishing
1. Layer, baste, and quilt as desired.
2. Add binding.
Note: Notice that the columns start with a green vertical strip on the left-hand side of the quilt and end with a gray vertical strip on the right-hand side of the quilt. The binding is cut from these same two fabrics. I wanted the binding strips to contrast with these edges as they wrap around the project, so the left side has the contrasting gray binding and the right side has the con-trasting green binding. As you join your strips, anticipate where the color will need to change to achieve this contrast.